
Related Manuals for ABB ABB-Welcome M2247 W Series


Summary of Contents for ABB ABB-Welcome M2247 W Series
- Page 1 2TMD042300D0013 │ 31.10.2024 Product manual ABB-Welcome M2247.-W Video Indoor Station 4.3 Handset...
-
Page 2: Table Of Contents
Table of c onte nts Notes on the instruction manual ......................4 Safety ..............................4 Intended use ............................4 Environment ............................5 ABB devices ..........................5 Product description ..........................6 Device type ..........................6 Control elements........................7 Terminal description ........................9 Technical data ............................ - Page 3 Table of contents 10.2 Program button settings ......................46 10.2.1 Accessing the "Program button" screen ................. 46 10.2.2 Adding a program function ....................47 10.2.3 Removing the program function ..................... 49 10.3 Intercom settings ........................50 10.3.1 Accessing the "Intercom list" screen ..................50 10.3.2 Adding an intercom .......................
-
Page 4: Notes On The Instruction Manual
Please keep this manual in a safe place. If you pass the device on, also pass on this manual along with it. ABB accepts no liability for any failure to observe the instructions in this manual. Safety... -
Page 5: Environment
ABB devices All packaging materials and devices from ABB bear the markings and test seals for proper disposal. Always dispose of the packing materials and electric devices and their components via an authorized collection facility or disposal company. -
Page 6: Product Description
Product description Product description Device type Article Product ID Product name Colour Size (mm) number M22473-W 2TMA220051W0001 Video Indoor Station 4.3 White 206 x 147 x 44.2 Handset (T-Loop) M22471-W 2TMA220051W0002 Video Indoor Station 4.3 White 206 x 147 x 44.2 Handset │6 Product manual 2TMD042300D0013... -
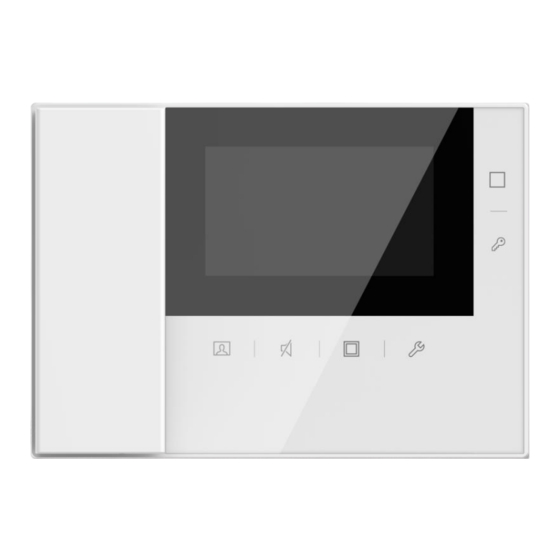
Page 7: Control Elements
Product description Control elements Description 4.3" colour display Unlock button 2 ■ In standby status, press to release the 2nd lock of the default Outdoor Station. ■ During a call request or communication, press to release the 2nd lock of the Outdoor Station which is calling. - Page 8 Product description Program button ■ In standby status, press to release the 2nd lock of the default Outdoor Station by default. If multiple functions are set to the program button, press to access the “Program button” screen. Setting button ■ In standby status, press to enter the system settings.
-
Page 9: Terminal Description
Product description Terminal description Description Default Outdoor Station address Adjust the jumper connector to set the address of the default Outdoor Station (1-9). Indoor Station selector switch Selector switch X10 sets tens digits, selector switch X1 sets units digits, Dip switches X100 and X200 set hundreds digits. -
Page 10: Technical Data
Technical data Technical data Designation Value 20-30 V ⎓ Operating voltage range Standby current 24 V ⎓, 6 mA 24 V ⎓, 150 mA Operating current (incoming call current) 24 V ⎓, 200 mA (with induction loop) Setting current 150 mA Door bell current 50 mA Display size... -
Page 11: Mounting/Installation
Mounting/Installation Mounting/Installation Warning Electric voltage! Dangerous currents flow through the body when coming into direct or indirect contact with live components. This can result in electric shock, burns or even death. – Disconnect the mains power supply prior to installation and/or disassembly! –... -
Page 12: General Installation Instructions
Mounting/Installation General installation instructions ■ Terminate all branches of the wiring system via a connected bus device (e.g. indoor station, outdoor station, system device). Do not install the system controller directly next to the bell transformer or other power ■ supplies (to avoid interference). -
Page 13: Mounting
Mounting/Installation Mounting 7.3.1 Installation height 7.3.2 Surface-mounted installation 1. Mounting bracket size │13 Product manual 2TMD042300D0013... - Page 14 Mounting/Installation 2. Surface mounted without the electrical accessory box (unit: mm) 120.7 120.7 3. Surface mounted with the electrical accessory box (unit: mm) 120.7 120.7 N MA (America) VDE&BS&CN 83.3 79.2 83.3 NEMA & Italy Swiss │14 Product manual 2TMD042300D0013...
-
Page 15: Desktop Installation
Mounting/Installation 7.3.3 Desktop installation (Unit: mm) 83.3 7.3.4 Dismantling │15 Product manual 2TMD042300D0013... -
Page 16: Commissioning
Commissioning Commissioning Operating instructions Please read the rules below before use: To perform an operation by pressing the button below. ■ To switch the selection by pressing “ ” or “ ”, the order of selection is from top to ■... -
Page 17: Initial Setup
Commissioning Initial setup You need to carry out the initial setup the first time this Indoor Station is powered on or when this Indoor Station is reset to the factory defaults. Please follow the steps below: [1] Select the language A maximum of 17 languages for selection. - Page 18 Commissioning [2] Show the licence agreement │18 Product manual 2TMD042300D0013...
- Page 19 Commissioning [3] Agree to the licence agreement [4] Set the date and time You can carry out this setting at this time or do it later by pressing “Next” to skip this setting. For more details, see chapter 10.6 “Date and time settings“ on page 61. │19 Product manual 2TMD042300D0013...
- Page 20 Commissioning [5] Set the camera list You can carry out this setting at this time or do it later by pressing “No” to skip this setting. For more details, see chapter 10.1 “Camera list“ on page 37. [6] Set the program button You can carry out this setting at this time or do it later by pressing “No”...
- Page 21 Commissioning [7] Set the intercom list You can carry out this setting at this time or do it later by pressing “No” to skip this setting. For more details, see chapter 10.3 “Intercom settings“ on page 50. [8] Complete the initial setup │21 Product manual 2TMD042300D0013...
-
Page 22: Operation
Operation Operation Incoming call 9.1.1 Incoming call from Outdoor Station 1. Call request During a call request, “ ” flashes white; pick up the handset to accept the call. ■ ■ During a call request, 2 snapshots will be taken automatically on the first second and the fifth second. - Page 23 Operation During a call request, press “ ” to set the volume, colour, contrast and brightness. ■ │23 Product manual 2TMD042300D0013...
- Page 24 Operation 2. Communication During communication, hang up the handset to terminate the call. ■ During communication, long press “ ” to take a snapshot. This snapshot will be removed ■ after 1 year. Description “ ” indicates the communication status. Call ID Display of the remaining time (1...120 seconds) Display the image from the calling Outdoor Station.
- Page 25 Operation During communication, press “ ” to set the volume, colour, contrast and brightness. ■ │25 Product manual 2TMD042300D0013...
-
Page 26: Incoming Call From Indoor Station/Guard Unit
Operation 9.1.2 Incoming call from Indoor Station/Guard Unit 1. Call request During a call request, “ ” flashes white, pick up the handset to accept the call. ■ Description “ ” indicates the ring status. Call ID Display of the remaining time (1...30 seconds) The call request will be terminated if no operation is carried out within 30 seconds. - Page 27 Operation 2. Communication During communication, hang up the handset to terminate the call. ■ Description “ ” indicates the communication status. Call ID Display of the remaining time (1...120 seconds) │27 Product manual 2TMD042300D0013...
-
Page 28: Surveillance
Operation Surveillance In standby status, press “ ” to monitor the default Outdoor Station. ■ During surveillance, pick up the handset to activate the manual call. ■ During surveillance, press “ ” to release the default lock of the Outdoor Station which is ■... - Page 29 Operation During surveillance, press “ ” to set the volume, colour, contrast and brightness. ■ │29 Product manual 2TMD042300D0013...
-
Page 30: Intercom
Operation Intercom Precondition An intercom list needs to be added before use. For more information, see chapter 10.3.2 “Adding an intercom“ on page 51. Initiating an intercom Please follow the steps below: [1] In standby status, pick up the handset to access the “Intercom” screen. [2] Press the button below the designated intercom icon to initiate an intercom. -
Page 31: Program Button
Operation Program button Precondition Program functions need to be set before use. For more information, see chapter 10.2.2 “Adding a program function“ on page 47. Initiating a program function Please follow the steps below: [1] In standby status, press “ ”... -
Page 32: History
Operation History 9.5.1 Accessing the "History" screen Please follow the steps below: [1] In standby status, press “ ”. [2] Select “ ” on the side menu. [3] Press “ ” to access the corresponding screen. │32 Product manual 2TMD042300D0013... -
Page 33: Displaying History Records
Operation 9.5.2 Displaying history records Please follow the steps below: [1] On the “History” screen, select the designated record. “ ” means the record with snapshots. ■ “ ” means the record without snapshots. ■ “ ” means an incoming call from the Outdoor Station or an intercom call from other ■... - Page 34 Operation [3] Display the date and time of the record. [4] Display the device ID. [5] Display the calling type. [6] Press “ ” or “ ” to select the image. │34 Product manual 2TMD042300D0013...
-
Page 35: Removing History Records
Operation 9.5.3 Removing history records Please follow the steps below: [1] On the “History” screen, select the designated record. [2] Press “ ”. [3] Press “ ”. │35 Product manual 2TMD042300D0013... - Page 36 Operation [4] Press “ ”. │36 Product manual 2TMD042300D0013...
-
Page 37: Setting
Setting Setting 10.1 Camera list 10.1.1 Accessing the "Camera list" screen Please follow the steps below: [1] In standby status, press “ ”. [2] Select “ ” on the side menu to access the corresponding screen. [3] Select “ √ ”. │37 Product manual 2TMD042300D0013... -
Page 38: Creating A Camera List
Setting 10.1.2 Creating a camera list Please follow the steps below: [1] On the camera list, press “ ” to search the cameras. [2] After a while, a camera list is created successfully. │38 Product manual 2TMD042300D0013... -
Page 39: Renaming The Camera
Setting 10.1.3 Renaming the camera Please follow the steps below: [1] On the “Camera list” screen, select the designated camera. [2] Press “ ”. [3] Select “ ”. [4] Press “ ”. │39 Product manual 2TMD042300D0013... - Page 40 Setting [5] Select a camera name. [6] Press “ ”. [7] The camera name is displayed. It will be named with an incremented number (e.g. “Main door camera 1”.) │40 Product manual 2TMD042300D0013...
-
Page 41: Previewing The Camera
Setting 10.1.4 Previewing the camera Please follow the steps below: [1] On the “Camera list” screen, select the designated camera. [2] Press “ ”. [3] Select “ Preview”. [4] Press “ ”. [5] The image from the camera will be displayed for 15 seconds. Press “ ”... - Page 42 Setting Warning message A warning message will be displayed on the screen when the designated Outdoor Station is busy. Error message An error message will be displayed on the screen if the designated Outdoor Station is not detected by the system. │42 Product manual 2TMD042300D0013...
-
Page 43: Visual Doorbell Setting
Setting 10.1.5 Visual doorbell setting If a camera is set to “Visual doorbell”, when the doorbell is pressed, the image on this camera will be displayed on the Indoor Station. Note The “Visual doorbell” function can only be set when a camera is connected to the camera interface and this camera interface has been associated with the Indoor Station (mode = 4). - Page 44 Setting [5] “ ” will be displayed on the screen if successful. [6] Press “ ”. [7] “ ” will be displayed on the screen to indicate the “Visual doorbell” status. Note Only one camera can be set to “Visual doorbell”. │44 Product manual 2TMD042300D0013...
-
Page 45: Removing The Camera
Setting 10.1.6 Removing the camera Please follow the steps below: [1] On the “Camera list” screen, select the designated camera. [2] Press “ ”. [3] Select “ ”. [4] Press “ ”. [5] Press “ ” again. │45 Product manual 2TMD042300D0013... -
Page 46: Program Button Settings
Setting 10.2 Program button settings 10.2.1 Accessing the "Program button" screen Please follow the steps below: [1] In standby status, press “ ”. [2] Select “ ” on the side menu to access the corresponding screen. [3] Select “ √ ”. │46 Product manual 2TMD042300D0013... -
Page 47: Adding A Program Function
Setting 10.2.2 Adding a program function Please follow the steps below: [1] On the “Program button” screen, press “ ”. [2] Select a function; it can be set to “2nd lock”, “Light”, “Door” or “Actuator”. [3] Press “ ”. │47 Product manual 2TMD042300D0013... - Page 48 Setting If the function is set to “Light”, “Door” or “Actuator”, you need to select the address. Note A maximum of 3 program functions can be set. │48 Product manual 2TMD042300D0013...
-
Page 49: Removing The Program Function
Setting 10.2.3 Removing the program function Please follow the steps below: [1] On the “Program button” screen, select the designated program button. [2] Press “ ”. [3] Select “ ”. [4] Press “ ”. [5] Press “ ” again. │49 Product manual 2TMD042300D0013... -
Page 50: Intercom Settings
Setting 10.3 Intercom settings 10.3.1 Accessing the "Intercom list" screen Please follow the steps below: [1] In standby status, press “ ”. [2] Select “ ” on the side menu to access the corresponding screen. [3] Select “ √ ”. │50 Product manual 2TMD042300D0013... -
Page 51: Adding An Intercom
Setting 10.3.2 Adding an intercom Please follow the steps below: [1] On the “Intercom list” screen, press “ ”. [2] Select the intercom type. It can be set to “Intercom internal”, “Intercom external” or “Guard Unit”. = Intercom internal ■ ■... - Page 52 Setting [4] If “ ” is selected, you need to set the address. [5] Press “ ”. If the intercom type is set to “Intercom internal”, you can skip steps 4 - 5. Note A maximum of 3 intercoms can be set. │52 Product manual 2TMD042300D0013...
-
Page 53: Removing The Intercom
Setting 10.3.3 Removing the intercom Please follow the steps below: [1] On the “Intercom list” screen, press the designated intercom. [2] Press “ ”. [3] Select “ ”. [4] Press “ ”. [5] Press “ ”. again. │53 Product manual 2TMD042300D0013... -
Page 54: Audio Settings
Setting 10.4 Audio settings 10.4.1 Accessing the "Audio settings" screen Please follow the steps below: [1] In standby status, press “ ”. [2] Select “ ” on the side menu. [3] Press “ ” to access the corresponding screen. │54 Product manual 2TMD042300D0013... -
Page 55: Setting The Feedback Tone
Setting 10.4.2 Setting the feedback tone Please follow the steps below: [1] On the “Audio settings” screen, select “Enable feedback tone”. [2] Press “ ” or “ ” to enable/disable the function. [3] Press “ ”. │55 Product manual 2TMD042300D0013... -
Page 56: Setting The Ringtone Volume
Setting 10.4.3 Setting the ringtone volume Please follow the steps below: [1] On the “Audio settings” screen, select “Ringtone volume”. [2] Press “ ”. [3] Press “ ” or “ ” to adjust the volume. [4] Press “ x ” to save and exit the setting. │56 Product manual 2TMD042300D0013... -
Page 57: Setting The Ringtone Type
Setting 10.4.4 Setting the ringtone type Please follow the steps below: [1] On the “Audio settings” screen, select “Ringtone setting”. [2] Press “ ”. [3] Select the designated device, it can be “Default Outdoor Station”, “Other Outdoor Station", "Intercom”, or “Doorbell”. [4] Press “... -
Page 58: Setting The Missed Call
Setting 10.4.5 Setting the missed call Please follow the steps below: [1] On the “Audio settings” screen, select “Missed call”. [2] Press “ ” or “ ” to enable/disable the function. [3] Press “ ”. If the “Missed call” function is enabled, “ ”... -
Page 59: Unlock Password
Setting 10.5 Unlock password Note This function can only be set on the primary Indoor Station. Please follow the steps below: [1] In standby status, press “ ”. [2] Select “ ” on the side menu. [3] Press “ ” to access the corresponding screen. Note The feedback tone will be enabled automatically when carrying out this setting. - Page 60 Setting [4] Select “Enter password” and press “ ” or “ ” to set the value for each digit one by one (3-8 digits). [5] “ ” will be displayed on the screen when the number of the digits reaches 3. [6] Select “Save”.
-
Page 61: Date And Time Settings
Setting 10.6 Date and time settings Please follow the steps below: [1] In standby status, press “ ”. [2] Select “ ” on the side menu. [3] Press “ ” to access the corresponding screen. [4] Press “ ” or “ ”... -
Page 62: Display Settings
Setting 10.7 Display settings Please follow the steps below: [1] In standby status, press “ ”. [2] On the “Settings” screen, select “ ” on the side menu to access the corresponding screen. [3] Press “ ” or “ ” to adjust the brightness. [4] Press “... -
Page 63: Language Setting
Setting 10.8 Language setting [1] In standby status, press “ ”. [2] On the "Settings" screen, select “ ” on the side menu. [3] Press “ ” to access the corresponding screen. [4] Press “ ” or “ ” to select the language. [5] Press “... -
Page 64: About
Setting 10.9 About Please follow the steps below: [1] In standby status, press “ ”. [2] Select “ ” on the side menu to access the corresponding screen. [3] Display the software version. [4] Display the Indoor Station type: “Primary” or “Secondary”. [5] Display the Indoor Station address. -
Page 65: Restoring To Factory Default
Setting 10.10 Restoring to factory default Please follow the steps below: [1] In standby status, press “ ”. [2] On the “Settings” screen, select “ ” on the side menu to access the corresponding screen. [3] Press “ ”. │65 Product manual 2TMD042300D0013... -
Page 66: Cyber Security
M2247.-W product, 2-wire system and interfaces against any kind of security breaches, unauthorised access, interference, intrusion, leakage and/or theft of data or information. ABB Ltd and its affiliates are not liable for damages and/or losses related to such security breaches, unauthorised access, interference, intrusion, leakage and/or theft of data or information. -
Page 67: Notice
We reserve the right to at all times make technical changes as well as changes to the contents of this document without prior notice. The detailed specifications agreed to at the time of ordering apply to all orders. ABB accepts no responsibility for possible errors or incompleteness in this document. - Page 68 Contact us Notice We reserve the right to at all times ABB Xiamen Smart Technology Co., Ltd. make technical changes as well as No. 881, FangShanXiEr Road, Xiang’An Industrial changes to the contents of this Area, Torch Hi-Tech Industrial Development document without prior notice.
Need help?
Do you have a question about the ABB-Welcome M2247 W Series and is the answer not in the manual?
Questions and answers