Table of Contents
Advertisement
Quick Links
Advertisement
Table of Contents

Related Manuals for Bruker EM27/SUN


Summary of Contents for Bruker EM27/SUN
- Page 1 EM27/SUN spectrometer Operating Manual June 25, 2013...
-
Page 2: Table Of Contents
Contents EM27/SUN spectrometer Safety Notes Overview of the EM27/SUN spectrometer Quick set-up Setup of the spectrometer and tracker Orientation of the spectrometer 4.1.1 General remarks 4.1.2 Constraints of the tracking angles 4.1.3 Orientation angles Observer’s location The CamTracker program General principle... - Page 3 6.5.1 Auto-save options 6.5.2 Mirror Image Correlation Miscellaneous...
-
Page 4: Em27/Sun Spectrometer
1 Safety Notes Please note the following information to ensure the safety of the operators, to obtain the full performance of the system as well as to reach a long lifetime of the system: The system must only be operated by trained personnel. All system components must only be used for the designated use. -
Page 5: Overview Of The Em27/Sun Spectrometer
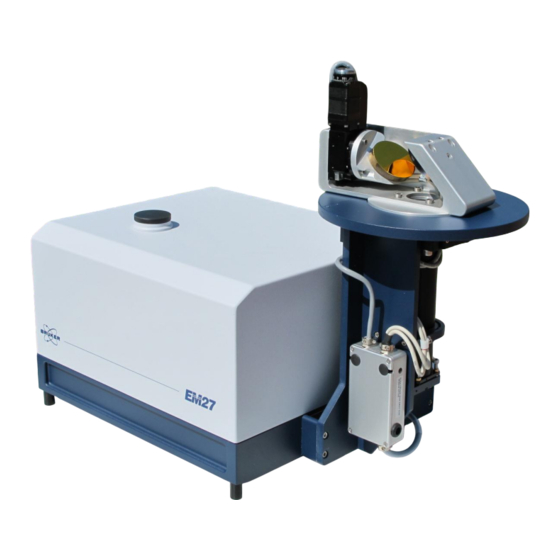
It is available at: http://www.atmos-meas-tech.net/5/2969/2012/amt-5-2969-2012.pdf The EM27/SUN contains a solar tracker (see Figure 1), which is used to reflect the solar radiation onto the detector. A very high precision of the tracker is reached by using a camera and image processing software to detect the actual line of sight of the spectrometer and to correct the solar tracker angles if necessary. - Page 6 Figure 1: The solar tracker of the EM27/SUN A sample spectrum recorded by the EM27/SUN spectrometer can be seen in Figure 2 © Bruker Optics /Bruker Optik GmbH, 2013...
- Page 7 PROFFIT: widely used in the Network for the Detection of Atmospheric Composition Change (NDACC). The spectra recorded by the prototype EM27/SUN by Gisi et al. were evaluated using PROFFIT. More information: http://www.imk-asf.kit.edu/english/898.php SFIT2: widely used in the NDACC. More information;...
-
Page 8: Quick Set-Up
“Camera” in the “Image Processing” tab. Here “Big ellipse” or “Circle” should have a green circle behind. 12. If the blue circle is not visible or no green circle is displayed, click on “Recalculate sun-pixels”. © Bruker Optics /Bruker Optik GmbH, 2013... - Page 9 13. The solar image should be moved onto the field stop opening, and the tracking is ready. 14. Start measurements in OPUS. © Bruker Optics /Bruker Optik GmbH, 2013...
-
Page 10: Setup Of The Spectrometer And Tracker
For simplicity the instrument is placed horizontally. The best orientation is shown in Figure 6. The EM27/SUN has three connectors at the rear side as shown in Figure 3: USB: This connects the internal camera with the controlling computer. This camera ensures the precision of the tracking. -
Page 11: Constraints Of The Tracking Angles
On the northern hemisphere, an orientation of the minimum position towards the north, on the southern hemisphere towards the south is advantageous. An illustration is shown in Figure 4. © Bruker Optics /Bruker Optik GmbH, 2013... - Page 12 To move the tracker into the minimum position, the tracker has to be initialized by clicking on the respective button in the CamTracker program (see Figure 14). In the initialization procedure, the tracker moves counterclockwise until the minimum position is reached and stops at this position. © Bruker Optics /Bruker Optik GmbH, 2013...
-
Page 13: Orientation Angles
CamTracker program. If the elevation mirror direction is lower, then the angle has to be negative, which is the case on this picture. For a typical tracker this value is about -50.5 degrees. © Bruker Optics /Bruker Optik GmbH, 2013... - Page 14 180 degrees as shown in Figure 6. Figure 7 shows an example, where the tracker is not orientated towards the North. Figure Recommended orientation northern hemisphere. The azimuthal direction offset is -180 degrees. © Bruker Optics /Bruker Optik GmbH, 2013...
- Page 15 Northern/Southern and Eastern/Western direction. For North and Eastern tilts, negative values have to be used. In the ideal case, where the spectrometer is placed horizontally, these values are 0. © Bruker Optics /Bruker Optik GmbH, 2013...
-
Page 16: Observer's Location
Latitude (-90° to +90°): South Pole is -90°, Equator is 0° and North pole +90°. Longitude (-180° to +180°): Greenwich is 0°, East of Greenwich is counted positive and west of Greenwich negative. Height: The height of the spectrometer above sea level. © Bruker Optics /Bruker Optik GmbH, 2013... -
Page 17: The Camtracker Program
Meas. Tech., 4, 47-54, doi:10.5194/amt-4-47-2011, 2011. Download: http://www.atmos-meas-tech.net/4/47/2011/amt-4-47-2011.pdf Bruker Optics also applied a patent for this principle. In the ideal case, the solar image is centered on the field stop opening of the spectrometer. For this reason, a camera is built into the spectrometer, recording the field stop. - Page 18 One reason that ellipses are fitted instead of circle is, that the camera observes the solar image from an angled position resulting in an non-round rim of the solar image. © Bruker Optics /Bruker Optik GmbH, 2013...
- Page 19 The advantage of this system is, that the image processing can detect the rim of the solar image even if a part of is not visible, e.g. due to obstructions (trees, clouds,…), leading to a high tracking precision. Examples are shown in Figure 12 and Figure 13. © Bruker Optics /Bruker Optik GmbH, 2013...
- Page 20 To prevent the tracker program to use the blue ellipse in Figure 13 as the rim of the sun, several quality parameters have to be provided. These are minimum and © Bruker Optics /Bruker Optik GmbH, 2013...
-
Page 21: Configuration File
Some default values are set by Bruker. More information can be found in sec. 5.6. 5.2 Configuration file Before the CamTracker program (CamTracker_3_8.exe) can work properly, a... - Page 22 - maximum Radius of Aperture ellipse / px - maximum deviation in big Ellipse-half-axis / px - maximum deviation of centers from big ellipse and circle /px (if bigger, circle will be used for correction) © Bruker Optics /Bruker Optik GmbH, 2013...
-
Page 23: Start Of The Tracking Program
The messages text area on the bottom left side shows the information read from the configuration file. The current solar position is shown on the top left side, as derived from astronomical calculations. © Bruker Optics /Bruker Optik GmbH, 2013... - Page 24 The motor angles are set to 0 after initialization, and shown in the column right of the astronomically calculated angles. © Bruker Optics /Bruker Optik GmbH, 2013...
- Page 25 In the field “Correction Sources”, it is possible to select “Sun” as an input for the tracker. When clicking this, the motors move to initial positions derived from astronomical calculations and the tracking is performed astronomically. © Bruker Optics /Bruker Optik GmbH, 2013...
-
Page 26: Start Camera-Based Tracking
To fix that, look at the tracker whether the solar beam correctly enters the vertical tube of the tracker, or if a part of it hits the tracker as shown in Figure 18. © Bruker Optics /Bruker Optik GmbH, 2013... - Page 27 Figure 18. If still no solar image is visible by the camera, it should be checked whether the radiation hits the 45 degrees mirror in front of the spectrometer’s entrance window as shown in Figure 19. © Bruker Optics /Bruker Optik GmbH, 2013...
- Page 28 “Load configuration file” in the Options pull-down menu. By clicking on “None” and then again on “Sun” in the “Image processing tab”, the motors move to the astronomically calculated position. © Bruker Optics /Bruker Optik GmbH, 2013...
- Page 29 Ellipticity lie in a reasonable range), the Quality-Indicator on the “Image Processing” tab should turn green. This ellipse (more precisely its center) then is used as the actual position of the solar image (Figure 21). © Bruker Optics /Bruker Optik GmbH, 2013...
- Page 30 As soon as this is fully inside the solar image, a second ellipse denoting the rim of the aperture, will be fitted. Subsequently the center of this ellipse will be used as the target central position of the solar image instead of the standard © Bruker Optics /Bruker Optik GmbH, 2013...
- Page 31 Note: The standard aperture position can be set, when the true aperture was detected by the image processing (second blue ellipse, see Figure 22) and the line “Save current field stop position as standard” is clicked in the “Camera”-pull down menu. © Bruker Optics /Bruker Optik GmbH, 2013...
-
Page 32: Manual Adaption Of The Circles
If the small ellipse has a bad quality (this also is the case if there was no second ellipse found as the field stop aperture is not illuminated by the sun at all), then the © Bruker Optics /Bruker Optik GmbH, 2013... - Page 33 The values of the ellipses and the circle can be seen while the tracking is performed on the user interface, as can be seen on Figure 23. © Bruker Optics /Bruker Optik GmbH, 2013...
- Page 34 10%. Note: When changing the values in the CamTrackerConfig.txt, these values can be load into the tracker program by clicking on the line “Read configuration file” in the Options pull-down menu. © Bruker Optics /Bruker Optik GmbH, 2013...
-
Page 35: Advanced Tab
E.g. if “Def Pos” is activated, then the solar image will be centered on the default position, even if there is a small ellipse found with a good quality. Figure 24: Advanced tab 5.8 Mirror image correlation © Bruker Optics /Bruker Optik GmbH, 2013... -
Page 36: Recording Spectra
Note: If you do not want to enter the password every time you start opus, add the command line “/directloginpassword=OPUS” in the desktop symbol you use to start OPUS. When starting OPUS the first time, you should register using the information which was supplied with the software. © Bruker Optics /Bruker Optik GmbH, 2013... - Page 37 “Enforce predefined Measurement Parameters” as shown in Figure Figure 25: Uncheck „Enforce predefined Measurement Parameters”. Click on “Setup”->”User settings”, and deactivate “Work in validated environment” in the “Rights” tab (see Figure 26) © Bruker Optics /Bruker Optik GmbH, 2013...
-
Page 38: Setting Up Measurements
.xpm file. For a first start, load the EM27SUN.xpm which you copied to the XPM-Folder. This contains the standard parameters recommended for solar EM27 measurements. In the following the settings will be explained: © Bruker Optics /Bruker Optik GmbH, 2013... - Page 39 Figure 27: Basic: In this tab the measurement parameters can be loaded and a measurement can be started using the button „Sample Single Channel“. © Bruker Optics /Bruker Optik GmbH, 2013...
- Page 40 The maximum . The range set by “Save resolution of the EM27/SUN is 0.5cm Data” is saved directly after the measurement. Any other available range can still be calculated from the interferograms afterwards, as long as “Sample Interferogram”...
- Page 41 B is a good choice, for the internal radiation source Ref gives good values. These pregain settings should be chosen such that the ADC of the detector is used best. The currently used range can be seen in the “Check Signal” tab (Figure 33). © Bruker Optics /Bruker Optik GmbH, 2013...
- Page 42 Otherwise the DC component is lost. The “Low Pass Filter” should be set to the scanner velocity (see Optic tab). This prevents distortions which may be induced by the electronics above the recorded spectral range. The EM27/SUN allows for double sided measurements with 0.5 cm resolution.
- Page 43 Figure 31: In the FT tab, the phase resolution that shall be recorded can be set, together with the FT-parameters for the Fourier Transformation performed directly after the measurement. © Bruker Optics /Bruker Optik GmbH, 2013...
- Page 44 Figure 32: In the Display tab, the spectral range for the „Check Signal“ tab can be set. Important: make sure the check box “Display single scans before measurement” is unchecked. © Bruker Optics /Bruker Optik GmbH, 2013...
-
Page 45: Time Of Spectra
Figure 33: In the „Check Signal“ tab, an interferogram is shown which is recorded repeatedly. In the EM27/SUN, the value is inverted, so that high intensities on the detector result in a lower value (note the minus sign at the Y axis). The amplitude should not exceed 32000, as this is the maximum range of the ADC. -
Page 46: Repeated Measurements
NUMERIC <hourAtLastTimeSync> = 0; PROGRAM SECTION UserDialog (0, STANDARD, EDIT:'<LoopCount>', BLANK, BLANK, BLANK, BLANK, BLANK, BLANK, BLANK, BLANK, BLANK, BLANK, BLANK, BLANK, BLANK); GetTime (<year>, <month>, <day>, <hour>, <minute>, <second>); <hourAtLastTimeSync>=<hour>; StartLoop (<LoopCount>, 0); © Bruker Optics /Bruker Optik GmbH, 2013... -
Page 47: Advanced Options
“LEARN_Az_Elev.dat”. The content looks like the following: Julian Date, Tracker Elevation, Tracker Azimuth, Elev Offset from Astro, Az Offset from Astro, Ellipse distance/px 2456462.008958,114.130600,147.685600,1.030589,-0.634910,2.132468 2456462.009016,114.126000,147.728400,1.031390,-0.632211,1.192406 2456462.009074,114.120400,147.771400,1.031199,-0.629298,1.427157 2456462.009132,114.116600,147.814200,1.032817,-0.626573,1.207216 2456462.009190,114.112800,147.857400,1.034444,-0.623434,1.710452 2456462.009259,114.107000,147.900200,1.035167,-0.628683,3.564279 2456462.009317,114.103800,147.943800,1.037413,-0.625116,2.494514 © Bruker Optics /Bruker Optik GmbH, 2013... - Page 48 “SunPixIntensity.dat” in intervals of about 5 seconds. This solar intensity is calculated as the average intensity of the pixels between the small and the big ellipse (the irradiated area), divided by the exposure time for normalization. This © Bruker Optics /Bruker Optik GmbH, 2013...
- Page 49 One parameter set the program has to know depends on the orientation of the camera relative to the tracker. This is called “Mirror Image Correlation” (MIC) and stays constant; therefore it is pre-set by Bruker. To retrieve new parameters, in the pull down menu “Tracker”, a line named “Retrieve Mirror Image Correlation (MIC)”...
- Page 50 7 Miscellaneous This manual was created to explain the steps necessary to operate the Bruker EM27/SUN spectrometer and the evaluation software Opus RS. For questions about the program, technical details, bugs, … please contact Bruker Optics GmbH. © Bruker Optics /Bruker Optik GmbH, 2013...
Need help?
Do you have a question about the EM27/SUN and is the answer not in the manual?
Questions and answers