Advertisement
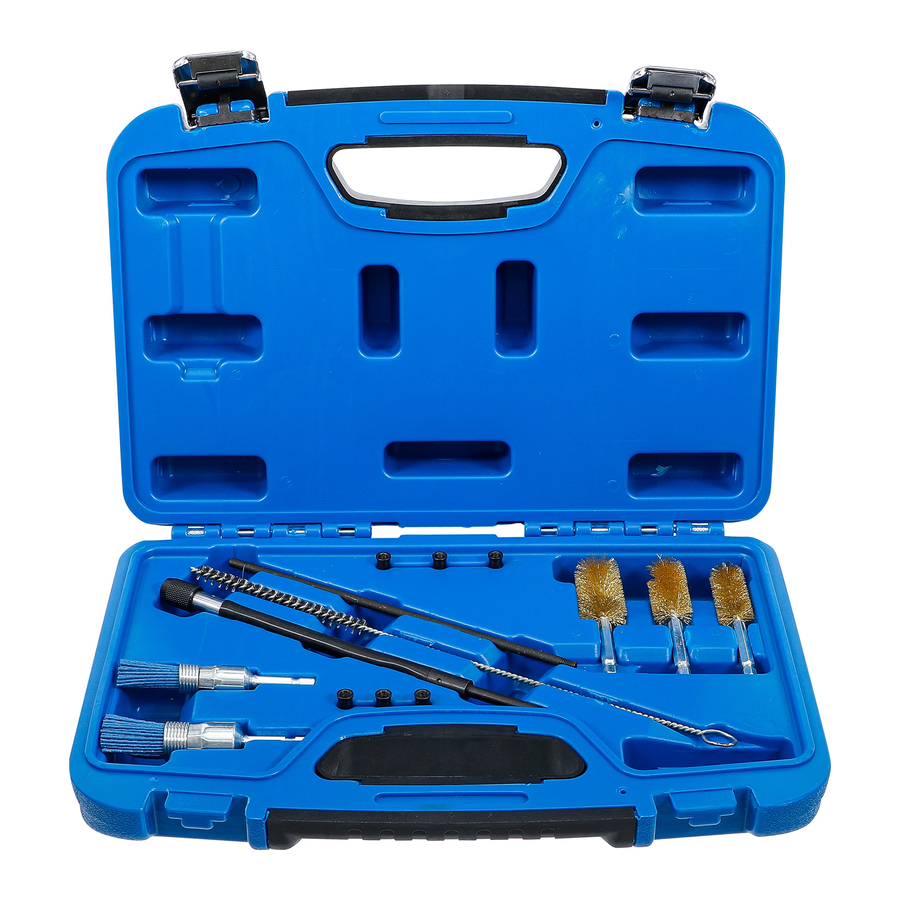
OVERVIEW

- Brush for injector nozzle port
- Brush for injector shaft Ø24 mm
- Brush for injector shaft Ø20 mm
- Brush for injector shaft Ø18 mm
- Quick-action chuck, flexible, length 224 mm
- Mounting rod for the sealing plugs (7)
- Sealing plugs for the injector nozzle port (6x)
- Brush for injector seat surface, Ø19.5x15.5 mm
- Brush for injector seat surface, Ø17.5x20.5 mm
INTRODUCTION
This tool set belongs to a special range of tools for diesel engines and offers everything for an efficient cleaning of the injector ports, shafts and seat surfaces before mounting new injectors. It is suitable for a wide range of vehicles and helps to avoid leaks caused by poorly positioned injectors. The tool set includes three brass-plated steel wire brushes for removing carbon deposits on the injector shaft walls as well as two nylon brushes to clean the injector seat surfaces. The nylon brushes enable a smooth uniform injector seat surface, which is particularly important for the aluminium sealing surface.
PRECAUTIONARY MEASURES
- Always consult the documentation of the vehicle manufacturer in order to determine the correct procedure when removing the injector.
- Wear eye protection when carrying out the cleaning process.
- When using the cleaning brushes (2, 3 or 4), take care that end section does not get caught in the sealing plugs for the openings (7).
- Always keep the tools and the tool box in a clean state in order to ensure for performance and safety. Brake cleaner or a similar solvent can be used to clean the brushes.
USE
Before removing the present injectors, thoroughly clean the area around each injector.

- Pull out the injector.
- Remove the copper sealing ring (A) from the base of the injector shaft (C); we recommend using an extractor for diesel injector seals, e.g. BGS 62630 or 62630-1 for this purpose.
- The injector nozzle port (B) sealed to the base of the injector shaft (C). For this purpose, screw a sealing plug (7) onto the mounting rod (6) and insert a sealing plug (7) into each injector nozzle port. The sealing plugs are dimensioned such that they fit into most injector nozzle ports.
Attention: Before inserting the sealing plug, compare the diameter of the sealing plug with the diameter of the injector bores or injectors. If the diameter is too small, the sealing plug can fall into the combustion chamber
- Remove the mounting rod (6) by turning anti-clockwise and leave the sealing plug (7) in its position.
- Select a brush with the matching size (2, 3 or 4) and attach to the quick action chuck (5).
- When selecting the brush size, observe that the injector shafts are conical and become more narrow towards the seat surface (D).
- Insert the quick action chuck (5) into a cordless drill and clean the injector shaft walls (C). Proceed with care during work and make sure that all carbon and dirt residues are removed. When using the cleaning brushes, take care that the end of the brush does not get caught in the sealing plug (7).
- After cleaning, hold the sealing plug (7) in position using the mounting rod (6) and vacuum clean the injector shaft.
- Select a cleaning brush for the seat surface with the matching size (8 or 9) and attach to the quick action chuck (5).
- Press the steel spiral mounted on the bristles of the brush to approx. 5 mm before the end of the bristles downwards. The purpose of the steel spiral is to keep the bristles bundled and straight.
- When the bristles are worn, position the steel spiral further upwards so that the steel spiral is located 5 mm in front of the bristle end piece.
![]()
- Using the brush (8 or 9), clean the injector seat surface (D).
- Keep the sealing plugs in position and vacuum clean the injector shaft again.
- Screw the mounting rod (6) into the sealing plug (7) and pull out the sealing plug.
- The last step is to clean the injector nozzle port (B).
- Apply a small amount of grease to the bottom end of the wire brush (1). By apply the grease, dirt and combustion residues will be retained and the anti-clockwise rotating movement transports these deposits upwards and removes them from the combustion chamber.
- Carefully insert into the nozzle opening and clean it by rotating the wire brush anti-clockwise several times.
- When removing the brush (1), keep rotating the wire brush anti-clockwise.
- Before mounting the new injectors, do not forget to insert a new copper seal.


Before cleaning

After cleaning
SAFETY NOTES
- Do not use the tool if parts are missing or damaged.
- Use the tool for the intended purpose only.
- Never place the tools on the vehicle battery. Danger of short circuit.
- Caution when working on the running engines. Loose clothing, tools and other objects may be caught by rotating parts and cause severe injuries.
- Keep children and other unauthorised persons away from the work area.
- Do not let any children play with the tool or its packaging.
![burn hazard]() Be careful when working on hot engines because of the risk of burn injuries!
Be careful when working on hot engines because of the risk of burn injuries! - If you remove the ignition key before repairing, you can prevent the engine from being started accidentally and resulting in engine damage.
- These instructions serve as brief information and never replace the workshop manual. Please always obtain technical specifications such as torque values, instructions on disassembly and assembly from the vehicle-specific service literature.
 Be careful when working on hot engines because of the risk of burn injuries!
 BGS technic KG
Bandwirkerstr. 3
D-42929 Wermelskirchen
Tel.: 02196 720480
Fax.: 02196 7204820
mail@bgs-technic.de
www.bgstechnic.com
Documents / Resources
References
Download manual
Here you can download full pdf version of manual, it may contain additional safety instructions, warranty information, FCC rules, etc.
Advertisement


Need help?
Do you have a question about the 9324 and is the answer not in the manual?
Questions and answers