EINHELL AGILLO 18/200 Manual
- Original operating instructions (258 pages) ,
- Operating instructions manual (63 pages)
Advertisement
- 1 Symbols
- 2 Safety information
- 3 Layout and items supplied
- 4 Intended use
- 5 Technical data
-
6
Before starting the equipment
- 6.1 Fitting the guard hood
- 6.2 Fitting the additional handle
- 6.3 Fitting the long handle
- 6.4 Adjusting the angle of the additional handle
- 6.5 Removing/fitting the cutting line unit
- 6.6 Guard hood for use with the cutting blade
- 6.7 Guard hood for use with the cutting line
- 6.8 Fitting/removing the cutting blade
- 6.9 Using the harness
- 6.10 Installing the rechargeable battery
- 7 Operation
- 8 Cleaning and maintenance
- 9 Storage
- 10 Documents / Resources
Symbols

 |  Read the operating instructions to reduce the risk of injury. |
 | Wear protective headgear, goggles and ear muffs. |
 | Wear sturdy, non-slip footwear. |
 | Wear safety gloves. |
 | Protect the equipment from rain and damp. |
 | Be careful of objects being thrown out! |
 | All bystanders must be kept at least 50 ft. (15 m) from the machine. |
 | Switch off the machine and remove the battery/batteries before you make any adjustments or clean the machine. |
 | The equipment continues to rotate! |
 | Beware of blade thurst! |
 | Do not use any saw blades. |
 | Store the batteries only in dry rooms with an ambient temperature of 50°F to 104°F (+10°C to +40°C). Place only fully charged batteries in storage (charged at least 40%). |
Safety information

Read all safety warnings, instructions, illustrations and specifications provided with this power tool. Failure to follow all instructions listed below may result in electric shock, fire and/ or serious injury.
Save all warnings and instructions for future reference.
The term 'power tool' in the warnings refers to your mains-operated (corded) power tool or BATTERY-operated (cordless) power tool.
- Work area safety
- Keep work area clean and well lit.
Cluttered and dark areas invite accidents. - Do not operate power tools in explosive atmospheres, such as in the presence of flammable liquids, gases or dust. Power tools create sparks which may ignite the dust or fumes.
- Keep children and bystanders away while operating a power tool. Distractions can cause you to lose control.
- Keep work area clean and well lit.
- Electrical safety
- Power tool plugs must match the outlet. Never modify the plug in any way. Do not use any adapter plugs with earthed (grounded) power tools. Unmodified plugs and matching outlets will reduce risk of electric shock.
- Avoid body contact with earthed or grounded surfaces such as pipes, radiators, ranges and refrigerators. There is an increased risk of electric shock if your body is earthed or grounded.
- Do not expose power tools to rain or wet conditions. Water entering a power tool will increase the risk of electric shock.
- Do not abuse the cord. Never use the cord for carrying, pulling or unplugging the power tool. Keep cord away from heat, oil, sharp edges or moving parts. Damaged or entangled cords increase the risk of electric shock.
- When operating a power tool outdoors, use an extension cord suitable for outdoor use. Use of a cord suitable for outdoor use reduces the risk of electric shock.
- If operating a power tool in a damp location is unavoidable, use a ground fault circuit interruptor (GFCI) protected supply. Use of an GFCI reduces the risk of electric shock.
- Personal safety
- Stay alert, watch what you are doing and use common sense when operating a power tool. Do not use a power tool while you are tired or under the influence of drugs, alcohol or medication. A moment of inattention while operating power tools may result in serious personal injury.
- Use personal protective equipment. Always wear eye protection. Protective equipment such as dust mask, non-skid safety shoes, hard hat, or hearing protection used for appropriate conditions will reduce personal injuries.
- Prevent unintentional starting. Ensure the switch is in the Off -position before connecting to power source and/or BATTERY pack, picking up or carrying the tool. Carrying power tools with your finger on the switch or energizing power tools that have the switch on invites accidents.
- Remove any adjusting key or wrench before turning the power tool on. A wrench or a key left attached to a rotating part of the power tool may result in personal injury.
- Do not overreach. Keep proper footing and balance at all times. This enables better control of the power tool in unexpected situations.
- Dress properly. Do not wear loose clothing or jewellery. Keep your hair and clothing away from moving parts. Loose clothes, jewellery or long hair can be caught in moving parts.
- If devices are provided for the connection of dust extraction and collection facilities, ensure these are connected and properly used. Use of these devices can reduce dust related hazards.
- Do not let familiarity gained from frequent use of tools allow you to become complacent and ignore tool safety principles. A careless action can cause severe injury within a fraction of a second.
- Power tool use and care
- Do not force the power tool. Use the correct power tool for your application. The correct power tool will do the job better and safer at the rate for which it was designed.
- Do not use the power tool if the switch does not turn it on and off. Any power tool that cannot be controlled with the switch is dangerous and must be repaired.
- Disconnect the plug from the power source and/or remove the battery pack, if detachable, from the power tool before making any adjustments, changing accessories, or storing power tools. Such preventive safety measures reduce the risk of starting the power tool accidentally.
- Store idle power tools out of the reach of children and do not allow persons unfamiliar with the power tool or these instructions to operate the power tool. Power tools are dangerous in the hands of untrained users.
- Maintain power tools and accessories. Check for misalignment or binding of moving parts, breakage of parts and any other condition that may affect the power tool's operation. If damaged, have the power tool repaired before use. Many accidents are caused by poorly maintained power tools.
- Keep cutting tools sharp and clean. Properly maintained cutting tools with sharp cutting edges are less likely to bind and are easier to control.
- Use the power tool, accessories and tool bits etc. in accordance with these instructions, taking into account the working conditions and the work to be performed. Use of the power tool for operations different from those intended could result in a hazardous situation.
- Keep handles and grasping surfaces dry, clean and free from oil and grease. Slippery handles and grasping surfaces do not allow for safe handling and control of the tool in unexpected situations.
- Battery tool use and care
- Recharge only with the charger specified by the manufacturer. A charger that is suitable for one type of battery pack may create a risk of fire when used with another battery pack.
- Use power tools only with specifically designated battery packs. Use of any other battery packs may create a risk of injury and fire.
- When BATTERY pack is not in use, keep it away from other metal objects, like paper clips, coins, keys, nails, screws or other small metal objects that can make a connection from one terminal to another. Shorting the BATTERY terminals together may cause burns or a fire.
- Under abusive conditions, liquid may be ejected from the battery; avoid contact. If contact accidentally occurs, flush with water. If liquid contacts eyes, additionally seek medical help. Liquid ejected from the battery may cause irritation or burns.
- Do not use a BATTERY pack or tool that is damaged or modified. Damaged or modified batteries may exhibit unpredictable behavior resulting in fire, EXPLOSION or risk of injury.
- Do not expose a BATTERY pack or tool to fire or excessive temperature. Exposure to fire or temperature above 266°F (130°C) may cause explosion.
- Follow all charging instructions and do not charge the BATTERY pack or tool outside the temperature range specified in the instructions. Charging improperly or at temperatures outside the specified range may damage the BATTERY and increase the risk of fire.
- Service
- Have your power tool serviced by a qualified repair person using only identical replacement parts. This will ensure that the safety of the power tool is maintained.
- Never service damaged BATTERY packs. Service of BATTERY packs should only be performed by the manufacturer or authorized service providers.
Additional safety instructions
We pay a great deal of attention to the design of every battery pack to ensure that we supply you with batteries which feature maximum power density, durability and safety. The battery cells have a wide range of safety devices. Each individual cell is initially formatted and its electrical characteristic curves are recorded. These data are then used exclusively to be able to assemble the best possible battery packs. Despite all the safety precautions, caution must always be exercised when handling batteries. The following points must be obeyed at all times to ensure safe use. Safe use can only be guaranteed if undamaged cells are used. Incorrect handling can cause cell damage.

Analyses confirm that incorrect use and poor care are the main causes of the damage caused by high performance batteries.
Information about the battery
- The battery pack supplied with your cordless tool is not charged. The battery pack has to be charged before you use the tool for the first time.
- For optimum battery performance avoid low discharge cycles. Charge the battery pack frequently.
- Store the battery pack in a cool place, ideally at 59°F (15°C) and charged to at least 40%.
- Lithium-Ion batteries are subject to a natural ageing process. The battery pack must be replaced at the latest when its capacity falls to just 80% of its capacity when new. Weakened cells in an aged battery pack are no longer capable of meeting the high power requirements and therefore pose a safety risk.
- Do not throw battery packs into an open fire. There is a risk of explosion!
- Do not ignite the battery pack or expose it to fire.
- Do not exhaustively discharge batteries. Exhaustive discharge will damage the battery cells. The most common cause of deep discharge is lengthy storage or non-use of partly discharged batteries. Stop working as soon as the performance of the battery falls noticeably or the electronic protection system triggers. Place the battery pack in storage only after it has been fully charged.
- Protect batteries and the tool from overloads. Overloads will quickly result in overheating and cell damage inside the battery housing without this overheating actually being apparent externally.
- Avoid damage and shocks. Replace batteries which have been dropped from a height of more than one meter or which have been exposed to violent shocks without delay, even if the housing of the battery pack appears to be undamaged. The battery cells inside the battery may have suffered serious damage. In this respect, please also read the waste disposal information.
- If the battery pack suffers overloading and overheating, the integrated protective cutoff will switch off the equipment for safety reasons.
![]()
Do not press the ON/OFF switch any more if the protective cut-off has actuated. This may damage the battery. - Use only original battery packs. The use of other batteries may result in injuries, explosion and a fire risk.
- Protect your rechargeable battery against moisture, rain and high humidity. Moisture, rain and high humidity can cause dangerous cell damage. Never charge or work with batteries which have been exposed to moisture, rain or high humidity – replace them immediately.
- If your equipment is fitted with a detachable battery, remove the battery for safety reasons after you have finished your work.
Information on chargers and the charging process
- Please check the data marked on the rating plate of the battery charger. Be sure to connect the battery charger to a power supply with the voltage marked on the rating plate. Never connect it to a different mains voltage.
- Protect the battery charger and its cable from damage and sharp edges. Have damaged cables repaired without delay by a qualifi ed electrician.
- Keep the battery charger, batteries and the cordless tool out of children's reach.
- Do not use damaged battery chargers.
- Do not use the supplied battery charger to charge other cordless tools.
- In heavy use the battery pack will become warm. Allow the battery pack to cool to room temperature before commencing with the charging.
- Do not over-charge batteries. Do not exceed the maximum charging times. These charging times apply only to discharged batteries. Frequent insertion of a charged or partly charged battery pack will result in over-charging and cell damage. Do not leave batteries in the charger for more than 48 hours.
- Never use or charge batteries if you suspect that the last time they were charged was more than 12 months previously. There is a high probability that the battery pack has already suffered dangerous damage (exhaustive discharge).
- Charging batteries at a temperature below 50°F (10°C) will cause chemical damage to the cell and may cause a fire.
- Do not use batteries which have heated during the charging process, as the battery cells may have suffered dangerous damage.
- Do not use batteries which have suffered curvature or deformation during the charging process or which show other non-typical symptoms (gassing, hissing, cracking,...)
- Never fully discharge the battery pack (recommended depth of discharge max. 80%) A complete discharge of the battery pack will lead to premature ageing of the battery cells.
- Never charge the batteries unsupervised.
Protection from environmental influences
- Wear suitable work clothes. Wear safety goggles.
- Protect your cordless tool and the battery charger from moisture and rain. Moisture and rain can cause dangerous cell damage.
- Do not use the cordless tool or the battery charger near vapors and inflammable liquids.
- Use the battery charger and cordless tools only in dry conditions and an ambient temperature of 50°F to 104°F (10°C to 40°C).
- Do not keep the battery charger in places where the temperature is liable to reach over 104°F (40°C). In particular, do not leave the battery charger in a car that is parked in the sunshine.
- Protect batteries from overheating. Overloads, over-charging and exposure to direct sunlight will result in overheating and cell damage. Never charge or work with batteries which have been overheated – replace them immediately if possible.
- Storage of batteries, battery chargers and cordless tools. Store the charger and your cordless tool only in dry places with an ambient temperature of 50°F to 104°F (10°C to 40°C). Store the Lithium-Ion rechargeable battery in a cool and dry place at 50°F to 68°F (10°C to 20°C). Protect them from humidity and direct sunlight! Place only fully charged batteries in storage (charged at least 40%).
- Prevent the Lithium-Ion battery pack from freezing. Battery packs which were stored below 32°F (0°C) for more than 60 minutes must be disposed of.
- When handling batteries beware of electrostatic charge: Electrostatic discharges cause damage of the electronic protection system and the battery cells. Avoid electrostatic charging and never touch the battery poles.
Grass trimmer, brush cutter and brush saw safety warnings
- Do not use the machine in bad weather conditions, especially when there is a risk of lightning. This decreases the risk of being struck by lightning.
- Thoroughly inspect the area for wildlife where the machine is to be used. Wildlife may be injured by the machine during operation.
- Thoroughly inspect the area where the machine is to be used and remove all stones, sticks, wires, bones, and other foreign objects. Thrown objects can cause personal injury.
- Before using the machine, always visually inspect to see that the cutter or blade and the cutter or blade assembly are not damaged. Damaged parts increase the risk of injury.
- Follow instructions for changing accessories. Improperly tightened blade securing nuts or bolts may either damage the blade or result in it becoming detached.
- The rated rotational speed of the blade must be at least equal to the maximum rotational speed marked on the machine. Blades running faster than their rated rotational speed can break and fl y apart.
- Wear eye, ear, head and hand protection. Adequate protective equipment will reduce personal injury by flying debris or accidental contact with the cutting line or blade.
- While operating the machine, always wear safety footwear. Do not operate the machine when barefoot or wearing open sandals. This reduces the chance of injury to the feet from contact with a moving cutter, line or blade
- While operating the machine, always wear long trousers. Exposed skin increases the likelihood of injury from thrown objects.
- Keep bystanders away while operating the machine. Thrown debris can result in serious personal injury.
- Always use two hands when operating the machine. Holding the machine with both hands will avoid loss of control.
- Hold the machine by the insulated gripping surfaces only, because the cutting line or blade may contact hidden wiring. Cutting line or blades contacting a "live" wire may make exposed metal parts of the machine "live" and could give the operator an electric shock.
- Always keep proper footing and operate the machine only when standing on the ground. Slippery or unstable surfaces may cause a loss of balance or control of the machine.
- Do not operate the machine on excessively steep slopes. This reduces the risk of loss of control, slipping and falling which may result in personal injury.
- When working on slopes, always be sure of your footing, always work across the face of slopes, never up or down and exercise extreme caution when changing direction. This reduces the risk of loss of control, slipping and falling which may result in personal injury.
- Keep all parts of the body away from the cutter, line or blade when the machine is operating. Before you start the machine, make sure the cutter, line or blade is not contacting anything. A moment of inattention while operating the machine may result in injury to yourself or others.
- Do not operate the machine above waist height. This helps prevent unintended cutter or blade contact and enables better control of the machine in unexpected situations.
- When cutting brush or saplings that are under tension, be alert for spring back. When the tension in the wood fibres is released, the brush or sapling may strike the operator and/or throw the machine out of control.
- Use extreme caution when cutting brush and saplings. The slender material may catch the blade and be whipped toward you or pull you off balance.
- Maintain control of the machine and do not touch cutters, lines or blades and other hazardous moving parts while they are still in motion. This reduces the risk of injury from moving parts.
- Carry the machine with the machine switched off and away from your body. Proper handling of the machine will reduce the likelihood of accidental contact with a moving cutter, line or blade.
- When transporting or storing the machine, always fit the cover on metal blades. Proper handling of the machine will reduce the likelihood of accidental contact with the blade.
- Only use replacement cutters, lines, cutting heads and blades specified by the manufacturer. Incorrect replacement parts may increase the risk of breakage and injury.
- When clearing jammed material or servicing the machine, make sure the switch is off and the battery pack is removed. Unexpected starting of the machine while clearing jammed material or servicing may result in serious personal injury.
- When clearing jammed material or servicing the machine, make sure the switch is off and the machine is disabled. Unexpected starting of the machine while clearing jammed material or servicing may result in serious personal injury.
Blade thrust causes and related warnings
- Maintain a firm grip with both hands on the machine and position your arms to resist blade thrust. Position your body to the left side of the machine. Blade thrust can increase the risk of injury due to the machine moving unexpectedly. Blade thrust can be controlled by the operator if proper precautions are taken.
- If the blade binds, or when interrupting a cut for any reason, switch the machine off and hold the machine motionless in the material until the blade comes to a complete stop. While the blade is binding, never attempt to remove the machine from the material or pull the machine backward while the blade is in motion, otherwise blade thrust may occur. Investigate and take corrective actions to eliminate the cause of blade binding.
- Do not use blunt or damaged blades. Blunt or damaged blades increase the risk of jamming or catching on an object, resulting in blade thrust.
- Always maintain good visibility of the material being cut. Blade thrust is more likely to occur in areas where it is diffi cult to see the material being cut.
- If you are approached by another person while operating the machine, switch the machine off. There is an increased risk of injury to other persons being struck by the moving blade in the event of blade thrust.
Additional safety instructions
- Before you begin your work, examine the material you want to cut. Remove any foreign bodies. Continue to watch out for foreign bodies while you are working. If you come across any foreign bodies while cutting, turn off the machine and remove the items in question.
- Work only when visibility is adequate.
- Always hold the equipment firmly in both hands. Your fingers and thumbs should be wrapped around the handles.
- Make sure that the handles are clean and dry.
- When carrying out mowing work on a slope always stand at a lower level than the cutting tool. Never cut or trim on a smooth, slippery hill or slope.
- Make sure you stand squarely at all times while working. Be careful when walking backwards. Tripping hazard!
- Never leave the equipment unsupervised in the work area. If you stop work for a while, leave the equipment in a safe place.
- If you stop your work in order to go to another area to work, you must make sure that the equipment is switched off while you are going there.
- Never use the equipment while it is raining or in damp or wet surroundings.
- Protect your equipment against moisture and rain.
- Before you switch on the equipment, check that the cutting unit will not touch any stones or other objects.
- Always wear suitable working clothes to prevent injuries to the head, hands and feet. Always wear heavy, long pants, boots, gloves, and a long-sleeve shirt. Do not wear loose clothing, jewelry, short pants, sandals, or go barefoot. Secure hair so it is above shoulder level.
- When the equipment is in operation, you must always hold it away from your body!
- Do not switch on the equipment when it is turned around or when it is not in working position.
- Switch off the machine and remove the battery: when the equipment is not being used, when you leave it unsupervised, when checking the equipment, when removing or replacing the spool, or when transporting the equipment from one place to another.
- Keep the equipment away from other people, especially children, and from pets. There may be stones and other objects in the grass that is cut and thrown up.
- When you are working, keep a distance of at least 50 feet (15 meters) from other persons and pets.
- Do not cut against hard objects. This will help you to prevent causing injury to yourself and damage to the equipment.
- Use the edge of the safety guard to keep the equipment away from walls, different surfaces and fragile objects.
- Never use the equipment without the safety guard.
- This equipment is not allowed to be used by children or by persons with reduced physical, sensory or mental capacities or those with a lack of experience and knowledge. Children should be supervised so that they do not play with the equipment. Children are not allowed to carry out cleaning or maintenance.
- Avoid abnormal working postures. Make sure you stand squarely and keep your balance at all times. Always maintain good footing on inclines. Only operate the equipment at a walking pace.
- Risk of injury from dangerous moving parts!
- The moving parts are not allowed to be touched before the battery has been removed and all moving parts have come to a complete standstill.
- Read the directions with due care. Familiarize yourself with the operator controls and proper operation of the equipment.
- Never allow children or other persons who are not familiar with the operating instructions to use the equipment. Contact your local governmental agency for information regarding minimum age requirements for the user.
- Always keep in mind that the user of the equipment is personally responsible for accidents or hazards involving other persons or their property.
- Before use, always carry out a visual check to make sure that the safety devices or covers are not missing or damaged and that they are correctly fitted.
- Never use the equipment in bad weather conditions and particularly never when there is a risk of lightning.
- Never use the equipment with a damaged cover or safety device or when a cover or safety device is missing.
- Switch on the motor only when there are no hands or feet within range of the cutting unit.
- Always switch off the equipment and remove the battery - when you leave the equipment unsupervised.
- before you remove a blockage.
- before you examine, clean or work on the equipment.
- after the equipment strikes a foreign body.
- when the equipment begins to make unusual vibrations (examine immediately).
The equipment is not allowed to be put into operation again until the cause of the unusual vibrations is eliminated. If you fail to find the cause of the vibrations, contact a service center.
- Risk of injury from the cutting unit! Keep hands and feet away from the cutting unit!
- Use only spare parts and accessories which are recommended by the manufacturer.
- Examine and service the equipment regularly.

The safety guard is there to ensure your safety and the safety of others. It is also essential for the equipment to work correctly. Failure to comply with this instruction will invalidate your warranty as well as create a potential source of danger.
- Never use your hands to try to stop the cutting unit.
- Always wait for it to stop by itself.
- Use only genuine cutting units.
- Make sure that the air vents are free of dirt.
- Do not try to use the equipment to cut grass which is not growing on the ground; for example, do not try to cut grass growing on walls or stones, etc. The person operating the grass trimmer is liable for any damages sustained by third parties within the equipment's working radius as a result of its use.
- Do not cross roads or gravel paths with the equipment switched on.
- When you are not using the equipment, keep it in a dry place out of the reach of children.
- Use the equipment only in the way described in these operating instructions and always hold it perpendicular to the ground. Every other position is dangerous.
- Check at regular intervals that the screws are properly tightened.
- The area to be cut must always be kept cleared of cables and other objects.
- If the equipment has to be lifted for transporting, be sure to switch off the motor first and wait for the cutter to come to a standstill. Each time you leave the equipment, switch off the motor.
- Under no circumstances are you to cut against hard objects during use. This is imperative to prevent injury to yourself and damage to the equipment.
- Use only original replacement parts when repairing.
- Before starting up the equipment, and after any collision, check the equipment for signs of wear or damage and have any necessary repairs carried out.
- Always keep your hands and feet away from the cutting unit, especially when switching the motor on.
- Remove the rechargeable battery before checking, cleaning or doing any work on the machine and when it is not being used.
- Acquaint yourself with the controls and how to use the equipment.
- Stop using the equipment when there are people – particularly children – or pets nearby.
- Never use the machine if protective equipment is damaged or missing.
- Never mount metal cutting elements. Never replace the non-metal cutting unit with a metal cutting unit.
If it is used for a lengthy period, the vibrations it causes in the hands of the user may result in circulation problems (hand-arm vibration syndrome).
White finger syndrome is a vascular disease that involves seizure-like spasms of the fingers and toes. The affected areas are no longer sufficiently supplied with blood and therefore appear extremely pale.
The frequent use of vibrating equipment may trigger nerve damage in people with an impaired circulation (for example smokers, diabetics). Should you observe any unusual impairments, interrupt your work immediately and consult a doctor.
Follow these instructions in order to reduce the dangers:
- Keep your body and in particular your hands warm when working in the cold.
- Take regular breaks and move your hands to stimulate the blood circulation during the breaks.
- Ensure that the equipment makes the least possible vibration through regular maintenance and solid parts on the equipment.
Safety precautions for handling the blade
- Take not of all warnings and instructions relating to operating and fitting the blade.
- The blade can recoil suddenly from objects if it cannot cut or mow through them. This can cause injuries to the arms or legs. Keep bystanders and animals at least 50 feet (15 meters) away from where you are working. If the equipment strikes a foreign body, stop the engine immediately and wait for the blade to come to a standstill. Check the blade for signs of damage. Always replace the blade if it is bent or cracked.
- The blade is liable to catapult away objects with high force. This can cause blindness or injuries. Wear protection that complies with ANSI Z87.1, face and legs. Always remove objects from your working area before you use the blade.
- Carefully check your machine and its fittings for signs of damage every time before use. Do not use the equipment unless all the blade fittings are installed correctly.
- When you release the throttle lever, the blade will continue to rotate and will only gradually come to a standstill. A blade which is in the process of rotating to a standstill can cause you or bystanders injuries through cutting. Before you start any work on the blade, switch off the engine and ensure that the blade has come to a standstill.
- The danger zone has a radius of 50 ft. (15 m). Bystanders may suffer blindness or injuries. Keep a distance of 50 ft. (15 m) between yourself and other people or animals.
The cutting unit continues to run for a few seconds after the motor is switched off.
The cutter continues to rotate!

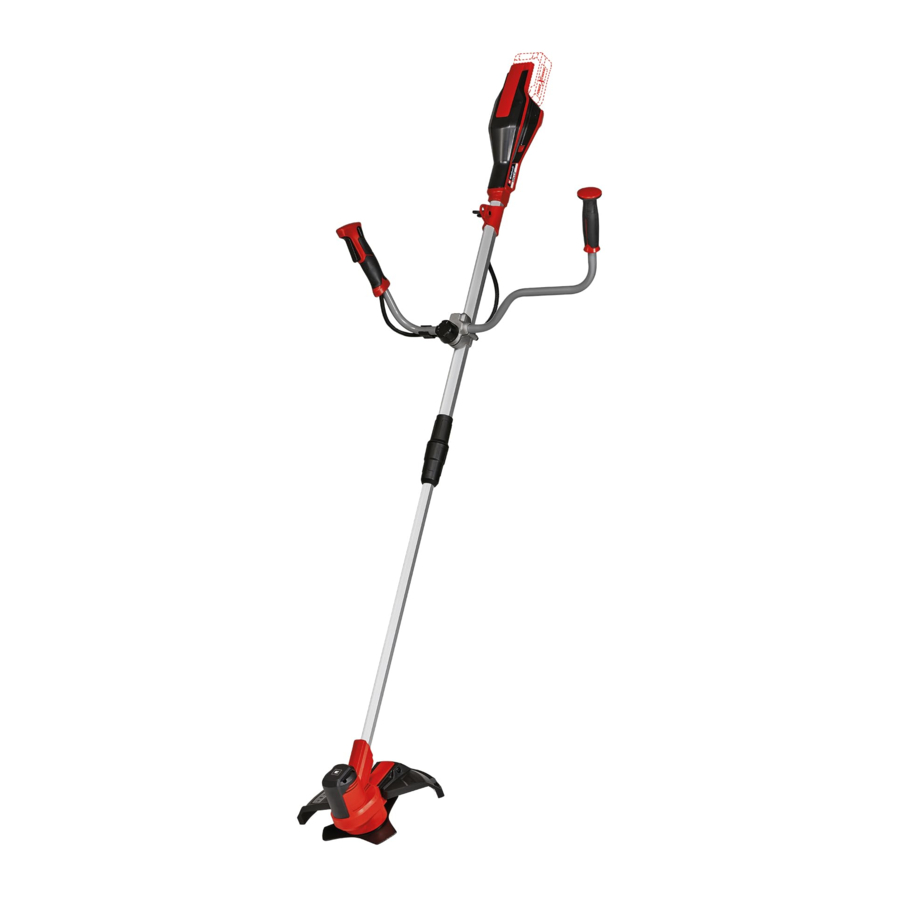
Layout and items supplied
Layout


- Battery mount
- On/Off switch
- Safety lock-off
- Strap attachment
- Additional handle attachment
- Top part of long handle
- Handle connecting piece
- Union nut
- Bottom part of long handle
- Motor housing
- Spool housing
- Locking lever
- Line safety guard
- Thread cutter
- Guard hood
- Additional handle
- Handle screw
- Line spool
- Line
- Harness
- Cutting blade
- Multi-tool
- Pressure plate
- Pressure plate cover
- Hex nut M10, self-locking
- Cable clips
- Mounting
- Motor shaft
- Plastic ring
- Cutting line unit
- Retaining screw
- Pressure spring
- Wall holder
- Groove
- Battery pack (not supplied)
- Pushlock button
- Battery capacity indicator
- Battery capacity indicator button
Items supplied
Please check that the article is complete as specified in the scope of delivery. If parts are missing, please contact our service center or the store where you made your purchase at the latest within 5 work days after purchasing the article and upon presentation of a valid bill of purchase.
- Open the packaging and take out the equipment with care.
- Remove the packaging material and any packaging and/or transportation braces (if present).
- Check to see if all the items are supplied.
- Inspect the equipment and accessories for transport damage.
- If possible, keep the packaging until the end of the guarantee period.
The equipment and packaging material are not toys. Do not let children play with plastic bags, plastic sheets and small parts. There is a risk of choking and suffocating!
- Top section of the trimmer with handle
- Bottom section of the trimmer with line spool
- Guard hood
- Steady grip
- Harness
- Cutting blade
- Multi-tool
- Pressure plate
- Pressure plate cover
- Hex nut M10
- 2x Cable clips
- Original operating instruction with safety information
Separately available accessories
18V 5.2Ah PXC Plus Lithium-Ion battery
18V 4.0Ah/6.0Ah PXC Plus Lithium-Ion battery
18V 5.0Ah/8.0Ah PXC Plus Lithium-Ion battery
18V PXC Dual Port Fast Charger 18V PXC Fast Charger
Contact your local retailer for more specific models of batteries and charger available in your area. You can also explore battery + charger options at Einhell.com.
Intended use
Used as a cordless string trimmer and brush cutter (using the cutting blade) the equipment is designed for cutting young trees, strong weeds and light undergrowth.
Used as a cordless grass trimmer (using the line spool with cutting line) the equipment is designed for cutting lawns, grassed areas and small weeds. It is not designed to be used for public facilities, parks, sports centers, along roadways, or in agriculture and forestry.
The operating instructions as supplied by the manufacturer must be obeyed to ensure that the equipment is used properly.
Due to the high risk of bodily injury to the user, the equipment is not allowed to be used to clean paths or to chop up tree and hedge clippings. Similarly, the equipment must not be used to level out high areas such as molehills. For safety reasons, the equipment must not be used as a drive unit for other work tools or toolkits of any kind.
The equipment is allowed to be used only for its prescribed purpose. Any other use is deemed to be a case of misuse. The user/operator and not the manufacturer will be liable for any damage or injuries of any kind resulting from such misuse.
Please note that our equipment has not been designed for use in commercial, trade or industrial applications. Our warranty will be voided if the equipment is used in commercial, trade or industrial businesses or for equivalent purposes.
Residual risks
Even if you use this electric power tool in accordance with the instructions, certain residual risks cannot be eliminated. The following hazards may arise in connection with the equipment's construction and layout:
- Lung damage if no suitable protective dust mask is used.
- Damage to hearing if no suitable ear protection is applied.
- Health damage caused by hand-arm vibrations if the equipment is used over a longer period or is not properly guided and maintained.
- Injury and damage to property caused by flying parts.
- Cut injuries if no suitable safety clothing is used.
This electric power tool generates an electromagnetic field during operation. Under certain circumstances this field may actively or passively impede medical implants. To reduce the risk of serious or fatal injuries, we recommend persons with medical implants to consult their doctor and the manufacturer of the medical implant prior to using the equipment.
Technical data
| Motor power supply: | 18V  |
| No load speed RPM: | 0-7500 |
| Cutting width with blade: | 8" |
| Cutting width with line: | 12" |
| Length of line spool: | 26 ft. |
| Line diameter: | 0.08" |
| Weight (Tool only): | 14.3 lbs |
Reduce noise generation and vibration to a minimum!
- Use only equipment that is in perfect condition.
- Maintain and clean the equipment regularly.
- Adapt your way of working to the equipment.
- Do not overload the equipment.
- Have the equipment checked if necessary.
- Switch off the equipment when not in use.
- Wear gloves.
Before starting the equipment
Carry out all the following assembly and adjustment work without rechargeable batteries – risk of injury. Wear protective gloves.
Inspect unit before each use. Replace damaged parts. Check for fuel leaks. Make sure all fasteners are in place and secure. Replace cutting attachment parts that are cracked, chipped, or damaged in any way. Make sure the cutting attachment is properly installed and securely fastened. Be sure the cutting attachment shield is properly attached and in the position recommended by the manufacturer. Use only flexible, nonmetallic line recommended by the manufacturer. Never use, for example, wire or wire-rope, which can break off and become a dangerous projectile.
Fitting the guard hood
Remove the socket head screw from the guard hood. Push the guard hood (15) onto the mount on the motor housing as far as it will go and screw it securely in place with the previously removed socket head screw (Fig. 3). A blade (Fig. 2/Item 14) on the underside of the guard hood automatically cuts the cutting line to the optimum length. This is provided with a safety guard.
Remove the safety guard before starting work.

Fitting the additional handle
Undo the handle screw (Fig. 2/Item 17) and remove the thrust piece (Fig. 2/Item 5). Fit the additional handle (16) into the holder (27) such that the plastic ring (29) lies in the groove (34) on the holder (27) (see detailed drawing 5).
The additional handle is wrongly fitted if the plastic ring (29) lies outside the groove (34) as shown in the detailed drawing 6. This mistake can result in damage to the additional handle during use.
Fasten the additional handle (16) to the thrust piece (5) by re-tightening the handle screw (17). Use the two supplied cable clips (26) to fasten the protective tubing for the cable.


Fitting the long handle
Slot the top part of the long handle (6) into the bottom part of the long handle (9). Screw the handle connecting piece (7) to the bottom part of the long handle with the union nut (8) on the top part of the long handle.

Adjusting the angle of the additional handle
(Fig. 7)
To adjust the additional handle to the optimum working angle, slacken the handle screw (17). Set the desired tilt of the additional handle (16). Tighten the handle screw (17) again.
Removing/fitting the cutting line unit
Note: The equipment is supplied from the factory ready for operation with the cutting line.
Take care not to cut yourself on the cutting line cutter.

- Removing the cutting line unit
Press the locking lever (12) forward and turn the cutting line unit (30) clockwise at the same time until the locking lever latches in place. Turn the cutting line unit clockwise and take it off the motor shaft. - Fitting the cutting line unit
Press the locking lever (12) forward and turn the cutting line unit (30) counterclockwise onto the motor shaft at the same time until the locking lever latches in place. Turn the line cutting unit on the motor shaft until it is tightly secured. Check whether the cutting line unit can rotate freely after you let go of the locking lever. If this is not the case, have the mechanism checked by an expert.
Guard hood for use with the cutting blade
The cutting line cover (13) must be removed if you want to work with the cutting blade. Take care not to cut yourself on the cutting line cutter.
Slacken the two retaining screws (31) on the cutting line cover.
Start at the side and carefully press in the lugs and pull the cutting line cover (13) up and off.

Guard hood for use with the cutting line
(Fig. 11)
The cutting line cover (13) must be fitted if you want to work with the cutting line. Take care not to cut yourself on the cutting line cutter. Start at the side and press the lugs of the cutting line cover back in and secure them with the two screws (31).
Fitting/removing the cutting blade
The procedure for fitting the cutting blade is shown in Figs. 12 - 14. Note the detailed drawing 15.
Take care not to cut yourself on the cutting blade.


- Fitting the cutting blade
![]()
If the spacer between the cutting blade and the motor housing (detailed drawing 15/Item 27) slips off the motor shaft (28) during dismantling, push it back onto the motor shaft as shown in the drawing.- Fit the cutting blade (21) in place.
- The pressure plate (23) must be fitted with the higher edge facing the cutting blade (detailed drawing 15).
- Fit the pressure plate cover (24).
- Screw the size M10 hex nut (25) in place.
![]()
For safety reasons, self-locking nuts are allowed to be used only once without exception. - Press the locking lever (12) and lock the motor shaft. Tighten the hex nut using the multifunction tool (22).
- Check whether the blade (21) can rotate freely after you let go of the locking lever. If this is not the case, have the mechanism checked by an expert.
Vibrations when using the cutting blade
If considerable vibrations of an unusual nature arise when using the cutting line after you have fitted the cutting blade, this is because the cutting blade is not fitted in central position. Switch off the tool immediately. Remove the battery/batteries and refit the cutting blade.
A cutting blade that is not fitted in central position will cause damage to the tool!
- Removing the cutting blade
Press the locking lever forward and lock the motor shaft. Unscrew and the hex nut and remove the pressure plate cover, pressure plate and cutting blade.
Each time before use, check the following:
- That the equipment is in perfect condition and that the safety devices and cutting devices are complete.
- That all screws are securely fastened.
- That all moving parts move smoothly.
Using the harness
Always use the harness when working with the equipment (Fig. 2/Item 20). Always switch off the equipment before you release the harness – risk of injury!
- Fit the harness

- Hook the equipment to the harness.

- Adjust to the perfect working and cutting position using the various harness adjusters on the harness. The strap attachment (Fig. 18/Item 4) can be moved on the top part of the long handle if required. To do so, slacken the wing nut on the strap attachment, move the strap attachment and then re-tighten the wing nut.

- To establish the optimum length of the harness, you should then make a few swinging movements without starting the motor.


The harness is fitted with a quick-release mechanism. Pull the red part of the harness (Fig. 20) if you need to remove the equipment quickly.
Installing the rechargeable battery
Push the rechargeable battery into the battery mount (Fig. 2/Item 1). The battery will be heard to click into place when it has been pushed fully in (Fig. 1). To take out the battery (Item 35), press the pushlock button (Fig. 21/Item 36) and remove the battery.

Operation
Please note that the statutory regulations governing noise abatement may differ from one location to another.
The guard hood must be fitted when carrying out work.
Switching the equipment on and off, adjusting the speed

Switching on and setting the speed
Press the safety lock-off (3) and press the On/Off switch (2) at the same time. Adjust the speed during operation by pressing the On/Off switch to a greater or lesser extent. The harder you push, the higher the speed.
Switching off
Release the On/Off switch.
Practical tips
Practice all the work steps with the motor switched off and without the rechargeable battery before you start to use the equipment. Only use the cutting line to mow grass that is dry. If the grass is long, the grass must be cut shorter in stages.

Extending the cutting line

Do not use any kind of metal wire or metal wire encased in plastic in the line spool. This may cause serious injuries to the user. The grass trimmer has a semi-automatic line extension system (automatic jog line feed). Each time you activate the semi-automatic line extension system, the line is automatically extended to ensure that you can cut your lawn with the perfect cutting width at all times. To extend the cutting line, run the motor and tap the line spool on the ground. This will automatically extend the line. The blade on the guard hood will cut the line to the permissible length. Please note that the more often you activate the semiautomatic line extension system, the more the line will wear.
Note: If the line is too long when you use the equipment for the first time, the surplus end of it will be cut by the blade on the guard hood. If the line is too short when you start the equipment for the first time, press the knob on the line spool and pull the line hard. When you then start the machine for the first time the line will be cut to the perfect length automatically.
Using a brush or similar, carefully remove all residual grass from the underside of the guard hood at regular intervals.
Different cutting methods
When the equipment is correctly assembled it will cut weeds and long grass in places which are difficult to access, e.g. along fences, walls and foundations and also around trees. It can also be used for "mowing" down vegetation so that a garden can be better prepared or a certain area cleared down to the soil.
Please note: Even if it is used carefully, cutting around foundations, stone or concrete walls, etc. will result in the line suffering above normal wear.
Trimming/mowing
Swing the trimmer from side to side in a scything motion. Always keep the line spool parallel to the ground. Check the site and decide which cutting height you require. Guide and hold the line spool at the required height to obtain an even cut.

Low trimming
Hold the trimmer right in front of you at a slight angle so that the underside of the line spool is above the ground and the line strikes the correct target. Always cut away from yourself. Never draw the trimmer towards yourself.
Cutting along fences/foundations
Approach wire mesh fences, lath fences, natural stone walls and foundations slowly so that you can cut close to them without striking the obstacle with the line. If, for example, the line strikes stones, stone walls or foundations, it will wear or fray. If the line strikes wire fencing, it will break.
Trimming around trees
When trimming around tree trunks, approach slowly so that the line does not strike the bark. Walk around the tree, cutting from left to right. Approach grass or weeds with the tip of the line and tilt the line spool forwards slightly.
Take extreme care during mowing work. When doing such work keep a distance of 100 ft. (30 m) between yourself and other people or animals.
Mowing
When mowing down to the ground you will cut all the vegetation. To do this, set the line spool at an angle of 30° to the right. Place the handle in the required position. Remember the increased risk of injury to the user, watchers and animals, and the danger of damaging property due to objects (for example stones) being thrown up.

Do not use the equipment to remove objects from footpaths, etc.
The equipment is a powerful tool and can throw small stones and other objects a distance of 50 ft. (15 m) or more, causing injuries and damage to cars, houses and windows.
Sawing
The equipment is not suitable for sawing.
Jamming
If the cutting blade jams as a result of attempting to cut vegetation that is too dense, switch off the engine immediately. Remove the grass and scrub from the equipment before you restart it.
Preventing recoil
When you work with the blade, there is a risk of recoil if it strikes solid objects such as tree trunks, branches, tree stumps, stones or the like. This will throw the equipment backwards in the direction opposite to the rotation of the tool. This can cause you to lose control of the equipment. Do not use the blade near fences, metal posts, boundary stones or foundations. For cutting dense stalks, position the blade as shown in Fig. 27 to prevent recoil.
Charging the Lithium-Ion battery
(not included)
The corresponding instructions can be found in the original operating instructions for your charger.
Battery capacity indicator
(Fig. 21/item 37)
Press the battery capacity indicator switch (38). The battery capacity indicator (37) shows the charge status of the battery using 3 LEDs.
All 3 LEDs lit:
The battery is fully charged.
2 or 1 LED(s) lit:
The battery has an adequate remaining charge.
1 LED flashing:
The battery is empty, recharge the battery.
All LEDs flashing:
The temperature of the battery is too low. Remove the battery from the device and leave it at room temperature for a day. If the error occurs again, this means that the battery has been completely depth discharged and is defective. Remove the battery from the device. Never use or charge a defective battery.
Cleaning and maintenance
 HAZARD!
Always take the battery out of the equipment before starting any cleaning work.
Cleaning
- Keep all safety devices, air vents and the motor housing free of dirt and dust as far as possible. Wipe the equipment with a clean cloth or blow it down with compressed air at low pressure.
- We recommend cleaning the equipment immediately each time after use.
- Clean the equipment regularly with a damp cloth and some soft soap. Do not use cleaning agents or solvents; these may be aggressive to the plastic parts in the equipment. Ensure that no water can get into the interior of the equipment. The ingress of water into an electric power tool increases the risk of an electric shock.
- Use a brush to remove deposits from the safety guard.
Replacing the line spool
Remove the battery packs!
- Press the line spool housing together at the marked points and remove the spool cover.

- Take out the empty line spool and the pressure spring.
- Fig. 29 Thread the end of the line on the new line spool through the eyelet in the spool cover and allow approx. 5.1" (13 cm) of line to project. Insert the pressure spring (32) in the line spool.

- Press the spool cover back into the line spool housing.


Replacing the cutting line
Remove the battery packs!
- Fig. 28 Press the line spool housing together at the marked points and remove the spool cover.
- Take out the empty line spool and the pressure spring.
- Remove any remaining cutting line if there is any.
- Insert the new cutting line through the line mount inside the spool.

- Wind the line with tension in a counterclockwise direction.
- Hook the line, approx. 5.9" (15 cm) before the end of the line, into one of the line holders on the edge of the spool.

- Fig. 29 Thread the end of the line on the new line spool through the eyelet in the spool cover. Insert the pressure spring (32) in the line spool.
- Pull the line sharply to release it from the line holder.
- Press the spool cover back into the line spool housing.


When you start the equipment again the line will be cut to the perfect length automatically.
Bits of the nylon line could cause injury when flung out.
Sharpening the guard hood blade
The guard hood blade (Fig. 2/Item 14) can become blunt over time. When you notice this, undo the screw holding the guard hood blade on the guard hood. Clamp the blade in a vise. Sharpen the blade with a fl at file and make sure that the angle of the cutting edge is not altered in the process. File in one direction only.
Replacing the blade
For safety reasons, we recommend having the blade replaced by an authorized professional. Important! Wear work gloves! Only replace the blade with a genuine Einhell replacement blade, as this will ensure top performance and safety under all conditions.
Maintenance
There are no other parts inside the equipment which require maintenance.
Spare line spool Art. No.: 3405097
Spare cutting blade Art. No.: 3405093
Storage
Store the equipment and its accessories out of children's reach in a dark and dry place at above freezing temperature. The ideal storage temperature is between 50°F and 104°F (10°C and 40°C). Keep the electric tool in its original packaging.
The equipment has an integrated wall holder (Fig. 32/Item 33) to enable it to be hung on the wall.

- Always hold the equipment with one hand on the handle and the other hand on the additional handle. Do not carry the equipment by its motor housing.
- Secure the equipment against slipping if you transport it in a vehicle.
- As far as possible, use the original packaging for transporting the equipment.
- Use a transport guard for metal blades during transport and storage.
The reprinting or reproduction by any other means, in whole or in part, of documentation and papers accompanying the products is strictly subject to the express consent of Einhell Germany AG.
Subject to technical changes.
Documents / Resources
References
Download manual
Here you can download full pdf version of manual, it may contain additional safety instructions, warranty information, FCC rules, etc.
Advertisement


Need help?
Do you have a question about the AGILLO 18/200 and is the answer not in the manual?
Questions and answers