ALLEN & HEATH ZED-10FX, AH-ZED10FX Manual
- User manual (32 pages) ,
- User manual (32 pages) ,
- Technical document (4 pages)
Advertisement
- 1 PACKED ITEMS
- 2 INTRODUCTION TO THE ZED-10FX
- 3 SPECIFICATIONS
- 4 DIMENSIONS
- 5 BLOCK DIAGRAM SCHEMATIC
- 6 MONO INPUT CHANNEL 1 & 2
- 7 MONO INPUT CHANNEL 3 & 4
- 8 STEREO INPUT CHANNEL 1
- 9 STEREO INPUT CHANNEL 2
- 10 ZED-FX EFFECTS PROCESSOR
- 11 MASTER SECTION
- 12 CONNECTING TO A COMPUTER
- 13 APPLICATION DRAWING—LIVE MIXING
- 14 APPLICATION DRAWING—STUDIO RECORDING
- 15 WIRING INFORMATION
- 16 SAFETY INSTRUCTIONS
- 17 Documents / Resources
PACKED ITEMS
Check that you have received the following:

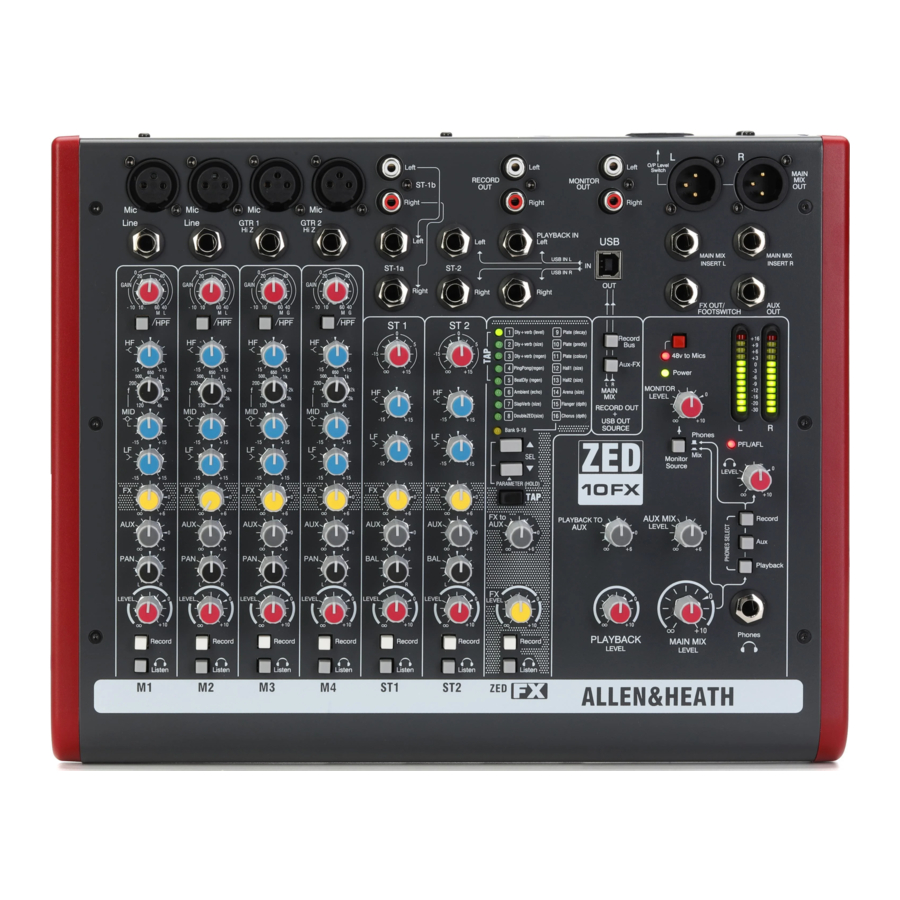
INTRODUCTION TO THE ZED-10FX
Background Overview:
The Allen & Heath ZED series mixers have been carefully and lovingly designed in the beautiful county of Cornwall in the UK and are manufactured alongside a wide range of professional audio mixing consoles to the same high standards. Many of the components used in ZED-10FX and ZED-10 are exactly the same as in the larger Allen & Heath products and the construction methods are also very similar — utilising individual vertically mounted channel circuit boards with each rotary control fixed with a metal nut to the front panel. This provides a very robust product that will resist damage and give years of reliable use. It also makes servicing much easier should it be required, with the ability to remove one particular channel from the mixer at a time. The vertical board construction method is unique in a product at this price point and puts the ZED-10FX and ZED-10 in a truly professional class of their own.
The audio circuitry is based on years of continual development and refinement, the performance of all the elements within the mixer is scrutinised and perfected to ensure the very best sound quality possible.
Multi-application:
ZED's are great for live mixing! Their layout makes them very easy to use and easy to achieve a great sound. They are also perfect for recording, either a live show or an audio project at home can be built up track by track using the USB digital audio interface. The flexibility and quality of these mixers make them stand out from the crowd. You can plug your guitars or instruments straight into the class A discrete FET high impedance inputs, cater for up to four microphones, two stereo sources with MP3 player compatibility, separate 2-track record outputs and a stereo playback input for 2-track replay or perhaps interval music from a CD player, XLR main stereo outputs with inserts, comprehensive monitoring with headphones and separate monitor speaker outputs, 48V microphone phantom power, DI level switching for sub mixing, and not least of all, the same digital effects algorithms as those used on our flagship digital consoles costing 150 times as much!
All this and the ability to withstand life being gigged night after night—there is nothing else like it at this price point.
ZED mixers are also ideal for teaching establishments, houses of worship, hotels and conference centres where their ease of use and robust qualities make them a top choice.
Mic/Line Pre-amps:
Based on the pre-amps from the MixWizard series, the ZED-10FX & ZED-10 pre-amps use low noise discrete transistor circuitry to achieve high gain (60dB max), low noise and good linearity.
GTR/Hi Z Inputs:
Specially designed for ZED-10FX and ZED-10, two ultra high impedance discrete class A FET
(Field Effect Transistor) inputs for plugging any kind of guitar or instrument straight in. A 26dB gain boost switch allows instruments with very low output pickups to be used, and the FET does a great job of approximating the valve/tube input circuitry commonly found on instrument combos or amplifiers.
EQ:
The ZED-10FX and ZED-10 mixers are equipped with a 3-band equaliser circuit on each mono input, with swept mid frequency section, and a 2-band EQ on the stereo channels. The frequency and response of each has been carefully chosen to give the maximum performance when using the EQ on a variety of sources.
Effects Processor:
Zed 10FX has a professional quality effects processor built in which uses our own effects algorithms developed by our talented engineering staff at Allen & Heath. The effects range from classic reverbs, cascaded delay plus reverbs to shimmering flanger & chorus effects. The different effects types are selected with a simple up/down button interface and the tempo of the delay settings can be set using the TAP button. Holding the TAP button allows the parameters of the effects to be adjusted. The audio signal to the DSP is converted using 24 bit high dynamic range converters running at 48kHz sample rate, ensuring low noise, low distortion, transparent effects.
Record Bus:
A separately switched stereo bus can be routed to from any channel creating a selective recording bus, monitoring bus or stereo clean feed output. You can even route just the effects processor output to this bus and use the mixer as a high end effects unit.
USB:
Getting audio to and from a computer easily is now a common requirement for live sound and music production. The way we have implemented this on ZED is super-flexible and super-easy! No longer do you need to fiddle around the back of your computer to get to the soundcard inputs, only to find that the levels are all wrong and noisy. Just plug in a USB lead to your ZED, select the USB routing on the mixer and the device on your computer and that's it! CD quality audio to and from your PC or MAC.
Internal power supply:
Not a "wall wart" - a proper built in power supply specifically designed and based on totally reliable technology.
SPECIFICATIONS
| Operating Levels | |
| Input | |
| Mono channel (XLR) Input | -10 to –60dBu for nominal (+11dBu in max) |
| Mono channel Line Input (Jack socket) | +10 to –40dBu (+31dBu maximum) |
| Stereo Input (Jack or phono sockets) | 0dBu nominal (control = Off to +15dB) |
| Output | |
| L/R Outputs ( XLR) Normal/DI out | 0dBu/-30dBu +21dBu/-9dBu maximum. |
| Aux & FX Outputs (Jack sockets) | 0dBu nominal. +21dBu maximum. |
| Record & Monitor Outputs (phono sockets) | 0dBu nominal. +21dBu maximum. |
| Frequency Response | |
| Mic in to Mix L/R Out, 30dB gain | +0.5/-1dB 10Hz to 30kHz. |
| Line in to Mix L/R out 0dB gain | +0.5/-1dB 10Hz to 25kHz |
| Stereo in to Mix L/R out | +0.5/-1dB 10Hz to 30kHz |
| THD+n | |
| Mic in to Mix L/R Out, 10dB gain 1kHz +10dBu out | 0.002% |
| Mic in to Mix L/R Out, 30dB gain 1kHz | 0.01% |
| Line in to Mix L/R out 0dB gain 0dBu 1kHz | 0.003% |
| Stereo in to Mix L/R out 0dB gain +10dBu 1kHz | 0.002% |
| Gtr Input to Mix L/R Out, 0dBu, Boost OUT | 0.015% |
| Gtr Input to Mix L/R Out, 0dBu, Boost IN | 2% Second Harmonic |
| Headroom | |
| Analogue Headroom from nominal (0Vu) | 21dB |
| USB in & out headroom from nominal (0Vu) | 14dB |
| Noise | |
| Mic Pre EIN @ max gain 150R input Z 22-22kHz | -127dBu |
| Mix L/R out, L/R faders = 0, Levels min, 22-22kHz | -96dBu |
| Mix L/R out, L/R faders = 0, Levels min, 22-22kHz | -96dBu |
| USB Audio CODEC (Coder/Decoder) | |
| USB Audio In/Out | USB 1.1 compliant 16bit. |
| Sample Rate | 32, 44.1, or 48kHz |
DIMENSIONS


| Weight | |
| ZED-10FX | |
| Unpacked | 3.3kg (7.3 lb) |
| Packed | 4.5kg (10 lb) |
BLOCK DIAGRAM SCHEMATIC

MONO INPUT CHANNEL 1 & 2


MONO INPUT CHANNEL 3 & 4

STEREO INPUT CHANNEL 1


STEREO INPUT CHANNEL 2

ZED-FX EFFECTS PROCESSOR

Effects Type List & Description.
There are 16 different effects presets in the ZED Effects Processor. Each is fed with a mono signal from the FX bus, and the output from the effects processor is in stereo.
Each preset has a parameter adjust control which is matched to the preset. This control may morph several parameters all at once, for example the parameter control for the Chorus effect will adjust not only the depth, but the response of the filters in software to create a more or less intense effect. In general, when adjusting the effect parameter, the more LED's that are illuminated, the more intense the effect or higher the parameter value.
To restore the parameter settings to the factory defaults, hold down both SEL buttons whilst switching on the power to your ZED.
Effects Type Table with description.
| Effect | Preset Name | Effect Description & Parameter adjustment. |
| 1 | Dly+verb(level) | Delay with Reverb. Delay feeds reverb (Classic Plate). TAP for delay time Min = 70mS Max = 1.35S, Adjust the level of reverb. |
| 2 | Dly+verb(size) | Delay with Reverb. Delay feeds reverb (Classic Plate). TAP for delay time Min = Min = 70mS Max = 1.35S, PARAMETER Adjusts the size of reverb. |
| 3 | Dly+verb(regen) | Delay with Reverb. Delay feeds reverb (Classic Plate). TAP for delay time Min = 70mS Max = 1.35S, PARAMETER adjusts the regeneration of the delay. |
| 4 | PingPong(regen) | Ping Pong delay (left then right) in parallel with Plate reverb. TAP for left delay time Min = 70mS Max = 1.35S, PARAMETER adjusts the delay regeneration. |
| 5 | BeatDly(regen) | As (4) but right delay is set for 1/4 beat of left. Good for off beat 4/4 delay sound. TAP for left delay time & PARAMETER adjusts the delay regeneration. |
| 6 | Ambient(echo) | Echo Delay with Reverb. PARAMETER adjusts the echo time. |
| 7 | SlapVerb(size) | Reverb with echo reflections creating classic slapback reverb sound. PARAMETER adjusts the slapback size (more slap echo). |
| 8 | DoubleZED(size) | Classic stereo doubler. PARAMETER adjusts delay and size. |
| 9 | Plate(decay) | Classic plate reverb. PARAMETER adjusts decay time. |
| 10 | Plate(predly) | Plate reverb with pre-delay. Good for vocals/percussion. PARAMETER adjusts pre-delay time (for increased intelligibility). |
| 11 | Plate(colour) | Classic plate reverb. PARAMETER adjusts tonal texture from dark to bright. |
| 12 | Hall1(size) | Smooth classic hall reverb. PARAMETER adjusts size of hall. |
| 13 | Hall2(size) | Brighter hall reverb. PARAMETER adjusts size of hall. |
| 14 | Arena(size) | Arena reverb. PARAMETER adjusts size of arena. |
| 15 | Flanger(dpth) | Classic flanger effect. PARAMETER adjusts depth and tonality. |
| 16 | Chorus(dpth) | Chorus effect. PARAMETER adjusts depth and tonality. |
MASTER SECTION


CONNECTING TO A COMPUTER

USB Audio Interface
The ZED is equipped with a stereo bi-directional USB 1.1 compliant audio CODEC. It is fully compliant with USB 2 ports and uses standard Windows and MAC Core Audio Drivers. In other words, plug it in and your computer will find it and be able to transfer audio to and from the ZED USB device.
You will need some form of audio software running on your computer to be able to store and play back what you record, but on a basic level, you can use your computers media player to play straight to the ZED device.

If there seems to be no audio transfer between the computer and your ZED, or the level is very low, please check the volume level setting of the Audio Device in your computers' operating system. This may need to be set to the Max position.
APPLICATION DRAWING—LIVE MIXING

APPLICATION DRAWING—STUDIO RECORDING

WIRING INFORMATION

General Wiring Information

See more products from ALLEN & HEATH at: www.allen-heath.com

Large Live Sound mixers — iLive digital, ML and GL Series
Small Format Live Sound mixers — ZED, MixWizards and PA Series
DJ products — Xone Series
Sound Management Series — iDR Series
Registering your product
We hope that you are happy with it and that you enjoy many years of faithful service with it.
Please go to www.allen-heath.com/register.asp and register your product's serial number and your details. By registering with us and becoming an official Registered User, you will ensure that any warranty claim you might make is actioned quickly and with the minimum delay.
Alternatively, you may either copy or cut off this section of the page, fill in the details, and return it by mail to:
Allen & Heath Ltd, Kernick Industrial Estate, Penryn, Cornwall TR10 9LU, UK
SAFETY INSTRUCTIONS

Read the following before proceeding :


This equipment must be earthed.
| Read instructions: | Retain these safety and operating instructions for future reference. Adhere to all warnings printed here and on the console. Follow the operating instructions printed in this User Guide. | |
| Do not remove cover: | Operate the console with its covers correctly fitted. | |
| Power sources: | Connect the console to a mains power unit only of the type described in this User Guide and marked on the rear panel. Use the power cord with sealed mains plug appropriate for your local mains supply as provided with the console. If the provided plug does not fit into your outlet consult your service agent for assistance. | |
| Power cord routing: | Route the power cord so that it is not likely to be walked on, stretched or pinched by items placed upon or against it. | |
| Grounding: | Do not defeat the grounding and polarisation means of the power cord plug. Do not remove or tamper with the ground connection in the power cord. | |
| Water and moisture: | To reduce the risk of fire or electric shock do not expose the console to rain or moisture or use it in damp or wet conditions. Do not place containers of liquids on it which might spill into any openings. | |
| Ventilation: | Do not obstruct the ventilation slots or position the console where the air flow required for ventilation is impeded. If the console is to be operated in a rack unit or flightcase ensure that it is constructed to allow adequate ventilation. | |
| Heat and vibration: | Do not locate the console in a place subject to excessive heat or direct sunlight as this could be a fire hazard. Locate the console away from any equipment which produces heat or causes excessive vibration. | |
| Servicing: | Switch off the equipment and unplug the power cord immediately if it is exposed to moisture, spilled liquid, objects fallen into the openings, the power cord or plug become damaged, during lightening storms, or if smoke, odour or noise is noticed. Refer servicing to qualified technical personnel only. | |
| Installation: | Install the console in accordance with the instructions printed in this User Guide. Do not connect the output of power amplifiers directly to the console. Use audio connectors and plugs only for their intended purpose. | |
Important Mains plug wiring instructions
The console is supplied with a moulded mains plug fitted to the AC mains power lead. Follow the instructions below if the mains plug has to be replaced. The wires in the mains lead are coloured in accordance with the following code:
| TERMINAL | WIRE COLOUR | ||
| European | USA/Canada | ||
| L | LIVE | BROWN | BLACK |
| N | NEUTRAL | BLUE | WHITE |
| E | EARTH GND | GREEN & YELLOW | GREEN |
The wire which is coloured Green and Yellow must be connected to the terminal in the plug which is marked with the letter E or with the Earth symbol. This appliance must be earthed. The wire which is coloured Blue must be connected to the terminal in the plug which is marked with the letter N.
The wire which is coloured Brown must be connected to the terminal in the plug which is marked with the letter L.
Ensure that these colour codes are followed carefully in the event of the plug being changed.
General Precautions:
| Damage: | To prevent damage to the controls and cosmetics avoid placing heavy objects on the control surface, scratching the surface with sharp objects, or rough handling and vibration. |
| Environment: | Protect from excessive dirt, dust, heat and vibration when operating and storing. Avoid tobacco ash, smoke, drinks spillage, and exposure to rain and moisture. If the console becomes wet, switch off and remove mains power immediately. Allow to dry out thoroughly before using again. |
| Cleaning: | Avoid the use of chemicals, abrasives or solvents. The control panel is best cleaned with a soft brush and dry lint-free cloth. The faders, switches and potentiometers are lubricated for life. The use of electrical lubricants on these parts is not recommended. The fader and potentiometer knobs may be removed for cleaning with a warm soapy solution. Rinse and allow to dry fully before refitting them. |
| Transporting: | Protect the controls from damage during transit. Use adequate packing if you need to ship the unit. |
Hearing: | To avoid damage to your hearing do not operate any sound system at excessively high volume. This applies particularly to close-to-ear monitoring such as headphones and in-ear systems. Continued exposure to high volume sound can cause frequency selective or wide range hearing loss. |
Documents / ResourcesDownload manual
Here you can download full pdf version of manual, it may contain additional safety instructions, warranty information, FCC rules, etc.
Advertisement


Need help?
Do you have a question about the ZED-10FX and is the answer not in the manual?
Questions and answers