Table of Contents
Advertisement
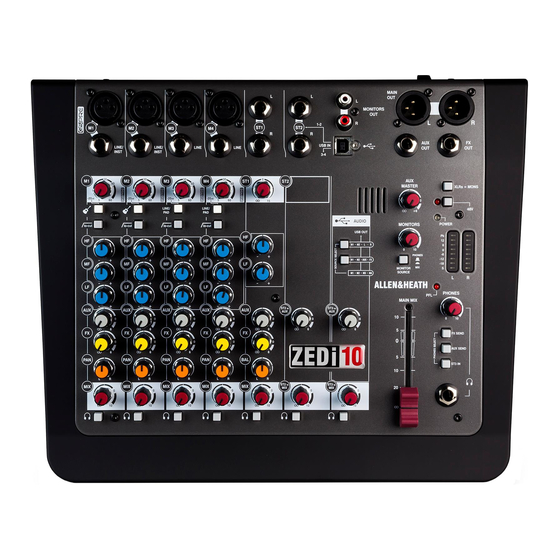
ZEDi-10 / ZEDi-10FX
10 Channel Live + Recording Mixer User Guide
Thank you for purchasing this Allen & Heath ZEDi-10 or ZEDi-10FX!
We recommend that you read all of this user guide to get the best from your mixer and after
reading, please keep this safe for future reference.
Included in this package is:
ZEDi-10 / ZEDi-10FX Mixer.
IEC C5 Mains Power Cable. Please check correct mains plug is fitted for your country.
USB A-B Cable 2M.
This User Guide!
Advertisement
Table of Contents

Related Manuals for ALLEN & HEATH ZEDi-10


Summary of Contents for ALLEN & HEATH ZEDi-10
- Page 1 ZEDi-10 / ZEDi-10FX 10 Channel Live + Recording Mixer User Guide Thank you for purchasing this Allen & Heath ZEDi-10 or ZEDi-10FX! We recommend that you read all of this user guide to get the best from your mixer and after reading, please keep this safe for future reference.
- Page 2 1. Get to know your mixer 1.1 MONO INPUT CHANNELS (M) Mic Input Socket uses a standard 3-Pin XLR socket for connecting dynamic or condenser microphones. Line / Inst Input Socket uses a standard 1/4” (6.25mm) Jack socket for connecting balanced or unbalanced signals such as guitars and other instruments.
- Page 3 1.2 STEREO INPUT CHANNELS (ST) ST1 and ST2 Inputs use standard 1/4” (6.25mm) Jack sockets for balanced or unbalanced line level stereo sources such as professional keyboards, drum machines and other pro audio equipment. ST2 includes USB IN 1-2 from the ZEDi USB interface. Plugging into the jacks will override the input from USB.
- Page 4 1.3 MASTER SECTION MAIN OUT L & R are line level outputs for the main stereo mix using standard XLR output connectors and are impedance balanced for rejection of unwanted interference. AUX OUT is a line level output from the AUX buss and uses a standard 1/4”(6.25mm) jack socket.
- Page 5 2. ZED FX Multi Model Processor (ZEDi-10FX only) 2.1 EFFECTS SECTION Effects such as reverb and delay are generally used to add “natural sounding” acoustics and a sense of space to the mix, but can also be used to add interesting repetitions in time with the music.
- Page 6 3. ZEDi USB Audio Interface 3.1 USB AUDIO INTERFACE A built-in 4 in, 4 out, 24-bit/96kHz USB Audio Interface allows for studio-quality recording direct from your mixer to your PC without the need of any additional equipment. This is class-compliant (plug-and-play) for Mac and iOS devices. (iOS devices require a camera connection kit).
-
Page 7: Connecting Microphones
4. Good Practice 4.1 “Zeroing” It’s good practice to “zero” your mixer and turn down relevant channels before connecting any devices as this prevents potential damage to speakers or other equipment. Follow these steps to make sure you’re safe and you avoid thumps and bangs when plugging equipment in. -
Page 8: Gain Structure
6. Get the best sound 6.1 Gain Structure Once you’ve connected your instruments and equipment you will need to set input levels before you can mix the signals together. Gain structure is important to get the maximum signal level, whilst maintaining headroom and without undesired distortion. - Page 9 6.3 Balancing the Mix Once you have set input gain levels and applied EQ to source signals, you can start to mix all of your channels to the outputs. Consider the importance of each instrument and how they should be heard in the mix.
- Page 10 7. Application examples Live...
- Page 11 Studio...
-
Page 12: Additional Information
8. Important Safety Precautions Water and moisture: Do not expose the mixer to rain or moisture or use it in damp or wet conditions. Do not place containers of liquids on it which might spill into any openings. Ventilation: Do not obstruct the ventilation slots or position the mixer where the air flow required for ventilation is impeded. If the mixer is to be placed in a rack unit or flight case ensure that it is well ventilated.
Need help?
Do you have a question about the ZEDi-10 and is the answer not in the manual?
Questions and answers