dji Ronin Manual
- User manual (71 pages) ,
- User manual (36 pages) ,
- User manual (8 pages)
Advertisement
Download DJI Ronin Assistant App
Download and install the DJI Ronin Assistant App.

Search "DJI Assistant" on the App Store and then follow the instructions for iOS installation.

iOS6.1 or above
Introduction
The DJI Ronin is the culmination of years of stabilization experience built into our most advanced camera stabilization platform to date. The technology built into the DJI Ronin allows a broad spectrum of cameras varying in size and weight to be mounted for class leading stabilization. We've put years of passion and excitement into the Ronin, bringing world-class movement translation and stability to the professional cinematographer's market.
A brushless gimbal stabilization system is not simply three brushless motors moving on three axes. The motors work with position feedback and the IMU (Inertial Measurement Unit) to communicate with our custom 32-bit processor, which processes movement calculations in milliseconds. This equates to control and stability accuracy down to 0.02 degrees of translated movement, meaning your images are going to be perfectly still in all three axes of movement. There are three operation modes in the Ronin: underslung mode, upright mode and briefcase mode.
Package & Instruction Sheet
Air pressure may be built up during air transportation or during extreme barometric pressure changes. Loosen the pressure valve knob on the side of the case prior to transportation in these circumstances to prevent pressure build up.

Below is the layout of the items inside the case. Not every item in this sheet is provided by DJI. There are pre-cut slots for some additional accessories. For more information regarding what's included, please refer to the "In the box" section of this manual.

In the box


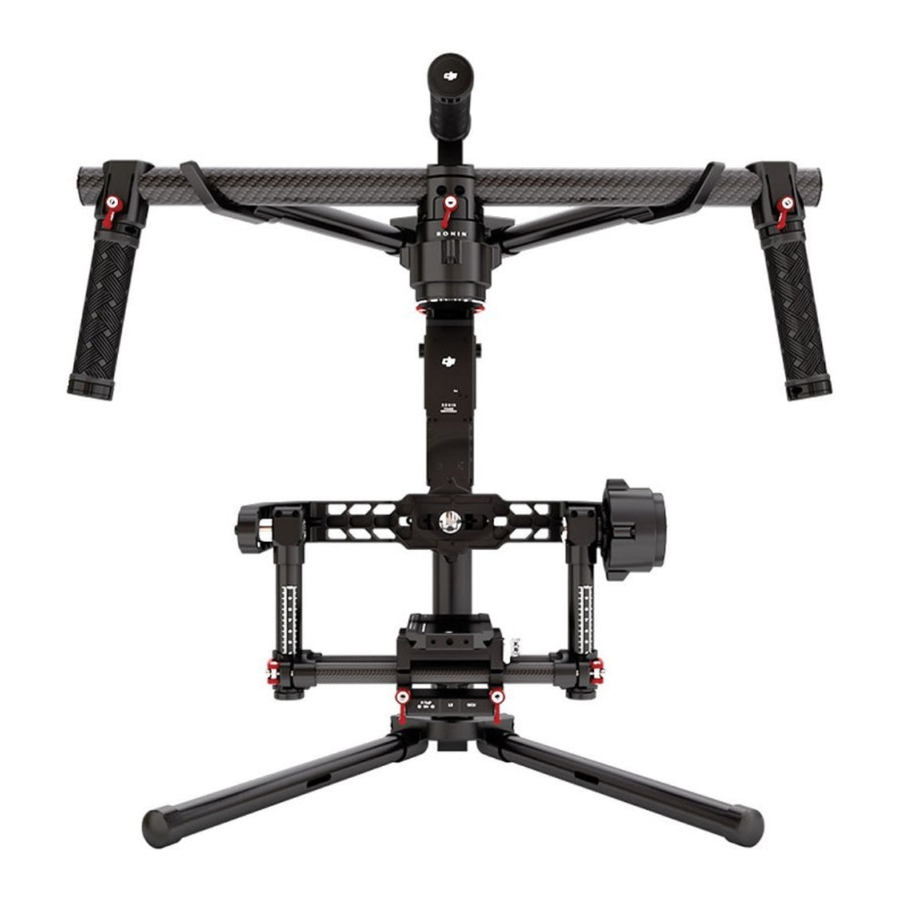
Gimbal Description

- Top Handle Bar
- Side Handle
- Quick Release Mount
- Pan Motor
- Pan Adjustment Slider
- D-BUS/PPM Receiver Port
- USB port & Can Bus Port
- Bind Button
- Gimbal LED Indicator light
- Smart Battery
- Roll Motor
- Tilt Motor
- Fore and Aft Adjustment
- Tilt Vertical Adjustment
- Roll Adjustment
- IMU
- P-TAP Accessory Power Port
- USB Accessory Power Port
- P-TAP Port (rear side)
- DJI Lightbridge Port (rear side)
- GCU (rear side)
Getting Started
Smart Battery
Before you start using your Ronin, be sure to charge the battery first. The smart battery is specially designed for the Ronin. It has a battery capacity of 3400mAh, voltage of 14.8V, and power management functionality. Charge the smart battery only with DJI approved chargers. When the battery is fully charged, it has a maximum run time of 4 hours.

DJI Smart Battery Functions
| Balance Charging | Automatically balances the voltage of each battery cell during charging. |
| Capacity Display | Displays current battery levels. |
| Overcharge Protection | Charging stops automatically when the battery voltage reaches 16.8V to prevent overcharge damage. |
| Over Discharge Protection | Discharging stops automatically when battery voltage reaches 12V to prevent over discharge damage. |
| Short Circuit Protection | Automatically cuts power supply when a short circuit is detected. |
| Sleep Protection | Sleep mode is activated after 10 minutes of inactivity to save power. |
| Charging Temperature Detection | The battery will charge only when the temperature is between 0°C and 55°C. |
Battery Specifications
| Type | LiPo |
| Capacity | 14.8V, 3400mAh |
| Charging Environment Temperature | 0°C ~ 45°C |
| Operating Environment Temperature | -15°C ~ 50°C |
| Charging/Discharging Environment Relative Humidity | <80% |

- Read the user manual, disclaimer, and battery warnings before use. Users take full responsibility for all operations and usage.
- Always use DJI approved chargers. DJI takes no responsibility for any use of non-DJI approved chargers.
Charging the Smart Battery
- Connect the charger to a wall socket (100-240V, 50/60Hz), using the plug set if necessary.
- Connect the battery to the charger.
- The battery level indicator lights display current capacity level as the battery charges.
- The battery is fully charged when the battery level indicator lights shut off and the indicator light on the charger turns green. Disconnect the battery from the charger when charging is completed.


Using the Smart Battery

[1] [2] [3] [4] LED indicator lights
[5] Power Button (with one LED battery power indicator.)
[6] Thumb Screws
Checking the battery level: When the battery is powered off, pressing the battery power button once will display the current battery level.
Powering on: When the battery is powered off, press and hold for 1 second to turn on the smart battery.
Powering off: When the battery is powered on, press and hold for 1 second to turn off the smart battery.
Description of the Smart Battery Level Indicators
The battery level indicators show the current battery level during both the charging and discharging process. The following is a description of the indicators.
![]() : The LED is in a solid state on
: The LED is in a solid state on
![]() :The LED is blinking
:The LED is blinking
![]() : The LED is off
: The LED is off
Discharging process

Tuning Stand
You can use the tuning stand during setup or for storage of the gimbal. The following steps show how to use the tuning stand.

- Put the stand in the upright position as shown in the picture below.
- Put your thumb on the silver button [1]. Using your index and middle finger behind the arm, pull the lower legs outward away from the stand, and then pull downward. Then pull the upper arms outward and upward.
- The upper half of this tuning stand can be removed by loosening the knob [3]. You can use it with any C-stand style stud that fits the hole [4]. When mounting on to a C-stand, be sure to check the balance of the stand so as to not have the Ronin with a camera tilt over. When setting on a table, make sure the table is a flat and even surface.
Installing the Handle Bar onto the Gimbal
- The turn knobs on the handles are loose by default. Adjust the grips to the desired position and tighten the screws to secure their position.
- Place the handle bar in the position as shown below.

- Push the lock [1 ]downward on the pan motor, and slide the handle bar into the gimbal. Then tighten the lock-knob [2].
- With your hands on the handles, be sure the gimbal is not obstructed during a 360 degree pan.
Installation is complete.


Smart Battery Installation
- Loosen the thumb screws on either side of the battery. Slide the battery directly into the gimbal and then slide down. Be sure the battery's thumb screws go down into their locating slots making full contact with the gimbal's electrical leads.
- Tighten the thumb screws on the battery to lock it in place.


- Make sure the battery is powered off during the installation.
- An incorrectly installed battery may lead to (1) Poor battery connection, or (2) Unavailable battery information.
Mounting the Camera
The Ronin uses an adjustable camera mounting plate to allow you to easily balance, install and remove your camera. The Ronin has been tested with the following types of cameras. Other cameras similar in size and weight may also work.
| Black Magic Cinema Camera | Canon 6D | Nikon D800 |
| Black Magic Pocket Cinema Camera | Canon 7D | Panasonic GH3 |
| Canon 1Dc | Canon C100 | Panasonic GH4 |
| Canon 5DMKII | Canon C300 | RED Epic/Scarlet |
| Canon 5DMKIII | Canon C500 | Sony NEX7 |
- Camera Size Requirements: the maximum depth from the center of gravity on the camera base plate is 140mm; the maximum height measured from the top of the camera base plate is 225mm; and the maximum width is 195mm.
- To avoid obstructing camera movement, the use of soft connection cables is recommended.
- Attach the camera mounting plate to your camera using the provided screws. Choose the correct 1/4" or 3/8" screws. Some cameras have two tripod mounting holes. It's best to secure the camera as tightly as possible. If two mounting holes are available on your camera, then use both mounting holes. Choose the right screw holes according to your camera's configuration.
- Install the extension rod holder and lens support. Gently push up to apply a little pressure to the lens, then tighten the thumbscrew.


 Why do you need to use a lens support?
Certain cameras have a very tight lens securing system, and some cameras like the Canon 5D MKII and MKIII have very loose lens securing systems. The Ronin balances the camera as one solid unit. If the mounted camera has a loose camera securing system, the lens support must be used. This is because if a loose connection between the lens and the camera body is apparent, vibrations could travel through to the camera but not directly to the lens, resulting in the two masses shaking at different frequencies. The resulting oscillation will translate to the IMU, causing the whole gimbal to shake. If the lens support fits, it's best to use it at all times.
- The lens support can be installed either facing outward or inward to accommodate different lens types.
- Ensure alignment of the camera plate and then tighten the screw prior to tightening the lens support.
- If using follow focus or other accessories, insert the extension rod into the extension rod holder and tighten. Configure the length of the rods needs to accomodate for the length of the lens used.

- With the gimbal on the tuning stand facing outward, insert the camera until the safety lock is engaged. Make sure the gimbal is not turned on when balancing the camera.
- Tighten the camera base side clamp. You can adjust the tightness of the side clamp with the M3allen wrench.


Documents / Resources
References
Download manual
Here you can download full pdf version of manual, it may contain additional safety instructions, warranty information, FCC rules, etc.
Advertisement


Need help?
Do you have a question about the Ronin and is the answer not in the manual?
Questions and answers