Table of Contents
Advertisement
Quick Links
Advertisement
Table of Contents

Related Manuals for Axis S2216 Mk II


Summary of Contents for Axis S2216 Mk II
- Page 1 AXIS Camera Station S2216 Mk II Appliance User manual...
-
Page 2: Table Of Contents
Log in to the server ..........Configure AXIS Camera Station Pro ....... . . -
Page 3: Get Started
3. Initial Axis recorder setup: After the initial Windows® setup, AXIS Recorder Toolbox is opened and you are guided through a few steps to set up basic and necessary settings, for example, computer name, date and time, and network. See . -
Page 4: Install Your Device
The built-in switch’s DHCP server is enabled by default. As soon as you plug the cameras into the PoE ports, the cameras will power on and obtain an IP address and be accessible via AXIS Camera Station Pro. - Page 5 Note When you use an additional recorder, for example, the AXIS S30 Recorders, the appliance does not route network data from the surveillance network to the server network for recording. Make sure that the AXIS S30 Recorders are connected to the same network as the cameras.
- Page 6 AXIS Camera Station S2216 Mk II Appliance Install your device IP: xxx.xxx.xx.xxx SWITCH SERVER RESET UPLINK SERVER RESET SWITCH UPLINK HDMI HDMI IP: xxx.xxx.xx.xxx IP: xx.xx.x.x Difficulty level Advanced Benefits Cameras are accessible from the corporate network and can be monitored with an SNMP server.
-
Page 7: Configure Your Device
Log in to the server Using the AXIS Camera Station Pro client, you can connect to multiple servers or a single server installed on the local computer or somewhere else on the network. You can connect to AXIS Camera Station Pro servers in different ways: Last used servers - Connect to the servers used in the previous session. -
Page 8: Configure Axis Camera Station Pro
• When trying to connect to a server using Axis Secure Remote Access, the server can’t upgrade the client automatically. • If the proxy server is between the network device and the AXIS Camera Station S2216 Mk II Appliance server, you must configure the proxy settings in Windows on the AXIS Camera Station S2216 Mk II Appliance server to access the server using AXIS Secure Remote Access. - Page 9 Start the video management system Double-click the AXIS Camera Station Pro client icon to start the client. When you start the client for the first time, it attempts to log in to the AXIS Camera Station Pro server installed on the same computer as the client.
-
Page 10: Network Configuration
See Signed video and the camera’s user manual for more information. Network configuration Configure proxy or firewall settings before using AXIS Camera Station Pro if the AXIS Camera Station Pro client, AXIS Camera Station Pro server, and the connected network devices are on different networks. Client proxy settings If the proxy server is between the client and the server, you must configure the proxy settings in Windows on the client computer. -
Page 11: License A System Online
AXIS Camera Station Pro server uses ports 55752 (HTTP), 55754 (TCP), 55756 (mobile communication), and 55757 (mobile streaming) for communication between the server and the client. You can change the ports in AXIS Camera Station Service Control if required. Security considerations To prevent unauthorized access to cameras and recordings, keep the following in mind: •... - Page 12 AXIS Camera Station S2216 Mk II Appliance Configure your device 6. Go back to the AXIS Camera Station S2216 Mk II Appliance client. 7. Click Import license file... and select your license file. 8. Click Go to AXIS License Manager to manage your licenses there.
-
Page 13: Manage Windows® User Accounts
AXIS Camera Station S2216 Mk II Appliance Manage Windows® user accounts Manage Windows® user accounts Create a user account To help keep your personal data and information more secure, we recommend that you add a password for each local account. -
Page 14: Change A User Account's Password
AXIS Camera Station S2216 Mk II Appliance Manage Windows® user accounts 1. Go to Settings > Accounts > Other people. 2. Go to the account you want to remove and click Remove. Change a user account's password 1. Log in with an administrator account. -
Page 15: Manage Axis Camera Station Pro User Accounts
Add users or groups Microsoft Windows® and Active Directory users and groups can access AXIS Camera Station S2216 Mk II Appliance. To add a user to AXIS Camera Station S2216 Mk II Appliance, you must add users or a group to Windows®. -
Page 16: User Or Group Privileges
Operator - Select cameras, views, and I/O ports to get access to live and recorded. An operator has full access to all functionality of AXIS Camera Station S2216 Mk II Appliance except system configuration. Viewer - Access to live video of selected cameras, I/O ports, and views. A viewer doesn’t have access to recorded video or system configuration. - Page 17 The following access privileges are available for users or groups with the Operator or Viewer role. You can select multiple views and set the access privileges. Access Allow access to the views in AXIS Camera Station S2216 Mk II Appliance. Edit Allow to edit the views in AXIS Camera Station S2216 Mk II Appliance.
- Page 18 AXIS Camera Station S2216 Mk II Appliance Manage AXIS Camera Station Pro user accounts Configuration of system health monitoring Allow configuration of the system health monitoring system. Access to system health monitoring Allow access to the system health monitoring system.
-
Page 19: Manage Your Device
AXIS Camera Station S2216 Mk II Appliance Manage your device Manage your device Update Windows® Windows® periodically checks for updates. When an update is available, your device automatically downloads the update but you've to install it manually. Note Recording will be interrupted during a scheduled system restart. -
Page 20: Add Additional Storage
The demand for storage can differ. Retention time of stored data or for storing high-resolution recordings often results in a need to install more storage. This section explains how to install an additional hard drive in your AXIS S22 series product. -
Page 21: Create Raid Volume
2.6 Select which devices you want to transfer recording data to the new drive. 2.7 In the Store to drop-down list, select the new drive and click Apply. For more information about storage management, see Axis Camera Station Pro — User manual. Create RAID volume For instructions on how to create RAID volume, please see the online version of this user manual. -
Page 22: Manage The Built-In Switch
Manage the built-in switch About the built-in switch The AXIS Camera Station S22 Mk II Appliance Series comes with an integrated Power over Ethernet (PoE) switch. You can configure and manage the built-in switch. The purpose of the switch is to segregate traffic on the network so that security cameras and related traffic managed by the switch (PoE and the switch uplink ports) are not shared with other networks. -
Page 23: Power Management
LLDP-MED: The switch communicates with the connected device and dynamically allocates PoE power as needed. Note The LLDP-MED power allocation method only works for cameras with AXIS OS 9.20 or later. To change the power allocation method: 1. In the switch’s power management page, go to Power management. - Page 24 AXIS Camera Station S2216 Mk II Appliance Manage the built-in switch 3. If you have selected Manual, you can change the power allocated to the connected device in the Power allocated column. 4. If you want to change the priority of the connected device, select a priority for that device. The priority of other devices will change automatically.
-
Page 25: Network Overview
AXIS Camera Station S2216 Mk II Appliance Manage the built-in switch The power requested is manually adjusted to 20 W for PoE class 4 devices. The switch can power 5 PoE class 4 devices and 3 PoE class 2 devices. The total power requested is (5 x 20) + (3 x 7) = 121 W. The actual power consumed is (5 x 15) + (3 x 5) = 90 W. In this way, all connected devices are guaranteed enough power and the priority is less important. -
Page 26: Settings
AXIS Camera Station S2216 Mk II Appliance Manage the built-in switch In the Lock column, click to lock the specific port. Unlock a MAC address from a port 1. In the menu bar, click Network overview. In the Lock column, click to unlock the specific port. -
Page 27: Configure Snmp
AXIS Camera Station S2216 Mk II Appliance Manage the built-in switch 3. Enter the start IP address, end IP address, subnet mask, gateway, primary DNS, secondary DNS, lease length, and domain name. 4. Click Save. Configure SNMP 1. In the menu bar, go to Settings > SNMP. -
Page 28: Manage Certificates
AXIS Camera Station S2216 Mk II Appliance Manage the built-in switch 2. Drag and drop the backup file or click Browse and navigate to the backup file. 3. Click Upload. It can take a few minutes to restore the switch from the backup file. Once the settings are restored, the switch will automatically reboot, and you will need to log in again. -
Page 29: Logs
AXIS Camera Station S2216 Mk II Appliance Manage the built-in switch Logs In the menu bar, click Logs to see a list of logs. Click the column title to sort in alphabetical order. Item Description Time The date and time the log event occurred. -
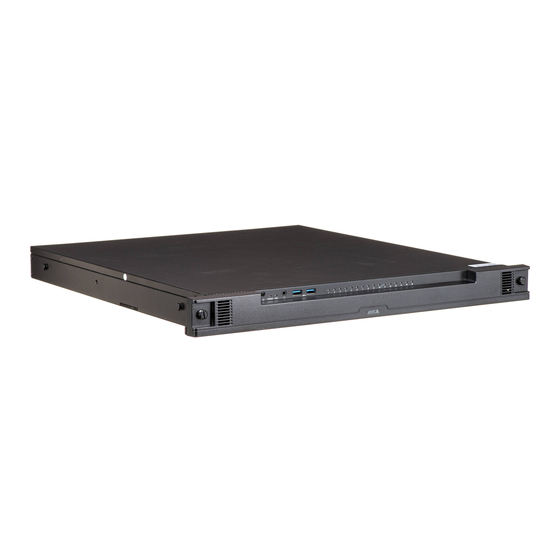
Page 30: Specifications
AXIS Camera Station S2216 Mk II Appliance Specifications Specifications Product overview Front and rear Power connector Switch reset button 1 GbE Ethernet port — Server uplink 1 GbE PoE Ethernet ports 1 GbE Ethernet port — Switch uplink (SFP) 1 GbE Ethernet port — Switch uplink (RJ45) Server reset button USB 2.0 ports... -
Page 31: Led Indicators
AXIS Camera Station S2216 Mk II Appliance Specifications 17 Hard drive status LED LED indicators Front LEDs Power button Power LED Indication Not pressed PC and switch are off Amber PC is on and switch is off Blinks amber PC is on and switch is booting... -
Page 32: Troubleshooting
Writing data to the USB drive takes approximately 10 to 15 min. Don’t remove the USB drive until the process is complete. 4. After the AXIS Network Video Recorder Recovery: ISO to USB Tool is complete, take the USB drive and plug it into your device. -
Page 33: Troubleshoot Axis Camera Station Pro
The recovery takes roughly 10 to 15 min to complete. You find detailed instructions in the download for the recovery kit. Troubleshoot AXIS Camera Station Pro For information about how to troubleshoot AXIS Camera Station Pro, go to the AXIS Camera Station Pro user manual. -
Page 34: Need More Help
Need more help? Useful links • AXIS Camera Station Pro user manual • Sign in to AXIS Secure Remote Access • What to include in an Antivirus allowlist for AXIS Camera Station Contact support If you need more help, go to axis.com/support. - Page 35 User manual Ver. M3.6 AXIS Camera Station S2216 Mk II Appliance Date: December 2024 © Axis Communications AB, 2024 Part no. T10207038...
Need help?
Do you have a question about the S2216 Mk II and is the answer not in the manual?
Questions and answers