Advertisement
Quick Links
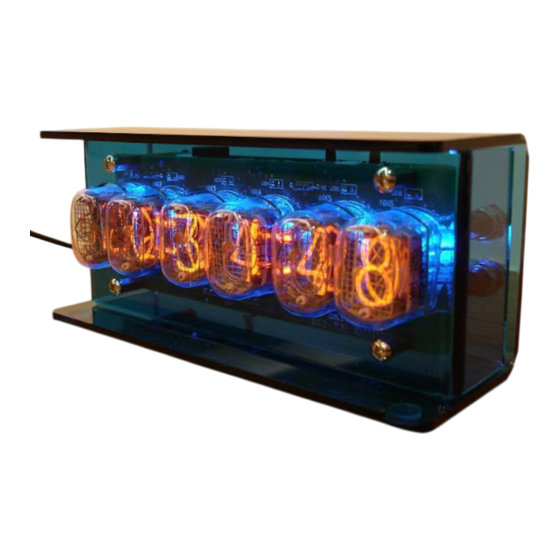
6-digit IN12 Nixie tube clock manual
1. Nixie tube installation:
Supports IN-12a or IN-12b Nixie tube, just plug it into the correct jack and plug it into
the socket. It is necessary to pay attention to whether the up and down directions are
correct. The lamp can be distinguished by observing the metal numbers inside, among
which the number "3" is the most obvious. The base has the buttons on top.
2. Set operation:
The clock base has the time set by default, just plug in the Nixie tube. If you need to set it up,
you can use the remote control or the buttons under the clock.
How to use the remote control: (Please skip the remote control part for the
basic version)
Press the SET key to enter the setting state. The year will flash (the first item in the table).
Press the plus and minus keys to adjust the year. After adjusting the year, press the right
arrow key to enter the next month setting. The month will flash. Press the plus key. Use the
minus key to adjust the month, and so on for the others. When you reach the last item of
settings, press the right arrow key to exit the setting, or press SET at any time to exit the
setting directly. In the non-setting state, pressing the LED button will switch the backlight
(the colored light under the Nixie tube), and press the following cycle to switch:
red>yellow>green>cyan>blue>purple>white>off>simultaneous gradient>rainbow gradient.
How to use the buttons under the clock:
After pressing and holding the SET button for a few seconds, the year will flash and display,
indicating that it has entered the setting state. Release the SET key and press "+" or "-" key
to adjust the value, press the SET key to enter the next item. Press the power key at any time
Print on both sides
Advertisement

Related Manuals for Nixie Clock IN-12a


Summary of Contents for Nixie Clock IN-12a
- Page 1 6-digit IN12 Nixie tube clock manual 1. Nixie tube installation: Supports IN-12a or IN-12b Nixie tube, just plug it into the correct jack and plug it into the socket. It is necessary to pay attention to whether the up and down directions are correct.
- Page 2 to exit the setting state directly. In the non-setting state, press the TEST key to light up all the numbers for testing the Nixie tube. In the non-setting state In the status, press the "+" key to switch the display mode in the following cycle: year>month, day, week>hour, minute and second.
- Page 3 Power supply specifications: USB5V power supply, it can be powered by mobile phone charger, computer or TV USB port, power bank, etc. with USB port. Current requirement is 2A. 1A can't afford Size: 160x38mm, height 45mm Print on both sides...
Need help?
Do you have a question about the IN-12a and is the answer not in the manual?
Questions and answers