
Related Manuals for Makita GNU01


Summary of Contents for Makita GNU01
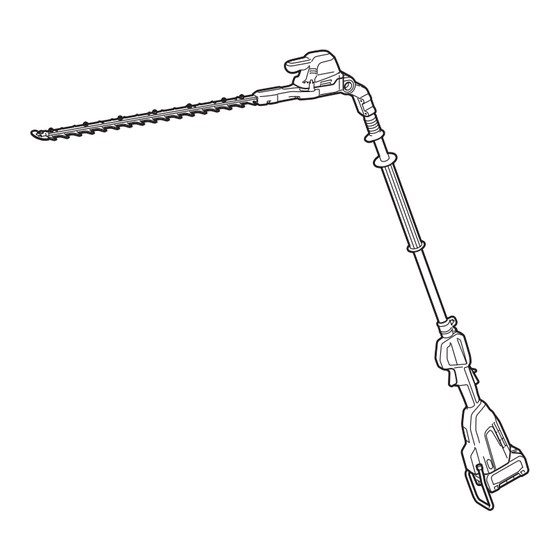
- Page 1 INSTRUCTION MANUAL MANUAL DE INSTRUCCIONES Cordless Pole Hedge Trimmer Cortasetos de Extensión Inalámbrico GNU01 IMPORTANT: Read Before Using. IMPORTANTE: Lea antes de usar.
-
Page 2: Specifications
ENGLISH (Original instructions) SPECIFICATIONS Model: GNU01 Blade length 600 mm (23-5/8") Strokes per minute 2,000 / 3,000 / 4,000 /min Cutting blade angle 115° (up 45°, down 70°) Overall length 2,268 mm (89-1/2") Rated voltage D.C. 36 V - 40 V max Net weight 4.7 - 5.9 kg (10.4 - 13.0 lbs) - Page 3 When operating a power tool outdoors, use an rate for which it was designed. extension cord suitable for outdoor use. Use of Do not use the power tool if the switch does a cord suitable for outdoor use reduces the risk of not turn it on and off. Any power tool that cannot electric shock.
-
Page 4: Additional Safety Warnings
Do not expose a battery pack or tool to fire or Cordless pole hedge trimmer safety warnings: excessive temperature. Exposure to fire or tem- Always use head protection when operating perature above 130 °C may cause explosion. the pole hedge trimmer overhead. Falling debris Follow all charging instructions and do not can result in serious personal injury. - Page 5 16. Immediately switch off the motor and remove 33. Avoid unintentional starting. Do not carry the the battery cartridge if the cutter should come tool when the battery cartridge is installed into contact with a fence or other hard object. and with finger on the switch.
- Page 6 Follow your local regulations relating to direct current disposal of battery. 12. Use the batteries only with the products specified by Makita. Installing the batteries to no load speed non-compliant products may result in a fire, exces- sive heat, explosion, or leak of electrolyte. revolutions or reciprocation per minute 13.
-
Page 7: Parts Description
Charge the battery cartridge before completely CAUTION: Only use genuine Makita batteries. discharged. Always stop tool operation and Use of non-genuine Makita batteries, or batteries that charge the battery cartridge when you notice have been altered, may result in the battery bursting less tool power. causing fires, personal injury and damage. It will... -
Page 8: Functional Description
Indicating the remaining battery FUNCTIONAL capacity DESCRIPTION Press the check button on the battery cartridge to indi- cate the remaining battery capacity. The indicator lamps CAUTION: Always be sure that the tool is light up for a few seconds. switched off and the battery cartridge is removed before adjusting or checking function on the tool. Installing or removing battery cartridge CAUTION: Always switch off the tool before... -
Page 9: Overload Protection
Turn the tool off, and then turn it on again to restart. Charge the battery(ies) or replace it/them with recharged battery(ies). Let the machine and battery(ies) cool down. If no improvement can be found by restoring protection system, then contact your local Makita Service Center. Power switch action WARNING: For your safety, this tool is Fig.4 equipped with lock-off switch which prevents the tool from unintended starting. NEVER use the tool ► 1 . Caution lamp if it runs when you simply pull the switch lever without pressing the lock-off lever. - Page 10 Speed adjusting NOTE: The caution lamp blinks in green if the switch lever is pulled under unoperatable conditions as follows: You can adjust the tool speed by pressing the main power button. Each time you press the main power • Turning on the main power switch while holding button, the level of speed changes. down the lock-off lever and the switch lever. • Pulling the switch lever with the lock-off lever being held down while folding the tool head.
-
Page 11: Adjusting The Cutting Angle
When folding the head, be careful tool consistently fails to stop the shear blades not to pinch your fingers between the head and quickly after the switch lever is released, have the the slide sleeve. tool serviced at Makita Authorized Service Center. • Accidental re-start preventive function The angle of the head can be adjusted in 6 steps at When you turn on the tool while pulling the switch between 45° upward and 70° downward. To change the lever, the tool does not start and the caution lamp angle of the head, follow the steps below. - Page 12 Use a slotted screwdriver to pry the cover open if you NOTE: Before installing or removing the shear find it hard to open the cover. blades, unfold the head of the tool so that the head is straight to the tool body. Insert the slotted screwdriver into one or more of the opening and cutouts on the tool housing, and then lift Place the tool upside down, and then remove the the cover out of the housing.
- Page 13 Remove the 2 bolts and the 2 sleeves from the Adjust the crank so that 2 holes are lined up on shear blades. Disassemble the shear blades from the the alignment line. tool body. Then detach the felt pad and the rubber dust seal from the shear blades. Fig.17 ► 1 . Holes 2. Alignment line Align the protruding parts on both sides of the shear blades.
- Page 14 Turn the shear blades upside down. Attach the Place new sleeves into the sleeve holes in the rubber dust seal to the shear blades. Adjust its position shear blades. so the one end of the dust seal touches with the pro- truding part of the shear blades. Fig.22 ► 1 . Sleeve 2. Sleeve hole NOTICE: Be careful not to lose the sleeves.
- Page 15 Install the shear blades again. NOTICE: If the parts other than the shear blades such as the connecting rods are worn out, ask Makita Authorized Service Centers for parts replacement or repairs. Installing or removing the chip Fig.28 receiver ► 1 .
-
Page 16: Operation
Makita. If you put on the shoulder harness included in the tool package and the shoulder harness of the back-... -
Page 17: Operating The Tool
The shoulder harness features a means of quick NOTICE: Do not attempt to cut branches thicker release. than 10 mm (3/8") in diameter with the tool. Cut Simply squeeze the sides of the buckle to release the branches to 10 cm (4") lower than the cutting height tool from the shoulder harness. using branch cutters before using the tool. -
Page 18: Maintenance
Assembling or adjusting the tool in an upright position may result in serious injury. Fig.42 Fig.39 To maintain product SAFETY and RELIABILITY, repairs, any other maintenance or adjustment should When trimming to make a round shape (trimming box- be performed by Makita Authorized or Factory Service wood or rhododendron, etc.), trim from the root to the Centers, always using Makita replacement parts. top for a beautiful finish. Cleaning the tool Clean the tool by wiping off dust with a dry cloth or one dipped in soapy water and wrung out. NOTICE: Never use gasoline, benzine, thinner, alcohol or the like. - Page 19 After operation, remove dust from both sides of the Remove the screw, and then remove the branch shear blades with a wire brush, wipe it off with a cloth catcher. and then apply low-viscosity oil (machine oil, or spray- type lubricating oil) to the shear blades. Fig.45 ► 1 . Screw 2. Branch catcher Fig.43 Set the angle of a file to 50°, and grind the upper NOTICE: Do not wash the shear blades in water. blade with the file in exactly the three edge directions.
-
Page 20: Grease Lubrication
Using grease nipple Grease lubrication The nipple connector helps to connect a grease gun Interval of lubrication: Every 50 operating hours with a positive fit. Prepare a grease gun for use. Using oil hole for lubrication Connect the adapter of the grease gun to the Remove the bolt from the hole for lubrication. grease nipple on the tool. -
Page 21: Troubleshooting
If annexed warranty sheet is not available, refer to the CAUTION: warranty details set forth at below website for your These accessories or attachments respective country. are recommended for use with your Makita tool specified in this manual. The use of any other United States of America: www.makitatools.com accessories or attachments might present a risk of Canada: www.makita.ca injury to persons. Only use accessory or attachment Other countries: www.makita.com for its stated purpose. -
Page 22: Especificaciones
ESPAÑOL (Instrucciones originales) ESPECIFICACIONES Modelo: GNU01 Longitud de la cuchilla 600 mm (23-5/8″) Carreras por minuto 2 000 cpm / 3 000 cpm / 4 000 cpm Ángulo de la cuchilla de corte 115° (hacia arriba 45°, hacia abajo 70°) Longitud total 2 268 mm (89-1/2″) Tensión nominal 36 V - 40 V c.c. máx. - Page 23 distracciones le pueden hacer perder el control. así como al levantar o cargar la herramienta. Cargar las herramientas eléctricas con su dedo Seguridad eléctrica en el interruptor o enchufarlas con el interrup- Las clavijas de conexión de las herramientas tor encendido hace que los accidentes sean eléctricas deberán encajar perfectamente en la comunes.
- Page 24 de personas que no saben operarlas. 130 °C podría causar una explosión. Dé mantenimiento a las herramientas eléctri- Siga todas las instrucciones para la carga y cas y los accesorios. Compruebe que no haya evite cargar la herramienta o la batería fuera piezas móviles desalineadas o estancadas, del rango de temperatura especificado en piezas rotas y cualquier otra condición que las instrucciones.
-
Page 25: Advertencias De Seguridad Adicionales
cables de alimentación u otros cables podrían atención se verá disminuida. Sea especialmente estar ocultos en setos o arbustos, y podrían ser cuidadoso al término de una jornada laboral. Realice todo el trabajo tranquila y cuidadosa- cortados accidentalmente por la cuchilla. mente. El usuario será responsable de todos los No utilice el cortasetos en condiciones de mal daños a terceras personas. clima, especialmente cuando exista riesgo de rayos. Esto disminuye el riesgo de ser golpeado Nunca utilice la herramienta si está... - Page 26 24. No utilice la herramienta en terrenos blandos, utilice, o guarde la batería en un lugar húmedo inestables, resbaladizos o en pendientes pro- o mojado. Si el terminal se moja o entra líquido nunciadas. Evite trabajar en escaleras o en dentro de la batería, la batería puede sufrir un alturas. De lo contrario, existe el riesgo de caída cortocircuito, con el consiguiente riesgo de sobre- y lesiones personales.
- Page 27 Siga las regulaciones locales Instrucciones importantes de relacionadas al desecho de las baterías. 12. Utilice las baterías únicamente con los pro- seguridad para el cartucho de ductos especificados por Makita. Instalar las batería baterías en productos que no cumplan con los requisitos podría ocasionar un incendio, un calen- Antes de utilizar el cartucho de batería, lea tamiento excesivo, una explosión o una fuga de...
-
Page 28: Descripción De Las Piezas
10 °C - 40 °C (50 °F - 104 °F). PRECAUCIÓN: Utilice únicamente baterías Si un cartucho de batería está caliente, déjelo originales de Makita. El uso de baterías no origina- enfriar antes de cargarlo. les de Makita, o de baterías alteradas, puede ocasio- Cuando no utilice el cartucho de batería, nar que las baterías exploten causando un incendio,... -
Page 29: Descripción Del Funcionamiento
Indicación de la capacidad restante DESCRIPCIÓN DEL de la batería FUNCIONAMIENTO Oprima el botón de verificación en el cartucho de la batería para que indique la capacidad restante de la PRECAUCIÓN: Asegúrese siempre de que la batería. Las luces indicadoras se iluminarán por algu- herramienta esté apagada y el cartucho de batería nos segundos. haya sido extraído antes de realizar cualquier ajuste o comprobación en la herramienta. Instalación o extracción del cartucho de batería PRECAUCIÓN:... -
Page 30: Protección Contra Sobrecarga
(herramienta) / miento Si no hay ninguna mejora al restaurar el sistema de Rojo Sobredes- protección, comuníquese con su centro local de servi- carga cio Makita. AVISO: Dependiendo de las condiciones de uso, Accionamiento del interruptor de la herramienta se detiene automáticamente sin encendido indicación si las ramas o residuos se enredan en la herramienta. En este caso, apague la herra- mienta, extraiga el cartucho de batería y luego... -
Page 31: Ajuste De Velocidad
Oprima el botón de encendido principal para encender la herramienta. Para apagar la herramienta, mantenga oprimido el botón de encendido principal hasta que el indicador de velocidad se apague. Fig.5 ► 1 . Botón de encendido principal 2. Indicador de velocidad 3. -
Page 32: Ajuste Del Ángulo De Corte
Indicador Modo Velocidad de NOTA: Si las ramas o residuos enredados no pueden carrera ser retirados, suelte la palanca del interruptor y luego oprima el botón de inversión, después jale la palanca Bajo 2 000 cpm del interruptor hasta que sean retirados. NOTA: Si oprime el botón de inversión mientras las cuchillas de cizalla están moviéndose, la herramienta se detendrá y se preparará para el movimiento NOTA: La herramienta se inicia en el mismo modo inverso. -
Page 33: Montaje
Si la herramienta constantemente no logra detener las cuchillas de cizalla rápidamente después de soltar la palanca del interruptor, lleve la herramienta a reparar al centro de servicio autorizado de Makita. • Función para evitar el encendido accidental Cuando enciende la herramienta mientras tira de la palanca del interruptor, la herramienta no arranca y la luz de precaución parpadea en verde. - Page 34 Utilice un destornillador plano para hacer palanca y Retire los 2 pernos y los 2 manguitos de las cuchi- abrir la cubierta si le resulta difícil abrirla. llas de cizalla. Desmonte las cuchillas de cizalla del cuerpo de la herramienta. Luego, separe la almohadilla Inserte el destornillador plano en una o más de las de fieltro y el sello de goma contra polvo de las cuchi- aberturas y recortes de la carcasa de la herramienta, y llas de cizalla. luego levante la cubierta para quitarla de la carcasa. Fig.15 ► 1 .
- Page 35 Ajuste la manivela de manera que los 2 orificios Voltee las cuchillas de cizalla boca abajo. Coloque queden alineados en la línea de alineación. el sello de goma contra polvo en las cuchillas de cizalla. Ajuste su posición de modo que un extremo del sello contra polvo toque la parte sobresaliente de las cuchilla de cizalla. Fig.17 ► 1 . Orificios 2. Línea de alineación Alinee las partes que sobresalen a ambos lados de las cuchillas de cizalla. Fig.20 ► 1 .
- Page 36 Si aparte de las cuchillas de cizalla otras Fig.24 piezas, tales como las barras de conexión, mues- ► 1 . Barra de conexión 2. Pequeño orificio del tran signos de desgaste, solicite su reparación o extremo 3. Rodamiento reemplazo a los centros de servicio autorizados Makita. 36 ESPAÑOL...
- Page 37 Instalación o extracción del colector AVISO: Asegúrese de que el colector de residuos no se encime en el receptáculo de ramas. de residuos Accesorio opcional PRECAUCIÓN: Siempre utilice guantes al instalar o extraer el colector de residuos de manera que sus manos no hagan contacto directo con las cuchillas de cizalla.
-
Page 38: Operación De La Herramienta
Makita. Fig.33 Si coloca el arnés para hombros incluido en el paquete de la herramienta y el arnés para hombros... - Page 39 Sujete la herramienta con ambas manos. PRECAUCIÓN: Si es posible, evite utilizar la herramienta cuando haga demasiado calor. Durante la operación de la herramienta, vigile su condición física. PRECAUCIÓN: Tenga cuidado de no tocar accidentalmente una cerca de metal u otros objetos duros durante el podado. Las cuchillas de cizalla podrían romperse y ocasionar una lesión.
-
Page 40: Mantenimiento
Para mantener la SEGURIDAD y FIABILIDAD del pro- ducto, las reparaciones, y cualquier otra tarea de man- Fig.42 Fig.39 tenimiento o ajuste deberán ser realizadas en centros de servicio autorizados o de fábrica Makita, empleando Cuando desee hacer formas redondas al podar (podar siempre repuestos Makita. setos de boj o rododendro, etc.), corte de la raíz a la parte superior para lograr un resultado excelente. Limpieza de la herramienta Quite el polvo de la herramienta con un paño seco o humedezca un paño en agua y jabón y exprímalo para... - Page 41 Después de la operación, elimine el polvo en ambos Retire el tornillo y luego extraiga el receptáculo de lados de las cuchillas de cizalla con un cepillo de alam- ramas. bre, limpie con un paño y luego aplique aceite de baja viscosidad (aceite para máquinas o aceite lubricante en aerosol) a las cuchillas de cizalla. Fig.45 ► 1 . Tornillo 2. Receptáculo de ramas Fig.43 Establezca el ángulo de una lima en 50, y afile la cuchilla superior con la lima exactamente en las tres...
- Page 42 Uso del engrasador Regrese la herramienta a la posición normal y luego retire las rebabas de la cuchilla de cizalla con la El conector del engrasador ayuda a conectar una pis- piedra de acabado. tola de engrase con un ajuste positivo. Fije el receptáculo de ramas apretando el tornillo. Prepare una pistola de engrase para usar. Lubricación con grasa Conecte el adaptador de la pistola de engrase al engrasador de la herramienta.
-
Page 43: Resolución De Problemas
Antes de solicitar alguna reparación, primero realice una inspección por su cuenta. Si detecta algún problema que no esté explicado en el manual, no intente desensamblar la herramienta. En vez de esto, solicite la reparación a un centro de servicio autorizado de Makita, usando siempre piezas de repuesto Makita. Estado de la anomalía Causa probable (avería) - Page 44 Makita Corporation 3-11-8, Sumiyoshi-cho, 885A66-942 Anjo, Aichi 446-8502 Japan GNU01-1 EN, ESMX 20240222 www.makita.com...
Need help?
Do you have a question about the GNU01 and is the answer not in the manual?
Questions and answers