
Related Manuals for Makita GRU05


Summary of Contents for Makita GRU05
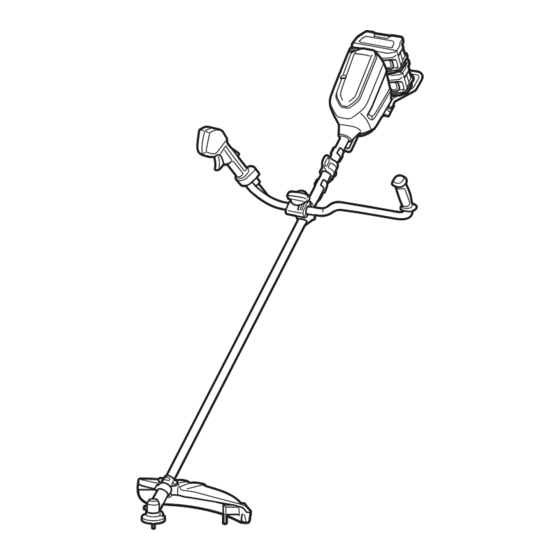
- Page 1 INSTRUCTION MANUAL MANUAL DE INSTRUCCIONES Cordless Grass Trimmer Cortador Inalámbrico de Pasto GRU05 IMPORTANT: Read Before Using. IMPORTANTE: Lea antes de usar.
-
Page 2: Specifications
ENGLISH (Original instructions) SPECIFICATIONS Model: GRU05 Handle type Bike handle No load speed 3: 0 - 6,400 /min (at each rotation speed level) 2: 0 - 5,000 /min 1: 0 - 3,500 /min Overall length 1,790 mm (70-1/2″) (without cutting tool) Nylon cord diameter 2.0 - 2.3 mm (0.08″... - Page 3 Never operate the tool when tired, feeling ill or Always wear a helmet where there is a risk of under the influence of alcohol or drugs. falling objects. The protective helmet is to be checked at regular intervals for damage and Avoid accidentally starting: is to be replaced at least every five years.
- Page 4 Do not use a cutting tool which is not recom- 19. After removing the battery from the tool or mended by Makita. charger, be sure to attach the battery cover to Method of operation the battery and store it in a dry place.
- Page 5 Remove sand, stones, nails etc. found within 27. Only use the cutting tool that are marked with the working range. Foreign particles may dam- a speed equal or higher than the speed marked on the tool. age the cutting tool. Should the cutting tool hit stones or other hard 28.
- Page 6 Never apply the segment between 11 and 12 When washing the tool, do not let water enter o’clock and between 2 and 5 o’clock, unless the electrical mechanism such as battery, the operator is well trained and experienced motor, and terminals. and does it at his/her own risk.
- Page 7 It will Do not expose battery cartridge to water also void the Makita warranty for the Makita tool and or rain. charger. A battery short can cause a large current...
-
Page 8: Parts Description
PARTS DESCRIPTION Speed indicator ADT indicator Caution lamp Main power button (ADT = Automatic Torque Drive Technology) Reverse button Battery cartridge Hanger Lock-off lever Switch trigger Knob Handle Protector (for cutter blade / nylon cutting head) Protector (for chisel Protector (for shredder Protector extension (for Shoulder harness blade) -
Page 9: Functional Description
Tool / battery protection system FUNCTIONAL DESCRIPTION The tool is equipped with a tool/battery protection sys- tem. This system automatically cuts off power to the motor to extend tool and battery life. The tool will auto- WARNING: matically stop during operation if the tool or battery is Always be sure that the tool is placed under one of the following conditions: switched off and the battery cartridge is removed... -
Page 10: Main Power Switch
Indicating the remaining battery Main power switch capacity Tap the main power button to turn on the tool. To turn off the tool, press and hold the main power Press the check button on the battery cartridge to indi- button until the speed indicator goes off. cate the remaining battery capacity. - Page 11 To prevent the switch trigger from being accidentally Automatic Torque Drive Technology pulled, a lock-off lever is provided. To start the tool, depress the lock-off lever and pull the switch trigger. When you turn on the Automatic Torque Drive The tool speed increases by increasing pressure on the Technology (ADT), the tool runs at optimum rotation switch trigger.
-
Page 12: Installing The Handle
Place the spring onto the base. This tool is equipped with an electric brake. If the tool consistently fails to quickly stop after the switch trigger is released, have the tool serviced at a Makita service center. NOTE: The electric brake will activate when you release the switch trigger while the lock-off lever is grasped. - Page 13 Hex wrench storage Cutting tool Protector Cutter blade (2-tooth, 3-tooth, 4-tooth, and CAUTION: Be careful not to leave the hex 8-tooth blades) wrench inserted in the gear case. It may cause injury and damage to the tool. When not in use, store the hex wrench as illustrated to keep it from being lost.
- Page 14 For nylon cutting head For chisel blade Optional accessory CAUTION: Take care not to injure yourself on Align the protrusion on the gear case with the groove on the cutter for cutting the nylon cord. the protector, and then attach the protector to the clamp Attach the protector to the clamp using bolts.
- Page 15 Cutter blade / chisel blade / shredder For the chisel and shredder blade, mount them as illustrated. blade Chisel blade CAUTION: When handling a cutter blade, always wear gloves and put the blade cover on the blade. CAUTION: The cutter blade must be well pol- ished, and free of cracks or breakage.
-
Page 16: Nylon Cutting Head
Nylon cutting head Put on the shoulder harness and fasten the buckle. NOTICE: Be sure to use genuine Makita nylon cutting head. Clasp the hook on the shoulder harness to tool's hanger. ► 1. Nylon cutting head 2. Spindle 3. Hex wrench 4. - Page 17 The shoulder harness features a means of quick Correct handling of the tool release. Simply squeeze the sides of the buckle while holding the tool to release the tool from the shoulder WARNING: harness. Always position the tool on your right-hand side.
-
Page 18: Shredder Blade
When using a nylon cutting head (bump & feed For ease of cutting a tree, support the protector against type) the tree stem as illustrated. The nylon cutting head is a dual string trimmer head provided with a bump & feed mechanism. To feed out the nylon cord, tap the cutting head against the ground while rotating. -
Page 19: Maintenance
Discoloration, deformation or cracks may result. To maintain product SAFETY and RELIABILITY, repairs, any other maintenance or adjustment should be performed by Makita Authorized or Factory Service Centers, always using Makita replacement parts. Replacing the nylon cord WARNING: Use only the nylon cord with diameter specified in this instruction manual. - Page 20 B&F Z5L 100 mm 3 m (9 ft) (3-15/16″) 80 mm (3-1/8″) 20 ENGLISH...
- Page 21 121-M10L 3 m (9 ft) 100 mm (3-15/16″) 21 ENGLISH...
-
Page 22: Troubleshooting
Before asking for repairs, conduct your own inspection first. If you find a problem that is not explained in the manual, do not attempt to dismantle the tool. Instead, ask Makita Authorized Service Centers, always using Makita replace- ment parts for repairs. -
Page 23: Optional Accessories
CAUTION: These accessories or attachments are recommended for use with your Makita tool specified in this manual. The use of any other accessories or attachments might present a risk of injury to persons. Only use accessory or attachment for its stated purpose. -
Page 24: Especificaciones
ESPAÑOL (Instrucciones originales) ESPECIFICACIONES Modelo: GRU05 Tipo de mango Mango tipo bicicleta Velocidad sin carga 3: 0 r/min - 6 400 r/min (en cada nivel de la velocidad de rotación) 2: 0 r/min - 5 000 r/min 1: 0 r/min - 3 500 r/min Longitud total 1 790 mm (70-1/2″) - Page 25 Asegúrese de que cualquier persona que vaya Para evitar lesiones ya sea en la cabeza, ojos, a utilizar la herramienta haya leído primero el manos o pies, así como para proteger su audi- manual de instrucciones. ción, se requiere el uso del siguiente equipo de protección y prendas protectoras durante la Use la herramienta con extremo cuidado y operación del equipo.
- Page 26 Seguridad eléctrica y de la batería 12. No modifique ni intente reparar la herramienta ni el paquete de baterías salvo como se indi- Evite los entornos peligrosos. No utilice la que en las instrucciones para el uso y cuidado. herramienta en lugares húmedos o mojados ni la exponga a la lluvia.
- Page 27 No utilice una herramienta de corte que no sea prender fuego al polvo o los humos. recomendada por Makita. 19. Tome un descanso para evitar la pérdida de Método de operación control a causa de la fatiga. Recomendamos tomar de 10 minutos a 20 minutos de descanso Use la herramienta sólo en condiciones de...
- Page 28 27. Utilice únicamente la herramienta de corte Para evitar un retroceso brusco: marcada con una velocidad igual o mayor a la Coloque el segmento de la cuchilla en un velocidad marcada en la herramienta. ángulo que en un reloj estaría representado 28.
- Page 29 Revise si hay sujetadores que estén sueltos o ADVERTENCIA: El uso de este producto piezas dañadas, tal como grietas en la herra- puede producir polvo que contenga sustancias mienta de corte. químicas que podrían causar enfermedades Siga las instrucciones para la lubricación y respiratorias o de otro tipo.
- Page 30 Asimismo, esto inva- ya no sirva en absoluto. El cartucho de batería lidará la garantía de Makita para la herramienta y el puede explotar si se tira al fuego. cargador Makita.
-
Page 31: Descripción De Las Piezas
DESCRIPCIÓN DE LAS PIEZAS Indicador de velocidad Indicador de ADT Luz indicadora de Botón de encendido (ADT = Automatic precaución principal Torque Drive Technology (Tecnología de acciona- miento automático de torsión)) Botón de inversión Cartucho de batería Colgador Palanca de desbloqueo Gatillo interruptor Perilla Mango... -
Page 32: Descripción Del Funcionamiento
DESCRIPCIÓN DEL PRECAUCIÓN: Introduzca siempre com- pletamente el cartucho de batería hasta que FUNCIONAMIENTO el indicador rojo no pueda verse. Si no, podría accidentalmente salirse de la herramienta y caer al suelo causando una lesión a usted o alguien a su ADVERTENCIA: Asegúrese siempre de que alrededor. - Page 33 Protección en caso de Interruptor de alimentación principal sobredescarga Pulse el botón de encendido principal para encender la Cuando la capacidad de la batería se reduzca, la herra- herramienta. mienta se detendrá automáticamente y la luz indicadora Para apagar la herramienta, mantenga oprimido el de precaución empezará...
-
Page 34: Ajuste De Velocidad
Se proporciona una palanca de desbloqueo para evitar que el gatillo Tecnología de accionamiento interruptor sea jalado accidentalmente. Para arrancar la herramienta, automático de torsión presione la palanca de desbloqueo y jale el gatillo interruptor. La velocidad de la herramienta aumenta al incrementar la presión en el Cuando enciende la tecnología de accionamiento auto- gatillo interruptor. -
Page 35: Montaje
Coloque el resorte en la base. soltar el gatillo interruptor, lleve la herramienta a mante- nimiento a un centro de servicio Makita. NOTA: El freno eléctrico se activará cuando libere el gatillo interruptor mientras sujeta la palanca de des- bloqueo. -
Page 36: Instalación Del Protector
Coloque el mango entre la abrazadera del mango Herramienta de corte Protector y el sujetador del mango. Cuchilla de corte Coloque temporalmente el mango apretando la (Cuchilla de 2 dientes, de 3 perilla y ajuste la posición del mango. dientes, de 4 dientes y de 8 dientes) Apriete la perilla por completo. - Page 37 Para el cabezal de corte de nailon Para la cuchilla de cincel Accesorio opcional PRECAUCIÓN: Tenga cuidado de no las- Alinee la protuberancia de la caja de engranajes con la timarse con la cortadora al cortar el cordón de ranura del protector, y luego fije el protector a la abraza- nailon.
- Page 38 Cuchilla de corte/cuchilla de cincel/ Para la cuchilla de cincel y la cuchilla desmenuzadora, móntelas como se ilustra. cuchilla desmenuzadora Cuchilla de cincel PRECAUCIÓN: Cuando vaya a manipular una cuchilla de corte, use siempre guantes y coloque la cubierta de la cuchilla sobre la cuchilla. PRECAUCIÓN: La cuchilla de corte deberá...
-
Page 39: Operación
AVISO: Asegúrese de utilizar un cabezal de corte de nailon original de Makita. Abroche el gancho en el arnés para hombro en el colgador de la herramienta. ► 1. Cabezal de corte de nailon 2. Eje 3. Llave hexa- gonal 4. - Page 40 El arnés para hombro cuenta con un medio de libera- Manipulación correcta de la ción rápida. Simplemente apriete los lados de la hebilla herramienta mientras sostiene la herramienta, para liberar la herra- mienta del arnés para hombro. ADVERTENCIA: Siempre coloque la herra- mienta de su lado derecho.
- Page 41 Cuando utilice un cabezal de corte de nailon (de Para facilitar el corte de un árbol, apoye el protector tipo golpe y alimentación) contra el tallo del árbol como se ilustra. El cabezal de corte de nailon es una cabeza de desbrozadora dual con un mecanismo de golpe y alimentación.
-
Page 42: Mantenimiento
Para mantener la SEGURIDAD y FIABILIDAD del pro- ducto, las reparaciones, y cualquier otra tarea de man- tenimiento o ajuste deberán ser realizadas en centros de servicio autorizados o de fábrica Makita, empleando siempre repuestos Makita. Reemplazo del cordón de nailon ADVERTENCIA: Utilice el cordón de nailon... - Page 43 B&F Z5L 100 mm 3 m (9 ft) (3-15/16″) 80 mm (3-1/8″) 43 ESPAÑOL...
- Page 44 121-M10L 3 m (9 ft) 100 mm (3-15/16″) 44 ESPAÑOL...
-
Page 45: Resolución De Problemas
Antes de solicitar alguna reparación, primero realice una inspección por su cuenta. Si detecta algún problema que no esté explicado en el manual, no intente desensamblar la herramienta. En vez de esto, solicite la reparación a un centro de servicio autorizado de Makita, usando siempre piezas de repuesto Makita. Estado de la anomalía Causa probable (avería) -
Page 46: Accesorios Opcionales
PRECAUCIÓN: Estos accesorios o aditamen- tos están recomendados para utilizarse con su herramienta Makita especificada en este manual. El empleo de cualquier otro accesorio o aditamento puede conllevar el riesgo de lesiones personales. Utilice los accesorios o aditamentos solamente para su fin establecido. - Page 48 Makita Corporation 3-11-8, Sumiyoshi-cho, 885903-944 Anjo, Aichi 446-8502 Japan GRU05-1 EN, ESMX www.makita.com 20210517...