Cisco 3905 Manual
- Administration manual (136 pages) ,
- User manual (40 pages) ,
- Using manual (16 pages)
Advertisement
- 1 Getting Started
- 2 Basic Operations
- 3 Call History
- 4 Voicemail
- 5 Advanced Operations
- 6 User Preferences
- 7 Documents / Resources
Getting Started
Accessibility Features
The Cisco Unified SIP Phone 3905 provides accessibility features for the vision impaired, the blind, and the hearing and mobility impaired.
http://www.cisco.com/en/US/docs/voice_ip_comm/cuipph/all_models/accessibility/english/user/guide/access_3905.html
You can also find more information about accessibility at this Cisco website:
http://www.cisco.com/web/about/responsibility/accessibility/index.html
Device Connections

Use the figure above to connect the phone to the network.
| 1 | DC adapter port (DC 4.2V). | 4 | Network port (10/100 SW) connection. IEEE 802.3af power enabled. |
| 2 | AC-to-DC power supply (optional). | 5 | Access port (10/100 PC) connection. |
| 3 | AC power wall connection. | 6 | Handset connection. |
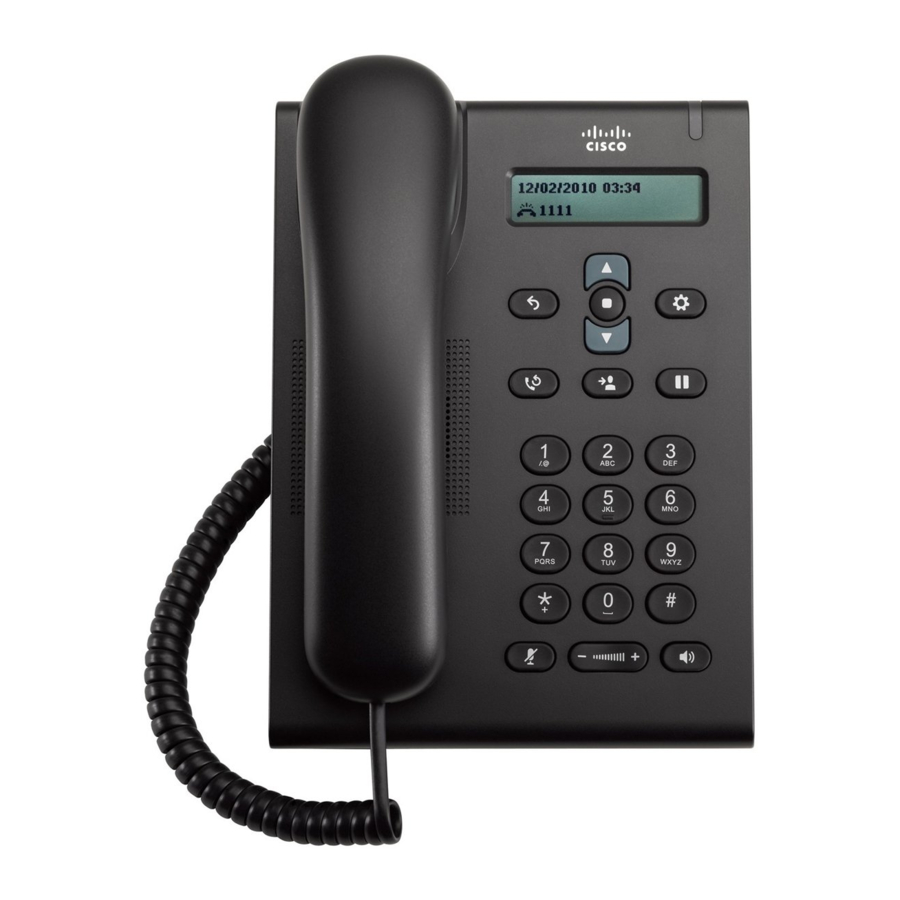
Buttons and Hardware

| 1 | Phone screen | Shows information about your phone such as directory number, active call, and phone menu listings. |
| 2 | Light strip | Indicates an incoming call (flashing red) or new voice message (steady red). |
| 3 |  Navigation bar and Select/Feature button | The Navigation bar allows you to scroll through menus and highlight items. The Select button (in the middle of the Navigation bar) allows you to select a highlighted item. When the phone is off-hook, the Select button functions as the Feature button. You can access these features:
|
| 4 |  Applications button | Opens or closes the Applications menu. Use it to access call history, user preferences, phone settings, and phone model information. |
| 5 |  Transfer button | Transfers a call. |
| 6 |  Hold/Resume button | Places an active call on hold or resumes a held call. |
| 7 | Keypad | Allows you to dial phone numbers. |
| 8 |  Speakerphone button | Selects the speakerphone as the default audio path and initiates a new call, picks up an incoming call, or ends a call. The speakerphone audio path does not change until a new default audio path is selected (for example, by picking up the handset). |
| 9 |  Volume button | Controls the handset and speakerphone volume (off-hook) and the ringer volume (on hook). |
| 10 |  Mute button | Toggles the microphone on or off. |
| 11 |  Redial button | Dials the last dialed number. |
| 12 |  Back button | Returns to the previous screen or menu. |
| 13 | Handset | Phone handset. |
Unit Screen

| 1 | Header | Displays date and time. Also displays line information such as voicemail and missed calls. When using the Applications menu, displays phone menu listings. |
| 2 | Line details and other phone information | Displays the directory number. During a call, also displays details for the active line. If not on a call, also displays line text label and other information such as placed calls and phone menu listings. |
Footstand
The Cisco Unified IP Phone 3905 has a foldable footstand. When the footstand is unfolded, it gives the phone an elevated viewing angle.

Clean the Unit Screen
Procedure
If your phone screen gets dirty, wipe it with a soft, dry cloth.

Do not use any liquids or powders on the phone because they can contaminate the phone components and cause failures.
Adjust the Handset Rest
If your phone is wall-mounted or if the handset slips out of the cradle too easily, you may need to adjust the handset rest to ensure that the receiver does not slip out of the cradle.

Procedure (See Figure 1)
- Remove the handset from the cradle and pull the plastic tab from the handset rest.
- Rotate the tab 180 degrees. Hold the tab between two fingers, with the corner notches facing you.
- Line up the tab with the slot in the cradle and press the tab evenly into the slot.
- An extension protrudes from the top of the rotated tab.
- Return the handset to the handset rest.
Important Headset Safety Information

High Sound Pressure—Avoid listening to high volume levels for long periods to prevent possible hearing damage.
When you plug in your headset, lower the volume of the headset speaker before you put the headset on. If you remember to lower the volume before you take the headset off, the volume will start lower when you plug in your headset again.
Be aware of your surroundings. When you use your headset, it may block out important external sounds, particularly in emergencies or in noisy environments. Don't use the headset while driving. Don't leave your headset or headset cables in an area where people or pets can trip over them. Always supervise children who are near your headset or headset cables.
Basic Operations
Make Calls
Your phone works just like a regular phone. But we make it easier for you to make calls.
Redial Number
Redial allows you to call the most recently dialed phone number by pressing the Redial button.
Procedure
To redial a number, press the Redial button 
You can be off-hook or on-hook when you press this button.
Dial International Number
Plus Dialing allows you to press and hold the "*" key for at least 1 second to add a plus "+" sign as the first digit in a phone number for international dialing. It applies only for off-hook dialing.
Procedure
- Press and hold the "*" key for at least 1 second.
The + sign is entered as the first digit in the phone number.
The corresponding tone stops to indicate that the * has changed to a + sign. - Dial the international number.
Place Call Using Forced Authorization Code
Your phone supports Forced Authorization Codes (FAC) that allow your administrator to manage call access. Your administrator provides you with the codes. When active, the Forced Authorization Codes feature requires that you enter a valid authorization code before the call connects.
Procedure
- Dial a number.
- After the tone, enter the Forced Authorization Code (FAC).
Answer Calls
Your Cisco phone works just like a regular phone. But we make it easier for you to answer calls.
Answer Call Using Hookflash
Hookflash allows you to activate features on your phone by quickly pressing and releasing the hookswitch button on the phone cradle rest.
Procedure
Quickly press and release the hookswitch button to answer the call.
Answer Call Using Pickup
Call Pickup allows you to answer a call that is ringing on a co-worker's phone by redirecting the call to your phone. Use Call Pickup if you share call-handling tasks with co-workers.
Pickup allows you to answer a call that is ringing on another phone within your call pickup group.
If multiple calls are available for pickup, your phone picks up the oldest call first (the call that has been ringing for the longest time).
Your system administrator sets up the call pickup group you are in and the call pickup buttons depending on your call-handling needs and work environment.
Procedure
- Press the Feature button.
- Use the Navigation pad to scroll and select Pickup.
- Press the Feature button to transfer a ringing call within your pickup group to your phone.
- Lift the handset to connect the call.
Answer Call Using Group Pickup
Group Pickup allows you to answer a call on a phone that is outside your call pickup group by using a group pickup number that your system administrator provides. You can also pick up the call on your phone.
Procedure
- Press the Feature button.
- Use the Navigation pad to scroll and select Group Pickup.
- Press the Feature button.
- Enter the group pickup number to answer a call on your phone or on a phone outside your pickup group.
- Lift the handset to connect the call.
Respond to Call Waiting Notification
Call Waiting provides cues to notify you that a new call is ringing on your phone when you are talking on another call, including:
- A call waiting tone (single beep)
- A display of the second incoming call on the phone screen
Procedure
To answer the ringing call, press the Hold/Resume button.
Your phone puts the original call on hold automatically and connects the ringing call.
Manage Calls
Forward All Calls
Call Forward All allows you to forward calls on your phone to another number. Call Forward All applies to all calls that you receive.
You can set up Call Forward All directly on your phone. To access Call Forward All remotely, go to your Self Care Portal.
When forwarding calls from your phone, enter the call-forward target phone number exactly as you would dial it from your phone. For example, enter an access code or the area code, if necessary.
When you lift the handset, you will hear a call forward confirmation tone until you cancel call forwarding. The visual confirmation turns off when Call Forward All is canceled.
Procedure
- Press the Feature button.
- Use the Navigation pad to scroll and select Call Forward All.
- Press the Feature button.
- Listen for the confirmation tone, then enter the phone number to which your calls will be forwarded. A visual confirmation displays on your screen for as long as the feature is enabled.
- To cancel call forwarding, repeat Step 1-2.
Related Topics
Sign In to the Cisco Unified Communications Self Care Portal.
Transfer a Call to Another Number
You can redirect a connected call from your phone to another number as follows:
- You can redirect a single call to another number that you specify.
- You can connect two calls to each other without remaining on the line yourself.
Procedure
- Verify that you are on an active call (not on hold).
- Enter the transfer recipient's phone number or press a speed-dial button.
- Wait for the recipient to answer, or skip to the next step while the call is ringing.
Toggle Between Calls Before Completing Transfer
After you connect to the transfer recipient—but before you transfer a call to this party—you can press the Hold/Resume button to toggle between the two calls. This allows you to consult privately with the party on each call before you complete the transfer.
Procedure
- Press the Hold/Resume button to toggle between the party that you intend to transfer and the transfer recipient.
- After you finish speaking with the transfer recipient, press the Transfer button to complete the transfer.
Hold Call
Hold allows you to put an active call into a held state.
Procedure
- To put a call on hold, press the Hold/Resume button
![]() .
.
The party that is put on hold hears the preset music. - To resume the call, press the Hold/Resume button
![]() .
.
 .
.Mute
You can block audio input for your handset, headset, and speakerphone, so that you can hear other parties on the call but they cannot hear you.
Conference
Conference allows you to talk simultaneously with multiple parties. When you are talking on a call, use Conference to dial another party and add them to the call. You can remove individual participants from the conference if your phone supports the feature.
You can set up a conference by using the Hookflash feature on the phone. You can include up to three participants in a conference. Use the hookflash feature to drop a participant from a conference. The conference ends when all the participants hang up.
Set Up Conference
Procedure
- Verify that you are on an active call (not on hold).
- Press and release the hookswitch to get a dial tone.
- Dial the party's number.
- (Optional) Wait for the recipient to answer.
Or skip to Step 5 while the call is ringing. - Press and release the hookswitch again.
The conference begins.
Drop Party from Conference
Only the conference host can drop a party from a conference.
Procedure
- Verify that you are in a conference.
- Press and release the hookswitch.
The party who joined last is dropped from the conference.
View Device Information
Phone Information allows you to view the following model information for your phone:
- Model Number
- MAC Address
- Application Load ID
- Boot Load ID
- Serial Number
- IP Address
- Active Server
- Stand-by-Server
Procedure
- Press Applications
![]() .
. - Select Phone Information.
- Press Back to return to the Applications screen.
 .
. Sign In to the Cisco Unified Communications Self Care Portal
Your phone is a network device that can share information with other network devices in your company, including your personal computer. You can use your computer to sign in to the Cisco Unified Communications Self Care Portal, where you can control features, settings, and services for your phone. For example, you can manage your phone display language, set up services, add entries to your personal address book, and set up speed-dial codes.
Before you can access any of your options, such as speed dial or personal address book, you must sign in. When you finish using the portal, sign out.
 Note
Note
Some features may not be available for your phone, and thus you can't set the features up in the Self Care Portal.
Sometimes, you can access the Cisco Unified Communications Self Care Portal without signing in.
For assistance in using the portal, see the Cisco Unified Communications Self Care Portal User Guide.
Procedure
- Obtain the portal URL, user ID, and default password from your administrator.
Typically, the portal URL is http://ip_address or hostname/ucmuser. - Open a web browser on your computer and enter the URL.
- If prompted to accept security settings, select Yes or Install Certificate.
- Enter your user ID in the Username field.
- Enter your password in the Password field.
- Select Login.
- Select Logout to sign out.
Call History
Call History Overview
Call History allows you to view information about the last 50 calls on your phone, listed under the following categories:
- Missed: lists the last 50 missed calls
- Received: lists the last 50 received calls
- Placed: lists the last 50 placed calls
- All: lists the last 50 calls, including Missed, Received, and Placed
A call icon is displayed to indicate the type of call. The caller ID is displayed with the call icon. If the caller ID is unavailable, then the phone number is displayed. If the phone number is unavailable, then "Unknown" is displayed. All Call History items are ordered by time (latest to oldest).
You can also dial a number directly from the Call History list.
View Call History
Procedure
- Press Applications
![]() .
. - Use the Navigation bar and button to scroll and select Call History.
The phone screen displays the four call categories. - Select a category.
The phone screen displays the call history for the selected category. - Press the
![]() button to return to the Call History screen, or press Applications
button to return to the Call History screen, or press Applications ![]() to exit the call history.
to exit the call history.
 .
.  button to return to the Call History screen, or press Applications
 Dial From Call History
Procedure
- Press Applications
![]() .
. - Use the Navigation bar and button to scroll and select Call History.
The phone screen displays the four call categories. - Select a category.
The phone screen displays the call history for the selected category. - From the Call History list, select the call you want to dial and do one of the following:
- Press the Select button (the phone uses the speakerphone by default).
- Pick up the handset.
- Press Speakerphone.
 .
. Voicemail
Voicemail Overview
Voice messages are stored on your voicemail system. Your company determines the voicemail system your phone uses.
For information about the commands that your voicemail service supports, see the voicemail service user documentation.
Personalize Voicemail
Procedure
- Press the Feature button.
- Use the Navigation pad to scroll and select Voice Mail.
- Press the Feature button.
- Follow the voice prompts.
Check for Voice Messages
Procedure
- Look for the following visual indications:
- A solid red light on the phone. Set up the visual message waiting lamp using the Self Care Portal.
- Message icon on a line.
- Listen for the stutter tone (if available) from your handset or speakerphone when you place a call. The stutter tone is line-specific and you hear it only when using the line that has new voice messages. You can set up audible message waiting tones using the Self Care Portal.
Listen to Voice Messages
Procedure
- Press the Feature button.
- Use the Navigation pad to scroll and select Voice Mail.
- Press the Feature button.
- Follow the voice prompts.
Advanced Operations
Call Functions
This section describes some of the advanced call functions available to you.
Auto Answer
Auto Answer prompts your phone to automatically answer incoming calls after one ring.
Auto Answer with Speakerphone
Your system administrator sets up Auto Answer to work with your speakerphone.
Keep the handset in the cradle to auto answer with your speakerphone. Otherwise, calls ring normally and you must answer them manually.
Auto Barge
Auto barge, if configured, allows you to barge into a shared line call automatically.
For example, in a shared line scenario, when you go off-hook and a call remote is already in use, you can barge into the call automatically.
Shared Lines
Shared lines allow you to use one phone number for multiple phones.
You may have a shared line if you have multiple phones and want one phone number, share call-handling tasks with co-workers, or handle calls on behalf of a manager.
For example, if you share a line with a co-worker:
- When a call comes in on the shared line:
- Your phone rings and the phone light strip flashes amber.
- Your co-worker's phone rings and the phone light strip flashes amber.
- If you answer the call:
- Your phone screen displays a connected icon for the shared call.
- Your co-worker's phone screen displays a remote-connected icon for the shared call.
If auto barge is enabled, you can auto barge a call by going off-hook or make a new call.
- If you put the call on hold:
- Your phone screen displays an on-hold icon for the shared call.
- Your co-worker's phone screen displays a remote-hold icon for the shared call.
Your co-worker can pick up the call.
User Preferences
Change Ringtone
You can customize how your phone indicates an incoming call. You can also adjust the ringer volume for your phone.
Procedure
- Press Applications
![]() .
. - Use the Navigation bar and button to scroll and select Preferences.
- Select Ringtone.
- Select a ringtone.
- Press the Select button to confirm your selection and play a sample.
- Press the button to return to the Preferences screen.
 .
. Line Settings
Line settings affect a specific phone line (directory number) on your phone. Line settings can include call forwarding, visual and audio message indicators, ring patterns, and other line-specific settings.
You can use the Cisco Unified Communications Self Care Portal to change your line settings. For information, see the Cisco Unified Communications Self Care Portal User Guide.
Americas Headquarters
Cisco Systems, Inc.
170 West Tasman Drive
San Jose, CA 95134-1706
USA
http://www.cisco.com
Tel: 408 526-4000
800 553-NETS (6387)
Fax: 408 527-0883
Documents / Resources
References
Accessibility Features for the Cisco Unified SIP Phone 3905 - Cisco
Accessibility at Cisco - Cisco
Cisco: Software, Network, and Cybersecurity Solutions - Cisco
Download manual
Here you can download full pdf version of manual, it may contain additional safety instructions, warranty information, FCC rules, etc.
Advertisement


Need help?
Do you have a question about the 3905 and is the answer not in the manual?
Questions and answers