Advertisement
- 1 About Your Product
-
2
Using Your Device
- 2.1 Important Tips Before Use
- 2.2 Preparation
- 2.3 Use the Self-Empty Station
- 2.4 Store Accessories
- 2.5 Use Your Unit with the eufy Clean App
- 2.6 Restore Factory Settings
- 2.7 Start / Pause Cleaning
- 2.8 Select a Cleaning Mode
- 2.9 Auto-Cleaning Mode
- 2.10 Spot Cleaning Mode
- 2.11 Select a Suction Power Level
- 2.12 Use Mopping System
- 2.13 Use RoboVac with Amazon Alexa / The Google Assistant
- 3 Cleaning and Maintenance
- 4 Allergy-Proof Your Home
- 5 Troubleshooting
- 6 Voice Alert
- 7 Specifications
- 8 IMPORTANT SAFETY INSTRUCTIONS
- 9 Customer Service
- 10 Documents / Resources
About Your Product
What's in the Box

Overview
Top & Side

Bottom

Dust Box and Water Tank 2-in-1

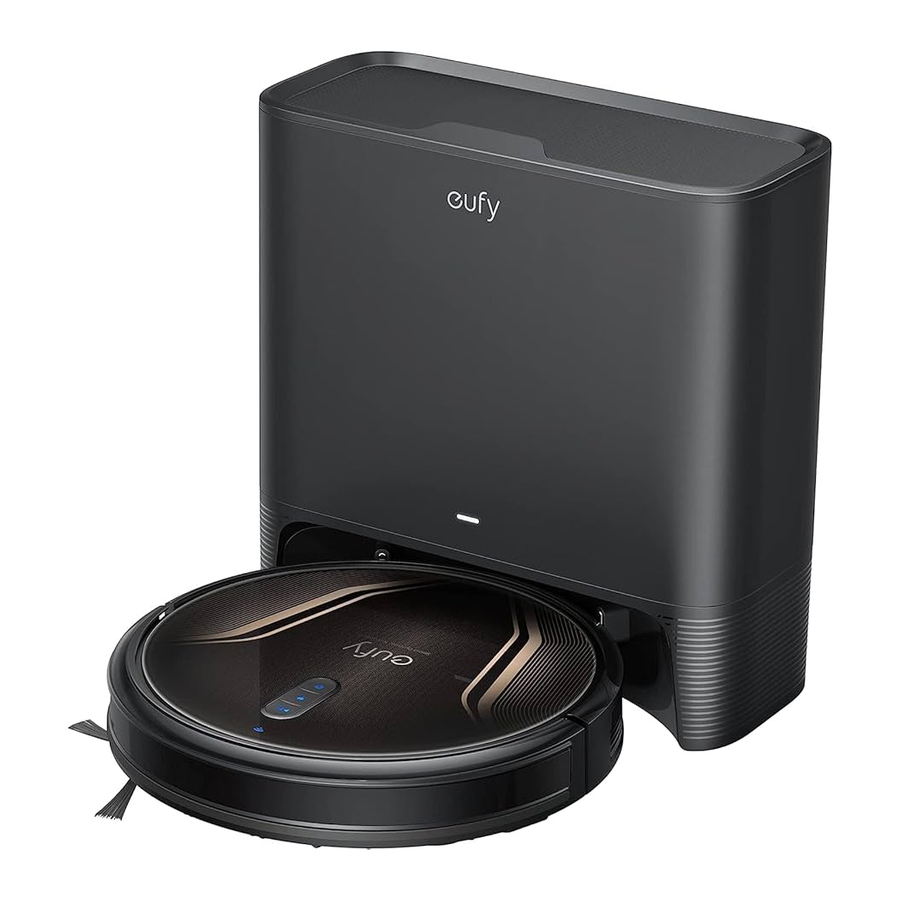
Self-Empty Station

LED Indication
You can see the status of RoboVac from the LED indicators.
 |  | Start / Pause Cleaning
|
 | Return to Self-Empty Station
| |
 | Spot Cleaning
|
Using Your Device
Important Tips Before Use
- Remove power cords and small objects from the floor that may entangle RoboVac.
![]()
- Fold tasseled edges of rugs underneath to prevent tangling RoboVac. Avoid cleaning dark-colored high-pile rugs or rugs thicker than 1.02 in / 26 mm as they may cause RoboVac to malfunction.
![]()
- It is strongly recommended to place physical barriers in front of fireplaces and certain areas (i.e. air vents) that may cause damage to RoboVac if entered.
![]()
- Keep RoboVac away from wet areas during cleaning.
![]()
- RoboVac may climb on top of objects less than 0.63 in / 16 mm in height. Remove these objects if possible.
![]()
- Anti-drop sensors will prevent RoboVac from tumbling down stairs and steep drops in most cases. Sensors are less effective if dirty or used on carpeted, reflective, or dark-colored floors. Place physical barriers to block off areas where RoboVac may fall.
![]()


Preparation
- Remove the foam blocks beside the bumper before use.
- Install the side brush before use. You will hear a click when the side brush is firmly installed.
![]()
- Turn on the main power switch on the right side of RoboVac.
![]()
- Install the self-empty station in a location that RoboVac can easily access. Place it against a wall, and on a hard, level surface.
![]()
- Peel off the stickers on the protective pad and install it under the self-empty station. Make sure the protective pad is firmly attached to the floor.

- Remove objects within 1.6ft / 0.5m to the left and right sides and within 4.9ft / 1.5m of the front of the Self-Empty Station.
![]()
- Connect the power cord to the Self- Empty Station and a wall outlet.
![]()


- Make sure the Self-Empty Station is plugged in, otherwise RoboVac will not automatically return to it. When the Self- Empty Station connects to AC power, the LED indicator on the Self-Empty Station is steady white.
- Please do not place the self-empty station on rugs or carpets, as it will interfere with RoboVac's return to the self-empty station for recharge.
Use the Self-Empty Station
- With Allergycare certified by TUV Rheinland, the Self-Empty Station can lock in 99.9% of allergens (such as dust, garbage, dust mites, pet dander, etc.) to prevent them from emitting into the air.
- RoboVac will return to the Self-Empty Station at the end of a cleaning cycle or when its battery is running low.
- Make sure the power cord is connected to a power outlet and the dust bag is properly installed.
- If the cleaning time or the time period between two cleaning sessions is too short, the Self-Empty Station may not empty the dust box automatically.
- The emptying function will not be activated if you have selected the 'Do-Not-Disturb' mode in the eufy Clean app.
- It is recommended that RoboVac moves away from the Self-Empty Station to start cleaning.
- Some noise will be made when the Self-Empty Station is working. It is recommended to place the device in a proper location or select the 'Do-Not-Disturb mode' in the eufy Clean app to prevent noise interference.
Attach RoboVac to the Self-Empty Station by aligning its charging pins.
- RoboVac starts charging automatically.
- If RoboVac has finished a round of cleaning (a couple of minutes), it will empty the dust box automatically by default when it returns to the self-empty station. Make sure the dust bag is properly installed.

| LED Indicator | Status of Self-Empty Station |
| Steady white, with 50% brightness | Standby |
| Flashing white slowly | Working normally |
| Flashing white quickly | Abnormal working status (Refer to the "Troubleshooting" section in this manual for solutions) |
![information]() Turn off the main power switch if RoboVac will not be used for a long period of time. To preserve the battery's lifespan, recharge at least once every 6 months.
Turn off the main power switch if RoboVac will not be used for a long period of time. To preserve the battery's lifespan, recharge at least once every 6 months.
Store Accessories

Store your frequently-used accessories in the storage compartment of the Self-Empty Station, such as the filter, side brush, dust bag, and cleaning tools. To prevent any damage or unpleasant smells, things that are damp should not be stored inside the Self-Empty Station.
Use Your Unit with the eufy Clean App
To enjoy all the available features, it is recommended to control your RoboVac via the eufy Clean app. Before you start, make sure that:
- Your smartphone or tablet is running iOS 10.0 (or above) or Android 5.0 (or above).
- The 2.4GHz band wireless signal is enabled on your wireless router.
- RoboVac is attached to the Self-Empty Station to ensure it has enough power during setup.
- Download the eufy Clean app from the App Store (iOS devices) or Google Play (Android devices).
![]()


- Open the app and create a user account.
- Tap the "+" icon to add RoboVac to your eufy Clean account.
- Follow the instructions in the app to set up the Wi-Fi connection.
- After connecting successfully, you can control RoboVac via the app.
- With the app, you can select a cleaning mode, set the time, schedule a cleaning, adjust suction power, view system status, receive notifications, and access additional features.
 | Slowly flashing blue | Waiting for connection |
| Rapidly flashing blue | Connecting with your wireless router | |
| Steady blue | Connected with your wireless router |
![information]() If RoboVac gets stuck in any space, tap Find My Robot in the app to find the device.
If RoboVac gets stuck in any space, tap Find My Robot in the app to find the device.
Restore Factory Settings
Press and hold  on RoboVac for 10 seconds to restore factory settings if necessary.
- You will hear a voice prompt when the settings have been reset and the Wi-Fi status light will slowly flash blue.
Start / Pause Cleaning
- Make sure the main power switch at the side of RoboVac is turned on before use.
- You can also start or pause cleaning via the eufy Clean app.

- Press
![]() on RoboVac to start cleaning in Auto-Cleaning mode.
on RoboVac to start cleaning in Auto-Cleaning mode. - To pause cleaning, press
![]() again.
again.
Select a Cleaning Mode
- You can also select the cleaning mode via the eufy Clean app.
- By default, RoboVac starts in Auto-Cleaning mode when it is turned on.
Auto-Cleaning Mode
After startup, RoboVac moves from the Self-Empty Station and automatically determines its cleaning route, following a Z-shaped cleaning path. When the cleaning is finished, RoboVac automatically returns to the Self-Empty Station.

Press ![]() to start cleaning in Auto-Cleaning mode.
to start cleaning in Auto-Cleaning mode.
Spot Cleaning Mode
RoboVac intensively cleans a specific area in a spiral pattern, which is useful if there is a concentrated area of dust or debris. In Spot Cleaning mode, RoboVac will stop cleaning after 2 minutes.
- Press
![]() on RoboVac to start cleaning in Spot Cleaning mode.
on RoboVac to start cleaning in Spot Cleaning mode.
![]()

Select a Suction Power Level
In the eufy Clean app, select a suction power level according to your needs: Quiet, Standard (Default), Turbo and Max.
![information]() When RoboVac starts cleaning next time, it will clean according to the suction power level you previously selected.
When RoboVac starts cleaning next time, it will clean according to the suction power level you previously selected.
Use Mopping System
- The mopping mode is only intended for a clean floor without stubborn stains. To avoid staining floors, do not use the mopping function when dust is mixed with liquids such as coffee or ink.
- Mopping system cleans best on smooth hard surfaces and may not perform so well on uneven tiles, heavily waxed floors or rough surfaces like slate or brick, which may snag the mopping module.
- The mopping mode is not recommended for use when no one is at home.
- Do not use the mopping mode on a carpeted floor. It is recommended to set a physical barrier to avoid cleaning the carpeted area.
- Before mopping, make sure the protective pad has been installed under the Self-Empty Station
- Remove the mopping module and water tank.
![]()
- Wet the mopping cloth and wring it until it does not drip, then attach the cloth to the mopping module.

- Open the water inlet cover to fill with water, then close the cover.
![]()
![information]() Only use the cleaning solution designated by eufy, otherwise it may affect the cleaning effect and damage the device.
Only use the cleaning solution designated by eufy, otherwise it may affect the cleaning effect and damage the device.
- Install the water tank and the mopping module under RoboVac with a click.
![]()
- Start cleaning. RoboVac will automatically vacuum and mop. During mopping, you can choose among three water levels via the eufy Clean app.
- When RoboVac finishes cleaning, remove the mopping module, dust box, and water tank.
- Clean the dust box and water tank, empty any remaining water, and clean the mopping cloth to prevent mildew or unpleasant smells. For how to clean and maintain the components, refer to the "Cleaning and Maintenance" section in this manual.


Use RoboVac with Amazon Alexa / The Google Assistant
Amazon Alexa or the Google Assistant is a smart voice control device that enables you to control RoboVac with your voice.
Before you start, make sure that:
- RoboVac is attached to the Self-Empty Station to ensure there is enough power.
- RoboVac is connected with the eufy Clean app.
- You have an Amazon Alexa-enabled device (i.e. Amazon Echo, Echo Dot, Amazon Tap, Echo Show, or Echo Spot) or a device enabled with the Google Assistant (i.e. Google Home, Google Home Mini). These devices are sold separately.
- The Amazon Alexa app or Google Home app is already installed on your smart device, and you have created an account.
To control RoboVac with Amazon Alexa or the Google Assistant:
- Open the eufy Clean app and find "Smart Integrations" in the top left.
- Follow the on-screen instructions to complete the setup.
![information]() Currently, this feature only supports a few languages including English, German, French, Portuguese, and Spanish.
Currently, this feature only supports a few languages including English, German, French, Portuguese, and Spanish.
For more supported languages, check https://www.eufy.com/support/.
Cleaning and Maintenance
Prior to cleaning and maintaining, turn off the device and unplug the power cord. For optimal performance, follow the instructions below to clean and maintain RoboVac regularly. The cleaning and replacement frequency will depend on your RoboVac usage habits.
- Use the original eufy Clean filter and dust bag during cleaning. Any use of unofficial parts may cause the AllergyCare function to fail.
- Make sure the rear filter and dust bag are installed in place to avoid allergen leakage.
- If your skin accidentally touches the dust containing allergens during cleaning and maintenance, rinse it with running water immediately if you are prone to allergies. Do not tap the dust to prevent the allergens from floating into the air.
- To protect yourself from allergens, wear a dust mask and rubber gloves before discarding the dust bag and cleaning the filter, and go outside to avoid contact with allergens or residual allergens indoors.
- Make sure the deodorizing cloth and the foam sealing strips are in place and installed correctly.


Recommended Cleaning and Replacement Frequency
| RoboVac Part | Cleaning Frequency | Replacement Frequency |
| Dust Box and Water Tank (2-in-1) | Dust Box: Once a week Water Tank: After each use | - |
| Washable Mopping Cloth | After each use | - |
| Filter | Once a week (Twice a week if you have a pet) | Every 6 months or after every 50 rounds of cleaning |
| Side Brush | Once a month | Every 3-6 months (or when visibly worn) |
| Brush Guard | Once a month | Every 3-6 months (or when visibly worn) |
| Rolling Brush | Once a month | Every 6-8 months |
| Sensors | Once a month | - |
| Charging Pins | Once a month | - |
| Swivel Wheel | Once a month | - |
| Dust Bag | Timely check and empty the dust bag if you have a pet. | Every 60 days |
Clean the Dust Box/Water Tank and Filter


- Do not clean the filter with hot water or any detergent.
- Do not use the filters if they are not completely dry, otherwise it may affect the cleaning performance.
Clean the Rolling Brush

- If there's a lot of hair scattering around your house, it is recommended to clean both ends of the rolling brush and the brush motor connectors after each cleaning.
Clean the Side Brush

![information]() Only use the side brush when it is completely dry.
Only use the side brush when it is completely dry.
Clean the Sensors and Charging Pins

- Be careful not to touch the path tracking sensor with your hands.
- Do not clean the path tracking sensor with sharp-pointed objects, as it may damage the sensor.
Clean the Swivel Wheel

![information]() Do not clean the swivel wheel with water.
Do not clean the swivel wheel with water.
Clean the Mopping Cloth

Replace the Dust Bag
- Lift open the top cover.
![]()
- Pull the release button to position, then pull up the handle to remove the dust bag.
![]()
- Discard the used dust bag.
![]()
- Install a new dust bag.
![]()
- Pull the release button to open the dust bag holder.
- Insert a new dust bag in place.
- Push the dust bag holder back until you hear a click.


![information]() When discarding the dust bag, carefully lift the handle and ensure the dust bag is completely closed to prevent dust leakage. Gently put the dust bag containing allergens into a garbage bag / trash can, then seal the garbage bag / trash can properly. In this way, you can avoid allergy symptoms due to exposure to allergens such as dust, pollen, pet dander, etc.
When discarding the dust bag, carefully lift the handle and ensure the dust bag is completely closed to prevent dust leakage. Gently put the dust bag containing allergens into a garbage bag / trash can, then seal the garbage bag / trash can properly. In this way, you can avoid allergy symptoms due to exposure to allergens such as dust, pollen, pet dander, etc.
Allergy-Proof Your Home
The AllergyCare Self-Empty Station is specially designed for people with dust and allergen sensitivity.
If you experience allergy symptoms such as hay fever or allergic asthma throughout the year, here's a room-by-room guide to reducing allergens in your home and maintaining a clean home environment.
Bedroom
- Clean weekly with the AllergyCare Self-Empty Station and shampoo the carpets frequently to minimize allergens.
- Remove carpeting and use hardwood or linoleum flooring and washable area rugs. If impossible, use low-pile instead of high-pile carpeting.
- Consider keeping pets out of your bedroom or away from any bedding.
Living room
- Replace carpeting with easy-to-clean flooring options. If impossible, use low-pile instead of high-pile carpeting and vacuum weekly with the AllergyCare Self-Empty Station. Wash area rugs and floor mats weekly, and shampoo the carpets periodically.
- Consider replacing upholstered sofas and chairs with furniture made of leather, wood, metal or plastic.
- Wipe pets off with a towel before they come inside and bathe pets regularly. Consider keeping pets outside if weather permits.
Bathroom
- Remove carpeting and use tile, vinyl, wood or linoleum flooring. Use washable rugs.
Kid's room
- Dust mites, mold, and pet dander often linger on children's toys. Clean toys every one to two weeks if your child is prone to allergies.
Basement
- Remove moldy or water-damaged carpeting. If possible, use concrete, vinyl or linoleum flooring.
Entire house
- Dust and damp mop solid surface flooring regularly. Clean carpets weekly with the AllergyCare Self-Empty Station. Use a damp cloth to clean other surfaces, including the tops of doors, windowsills and window frames. Maintain good pet hygiene.
Troubleshooting
The solutions below are for general questions. If your problem persists, visit www.eufy.com, go to the eufy Clean app, or contact support@eufy.com for help.
| Problems | Solutions |
| RoboVac will not turn on. |
|
| RoboVac stops working suddenly. |
|
| Too much water comes out during mopping. |
|
| You cannot schedule cleanings. |
|
| Suction power is weak. |
|
| RoboVac's movements or travel path are abnormal. |
|
| Water does not come out during mopping. |
|
| RoboVac cannot be charged. |
|
| The LED on the Self- Empty Station flashes white quickly. |
|
| RoboVac stops collecting dust. |
|
| You cannot control RoboVac with the Google Assistant. |
|
| RoboVac cannot return to the self-empty station for recharge with the protective pad installed. |
|
| RoboVac cannot connect to a Wi-Fi network. |
|
| You cannot control RoboVac with Amazon Alexa. |
|
Voice Alert
When RoboVac encounters a problem, the red indicator on RoboVac will flash and you will hear the relevant voice prompts.
The voice prompts below are only for reference and may be changed after voice pack updates. Please follow the voice prompts you have heard to find the cause and solution below. If the issue persists, contact customer support for help.
| Voice Prompt | Cause and Solution |
| Error 1: Front bumper stuck. | Front bumper is stuck. Tap it repeatedly to remove any dust, if not, then move the device to a new position and try again. |
| Error 2: Wheel stuck. Check the wheel and move it to a new position. | Wheel may be stuck or trapped. Clear any obstacles in the surrounding area and check the wheel for any trapped dust. Move the device to a new position and try again. |
| Error 4: Rolling brush stuck. Remove and clean the rolling brush. | Remove the rolling brush, roller joint, roller brush cover, and suction inlet to clean it. Once cleaned, place the items back into the device and try again. |
| Error 5: Device trapped. Clear the surrounding area. | Device is trapped. Clear any obstacles in the surrounding area and try again. |
| Error 6: Device trapped. Place device near the position where the problem occurred. | Device may be suspended in air. Move it to a new position close to the original position and try again. If the device is still unable to start, clean the edge sensor and try again. |
| Error 7: Wheel suspended. Please move the device to a new position. | Wheels may be suspended in air. Move the device to a flat surface and a new position close to the original position then try again. |
| Error 8: Low battery, shutting down device. Please charge your device. | Low Battery; system will shut down. Charge the device and try again. |
| Error 9: Magnetic Boundary Strip detected. Move device to a different area. | Device is too close to a strong magnetic field or strip. Move the device to a different area and try again. |
| Error 21: Self-Empty Station blocked by surrounding obstacles. | Self-Empty Station is blocked by obstacles, clear any obstacles around the Self-Empty Station and try again. |
| Error S1: Battery Error. Refer to Owner's Manual or App for help. |
|
| Error S2: Wheel Module Error. Refer to Owner's Manual or App for help. |
|
| Error S3: Side Brush Error. Refer to Owner's Manual or App for help. |
|
| Error S4: Suction Fan Error. Refer to Owner's Manual or App for help. |
|
| Error S5: Rolling Brush Error. Refer to Owner's Manual or App for help. |
|
| Error S8: Path Tracking Sensor Error. Refer to Owner's Manual or App for help. |
|
| Error 54: Please install the dust bag. |
|
| Error 66: Self-Empty Station input voltage error, please check. |
|
Specifications
 | Input | 19V  0.6A 0.6A |
| Battery Voltage | 14.4 V | |
| Power Consumption | 48W | |
| Battery Type | 14.4V Li-ion 2600mAh | |
| Dust Box Capacity | 250ml | |
| Water Tank Capacity | 130ml | |
| Cleaning Time | Maximum 100 min | |
| Charging Time | 300 - 360 min | |
 | Power Consumption | 1000W |
IMPORTANT SAFETY INSTRUCTIONS
To reduce the risk of injury or damage, keep these instructions at hand when setting up, using, and maintaining this device.
WARNING SYMBOLS USED
 This is the safety alert symbol. This symbol alerts you to potential hazards that could result in property damage and/or serious bodily harm or death.
- This device can be used by individuals aged 8 years and above and individuals with reduced physical, sensory or mental capabilities or lack of experience and knowledge if they have been given supervision or instruction concerning use of this device in a safe way and understand the hazards involved.
- Children should be supervised to ensure they do not play with this device.
- Cleaning and maintenance shall not be performed by children without adult supervision.
- This device is only to be used with the Self-Empty Station provided.
- Before cleaning or maintaining this device, the plug must be removed from the outlet.
- The battery in this device should only be replaced by a skilled professional.
- Before removing the battery, disconnect the device from its power supply.
- The battery must be removed before this device is disposed of. To remove the battery, first unscrew the screws on the bottom, then remove the back cover. Remove the battery by disconnecting the quick connector.
- The used battery should be placed in a sealed plastic bag and disposed of safely according to local environmental regulations.
- This device is for indoor use only.
- This device is not a toy. Do not sit or stand on this device. Small children and pets should be supervised when this device is operating.
- Store and operate this device in room temperature environments only.
- Do not use to pick up flammable or combustible liquids, such as gasoline, or use in areas where they may be present.
- Before using this device, pick up objects like clothing and loose paper. Lift up cords for blinds or curtains. Move power cords and sharp, pointed, or fragile objects out of the way. Be aware that if this device passes over a power cord and drags it, an object could be pulled off a table or shelf.
- If the room to be cleaned has a balcony, a physical barrier should be used to prevent access to it to ensure safe operation.
- Do not place anything on top of this device.
- Be aware that this device moves around on its own. Take care when walking in the area where this device is operating to avoid stepping on it.
- Do not operate this device in areas with exposed electrical outlets on the floor.
- Do not expose the electronic components of this device, its battery, or the Self-Empty Station. There are no user-serviceable parts inside.
- Do not use this device on carpets with tasseled edges or loose threads or on an unfinished, unsealed, waxed, or rough floor, as it may result in damage to the floor and this device. Use only on hard floor surfaces or low-pile carpets.
- This device has been designed to be used on floors without scratching them. We recommend that you test this device on a small area of the room to be cleaned to ensure no scratches are made before cleaning the whole room.
- Only use attachments recommended or described in this manual.
- Do not handle the device or plug with wet hands.
- Ensure that the dust bag and/or filters are correctly in place before use.
![burn hazard]() Do not use a battery pack or device that is damaged or modified. Damaged or modified batteries may exhibit unpredictable behavior resulting in fire, explosion, or risk of injury.
Do not use a battery pack or device that is damaged or modified. Damaged or modified batteries may exhibit unpredictable behavior resulting in fire, explosion, or risk of injury.- Do not expose the battery pack or device to fire or excessive heat. Exposure to fire or temperatures above 130°C / 266℉ may cause an explosion.
- Do not modify or attempt to repair the device or the battery pack, except as indicated in the instructions for use and care.
![burn hazard]() Follow all charging instructions and do not charge the battery pack or device outside of the temperature range specified in the instructions. Charging improperly or at temperatures outside of the specified range may damage the battery and increase the risk of fire.
Follow all charging instructions and do not charge the battery pack or device outside of the temperature range specified in the instructions. Charging improperly or at temperatures outside of the specified range may damage the battery and increase the risk of fire.- Do not unplug by pulling on cord. To unplug, grasp the plug, not the cord. Keep cord away from heated surfaces
- Turn off all controls before unplugging.
- Do not put any object into openings. Do not use with any opening blocked; keep free of dust, lint, hair, and anything that may reduce air flow.
- Keep hair, loose clothing, fingers, and all parts of body away from openings and moving parts.
- Use extra care when cleaning on stairs.
 Do not use a battery pack or device that is damaged or modified. Damaged or modified batteries may exhibit unpredictable behavior resulting in fire, explosion, or risk of injury.
SAVE THESE INSTRUCTIONS
Customer Service
Contact Us
support@eufy.com
www.eufy.com
(US/CA) +1 (800) 994 3056
(UK) +44(0)1604 936200
(DE) +49(0)69 9579 7960
(日本) +81 03 4455 7823
For more support phone numbers, please visit:
https://support.eufylife.com/s/phonecontactus
Or scan the QR code below:

For tutorial videos, FAQs, and more information, please visit:
https://support.eufylife.com
Or scan the QR code below:


@EufyOfficial

@EufyOfficial

@EufyOfficial

@EufyOfficial
Documents / Resources
References
![www.eufy.com]() eufy Support
eufy Support![www.eufy.com]() eufy - Built with Care | Home Security System & Robovacs - eufy US
eufy - Built with Care | Home Security System & Robovacs - eufy US![support.eufylife.com]() eufy Support
eufy Support![support.eufylife.com]() eufy Support
eufy Support![www.apple.com]() App Store - Apple
App Store - Apple![play.google.com]() Google Play
Google Play![support.eufylife.com]() eufy Support
eufy Support
Download manual
Here you can download full pdf version of manual, it may contain additional safety instructions, warranty information, FCC rules, etc.
Advertisement


Need help?
Do you have a question about the G30 Hybrid+ and is the answer not in the manual?
Questions and answers