Dometic RMDT10.5T, RMDT10.5XT, 10 Series Manual
- Operating manual (804 pages) ,
- Operating instructions manual (468 pages) ,
- Installation manual (384 pages)
Advertisement
- 1 Explanation of symbols
- 2 Accessories
- 3 Intended use
- 4 Technical description
-
5
Using the refrigerator
- 5.1 Tips for using the unit optimally
- 5.2 Operating in low outdoor temperatures
- 5.3 Operation at high ambient temperatures
- 5.4 Switching on the unit
- 5.5 Switching off the unit
- 5.6 Operating the unit
- 5.7 Tank stop mode
- 5.8 Stand-alone gas operation
- 5.9 Fan operation
- 5.10 Setting the cooling capacity
- 5.11 Using the unit door/ice compartment door
- 5.12 Notes on storing food
- 5.13 Using the VG fresh base
- 5.14 Positioning the shelves
- 5.15 Defrosting the refrigerator
- 5.16 Positioning the unit door in the winter position
- 6 Using the oven
-
7
Troubleshooting
- 7.1 The refrigerator does not work with AC operation
- 7.2 The refrigerator does not work with DC operation
- 7.3 The refrigerator does not work with gas operation
- 7.4 The refrigerator is not adequately cooling
- 7.5 Fault messages and signal tones
- 7.6 Refrigerator door/ice compartment door does not close
- 8 Cleaning and maintenance
- 9 Technical data
- 10 Safety instructions
- 11 Documents / Resources
Explanation of symbols

Safety instruction: Indicates a hazardous situation that, if not avoided, will result in death or serious injury.

Safety instruction: Indicates a hazardous situation that, if not avoided, could result in death or serious injury.

Safety instruction: Indicates a hazardous situation that, if not avoided, could result in minor or moderate injury.
NOTICE!
Indicates a situation that, if not avoided, can result in property damage.
 NOTE
NOTE
Supplementary information for operating the product.
Accessories
| Description | |
| Winter cover LS300 for the ventilation grill | |
 Optional Fan Kit REF-FANKIT Note: The Fan Kit can only be installed in refrigerators with software version 36 or higher (fig.  ). ). | |
| Optional Battery pack Pack R10-BP for stand-alone gas operation | |
Optional Ø2,5/5,5 mm connector for stand-alone gas operation with a 9 V powerbank powerbank |
Intended use
The refrigerator-oven combination is suitable for:
- Installation in caravans and motor homes
The refrigerator is suitable exclusively for:
- Cooling and storing food as well as storing frozen food
The refrigerator is not suitable for:
- Storing medications
- Storing corrosive substances or substances that contain solvents
- Quick-freezing food
The oven is suitable exclusively for:
- Cooking, baking and grilling food
The oven is particularly not suitable for:
- Heating
This product is only suitable for the intended purpose and application in accordance with these instructions.
This manual provides information that is necessary for proper installation and/or operation of the product. Poor installation and/or improper operating or maintenance will result in unsatisfactory performance and a possible failure.
The manufacturer accepts no liability for any injury or damage to the product resulting from:
- Incorrect installation, assembly or connection, including excess voltage
- Incorrect maintenance or use of spare parts other than original spare parts provided by the manufacturer
- Alterations to the product without express permission from the manufacturer
- Use for purposes other than those described in this manual
Dometic reserves the right to change product appearance and product specifications.
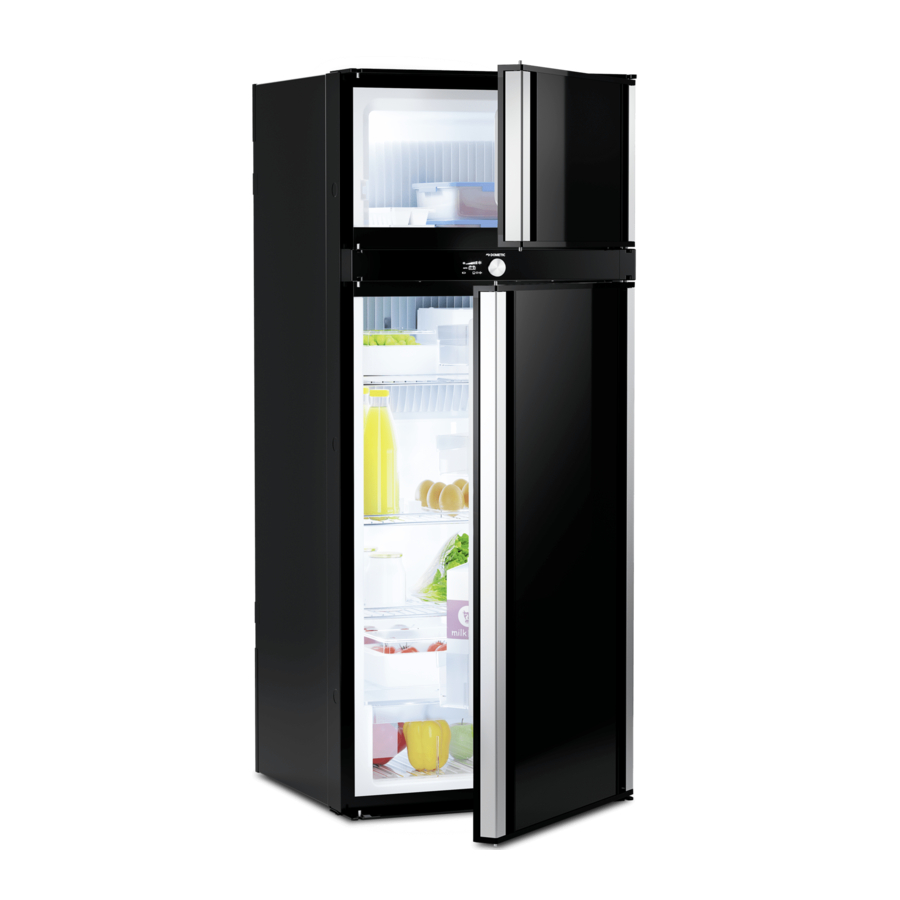
Technical description
The device is a combination of refrigerator and oven which are firmly screwed together. The refrigerator and the oven can be operated independently of one another. The oven uses the power and gas supply of the refrigerator and does not need to be separately connected.
The refrigerator
The device is an absorption refrigerator.
The refrigerator is designed for use:
- On a DC power supply (12 V)
- On an AC power supply
- With liquefied gas (propane or butane)
The refrigerator has an automatic operating mode that selects the most economical connected type of energy. The cooling unit operates silently.
The oven
The device is a gas-operated oven with grill function made of stainless steel.
NOTE
The oven uses the gas connection of the refrigerator and does not need to be separately connected
Food can be cooked or baked in the oven at 130 – 230°C. The grill function can be switched on to warm up food evenly. The grill and the oven cannot be used at the same time.
The gas can be ignited electronically.
Refrigerator control and display elements
The TFT display has the following operating and display elements (fig.  1):
1):


Oven control elements

No. in fig.  | Symbol | Description |
| 1 | Electronic ignition and control knob for oven | |
| 2 |  | Oven mode |
| 3 |  | Zero position (gas switched off) |
| 4* |  | Grill mode (*optional) |
Using the refrigerator
NOTE
- Before starting your new refrigerator for the first time, clean it inside and outside with a damp cloth for hygienic reasons.
- When using the refrigerator for the first time, there may be a mild odor which will disappear after a few hours. Air the living space well.
- Park the vehicle so that it is level, especially when starting up and filling the refrigerator before setting off on a journey.
- The cooling performance can be affected by:
- The ambient temperature (e.g. when the vehicle is exposed to direct sunlight)
- The amount of food to be refrigerated
- How often you open the door
Tips for using the unit optimally
- Do not store goods in the refrigerator for the first 12 hours of operation.
- Protect the interior of the vehicle from warming up excessively (e.g. sunshades in the windows, air conditioner).
- Protect the refrigerator from direct sunlight (e.g. sunshades in the windows).
Operating in low outdoor temperatures
NOTICE!
In AC operation and DC operation, install both winter covers. In gas mode or automatic mode, install only the lower winter cover. This prevents heat from building up and the fumes from the refrigerator can be extracted properly.
NOTE
Cold air can restrict the performance of the cooling unit. Attach the winter covers if you experience a reduced cooling capacity at low ambient temperatures.
- Install the LS 300 winter covers (accessory) as shown in fig.
![]() .
.

 .
.
Operation at high ambient temperatures
At high ambient temperatures in combination with high levels of humidity, condensation may form on the ice compartment frame. The ice compartment is equipped with a frame heater to reduce condensation on the frame of the ice compartment.
The frame heater is switched on continuously in the following operating modes:
- AC operation
- DC operation (when the engine of the vehicle is running)
In gas operation, the frame heater can be switched on manually.
Switching on the unit
- Press the control knob for 2 seconds
- The refrigerator starts with the last selected settings.
Switching off the unit
- Press the control knob for 4 seconds
- A beep sounds and the refrigerator switches off.
Operating the unit

Menu navigation: fig. 
- Press the control knob to activate the TFT display.
The main menu is divided into three lines:
| Main menu | Details menu |
 | Cooling capacity menu |
 | Operating mode menu |
 | Settings menu |
- Turn the control knob to select the desired detail menu.
- Press the control knob to open the selected detail menu.
- Turn the control knob to navigate through the detail menu.
- Selected settings are displayed in blue.
- Press the control knob to choose the selected setting.
- Confirm the selection with
![]() .
.
Tank stop mode
Turn off the refrigerator or select a different operating mode if refueling takes longer than 15 minutes.
If the vehicle's ignition is switched off, the refrigerator will switch to tank stop mode for safety reasons. This blocks gas operation for 15 minutes. After that, the refrigerator automatically switches back to regular, automatic mode.
In tank stop mode the symbol ![]() is displayed.
is displayed.
Stand-alone gas operation
(Accessory)
In stand-alone gas mode, the refrigerator must be switched off manually during refueling.
NOTE
- When no AC or DC power is connected, there is a load on the batteries even when the refrigerator is off.
- Remove the batteries when the refrigerator is not in use (risk of leakage).
- If your vehicle manufacturer has installed the Ø2,5/5,5 mm connector, ask the manufacturer about the connection point for the 9 V
![]() powerbank.
powerbank.
For stand-alone gas mode, the optional battery packs must be installed or the optional Ø2,5/5,5 mm connector must be plugged into a 9 V powerbank. This makes connecting to AC or DC power unnecessary.
When using 12 batteries (type AA), the refrigerator can be operated in stand-alone gas mode for 2 to 3 days.
Note the following special features for stand-alone gas mode:
- The refrigerator interior lighting remains switched off.
- The display turns off 2 seconds after the last activity.
- The display switches on briefly every 15 seconds. This indicates that the refrigerator is on.
- If there is a pending error message, the display switches on permanently.
Stand-alone gas mode is indicated through symbols  and
and  .
.
The batteries of the battery packs must be replaced when the error "E14" is displayed.
Fan operation
(Optional)
For fan operation the optional fan must be installed.
When switching on the device, the fan is switched on for a short time (function test). During the device's operation the fan only switches on:
- When the ambient temperature is above 32°C.
- When the set cooling temperature is not reached within 2 hours.
- When the fan function is activated.
NOTE
In delivery state, the fan function is activated
The fan operation is indicated by the symbol ![]() .
.
Setting the cooling capacity
NOTE
For ambient temperatures of +15°C to +25°C, select the average cooling capacity
- Select the desired temperature level in the cooling capacity menu.
Using the unit door/ice compartment door
Risk of injury
- The refrigerator door or ice compartment door can completely detach from the device if used incorrectly.
- Do not lean on the open refrigerator door.
NOTE
If the door is not locked correctly on the opposite side, carefully push on the top and bottom of the door on that side until it locks into place
Closing and locking the refrigerator door/ice compartment door
- Press the door shut until you hear it clearly click at the top and bottom.

- The door is now closed and locked.

Notes on storing food
Health hazard
- Please check if the cooling capacity of the refrigerator is suitable for the food you want to cool.
- Opening the door for long periods can cause significant increase of the temperature in the compartments of the refrigerator.
- Store raw meat and fish in suitable containers in the refrigerator, so that raw meat and fish is not in contact with or drip onto other food.
- Food may only be stored in its original packaging or in suitable containers.
- The ice compartment is suitable for making ice cubes and for keeping frozen food. It is not suitable for freezing previously unfrozen food.
- If the refrigerator is exposed to a room temperature of below +10°C for a prolonged period of time, an even temperature of the ice compartment cannot be guaranteed. This can lead to an increase in the ice compartment temperature and the stored goods may defrost.
NOTICE!
- The maximum weight per door shelf is 6 kg. The maximum weight for the entire door is 7.5 kg.
- Store heavy objects such as bottles or cans only in the refrigerator door, in the lower storage compartment or on the bottom shelf.
- Do not keep carbonated drinks in the ice compartment.
- Store food as shown (fig.
![]() ).
).
 ).
).Using the VG fresh base
NOTICE!
The maximum load capacity of the VG fresh base is 5.5 kg.
Using the slider in the VG fresh base, the humidity in the vegetable compartment below can be regulated:
| Goods to be cooled | Optimal humidity | Slider position |
Vegetables  | High  |
|
Fruit  | Low  |
|
Positioning the shelves
Risk of child entrapment
All shelves are fixed in place to prevent children from climbing inside the refrigerator.
- Only remove the shelves for cleaning purposes.
- Refit the shelves and lock them in place.
- Remove the shelf as shown (fig.
![]() ).
).

- Re-assemble the shelf in the reverse order.
 ).
).
Positioning the shelf at an angle for wine bottles
NOTICE!
While driving, the shelf in the angled position must not be filled.
- Change the position of the shelf as shown (fig.
![]() ).
).

 ).
).
Removing and inserting the VG-Fresh base
- Proceed as shown (fig.
![]() ).
).

 ).
).
Defrosting the refrigerator
NOTICE!
Do not use mechanical tools or a hair dryer to remove ice or loosen frozen items.
NOTE
Over time, frost builds up on the cooling fins inside the refrigerator. If this layer of frost is about 3 mm thick, you should defrost the refrigerator.
- Proceed as shown (fig.
![]() ).
).

 ).
).
Positioning the unit door in the winter position
The winter position must not be used while driving.
Put the refrigerator door and the ice compartment door into the winter position if you are not going to use the refrigerator for a longer period of time. This prevents mold from forming.
- Defrost the refrigerator (chapter "Defrosting the refrigerator").
- At the top and bottom of the door in the area of the locking mechanism, pull the hook all the way out (fig.
![]() ).
).

- Press against the refrigerator door.
- The protruding pin snaps into the hook.
 ).
).
Open the door in winter mode as follows:
- Pull the door toward you.
- Push in the protruding hooks at the top and bottom of the door.
Using the oven
Risk of asphyxiation
In particular, the oven must not be used for heating.
- Using the gas cooker results in heat and moisture building up in the area in which it is used.
Ensure that the area is well-ventilated:- Keep the natural air vents open or provide a mechanical ventilation device (such as an extractor hood).
- Using the device intensively and for prolonged periods can make additional ventilation necessary, for example by opening a window or using a more efficient ventilation system, such as operating the mechanical ventilation device at a higher power level.
- Insufficient ventilation can constitute a hazard for the user with a risk of injury.
- Do not use the oven for more than 2 hours at the highest power level.
- Do leave the device unattended when it is in operation.
- During and immediately after use, some accessible elements can be very hot. Do not touch these and keep children away from the device.
- Ensure that all the control knobs are set to the zero position after cooking. Close the main shut-off valve of the gas line after use.
- Some parts of the oven become very hot when in use. Protect yourself and especially children against contact with hot parts.
- Only light the oven when the oven door is completely open.
- Position food being cooked, the oven shelf and the drip pan so that they are not in contact with the flame.
- Use protective gloves when handling the hot parts.
- If the glass of the oven door is breaks:
- Immediately turn off all burners.
- Do not touch the surface of the appliance.
- Do not use the appliance.
NOTE
- Ensure additional ventilation when baking, for example, by opening the window.
- Do not use the oven to heat the vehicle interior.
Inserting the oven shelf
- Open the oven door completely.
- Insert the oven shelf in the oven so that it rests on the left and right-hand brackets mounted on the oven sides.
Before initial use
- Clean the rack and the baking tray with a standard cleaning agent.
- Turn on the oven for 30 minutes while empty at the highest temperature.
- Turn on the grill (optional) for 15 – 20 minutes while empty at the highest temperature.
- Afterwards switch the oven off and leave it switched off for at least 1 minute before lighting it again.
Switching on the oven
- The burner may only be ignited when the oven door is completely open.
- Keep an eye on the gas outlets while you are igniting the burner.
- If the burner flame goes out accidentally, turn off the oven and wait at least 1 minute before re-igniting the burner.
Electronic ignition (fig.  )
)
- If the burner does not start electronically, check whether the gas cylinder is filled.
- If the device does not function at all, turn off the gas valve and contact an authorized customer service
- Open the oven door completely.
- Ensure the gas supply is turned on.
- Press and hold down the temperature regulator (1).
- Turn the temperature regulator to the left into a 1 – 6 position on the temperature scale.
NOTE
When switching on the oven from a cold state, a slight lifting of the flame may occur. The flame should stabilize after 60 seconds.
Usually the flame should hold after 5 – 10 seconds.
- Press and hold down the temperature regulator for another 5 – 10 seconds.
- The burner is ignited electronically.
- Turn the temperature regulator to the required position (see chapter "Setting the oven temperature").
- Close the oven door.
If the burner does not ignite:
- Turn the temperature regulator to the
![]() position.
position. - Wait a minute.
- Ignite the oven again.
Manual ignition (fig. )
- Open the oven door completely.
- Ensure the gas supply is turned on.
- Press and hold down the temperature regulator (1).
NOTE
When switching on the oven from a cold state, a slight lifting of the flame may occur. The flame should stabilize after 60 seconds.
Usually the flame should hold after 5 – 10 seconds.
- Turn the temperature regulator to the left into a 1 – 6 position on the temperature scale and simultaneously ignite the burner with a gas lighter or match.
- Press and hold down the temperature regulator for another 5 – 10 seconds.
- The burner is ignited.
- Close the oven door.
Setting the temperature
NOTE
- The set temperature may deviate from the values stated below by up to ±20°C.
- Immediately after the ignition in any position of the control knob, the flame of the oven burner is switched on at the maximum output and then automatically reverts to the minimum output as soon as the set oven temperature is reached.
- If the oven has not cooled down from previous use, the burner may go out straight after lighting it. In this case, blow into the burner opening to get rid of the steam.
- Ignite the oven again as previously described.
- Set the required temperature using the temperature regulator (fig.
![]() 1):
1):
| Position | Temperature in °C |
 | – |
| 1 | 130 |
| 2 | 150 |
| 3 | 170 |
| 4 | 190 |
| 5 | 210 |
| 6 | 230 |
If the flame goes out during operation:
- Turn the temperature regulator to the
![]() position.
position. - Wait a minute.
- Ignite the oven again.
Switching on the grill
- Never use the grill without any food under the grill.
- Do not use the grill for longer than 15 minutes. The grill may not be used as an oven.
- The burner may only be ignited when the oven door is fully open.
- Keep an eye on the gas outlets while you are igniting the burner.
- If the burner flame goes out accidentally, turn off the oven and wait at least 1 minute before re-igniting the burner.
Electronic ignition (fig. )
- If the burner does not start electronically, check whether the gas cylinder is filled.
- If the device does not function at all, turn off the gas valve and contact an authorized customer service.
- Open the oven door completely.
- Make sure that the gas supply is turned on.
- Press in the temperature regulator (1) and hold it down.
- Turn the temperature regulator to the right to the position
![]() .
.
NOTE
When switching on the grill from a cold state, a slight lifting of the flame may occur. The flame should stabilize after 60 seconds.
Usually the flame should hold after 5 – 10 seconds.
- Press and hold down the temperature regulator for another 5 – 10 seconds.
- The burner is ignited electronically.
- Close the oven door.
If the burner does not ignite:
- Turn the temperature regulator to the
![]() position.
position. - Wait a minute.
- Ignite the oven again.
Manual ignition (fig. )
- Open the oven door completely.
- Make sure that the gas supply is turned on.
- Press in the temperature regulator (1) and hold it down.
NOTE
When switching on the grill from a cold state, a slight lifting of the flame may occur. The flame should stabilize after 60 seconds.
Usually the flame should hold after 5 – 10 seconds.
- Turn the temperature regulator to the right to the position
![]() and simultaneously ignite the burner with a gas lighter or match.
and simultaneously ignite the burner with a gas lighter or match. - Press and hold down the temperature regulator for another 5 – 10 seconds.
- The burner is ignited.
- Close the oven door.
Visual inspection of the flame
Depending on the type of gas used, the flame should look as follows:
- Propane (G31): flame with a blue inner flame and a clear contour.
- Butane (G30): flame with slightly yellow tips when the burner is switched on, which becomes more intensive as the burner heats up.
Switching off the oven or grill
- Turn the temperature regulator to the
![]() position.
position.
NOTE
If you do not use the oven and the refrigerator for a prolonged period of time:
Shut off the gas supply in the vehicle and the valve to the gas cylinder
Changing the light bulb
- Switch off the oven.
- Unscrew the glass cover of the light.
- Take the halogen bulb out of the socket and put the new bulb in (G4, 5 W). Use a cloth to do this to avoid damaging the new bulb.
Troubleshooting
NOTE
To safely operate 12 V consumer units in the caravan while driving, it must be ensured that the towing vehicle provides sufficient voltage. On some vehicles, the battery management system may automatically switch off the consumer units to protect the battery. Ask your vehicle manufacturer for more information.
| Fault | Possible cause | Suggested remedy |
The refrigerator does not work with AC operation | The fuse in the AC power supply is defective. |
|
| The vehicle is not connected to the AC power supply. |
| |
| The AC heating element is defective. |
| |
The refrigerator does not work with DC operation | The fuse in the DC supply is defective. | The fuse on the relay must be replaced.
|
| The vehicle fuse has blown. |
| |
| The vehicle battery is discharged. |
| |
| The ignition is not turned on. |
| |
| The DC heating element is defective. |
| |
The refrigerator does not work with gas operation | The gas cylinder is empty. |
|
| The gas valve is closed. |
| |
| Air is in the supply line. |
| |
| In automatic mode: The refrigerator is being operated with gas although it is connected to the AC mains. | The mains voltage is too low. |
|
The refrigerator is not adequately cooling | The ventilation around the cooling unit is not sufficient. |
|
| The evaporator is iced up. |
| |
| The temperature is set too high. |
| |
| The ambient temperature is too high. |
| |
| Too much food was placed in the refrigerator at once. |
| |
| Too much warm food at once was placed in the refrigerator. |
| |
| The refrigerator has not been operating for very long. |
|
Fault messages and signal tones
All faults are indicated with a warning symbol, a fault ID and a beep. The beeping lasts for 2 minutes and is repeated every 30 minutes until the error has been rectified.
If multiple faults occur, the display shows the last fault. The underlying faults are displayed after the last fault has been confirmed.
Faults are indicated by a fault code with a warning symbol ( ![]() ) in the middle of the TFT display.
) in the middle of the TFT display.
WARNING type fault messages
All faults of the WARNING type are reset automatically once the fault has been rectified.
| Code | Fault | Solution |
| W01 | Defective temperature sensor in the refrigerator compartment |
|
| W05 | AC power not connected or AC voltage < 190 V |
|
| W06 | DC power not connected |
|
| W11 | DC overvoltage (> 16 V). |
|
 | Tank stop mode: Gas operation is blocked for 15 minutes. |
|
 W10 + beep | The door is opened for more than 2 minutes. |
|
ERROR type fault messages
All faults of the ERROR type must be reset manually:
- Press the control knob for 2 seconds.
- A beep sounds.
- The error has been reset.
| Code | Fault | Solution |
| E03 | No connection between power module and display |
|
| E07 | No cooling capacity in gas mode |
|
| E08 | No cooling power in AC mode |
|
| E09 | No cooling power in DC mode |
|
| E12 | Gas valve check error | Gas operation is not possible.
|
| E13 | Internal communication error | Gas operation not possible.
|
| E14 | In stand-alone gas mode: The battery charge of the battery packs is too low |
|
| E50 | Gas lock after 3 ignition attempts | Ignition not possible.
|
| E51 | Gas lock, internal error in the power module | Reset the error.
|
| E52 | Ground contact, gas valve |
|
| E53 | Ground contact, ignition electrode |
|
Refrigerator door/ice compartment door does not close
NOTE
If the door no longer closes, then the door handle is blocked on the opened side.
- Remove the door handle blockage as shown (fig.
![]() ).
).

 ).
).
Refrigerator door/ice compartment door has completely detached from the device
Risk of injury
The door can completely detach from the device if the locking pin has been tampered with or is twisted
- Insert the door as shown (fig.
![]() ).
).

 ).
).
Cleaning and maintenance
Always disconnect the refrigerator from the energy supply before you clean and service it.
Risk of injury
Allow the oven to cool down before cleaning it.
NOTICE!
- Hot surfaces could be damaged if they come into contact with cold water or a damp cloth.
- Do not use abrasive, corrosive, chlorine-based products, scourers or steel wool on the oven.
- Do not leave acid or alkaline substances (for example: vinegar, salt, lemon juice) on appliance surfaces.
- For stainless steel surfaces and enamelled parts: wash with soap and water or mild detergent, rinse and dry. Use clean sponges and cloths.
- Do not use rough abrasive material or sharp metal scrapers to clean the glass oven doors as these products may cause the glass to shatter.
- For cleaning, never use sharp cleaning agents or hard or pointed tools to remove ice or to loosen objects which have frozen in place.
- Clean the refrigerator and oven regularly and when it gets dirty using a damp cloth.
- Make sure that no water drips into the seals. This can damage the electronics.
- Wipe the refrigerator and oven dry with a cloth after cleaning.
- Check the condensate drain regularly.
Clean the condensate drain when necessary. If it is blocked, the condensate collects on the bottom of the refrigerator. - Make sure that the ventilation grills in the outer wall of the motorhome or caravan and the roof ventilator of the refrigerator-oven combination are free from dust and pollutants. This ensures that the heat generated during operation can be dispersed, the refrigerator is not damaged and the cooling capacity is not reduced.
Cleaning the gas burner of the refrigerator
- Allow the burner to cool down before cleaning it.
- Do not modify the gas equipment.
NOTE
- Dirt in the gas burner is indicated by poor ignition or deflagrations.
- The manufacturer recommends also cleaning the burner after not being used for a longer period and at least once a year.
- When using liquefied petroleum gas, the cleaning interval, depending on the degree of pollution, is reduced to half yearly or quarterly.
- Proceed as shown (fig.
![]() ).
).

 ).
).
Maintenance
Work on gas and electrical installations may only be performed by qualified technicians.
- Have the gas system and connected flues inspected before initial operation and then every two years by an authorized professional to ensure they comply with the national safety requirements.
- Keep a record of any maintenance performed.
Technical data

| RMDT10.5T | RMDT10.5XT | |
| Connection voltage | 230 V~/50 Hz 12 V | |
| Capacity | ||
| Gross capacity | 153 l | 177 l |
| Refrigerator compartment | 124 l | 142 l |
| Ice compartment | 29 l | 35 l |
| Total net capacity | 147 l | 171 l |
| Power consumption | 250 W (230 V~) 170 W (12 V ) | |
| Energy consumption | 4.4 kWh/24 h (230 V~) | |
| Gas consumption | ||
| Refrigerator | 580 g/24 h | |
| Oven | 80 g/1 h | |
| Oven with grill | 95 g/1 h | |
| Climate class | SN | |
| Dimensions H x W x D | ||
| Standard frame | fig.  A A | |
| Optional frame for flush mounting | fig. B | |
| Weight | 60.4 kg | 62.7 kg |
Safety instructions
General safety

Failure to obey these warnings could result in death or serious injury.
Electrocution hazard
- Installation and removal of the refrigerator may only be carried out by qualified personnel.
- Do not operate the refrigerator if it is visibly damaged.
- This refrigerator may only be repaired by qualified personnel. Improper repairs can result in considerable danger or damage to the refrigerator.
- If this refrigerator's power cable is damaged, it must be replaced by the manufacturer, a service agent or a similarly qualified person in order to prevent safety hazards.
- When positioning the refrigerator, ensure the supply cord is not trapped or damaged.
- Do not locate multiple portable socket-outlets or portable power supplies at the rear of the refrigerator.
- Plug the device to sockets that ensure proper connection especially when the device needs to be grounded.
Explosion hazard
- Do not spray aerosols in the vicinity of this refrigerator while it is in operation.
- Do not store any explosive substances, such as aerosol cans with propellants, in the refrigerator.
- Never open the absorber unit. It is under high pressure and can cause injury if it is opened.
Health hazard
- This refrigerator can be used by children aged from 8 years and above and persons with reduced physical, sensory or mental capabilities or lack of experience and knowledge if they have been given supervision or instruction concerning use of the refrigerator in a safe way and understand the hazards involved.
- Children aged from 3 to 8 years are allowed to load and unload the refrigerator.
- Cleaning and user maintenance shall not be made by children without supervision.
- Children must be supervised to ensure that they do not play with the refrigerator.
Risk of child entrapment
- Ensure that the shelves are mounted and secured so that children cannot lock themselves in the refrigerator.
- Before disposing of your old refrigerator:
- Dismantle the drawers.
- Leave the shelves in the refrigerator so that children cannot climb inside.
- Take off the doors.
Failure to obey these cautions could result in minor or moderate injury.
Health hazard
- To avoid a hazard due to instability of the refrigerator, it must be fixed in accordance with the installation instructions.
- Keep ventilation openings, on the refrigerator and in its enclosure or in the built-in structure, clear of obstruction.
- Do not use mechanical devices or other means to accelerate the defrosting process, other than those recommended by the manufacturer.
- Do not open or damage the refrigerant circuit under any circumstances.
- Do not use electrical devices inside the refrigerator unless they are recommended by the manufacturer for that purpose.
Risk of injury
- Do not use or store flammable materials in or near this refrigerator.
- Do not place articles on or against this refrigerator.
- Do not modify this refrigerator.
NOTICE! Damage hazard
- Only select operation with DC power supply if the vehicle engine is running and providing sufficient voltage to the light system, or if you are using a battery monitor.
- If present, keep the condensate drain clean at all times.
- If the refrigerator has ventilation grilles, do not use a high-pressure cleaner near the ventilation grille when cleaning the vehicle.
- The refrigerator may not be exposed to rain.
Safety when operating

Failure to obey these warnings will result in death or serious injury.
Electrocution hazard
- Do not touch exposed cables with your bare hands.
- Before starting the refrigerator, ensure that the power supply line and the plug are dry.
Failure to obey these cautions could result in minor or moderate injury.
Health hazard
- Ensure that foodstuffs do not touch the walls of the cooling area.
- Clean regularly surfaces that can come in contact with food and accessible drainage systems.
- Store raw meat and fish in suitable containers in the refrigerator, so that it is not in contact with and cannot drip onto other food.
- If the refrigerator is left empty for long periods:
- Switch off the refrigerator.
- Defrost the refrigerator.
- Clean and dry the refrigerator.
- Leave the door open to prevent mold developing within the refrigerator. If available, put the refrigerator door and the freezer door into the winter position.
Risk of injury
- Do not put your fingers into the hinge.
- Close and latch the refrigerator door before beginning a journey.
- The cooling system at the back of the refrigerator becomes very hot during operation. If the refrigerator is equipped with ventilation grilles, protect yourself from contact with hot parts when removing the ventilation grilles.
- The device door or the freezer door can completely detach from the device if used incorrectly. Push the doors closed until you hear a clear click at the top and bottom.
NOTICE! Damage hazard
- Do not lean on the open refrigerator door.
- Store heavy objects such as bottles or cans only in the refrigerator door, in the vegetable compartment or on the bottom shelf.
- If the refrigerator has a double-sided door and the door is not locked correctly on the opposite side, push on that side at the top and the bottom until it locks in place.
- Danger of overheating!
Always ensure sufficient ventilation so that the heat generated during operation can dissipate. Ensure that the refrigerator is sufficiently far away from walls and other objects so that the air can circulate. - Do not fill the interior with ice or fluid.
- Protect the refrigerator and the cable against heat and moisture.
- Never pull the plug out of the socket by the connection cable.
NOTE
- If the battery management system of your vehicle shuts down the refrigerator to protect the battery, contact your vehicle manufacturer.
- For ambient temperatures of +15°C to +25°C select the average temperature setting.
- If the door is not locked correctly on the opposite side, push on that side at the top and the bottom until it locks in place.
- To avoid food waste, note the following:
- Keep temperature fluctuation as low as possible. Only open the refrigerator or the freezer as often and for as long as necessary. Opening the door for long periods can cause significant increase of the temperature in the compartments of the refrigerator.
- Store the foodstuff in such a way that the air can still circulate well.
- Ensure to put only items in the refrigerator which may be chilled at the selected temperature.
- Store the different foodstuff types as shown in the figures.

- If the temperature can be adjusted: Adjust the temperature to the quantity and type of the foodstuff.
- Foodstuff can easily absorb or release odor or taste. Always store foodstuff covered or in closed containers/bottles.

Safety when operating with gas
Failure to obey these warnings could result in death or serious injury.
Explosion hazard
- Only operate the refrigerator at the pressure shown on the data plate. Only use pressure controllers with a fixed setting which comply with the national regulations.
- Only operate the refrigerator on gas while driving if the vehicle manufacturer permits operation of the gas system while driving (see vehicle manual).
- Check the national requirements for operating the refrigerator with gas during driving.
- Never operate the refrigerator with gas:
- At petrol stations
- In parking garages
- On ferries
- During transport of the caravan or motor home with a transport vehicle or tow truck
- Never use a naked flame to check the refrigerator for leaks.
- In case of gas odor:
- Close the gas supply tap and the valve on the cylinder.
- Open all windows and leave the room.
- Do not operate any electrical switch.
- Extinguish all open flames.
- Have the gas system checked by a specialist.
Accessories
- Never store liquid gas cylinders in unventilated areas or below ground level (funnel shaped holes in the ground).
- Keep liquid gas cylinders away from direct sunlight.
NOTICE! Damage hazard
- Only use universal LPG gas, not natural gas (see data plate).
NOTE
- At altitudes above 1000 m, ignition problems may occur. Switch to a different energy source.
Documents / ResourcesDownload manual
Here you can download full pdf version of manual, it may contain additional safety instructions, warranty information, FCC rules, etc.
Advertisement


Need help?
Do you have a question about the 10 Series and is the answer not in the manual?
Questions and answers