Dometic RC Series, RC10.4 70, RC10.4 90 Manual
- Installation and operating manual (88 pages)
Advertisement
Explanation of symbols
Please read this instruction manual carefully before installation and first use, and store it in a safe place. If you pass on the product to another person, hand over this instruction manual along with it.

Safety instruction: Failure to observe this instruction will cause death or serious injury

Safety instruction: Failure to observe this instruction can cause death or serious injury.

Safety instruction: Failure to observe this instruction can lead to injury.
NOTICE!
Failure to observe this instruction can cause material damage and impair the function of the product.
 NOTE
NOTE
Supplementary information for operating the product.
Scope of delivery
1 Refrigerator
1 Door hinge
1 Installation and Operating Manual
Accessory
If you wish to operate the cooling device with an AC mains supply, please use one of the following rectifiers.
Available as accessory (not included in scope of delivery):
| Description | Ref. no. |
| CoolPower EPS100W rectifier | 9600000440 |
| CoolPower MPS35 rectifier | 9600000445 |
All the accessories are available from specialist dealers. If you have any questions, please contact the dealer or your service partner directly.
Intended use
The refrigerator is designed for setting up in caravans and motorhomes. It is suitable for refrigerating foodstuffs and storing frozen foodstuffs.
| Health hazard! Please check if the cooling capacity of the device is suitable for storing the food or medicine you wish to cool. |
The refrigerator is suitable for use with a DC voltage.
| NOTE To safely operate 12 V DC and 24 V DC consumer units in the caravan, it must be ensured that the towing vehicle provides sufficient voltage. On some vehicles, the battery management system may automatically switch off consumer units to protect the battery. Ask your vehicle manufacturer for more information. |
Technical description
RC series refrigerators are suitable for use with DC voltage and can therefore also be used for camping or on boats. You can also use the CoolPower EPS100W and MPS35 rectifiers to connect them to a AC mains supply.
The refrigerator can chill products and keep them cool. Frozen products can be stored in the freezer compartment.
All materials used in the refrigerator are suitable for use with foodstuffs. The refrigerant circuit is maintenance-free.
When used on boats the refrigerator can be subjected to a short-term inclination of 30°.
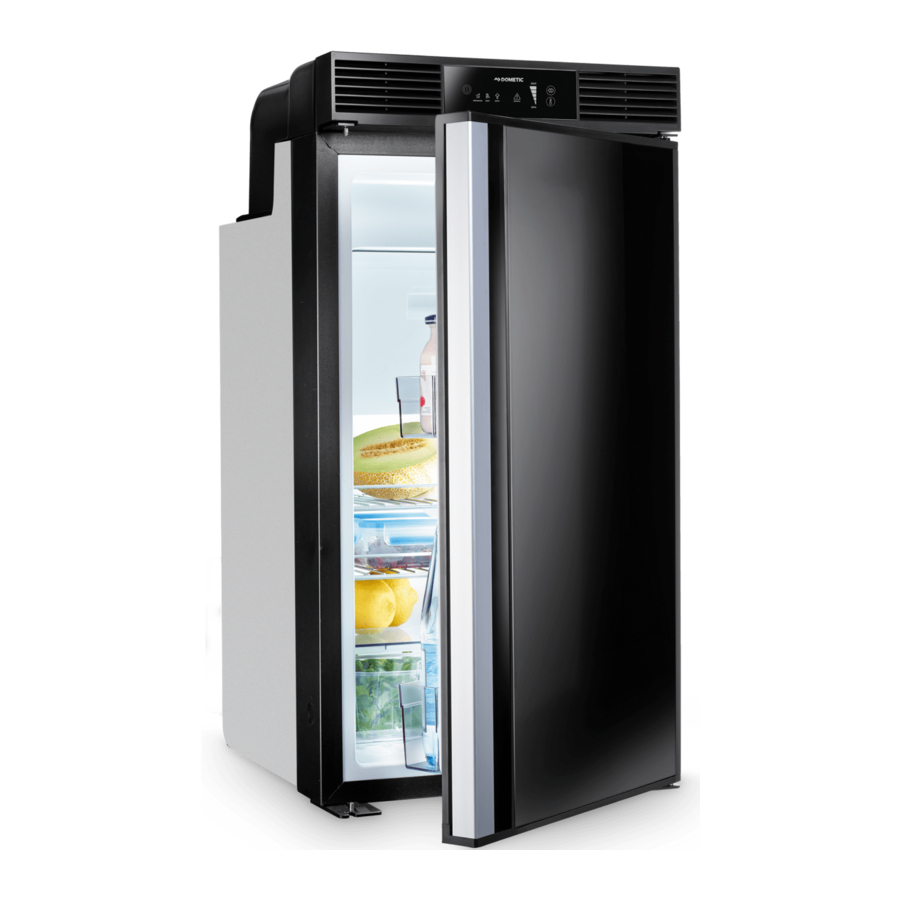
Description of the device

| No. in fig. 1 | Description |
| 1 | Top door tray |
| 2 | Refrigerator door |
| 3 | Middle door tray |
| 4 | Bottom door tray with bottle holder |
| 5 | Fruit and vegetable section |
| 6 | Refrigerator compartment |
| 7 | Refrigerator shelf |
| 8 | Freezer compartment |
| 9 | Control and display elements |
Operating and display elements

| No. in fig. 2 | Explanation | |
| 1 | Power button | |
| 2 | LED PERFORMANCE mode: Standard mode Selection of all temperature levels (1 to 5) | |
| 3 | LED SILENT mode: Decreased fan and compressor speed with reduced noise, e.g. if the user wants to relax or sleep Selection of three temperature levels (1 to 3) | |
| 4 | LED BOOST mode: Maximum performance, e.g. for an immediate cool down or after a larger amount of uncooled foodstuff has been put in the refrigerator No selection of temperature levels | |
| 5 | LED error | |
| 6 | LEDs temperature level | |
| 7 | Temperature selection button | |
| 8 | Mode selection button | |
Setting up and connecting the refrigerator
| NOTICE! Beware of damage Only ever lay the refrigerator on its side, but never on its back. Otherwise the refrigerator may be damaged. |
Setting up the refrigerator
The device is designed for ambient temperatures between +16°C and +43°C. In continuous operation, the air humidity may not exceed 90%.
Set up the refrigerator in a dry, sheltered place. Avoid placing the refrigerator near heat sources such as radiators, gas ovens or hot water pipes. Do not let the refrigerator stand in direct, strong sunlight.
Setting up and connecting the refrigerator
Changing the door hinge
You can also change the hinge of the door, so that it opens to the left rather than the right.
➤ To change the door hinge, proceed as follows (see fig. 3,to fig. 5,).


Changing the decorative plate
You can change the decorative plate on your cooling device to improve the appearance.
➤ To change the decorative plate, proceed as follows (see fig. 6 to fig. 7).


Connecting the cooling device
For the electrical connection you also need the wiring diagram (fig. 8).

Cable colours:
| Abbrev. in fig. 8 | Meaning |
| bk | black |
| rd | red |
Connecting to a battery
| NOTICE! To avoid voltage loss and therefore a drop in performance, the cable should be kept as short as possible and should not be interrupted if possible. For this reason avoid additional switches, plugs or power strips. |
➤ Determine the required cross section of the cable in relation to the cable length according to fig. 9.

| Key for fig. 9 | ||
| Co-ordinate axis | Meaning | Unit |
| l | Cable length | m |
| ∅ | Cable cross section | mm² |
NOTICE!
Make sure that the polarity is correct.
- Before starting the device for the first time, check whether the operating voltage and the battery voltage correspond (see type plate).
➤ Connect the cooling device
- As directly as possible to the pole of the battery or
- To a plug socket which is fused with at least 15 A (at 12 V) or 7.5 A (at 24 V).
NOTICE!
Disconnect the cooling device and other power consuming devices from the battery before connecting the battery to a quick charging device.
Overvoltage can damage the electronics of the device.
The cooling device is equipped with an electronic device to protect against reversing the polarity and short circuits when connecting to a battery. To protect the battery, the cooling device switches off automatically if the voltage is insufficient (see table below).
| 12 V | 24 V | |
| Switch-off voltage | 10.4 V | 22.8 V |
| Switch-on voltage | 11.7 V | 24.2 V |
Connecting to AC mains supply
- Never handle plugs and switches with wet hands or if you are standing in a puddle.
- If you are operating your cooling device on board a boat with a mains connection from the land, you must install a ground protection circuit breaker between the AC mains supply and the cooling device. Seek advice from a trained technician.
➤ To operate the refrigerator with a AC mains supply, use a CoolPower EPS100W or MPS35 rectifier.
Mounting the refrigerator
| Only drill through the washers provided, otherwise foamed components, including cables, can be damaged. |
NOTE
Attach the side walls or the attached strips so that the screws are tight, even when under increased loads (while driving).
Proceed as follows (fig. 10):

➤ Move the refrigerator into its final location.
➤ Fasten the four screws through the four plastic washers in the sides of the refrigerator into the wall (1).
➤ Put the caps onto the screw heads.
Operation
| NOTE Before starting your new cooling device for the first time, you should clean it inside and outside with a damp cloth for hygienic reasons (please also refer to the chapter "Cleaning and maintenance"). |
Energy saving tips
- Choose a well ventilated installation location which is protected from direct sunlight.
- Allow food to cool down first before placing it in the device.
- Do not open the cooling device more often than necessary.
- Do not leave the door open for longer than necessary.
- Defrost the cooling device as soon as a layer of ice forms.
- Avoid unnecessarily low temperatures.
- Clean the condenser of dust impurities at regular intervals.
Using the refrigerator
The fridge device conserves fresh foodstuffs. You can also conserve frozen foodstuffs in the freezer compartment.
| NOTICE! Ensure that food or liquids in glass containers are not excessively refrigerated. Liquids expand when they freeze and can thus destroy the glass containers. Ensure that the objects placed in the cooling device are suitable for cooling to the selected temperature. |
➤ Switch the cooling device on by pressing the ![]() button for five seconds.
button for five seconds.
➤ Press the ![]() button, until the LED for the desired operating mode (chapter "Operating and display elements" ) lights up.
button, until the LED for the desired operating mode (chapter "Operating and display elements" ) lights up.
| NOTE After switching on, the cooling device requires approx. 60 s until the compressor starts up. |
Setting the temperature (PERFORMANCE and SILENT MODE only)
You can set the temperature using the ![]() button.
button.
➤ Press the ![]() button repeatedly until the desired temperature is set.
button repeatedly until the desired temperature is set.
✓ The display shows the selected temperature:
- one bar = lowest cooling capacity
- three bars = medium cooling capacity
- five bars = highest cooling capacity
| NOTE The cooling capacity can be influenced by:
|
Conserving foodstuffs
You can conserve foodstuffs in the cooling device compartment. The time for which the food can be conserved in this way is usually stated on the package.
| NOTICE! Do not conserve warm food in the cooling device compartment. Do not place glass containers with liquid in the freezer compartment. |
NOTE
Food which can easily absorb tastes and odours as well as liquids and products with a high alcohol content should be conserved in air-tight containers.
The cooling device compartment is divided in different zones with different temperatures:
- The colder zones are immediately over the base, near the back wall.
- Observe the temperature information and best before date on the food packaging.
➤ Observe the following when using the device:
- Do not re-freeze products which are defrosting or have been defrosted, consume them as soon as possible.
- Wrap food in aluminium foil or cling film and shut it in a suitable box with a lid. This ensures that aromas, the shape and the freshness are better conserved.
Positioning the wire shelves
| Children beware! The shelves are fixed to prevent children from getting into the refrigerator.
|
➤ Remove the wire shelf as shown (fig.11 ).

➤ Insert the wire shelf as shown (fig. 12).

Removing the freezer compartment
The freezer compartment can be removed to increase to the size of the cooling compartment.
Proceed as follows:
➤ Remove the freezer compartment as shown (fig. 13).

➤ Keep the freezer compartment in a safe place to prevent any damage.
Defrosting the cooling device
Humidity can form frost in the interior of the cooling device or on the vaporiser. This reduces the cooling capacity. Defrost the device in good time to avoid this.
| NOTICE! Never use hard or pointed tools to remove ice or to loosen objects which have frozen in place. |
To defrost the cooling device, proceed as follows:
➤ Take out the contents of the cooling device.
➤ Place them in another cooling device to keep them cool, if necessary.
➤ Switch the cooling device off by pushing the ![]() button for five seconds.
button for five seconds.
✓ The display switches off, a short beep sounds and the refrigerator is completely switched off.
➤ Leave the door open.
➤ Wipe off the water resulting from defrosting or – if present – empty the collecting tray. If your device has a water drain, drain the thawed water off.
Switching off and storing the cooling device
If you do not intend to use the cooling device for a long time, proceed as follows:
➤ Switch the cooling device off by pushing the ![]() button for five seconds.
button for five seconds.
✓ The display switches off, a short beep sounds and the refrigerator is completely switched off.
➤ Disconnect the power cable from the battery or pull the DC cable plug out of the rectifier.
➤ Clean the cooling device (see chapter "Cleaning and maintenance").
➤ Leave the lid or door open to avoid unpleasant odours building up.
➤ Put the door lock to VENT position (fig.14).

This prevents odours from building up.
| NOTICE! The VENT position can only be used if the vehicle is not moving. When moving the door can unlock and damage the refrigerator or the interior. |
Cleaning and maintenance
NOTICE!
|
➤ Clean the cooling device regularly as soon as it becomes dirty with a damp cloth.
➤ Make sure that no water drips into the sealings as this water can damage the electronics.
➤ Wipe the cooling device dry with a cloth after cleaning.
Guarantee
The statutory warranty period applies. If the product is defective, please contact the manufacturer's branch in your country (see the back of the instruction manual for the addresses) or your retailer. For repair and warranty processing, please include the following documents when you send in the device:
- A copy of the receipt with purchasing date
- A reason for the claim or description of the fault
Troubleshooting
The significance of the red LED (fig. 2 /2, )
When operational faults occur the LED flashes a numer of times. The number of pulses depends on the type of fault.
Each flash lasts for one quarter of a second. After the series of impulses a pause follows. The sequence for the fault is repeated every four seconds.
| Number of flashes | Fault | Possible cause |
| 1 | Supply voltage | The supply voltage is outside of the set range. |
| 2 | Excessive fan current | The fan loads the electronics unit with more than 1 A. |
| 3 | The motor doesn't start | The rotor is jammed. The pressure difference in the cooling system is too high (> 5 bar). |
| 4 | Speed too low | If the cooling system is overloaded, the minimum speed of the motor of 1850 RPM cannot be maintained. |
| 5 | Overheating of the electronics unit | If the cooling system is loaded too heavily or if the temperature is too high, the electronics can overheat. |
| Continuous | Temperature not measurable | NTC sensor is faulty. |
Interior temperature too low in temperature level "1"
| Fault | Possible cause | Remedy |
| Compressor runs constantly | Faulty thermostat | Change the thermostat |
| Compressor runs for a long time | Large quantities have been frozen in the freezer compartment | – |
Compressor does not run (battery connection)
| Fault | Possible cause | Remedy |
| UKL = 0 V | There is an interruption in the connection between the battery and the – electronics | Establish a connection |
| Main switch faulty (if installed) | Replace the main switch | |
| Additional supply line fuse has blown (if installed) | Replace the supply line fuse | |
| UKL ≤ UON | Battery voltage is too low | Charge the battery |
| Start attempt with UKL≤ UOFF | Loose cables Poor contact (corrosion) | Establish a connection |
| Battery capacity too low | Replace the battery | |
| Cable cross section too small | Replace the cable | |
| Start attempt with UKL≥ UON | Ambient temperature too high | – |
| Insufficient ventilation and/or air supply | Move the refrigerator to another location | |
| Condenser is dirty | Clean the condenser | |
| Electric circuit between the pins in the compressor interrupted | Defective compressor | Replace the compressor |
UKL Voltage between the positive and negative terminals of the electronics
UON Cut-in voltage of the electronics
UOFF Cut-off voltage of the electronics
Compressor is not running (connected to AC supply)
| Fault | Possible cause | Remedy |
| No voltage | Interruption in the supply cable | Establish a connection |
| Main switch faulty (if installed) | Replace the main switch | |
| Additional supply line fuse has blown (if installed) | Replace the supply line fuse | |
| Voltage is present but the compressor doesn't run | Ambient temperature too high | – |
| Insufficient ventilation and/or air supply | Move the refrigerator to another location | |
| Condenser is dirty | Clean the condenser | |
| Electric circuit between the pins in the compressor interrupted | Defective compressor | Replace the compressor |
| Poor cooling, interior temperature increases | ||
| Fault | Possible cause | Remedy |
| Compressor runs for a long time/continuously | Ambient temperature too high | – |
| Insufficient ventilation and/or air supply | Move the refrigerator to another location | |
| Condenser is dirty | Clean the condenser | |
| Faulty fan | Replace the fan | |
| Compressor runs intermittently | Battery capacity exhausted | Charge the battery |
| Unusual noises | ||
| Fault | Possible cause | Remedy |
| Loud humming | A component of the refrigerant circuit cannot move freely (touching the wall) | Bend the component carefully away from the obstruction |
| Foreign body jammed between the cooling unit and a wall | Remove the foreign body | |
| Fan noise | - | |
Technical data
| RC10.4 70 | RC10.4 90 | |
| Gross capacity: | 69 l | 90 l |
| Net capacity (without freezer compartment): | 64 l | 85 l |
| Capacity freezer compartment: | 7.5 l | |
| Connection voltage: | 12 Vg or 24 Vg | |
| Average power consumption: 12 V  24 V | 42 W 58 W | 45 W 61 W |
| Energy consumption: | ≤ 0.45 kWh/24 h (PERFORMANCE mode) ≤ 0.35 kWh/24 h (SILENT mode) | |
| Cooling device compartment temperature: | <+5°C (PERFORMANCE mode) | |
| Freezer compartment temperature: | < –12°C (PERFORMANCE mode) | |
| Relative humidity: | max. 90% | |
| Short-term inclination: | max. 30° | |
| Climate class: | T | |
| Coolant quantity: | 40 g | 43 g |
| CO2 equivalent: | 0.057 t | 0.061 t |
| Global warming potential (GWP): | 1430 | |
| Noise emission: | 40 dB(A) (PERFORMANCE mode) 37 dB(A) (SILENT mode) | |
| Dimensions (W x H x D): | 420 x 821 x 450 mm | 420 x 975 x 485 mm |
| Weight: | 19.5 kg | 21.4 kg |
| Test/certificates: |  | |
The coolant circuit contains R-134a.
Contains fluorinated greenhouse gases
Hermetically sealed equipment
Safety instructions
The manufacturer accepts no liability for damage in the following cases:
- Faulty assembly or connection
- Damage to the product resulting from mechanical influences and incorrect connection voltage
- Alterations to the product without express permission from the manufacturer
- Use for purposes other than those described in the operating manual
General safety
- Have a qualified technician perform the installation in wet rooms.
- Do not operate the device if it is visibly damaged.
- If this device's power cable is damaged, it must be replaced by the manufacturer, customer service or a similarly qualified person in order to prevent safety hazards.
- This device may only be repaired by qualified personnel. Inadequate repairs may cause serious hazards.
- This device can be used by children aged 8 years or over, as well as by persons with diminished physical, sensory or mental capacities or a lack of experience and knowledge, providing they are supervised, or have been taught how to use the device safely and are aware of the resulting risks.
- Cleaning and user maintenance must not be carried out by children without supervision.
- Children must be supervised to ensure that they do not play with the device.
- Always keep and use the device out of the reach of children under 8 years of age.
- Do not store any explosive substances, such as spray cans with propellants, in the device.
- Danger of crushing! Do not put your fingers into the hinge.
- Foodstuff may only be stored in its original packaging or in suitable containers.
NOTICE!
- Check that the voltage specification on the type plate is the same as that of the power supply.
- Never pull the plug out of the socket by the connection cable.
- If the refrigerator is connected to the DC socket: Disconnect the refrigerator and other electric consumers from the battery before connecting the quick charging device.
- If the refrigerator is connected to the DC socket: Disconnect the refrigerator or switch it off when you turn off the engine. Otherwise you may discharge the battery.
- The refrigerator is not suitable for storing substances which are caustic or contain solvents.
- Keep the drainage outlet clean at all times.
- Do not open the refrigerant circuit under any circumstances.
- Never transport the device in a horizontal position, so that no oil can leak out of the compressor.
- Make sure that the refrigerator circuit is not damaged during transportation. The refrigerant in the refrigerator circuit is highly flammable.
In the event of any damage to the refrigerator circuit:- Avoid naked flames and sparks.
- Air the room well.
- Set up the device in a dry location where it is protected against splashing water.
Operating the device safely
- Do not touch exposed cables with your bare hands. This applies especially when operating the device from the AC mains.
- Before starting the device, ensure that the power supply line and the plug are dry.
- If you connect the device to a battery, make sure that no food comes into contact with the battery acid.
NOTICE!
- Do not use electrical devices inside the cooling device unless they are recommended by the manufacturer for that purpose.
- Do not place it near naked flames or other heat sources (heaters, direct sunlight, gas ovens etc.)
- Danger of overheating! Always ensure sufficient ventilation so that the heat generated during operation can dissipate. Make sure that the device is sufficiently far away from walls and other objects so that the air can circulate.
- Ensure that the ventilation vents are not covered.
- Do not fill the inner container with ice or fluid.
- Never immerse the appliance in water.
- Protect the appliance and the cable against heat and moisture.
- Make sure that foodstuffs do not touch the walls of the cooling area.
Documents / ResourcesDownload manual
Here you can download full pdf version of manual, it may contain additional safety instructions, warranty information, FCC rules, etc.
Advertisement


Need help?
Do you have a question about the RC Series and is the answer not in the manual?
Questions and answers