Poly TC8 Manual
- Admin manual (47 pages) ,
- User manual (37 pages) ,
- Quick manual (3 pages)
Advertisement
- 1 Before you begin
-
2
Getting Started
-
2.1
Poly TC8 Overview
- 2.1.1 Poly TC8 as a Poly Video Controller
- 2.1.2 Poly TC8 Local Interface
- 2.1.3 Home Screen in Poly Video Mode
- 2.1.4 Poly TC8 as a Zoom Rooms Controller
- 2.1.5 Poly TC8 as a Microsoft Teams Rooms Controller
- 2.1.6 Poly TC8 Controller Hardware Overview
- 2.1.7 Access the Poly Control Center
- 2.1.8 Waking the Poly TC8
- 2.2 Accessibility Features
-
2.1
Poly TC8 Overview
-
3
Setting Up the Poly TC8
- 3.1 Power the Poly TC8 with PoE
- 3.2 Power the Poly TC8 with a PoE Injector
- 3.3 Set up Poly TC8 for the first time as a paired device
- 3.4 Configuring Network Settings
- 3.5 Manually Pair the Poly TC8 with a Video System
- 3.6 SCEP support on Poly touch controllers
- 3.7 Enable 3K-bit encryption
- 3.8 Restrict view of information screen in touch controller interface to administrators
- 4 Managing a Zoom Room
- 5 Using the Poly TC8 in Poly Video Mode
- 6 Poly Touch Controller privacy and security
- 7 Device Maintenance
- 8 Troubleshooting
- 9 Documents / Resources
Before you begin
This guide helps you understand how to set up, manage, and use your Poly TC8 device.
Audience, purpose, and required skills
This guide is intended for technical users familiar with setting up and managing telecommunications systems and equipment.
Product terminology used in this guide
Use the terminology in this section to help you understand how this guide sometimes refers to Poly products.
Device
Refers to the Poly TC8 device.
Video system
Refers to the Poly codec (Poly G7500 or PolyG62) and Poly Studio X Series video conferencing systems.
System
Another way of referring to the Poly codec and the Poly Studio X Series video conferencing systems.
Icons used in Poly documentation
This section describes the icons used in Poly documentation and what they mean.

Indicates a hazardous situation that, if not avoided, could result in serious injury or death.

Indicates a hazardous situation that, if not avoided, could result in minor or moderate injury.

Indicates information considered important but not hazard-related (for example, messages related to property damage). Warns the user that failure to follow a procedure exactly as described could result in loss of data or in damage to hardware or software. Also contains essential information to explain a concept or to complete a task.
NOTE: Contains additional information to emphasize or supplement important points of the main text.
TIP: Provides helpful hints for completing a task.
Getting Started
The Poly TC8 delivers room control with any Poly partner app, or lets you control supported Poly video conferencing systems.
Poly TC8 Overview
With a TC8 device, you can control and manage aspects of a Poly video system.
Poly TC8 pairs with a Poly video system and operates as a controller for the provider selected in the Poly Video system. This provider can be Poly or a supported third party app such as Microsoft Teams Rooms or Zoom Rooms.
Poly TC8 can pair with the following devices:
- Poly G7500
- Poly Studio G62
- Poly Studio X30
- Poly Studio X50
- Poly Studio X52
- Poly Studio X70
- Poly Studio X72
Poly TC8 as a Poly Video Controller
The following features and capabilities are available in Poly Video Mode:
- Placing and joining video calls
- Viewing and joining scheduled calendar meetings
- Managing contacts, call lists, and directories
- Managing shared content
- Taking snapshots
- Maximizing, minimizing, and stopping content
- Adjusting camera pan, tilt, zoom and tracking settings
- Creating camera presets
- Adjusting display brightness
- Using multiple Poly TC8 controllers to control a single system
- Pairing with video systems over the network (wired LAN) for flexible room setups
NOTE: Exact features and capabilities can vary if you aren't using Poly Video Mode. See your thirdparty application's documentation for information.
Poly TC8 Local Interface
The Poly TC8 controller's local interface displays controls and settings available to you depending on the mode you're using.
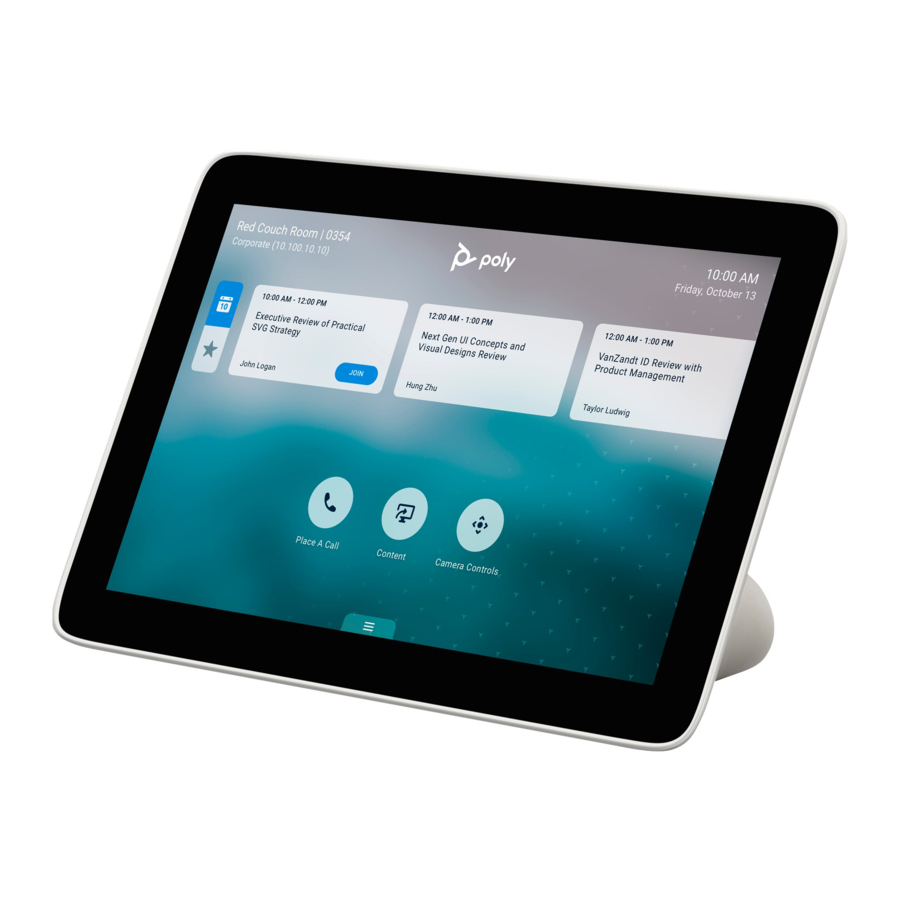
Home Screen in Poly Video Mode
The Home screen is the first screen you encounter in Poly Video Mode. From this screen, you have quick access to many of the system functions.
NOTE: Some elements of your screen may be different depending on the system configuration.
Home Screen

Table 2-1 Feature descriptions
| Ref. Number | Description |
| 1 | Time and date information |
| 2 | Task buttons for placing calls, managing content, controlling cameras, or launching Poly Device Mode. |
| 3 | Menu for accessing other features. |
Some of the following interactive and read-only elements might not display on your system depending on the system configuration.
Table 2-2 Element descriptions
| Element | Description |
| Name | Descriptive name determined by the system administrator. Used when you want to connect to a system. |
| IP address | IP address, SIP, H.323, or secondary network configured for your system. |
| Current time | Local time zone. |
| Current date | Local time zone date. |
| Calendar or Favorites cards | View your calendar or favorites. |
Place a Call  | Opens a call screen where you can dial a call, or you can select a card to dial numbers, access favorites, or view your calendar. |
Content  | When content is available, the system displays a list of available content. Otherwise, this function opens a help screen that describes how to set up content sharing using HDMI, the Polycom Content App, or an AirPlay- or a Miracast-certified device. |
Camera  | Opens the camera control screen. |
Poly Device Mode  | Launches Poly Device Mode, which allows you to use the Poly Video system as an external camera, microphone, and speaker for your connected laptop. |
Menu  | Opens new menu selections for calling, sharing content, camera control, and additional functions. |
Poly TC8 as a Zoom Rooms Controller
Run Zoom Rooms Controller on a Poly TC8 to launch and manage Zoom meetings.
With Zoom Rooms Controller, a Poly TC8 paired to a Poly video conferencing system controls the Zoom Room. Once logged into the Zoom Room, you can join a scheduled meeting, start an unscheduled meeting, invite participants to a meeting, view upcoming meetings, share content, dial a phone number, and manage all aspects of a Zoom meeting.
Poly TC8 as a Microsoft Teams Rooms Controller
Positioned inside a conference room, paired to a codec, use the Poly TC8 as a touchscreen controller for Microsoft Teams.
The following features and capabilities are available in Microsoft Teams controller mode:
- Placing and joining video calls
- Viewing and joining scheduled calendar meetings
- Managing contacts, call lists, and directories
- Sharing content
Poly TC8 Controller Hardware Overview
The following illustration and table outline the hardware features of the TC8 controller.

Table 2-3 Poly TC8 feature descriptions
| Reference number | Description |
| 1 | Touchscreen |
| 2 | Security lock |
| 3 | Factory restore pinhole |
| 4 | LAN connection |
Access the Poly Control Center
If your system is using a conferencing application that isn't Poly, you can still access the Poly TC8 device and paired video system settings in the Poly Control Center.
- On the right side of the device touchscreen, swipe left.
The Poly Control Center opens.
Waking the Poly TC8
After a period of no activity, the system enters sleep mode (if configured by your administrator). You can wake the system by touching the screen of your paired TC8 device.
Accessibility Features
Poly products include a number of features to accommodate users with disabilities.
Users Who Are Deaf or Hard of Hearing
Your system includes accessibility features so that users who are deaf or hard of hearing can use the system.
The following table lists the accessibility features for users who are deaf or hard of hearing.
Table 2-4 Accessibility Features for Users Who Are Deaf or Hard of Hearing
| Accessibility Feature | Description |
| Visual notifications | Status and icon indicators let you know when you have incoming, outgoing, active, or held calls. Indicators also alert you of the device's status and when features are enabled. |
| Status indicator lights | The system LEDs to indicate some statuses, including if your microphones are muted. |
| Adjustable call volume | While in a call, you can raise or lower the volume of the device. |
| Auto-answering | You can enable the system to auto-answer calls. |
Users Who Are Blind, Have Low Vision, or Have Limited Vision
Your system includes accessibility features so that users who are blind, have low vision, or have limited vision can use the system.
The following table lists the accessibility features for users who are blind, have low vision, or have limited vision.
Table 2-5 Accessibility Features for Users Who Are Blind, Have Low Vision, or Have Limited Vision
| Accessibility Feature | Description |
| Auto-answering | You can enable the system to auto-answer calls. |
| Visual notifications | Status and icon indicators let you know when you have incoming, outgoing, active, or held calls. Indicators also alert you of the device's status and when features are enabled. |
Users with Limited Mobility
Your system includes accessibility features so that users with limited mobility can use various system features.
The following table lists the accessibility features for users with limited mobility.
Table 2-6 Accessibility Features for Users with Limited Mobility
| Accessibility Feature | Description |
| Auto-answering | You can enable the system to auto-answer calls. |
| Calling from a personal device | With administrator credentials, you can wirelessly access the system web interface from your own device to make calls and manage contacts and favorites. |
Setting Up the Poly TC8
Pair the TC8 with a Poly video system over your primary network.
If you purchased a Poly TC8 with your video system, the two automatically pair once you power on the TC8 (the video system locates the device on the network by its MAC address).
Once paired, the TC8's local interface shows the conferencing mode configured on your video system (for example, Poly Video Mode or Partner Mode).
There are situations where you must manually pair the Poly TC8, such as adding or replacing a device with an existing video system setup.
Ensure your Poly TC8 has the latest software to use all the features of the system. On initial powerup, if the system displays a Critical Update Required message, allow the device to go through the update process before configuring and deploying.
Power the Poly TC8 with PoE
Because the Poly TC8 gets power through the LAN, the connection must support Power over Ethernet (PoE).
- Connect the Poly TC8 to your network using the supplied LAN cable.
If you purchased the device with your video system, the two automatically pair once the device powers on.
Power the Poly TC8 with a PoE Injector
If your space isn't equipped with Power over Ethernet (PoE), you can use a PoE injector to power the Poly TC8.
- Plug the AC power cord of the PoE injector into an accessible earthed mains outlet.
- Connect the PoE injector to the Poly TC8 using a LAN cable.
- Connect the PoE injector to your network with a LAN cable.
If you purchased the device with your video system, the two automatically pair once the device powers on.
Set up Poly TC8 for the first time as a paired device
When paired with a Poly video system, you can use Poly TC8 to control the video system. Poly TC8 supports all Poly partner modes.
NOTE: To add additional touch controllers to an existing video conferencing system, add them from the video conferencing system web interface.
- Power on the Poly TC8 device by connecting it to a PoE-enabled Ethernet switch on the same network as the conferencing PC.
- If a Poly TC8 software update is available, select Update.
The Poly TC8 device updates and restarts. - Optional: Select the default language to change it, or choose dark mode by toggling to the moon icon.
- Select Get Started.
The System Overview screen displays. - Select Room Controller, then select the next arrow.
The Connect to a Room screen displays. - The system searches for devices with which to pair and displays a list. Connect to a device in the list or manually connect to a room.
- To automatically connect to a room, select the device you want to pair the Poly TC8 with from the list.
- To manually connect to a room, select Manually Connect to a Room, enter the IP address of the video conferencing system you want to connect your touch controller to, and select the next arrow.
TIP: When you set up your video conferencing system, the IP address displays on the setup screen of the connected display.
A screen displays a selection of shapes.
Match the sequence of symbols on the display connected to your video conferencing system by selecting them in the correct order, then select Confirm.
If connecting to a video conferencing system that has not been previously set up, the Poly Lens screen displays.
- To onboard your device to Poly Lens, follow the instructions onscreen. Otherwise select Skip.
- If connecting to a video conferencing system that has not been previously set up, the Choose a Video Provider screen displays. Select the provider you want to use with your Poly system, then select the next arrow.
The software for the selected provider installs and launches.
NOTE: If connecting to a video conferencing system that has been set up, this step is skipped and the Poly TC8 launches the provider selected in the Poly VideoOS system web interface.
Configuring Network Settings
If your environment uses DHCP, after plugging it into a LAN port in the room with your video system, the Poly TC8 automatically connects to your primary network.
You can also manually configure the network settings if, for example, your environment needs static IP addresses or the DHCP server is offline.
NOTE: Network settings are available prior to pairing with a codec.
Manually Configure IPv6 Address Settings
Your system gets its IP address information automatically by default. However, you can manually configure the IPv6 address settings.
- In the device local interface, go to Settings
![]() > Network.
> Network. - Turn the Enable IPv6 setting on.
- Turn the Obtain Automatically Using DHCP setting off.
- Configure the following settings:
Table 3-1 Settings descriptionsSetting Description Link-Local Specifies the IPv6 address to use for local communication within the subnet. Site-Local Specifies the IPv6 address to use for communication within the site or organization. Global Address Specifies the IPv6 internet address. Default Gateway Specifies the default gateway assigned to your system. - Select Save.
Manually Assign a Host Name and Domain Name
You can manually enter the host name and domain name for your TC8 device. You can also modify these settings even if your network automatically assigns them.
- In the device local interface, go to Settings
![]() > Network.
> Network. - Enter or modify the device Host Name.
If the device discovers a valid name during setup or a software update, the device automatically creates the host name. However, if the device finds an invalid name, such as a name with a space, the device creates a host name using the following format: DeviceType-xxxxxx, where xxxxxx is a set of random alphanumeric characters. - Optional: Enter or modify the Domain Name that the device belongs to.
- Select Save.
Manually Configure DNS Settings
You can manually enter the DNS settings for your device.
- In the device local interface, go to Settings
![]() > Network.
> Network. - Turn the Obtain Automatically Using DHCP setting off.
- Enter the DNS server addresses your device uses (you can enter up to four addresses).
- Select Save.
Enable LLDP on Your Poly TC8
You can configure your Poly TC8 to automatically select VLAN settings using LLDP.
The VLAN ID of the TC8 must match the VLAN ID of the system for system pairing to be successful.
NOTE: VLAN isn't supported in IPv6 environments.
- In the device local interface, go to Settings
![]() > Network.
> Network. - Select the LLDP toggle button to turn the setting on. The TC8 automatically assigns a value to VLAN ID based on your network configuration.
- Select Save.
Configure Poly TC8 VLAN Settings
You can configure the TC8 virtual LAN (VLAN) settings.
The VLAN ID of the Poly TC8 must match the VLAN ID of the system for system pairing to be successful.
NOTE: VLAN isn't supported in IPv6 environments.
- In the device local interface, go to Settings
![]() > Network.
> Network. - Select the 802.1p/Q check box and enter a VLAN ID.
The ID specifies the VLAN that you want the Poly TC8 to operate on. You can use values from 1 to 4094. - Select Save.
Configure Poly TC8 802.1X Settings
You can configure your Poly TC8 to use 802.1X authentication when connecting to the wired LAN.
Install the PKI certificates that are required for authenticating with your network. See your video system Administrator Guide for instructions and more information.
NOTE: 802.1X isn't supported in IPv6 environments.
The system supports the following authentication protocols:
- EAP-MD5
- EAP-TLS
- EAP-TTLS
- EAP-MSCHAPv2
- EAP-GTC
- EAP-PEAPv0 (MSCHAPv2)
- EAP-MSCHAPv2
- EAP-GTC
- In the device local interface, go to Settings
![]() > Network.
> Network. - Turn on the Enable EAP/802.1X setting.
- Select an EAP/802.1X authentication method.
- Optional: For EAP-TTLS or EAP-PEAPv0, choose an EAP/802.1X Phase 2 Authentication.
- Enter a EAP/802.1X Identity.
You can't leave this field blank. - Enter a EAP/802.1X Password.
This setting is required when you use EAP-MD5, EAP-PEAPv0, or EAP-TTLS. - Select Save.
Using Web Proxies
Poly TC8s that must communicate with an external cloud service to control a video system can do so from behind a web proxy.
No extra setup is required. The Poly TC8 uses the web proxy information configured on your paired video system. See your video system Administrator Guide for more information.
Manually Pair the Poly TC8 with a Video System
You can manually pair the Poly TC8 connected to your primary network with a video system in the room.
To pair, the Poly TC8 must be on the same subnet as the video system and the following network components unblocked:
- Multicast address 224.0.0.200
- UDP port 2000
- TCP port 18888
You may see multiple devices that you can pair with on your video system's Device Management page. Know the MAC address to ensure you're pairing with the device you want such as the device in the room you're setting up.
A device may pair automatically after connecting to the network. However, you may need to manually pair a device in the following situations:
- The device doesn't automatically pair during setup with the system that you purchased.
- You want to pair the device with a different system.
- You want to pair additional devices to control the video system with more than one TC8.
- Connect the Poly TC8 that you want to pair to an Ethernet port in the room.
- In the system web interface, go to General Settings > Device Management.
- Under Available Devices, find the device by its MAC address such as 00e0db4cf0be and select Pair.
If paired successfully, the device displays under Connected Devices with a Connected status. If a device shows a Disconnected status, the pairing wasn't successful.
If pairing isn't successful, check the network connection and the configuration of both the Poly TC8 and the system you want to pair it with.
SCEP support on Poly touch controllers
You can manage certificates using your touch controller.
SCEP enables you to automatically enroll devices to retrieve new digital certificates or renew expiring certificates. If paired, your touch controller syncs settings automatically from your Poly video system.
Configure or pair the touch controller in a staged network before moving to an 802.1x enabled network.
- Settings can't be configured via the touch controller. SCEP and 802.1x settings are read-only.
- The touch controller syncs all SCEP and 802.1x settings from the primary device.
- Settings can either be set in the system web interface or provisioned via Poly Lens.
NOTE: Only HTTP SCEP server URLs are currently supported. Your SCEP challenge password must be configured as a static password. A single set of credentials is shared between the Poly video system and the Poly touch controller.
Enable 3K-bit encryption
A 3072-bit encryption certificate is a more secure type of digital security key compared to shorter 2048-bit keys, ensuring better security for sensitive information. The 3072-bit certificate identifies the device for network access such as 802.1x, Simple Certificate Enrollment Protocol (SCEP), and web proxy.
Note the following information about provisioning:
- A paired touch controller inherits the encryption bit length from the paired Poly video conferencing system, which is configured in the video conferencing system web interface.
- You can provision 3072-bit certification for all devices via SCEP in Poly Lens. When your 2048-bit certificates expire, the SCEP server sends 3072-bit certificates.
- For those not using Poly Lens, configure via the touch controller web interface. Delete the 2048-bit certificate, and set the certificate key size to 3072. Depending on network settings this may result in a loss of device connection. Re-pair the device on your staging network.
Restrict view of information screen in touch controller interface to administrators
Restrict the information page from view for all users other than authenticated administrators.
- Access the Swagger UI of the device: https://<ip-of-devce>/rest/swagger-ui
- In the same web browser, open a new tab and access the touch controller web interface and sign in as an admin.
This creates a session for the swagger-ui. - In the swagger-ui, scroll down to the Config section.
- Select PUT, followed by Try it Out.
- The session_id field requires some text; a period is accepted.
If you're still signed in as an administrator in the touch controller web interface, the REST call is authenticated. - In the Request body field, change the value of the "name" property from "room.name" to "security.info.menu.restricted" and the value of the "value" property from "string" to "true".
- Select Execute.
Managing a Zoom Room
Administrators can manage the settings of a Zoom Room in the Zoom web portal.
You can manage a range of settings for a Zoom Room in the Zoom web portal, including the following:
- The calendar synced to the Zoom Room
- The Zoom Room name, display name, type, location, and region
- How long before a meeting that users can check in
- How long before the room automatically releases following a period of no activity
- Display meeting reminders
- Set up mirrored displays
- Set alerts and notifications
- Enable/Disable room reservation on the Poly TC8
- Enable whiteboard
Add a Calendar to a Zoom Room Account
Administrators can add a calendar to a Zoom Room account on the Zoom web portal.
- Log into https://zoom.us/profile.
- Select Room Management > Calendar Integration.
- Select Add a Calendar Service.
- Choose a calendar service. Currently Zoom Rooms supports Google, Office 365, or Exchange.
- Follow the instructions to integrate the calendar to the Zoom Rooms account.
Once you integrate the calendar, you can sync that calendar to your Zoom Room.
Sync a Calendar to a Zoom Room
Administrators can sync a calendar to a Zoom Room on the Zoom web portal.
- Log into https://zoom.us/profile.
- Select Room Management > Zoom Room.
- Search for and select the Zoom Room.
- Select Room Settings.
- Under the Rooms Profile tab, scroll down to the Calendar (optional) section.
- Select the calendar service and resource.
- Select Save.
The calendar syncs with the Zoom Room and upcoming meetings display on the connected Poly TC8.
Manage a Zoom Room
Administrators can manage the settings of a Zoom Room on the Zoom web portal.
- Log into https://zoom.us/profile with an administrator login.
- Select Room Management > Zoom Room.
- Search for and select the Zoom Room you want to manage.
- Select Room Settings.
- Adjust the settings under the various tabs:
- Rooms Profile
- Meeting
- Display
- Alert
- Digital Signage
- Scheduling Display
- Whiteboard
Using the Poly TC8 in Poly Video Mode
With the TC8 device, you can control and manage aspects of your paired Poly video system.
Cameras
Camera controls are available in and out of calls.
You can control cameras, depending upon the camera type, in the following ways:
- Adjust an in-room camera
- Turn camera tracking on or off
Selecting the Primary Camera
If you have more than one camera attached to the system, you can select the primary camera in or out of a call.
Camera Priority
When you connect or disconnect a camera, camera priority determines the primary or active camera.
The system observes the following camera type priority:
- Embedded camera (Poly Studio X only)
- HDCI camera (Poly G7500 only)
- USB camera
- HDMI source set to display as people
Select the Primary Camera Using the Poly TC8
When you attach multiple cameras to the system, you can select the primary camera from the TC8 Camera Controls screen.
- Select Camera
![]() .
. - From the camera drop-down menu, select a camera.
The selected camera becomes the primary camera.
Using Camera Presets
If your camera supports presets, you can save up to 10 camera positions. Camera presets are stored camera positions that let you quickly point a camera at predefined locations in a room.
Near camera presets are available in or out of a call. Far camera presets are only available during a call. If enabled, you can use them to control the far-site camera.
When you save a preset, the preset saves the selected camera and the camera position.
NOTE: If camera tracking is on, camera controls and presets are unavailable. Turn tracking off to access these features.
Save a Camera Preset Using the Poly TC8
Save the current camera position as a preset for later use.
Use saved presets to change the near camera position in or out of a call. Far camera presets are available only in a call.
- Select Camera
![]() .
. - Adjust the camera to the desired position.
- Under Presets, do one of the following:
- On an empty preset card, press the preset card.
- To replace a preset, long press the preset card for 1 second.
Select a Preset
Using previously created camera presets, you can quickly move the camera to a desired position in a call.
- Select Camera
![]() .
. - Select the image of the preset you want.
Delete a Preset
You can delete a camera preset that you no longer need.
- Select Camera
![]() .
. - Select Delete
![]() .
.
 .
.Environment Controls
Using the Poly TC8, you can control room elements that enable you to customize your meeting environment.
Control Room Elements Using the Poly TC8
You can control room elements such as electronic shades, smart lighting, monitors, and projectors using the Extron Room Control App on the Poly TC8.
The administrator must enable the Environment menu option and configure the room elements using an Extron processor.
- Select Environment
![]() .
. - Choose one of the following:
- Lights - Adjust the lights in the room.
- Shades - Adjust the electronic shades in the room.
- Display - Control monitors and projectors in the room.
Poly Touch Controller privacy and security
Poly-HP delivers a secure touch controller platform, whether operating as a paired controller in a room, or as a stand-alone scheduling device.
This section contains details about configurable privacy options. For more information on security- and privacy-related information, see the Poly-HP Touch Controller Security and Privacy Whitepaper.
Open Poly touch controller ports
Correct operation of a Poly touch controller requires a limited number of open inbound ports.
Outbound ports are ephemeral ports, other than the UDP multicast ports listed in the following table. They're opened as needed to make the listed pairing connections and to make mostly HTTPS-based outbound requests as needed, depending on selected provider and feature configurations, for example:
- Poly Lens IoT
- Microsoft Teams app
- Zoom Rooms app
- Provisioning
Table 6-1 Poly touch controller open ports
| Port | Protocol | Description | When active |
| 80,443 | TCP/TLS | HTTPS port for administrative system web interface and REST APIs | Always active unless web or REST interfaces are administratively disabled |
| 2000 | UDP Multicast | Multicast for discovery of Poly endpoint devices (modular room protocol) on the same LAN segment or LLN | Active when running out-ofbox flow, and then only when paired with a room endpoint device; for example, an Android endpoint |
| 18888 | TCP/TLS | For pairing and communications with Poly endpoint devices (modular room protocol) | Active when running out-ofbox flow, and then only when paired with a room endpoint device; for example, an Android endpoint |
| 40777 | UDP Multicast | Multicast for discovery of PC-based Poly devices (room device communication protocol) on the same LAN segment or LLN | Active when running out-ofbox flow, and then only when paired with a PC device, for example, when running MTRoW |
| 50777 | TCP+AES-256 | For pairing and communication with PCbased Poly devices (room device communication protocol) | Active when running out-ofbox flow and then only when paired with a PC device; for example, when running MTRoW |
NOTE: The following terms are used in this table:
Endpoint
Also call a codec, an audio and video device that can place and receive A/V communication calls or be a participant in an A/V conference.
LAN
Local Area Network, a segment of IP networking usually within an office as opposed to outside of the building.
LAN segment
A subnet of a LAN, or a sub-section of a total LAN.
LLN
Link Local Network, a LAN segment that is only visible by devices directly connected or directly connected to the same switch. These are normally isolated networks not connected to other segments.
Outbound Traffic
Network traffic sent from a device.
REST API
Representational State Transfer API, a style of APIs commonly used in web-based systems characterized by stateless commands sent from clients to servers. Visit this paper detailing REST for details.
Device Maintenance
You have several options to keep your device running properly.
Updating a touch controller
NOTE: Updating your touch controller to version Poly TCOS 4.1.0 or later includes a major platform update to Android 11. Once updated to this platform, you can't downgrade to a previous version.
Updating a paired touch controller
- When an update becomes available, you may be prompted to update via the touch controller device interface. Follow the onscreen instructions.
- When paired to a Poly video conferencing system, update the touch controller through the Poly VideoOS system web interface.
Unpair the TC8 from a Video System
Unpair the TC8 if you no longer want to use it with a particular video system.
Don't unpair devices if you plan to use them with the same system. For example, if you move your video-conferencing equipment to another room, just disconnect and reconnect the devices in the new location.
- In the system web interface, go to General Settings > Device Management.
- Under Connected Devices, find the device by its MAC address (for example, 00e0db4cf0be) and select Unpair.
The unpaired device moves from Connected Devices to Available Devices (which shows discovered devices you can pair with the system).
Restart the Poly TC8 device
If you have issues, restart the Poly TC8 device to try resolving them.
- Disconnect the LAN cable from the Poly TC8 device and reconnect it.
Factory reset the Poly TC8 device
Reset the TC8 device to its default settings. This process refreshes the device by deleting its configurations except the current version of software.
- Disconnect the LAN cable from the Poly TC8 device to power it off.
- On the back of the Poly TC8 device, insert a pin or straightened paper clip through the factory reset button pinhole (the pinhole has a raised dot, at both the top and bottom of the ventilation hole).
![]()
- Press and hold the reset button, then reconnect the LAN cable to power on the Poly TC8 device.

Don't power off the Poly TC8 device until it finishes the factory reset process.
Factory Restore the Poly TC8 in the UI
You can restore the TC8 to its default settings in the device UI. This process refreshes the device by deleting its configurations except the current version of software.
If paired to a codec, unpair the device before factory restore.
- In the device local interface, go to Settings
![]() > Reset > Reset.
> Reset > Reset. - To confirm, select Reset.
The Poly TC8 resets all configurations to factory defaults. The most recently installed version of software remains on the device.
Troubleshooting
These troubleshooting tips can help when encountering issues with your TC8 device.
View the Poly TC8 and Paired Video System Information
You can see basic information about your TC8 and the paired video system in the device local interface.
- In the device local interface, go to Settings
![]() > Information.
> Information.
Some of the Poly TC8 and video system details include:- Device name
- Name of paired-video system
- Model
- MAC address
- IP address
- Hardware version
- Software version
- Serial number
Downloading Poly TC8 Logs
Download logs to help troubleshoot issues on your system.
Download Logs When Paired to Video System
The Poly TC8 logs are available in the paired video system's log package. To download the log package, see your video system's Administrator Guide.
Paired IP Devices
Use the following information to troubleshoot issues with paired IP devices.
IP Device Can't Pair to the Video System
If your device can't pair to the video conferencing system, use the following information to troubleshoot the issue.
Symptom
- After powering on the Poly TC8 device, it doesn't automatically pair with the video system.
- You can't manually pair the device from the Available Devices list in the video system web interface.
Problem
There are a few possible causes for this issue:
- Network traffic on TCP port 18888 is blocked.
- Your system and Poly TC8 aren't on the same VLAN.
Workaround
Complete each step until the device pairs with your system:
- Allow traffic on TCP port 18888.
- On your Poly TC8 device, verify that the Poly TC8 VLAN ID matches the VLAN ID on your system.
IP Device Doesn't Display on the Available Devices List
The Poly TC8 device you want to pair is connected to the network but you don't see it under Available Devices in the video system web interface.
Problem
There are a few possible causes for this issue:
- The device and video system aren't on the same subnet.
- The network switch isn't allowing UDP broadcast traffic forwarded to multicast address 224.0.0.200 on port 2000.
- The device is paired with another video system.
Workaround
Complete each step until you see the Poly TC8 device on the Available Devices list:
- Make sure the device and video system are on the same subnet.
If needed, work with your network administrator. - Allow traffic to 224.0.0.200 on UDP port 2000.
- Make sure the device isn't paired with another video system. If it is, unpair the device.
- Go to Settings > Reset and select Reset.
Your device resets to its default configuration settings, which unpairs it from the video system.
Paired IP Device is Disconnected
You paired the Poly TC8 device with your video system but can't use it. On the system web interface Device Management page, you see that the device is Disconnected.
Problem
A paired device must have a Connected status to use. A Disconnected status may mean there's a physical connection issue or your device or system is malfunctioning.
Workaround
Complete each step until you fix the issue.
- Check the device's LAN cable connection.
- Restart the device.
- Restart the video system.
- Make sure network traffic on TCP port 18888 is unblocked.
- Perform a factory restore on the device.
- Perform a factory restore on the system.
IP Device Paired to Inaccessible Video System
The Poly TC8 device was paired with a video system you can no longer access.
Symptom
The Poly TC8 device was paired with a video system you can no longer access (for example, the video system lost its network connection or was moved to another location). Whatever the situation, the Poly TC8 device screen now indicates it's waiting to pair.
Problem
The Poly TC8 device is still paired to the video system but can't connect to it.
Workaround
When this happens, there's a reset button in the Poly TC8 Settings menu to unpair the device from the video system.
If you can eventually access the video system it was paired with, you also should unpair the device from the Device Management page. Otherwise, the device continues to display in the Connected Devices list but is Unavailable.
Once unpaired, you can pair the device with the same video system or another video system.
- Go to Settings > Reset and select Reset.
Your device resets to its default configuration settings, which unpairs it from the video system. - In the system web interface, go to General Settings > Device Management.
- Under Connected Devices, find the device by its MAC address (for example, 00e0db4cf0be) and select Unpair.
HP Inc. addresses
HP US
HP Inc.
1501 Page Mill Road
Palo Alto 94304, U.S.A.
650-857-1501
HP Germany
HP Deutschland GmbH
HP HQ-TRE
71025 Boeblingen, Germany
HP UK
HP Inc UK Ltd
Regulatory Enquiries, Earley West
300 Thames Valley Park Drive
Reading, RG6 1PT
United Kingdom
Documents / Resources
References
Download manual
Here you can download full pdf version of manual, it may contain additional safety instructions, warranty information, FCC rules, etc.
Advertisement


Need help?
Do you have a question about the TC8 and is the answer not in the manual?
Questions and answers