Advertisement
- 1 NOW IT'S TIME TO PUT IT TOGETHER!
- 2 MAINTENANCE
- 3 PARTS - Be Smart- Sort Your Parts
- 4 TOOLS & HARDWARE
- 5 PLAY FOOD PIECES
- 6 Every Journey Begins with the First Step
- 7 Brace Yourself
- 8 Groovy
- 9 That's Right
- 10 Top This
- 11 Topsy-Turvy
- 12 Rolling Along
- 13 Get a Leg Up
- 14 Here to Support You
- 15 Ring In the Good Times
- 16 Don't Fail to Attach the Rails
- 17 Order Up
- 18 Divide and Conquer
- 19 Well Done- Now It's Time for Fun!
- 20 YOU DID IT!
- 21 ACCESSORIZE
- 22 Documents / Resources
NOW IT'S TIME TO PUT IT TOGETHER!
Don't worry, assembling your new cart is simple, and we're here to help. It may go a little faster with a partner to lend a hand, but we've made it so one person can assemble the cart. Here are a few tips before you begin:
- Read through all the instructions first.
- Clear a fiat, covered space (carpeted is best) to lay out all the materials so everything is close at hand.
- You will need a Phillips head screwdriver (not included) to assemble the cart.
- The instructions include lots of helpful pictures—we show you, step-by-step, exactly how to align pieces and parts for speedy and accurate assembly. Note that hardware needed for each step is shown in the upper right corner of the page, each piece being added in a given step is highlighted in gray, and the 'assembled view" (what it looks like when the step is completed) is included in the lower right corner of every page.
- In the instructions, the name of a part is followed by a number or a letter in parentheses. This number or letter corresponds to the sticker on the part.
- Helpful hints are highlighted with a large exclamation point.

Helpful hints are found here.
- If you have any questions, we're here for you! Give our customer care team a call at 1-800-284-3948!

Retain these instructions for future reference.
Prevent Tip Overs!
- Do not allow children to pull, climb, sit, or stand on any part of the cart.
- Never place computers, televisions, or other heavy objects on top of the cart.
- The cart must be placed on a hard, fiat, and level surface.
- For more information on how to prevent furniture tip overs in your home, visit Anchorlt.gov.
- The cart must be assembled as instructed.
MAINTENANCE
Ensure the cart continues to function properly and safely by regularly checking the hardware and tightening when necessary.
PARTS - Be Smart- Sort Your Parts
Before you begin assembly, make sure you have all the parts listed below. When directed, use the Allen wrench (X) to attach bolts and the fiat wrench (Y) to attach lock nuts.


TOOLS & HARDWARE

Melissa & Doug Customer Service: 1-800-284-3948
PLAY FOOD PIECES

Every Journey Begins with the First Step
Using 2 long screws (part 1), attach the left side panel (part A) to the side panel (part B).

Brace Yourself
Using 1 long screw (part 1),attach the lower brace (part C) to the cart. The wooden dowel will fit into bottom of panel A.

Melissa & Doug Customer Service: 1-800-284-3948
Groovy

Slide bottom panel (part D) into the grooves inside the cart.
That's Right
Using 3 long screws (part 1), attach the right side panel (part E) to the cart.

Top This

Place the countertop (part F) into the top of the cart. Using 4 long screws (part 1), attach the countertop to the cart.
Topsy-Turvy

Melissa & Doug Customer Service: 1-800-284-3948
Rolling Along

- Insert a wheel bolt (part 4) through a wheel (part H), through a spacer (part l), and then into the wheel block. Use a lock nut (part 5) to secure the wheel.
- Repeat step on the opposite side.
Get a Leg Up
Using 4 short bolts (part 2) and 4 bolt caps (part 3), attach the front legs (part J) to the back end of the cart.

Here to Support You
Using 4 short bolts (part 2) and 4 bolt caps (part 3), attach the awning support posts (part K) to the side of the cart.

Melissa& Doug Customer Service: 1-800-284-3948
Ring In the Good Times

- First, slide bell (part L) onto large awning wire (part M).
- Second, slide large and small awning wires (parts M & N) into awning (part O).
- Third, slide small awning wire into notches on the top of the awning supports. Hook the ends of the large awning wire into the notches on the sides of the awning supports.
Don't Fail to Attach the Rails

- Using 4 short screws (part 6), attach the upper and lower menu card rails (part P).
- Using 2 small screws (part 6), attach the side menu card rail (part Q).
Order Up

Slide menu card (part R) into place.
Divide and Conquer

- First, using 1 long screw (part 1)attach 1drawer end panel (part S) to 1 drawer side panel (part T)
- Second, slide 1 drawer bottom panel (part U) into the groove in drawer assembly.
- Third, insert 2 drawer dividers (part V) into drawer assembly.
- Fourth, using 1long screw, attach 1drawer side panel (part T) to drawer assembly.
- Fifth, insert drawer long middle divider (part W) into drawer assembly.
- Sixth, using 2 long screws (part 1), install 1end panel (part S) to the drawer assembly.
- Repeat these steps to assemble the second drawer.
Well Done- Now It's Time for Fun!

Slide drawers into cart.
YOU DID IT!
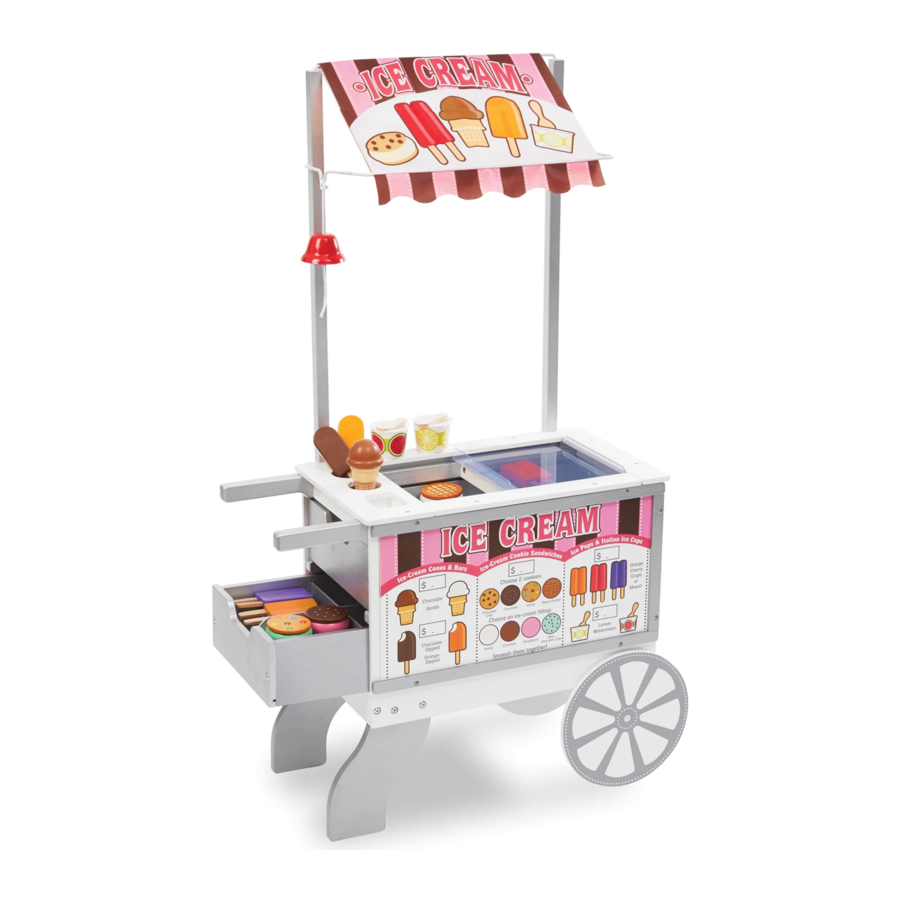
Now the real fun begins—it's time to stock, order, create, and serve up delicious pretend play snacks and sweets! Roll up the food cart and instantly transform any play space into an imaginary stadium, park, city street, playground, or ball field! Here are some of the special features of the Snacks & Sweets Food Cart:
- REVERSIBLE AWNING: Choose what wares to sell! Roll the awning along the awning wires to flip the sign: Display one side and the cart is an ice cream stand; with the other, it becomes a hot dog stand with all the fixings!
- REVERSIBLE MENU CARD: Match the menu to the awning to let customers know what's for sale today. Menu material lets little vendors fill in the prices for all the sweets and treats options with pencil and then erase to reuse. Colorful pictures of the items help pre-readers know which items to set up in the cart and how they can be mixed and matched. Card slides easily in and out of the front of the cart.
- EXTRA-LARGE DIVIDED DRAWERS: Two large wooden drawers, divided into six compartments each, make it easy to stay organized and provide plenty of storage and display space for the toy snacks included with the cart. When using as an ice cream cart, store the sweets in the top drawer and the snacks in the bottom. Switch when using the cart as a hot dog stand so the correct items are in easy reach!
- PLAY FOOD PIECES: The set includes more than 40 wooden "hot" and "cold" treats to sell from the cart! Perfect for a hot summer day, there are deliciously decorated ice cream cones and pops, Italian ice cups, mix and match ice cream sandwiches, and ice pops. Hankering for something hot? Order up hot dogs and pretzels the way you like them—plain, with the works, and everything in between, including ketchup and mustard that really "squirt," and favorite toppings like chili, sauerkraut, onions, and relish. Quench thirsty imaginations with five varieties of seltzer (with removable tops!).
- SLIDING SEE-THROUGH DOORS: Sturdy clear plastic double-doors give customers a clear view of what's available, and give vendors easy access by allowing them to reaching through the top of the cart to grab what's in the top drawer.
- WORKING BELL: Ding-ding! Ring the metal bell with wooden clapper to get the vendor's attention, or let customers know when an order is ready for pick-up.
- STURDY WOODEN WHEELS & HANDLES: Lift the handles and roll the cart wherever there are hungry customers! The cart is sturdy enough to hold up to years of imaginative play, and yet light enough for kids to maneuver.
ACCESSORIZE
Melissa & Doug offers lots of pretend play accessories that can be used with your Snacks & Sweets Food Cart! To find items to stock your cart, such as play food, pantry items, utensils, play money, and more, visit us at MelissaAndDoug.com!
Documents / Resources
References
Download manual
Here you can download full pdf version of manual, it may contain additional safety instructions, warranty information, FCC rules, etc.
Download Melissa & Doug Snacks & Sweets Food Cart (9350) Manual
Advertisement


Need help?
Do you have a question about the Snacks & Sweets Food Cart and is the answer not in the manual?
Questions and answers