Table of Contents
Advertisement
Quick Links
We care about your comments. Please call us!
1·800·284·3q48
www.MelissaAndDaug.com
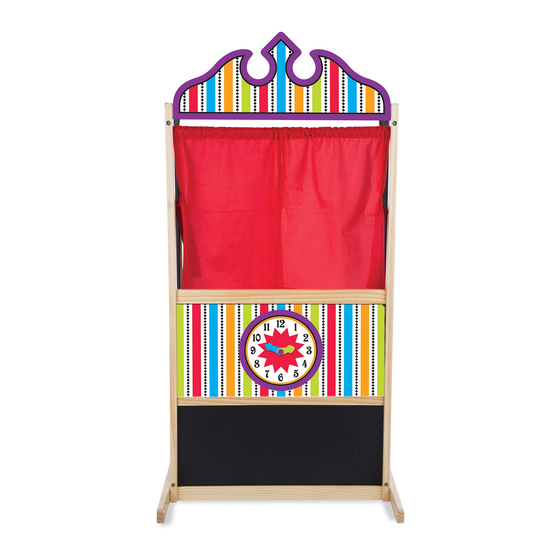
Deluxe Puppet
Theater
ASSEMBLY INSTRUCTIONS
Melissa & Doug products meet or exceed U.S. testing
standards and pass our high quality requirements.
© Melissa & Doug, LLC, P.O. Box 590, Westport, CT 06881
MADE IN CHINA
Item #2530
.& WARNING:
CHOKING HAZARD - Small Parts.
Not for children under 3 years.
I-lave a
question
or need help?
Give us a call!
1-800-284-3948
.& WARNING:
Ages3+
KEEP AWAY FROM FIRE.
.& CAUTION:
ADULT ASSEMBLY REQUIRED.
Advertisement
Table of Contents

Related Manuals for Melissa & Doug Deluxe Puppet Theater


Summary of Contents for Melissa & Doug Deluxe Puppet Theater
- Page 1 Deluxe Puppet Theater ASSEMBLY INSTRUCTIONS I-lave a question or need help? Give us a call! 1-800-284-3948 Item #2530 .& WARNING: Ages3+ We care about your comments. Please call us! KEEP AWAY FROM FIRE. .& WARNING: Melissa & Doug products meet or exceed U.S. testing standards and pass our high quality requirements.
- Page 6 STEP Every Journey Begins with the l=irst Step Assemble clock by fitting male snap grommet (part L) through hour hand (part 0), minute hand (part P), clock panel (part J), foam washer (part N), and snapping into female snap grommet (part M). Assembled View Melissa &...
- Page 7 STEP Side by Side Line up hole on the end of one foot (part H) with the threaded insert on the outside of the right panel (part A). Using a short bolt (part U) attach the foot to the panel. Do not tighten-leave slightly loose. Attach the other foot (part H) to the outside of the left panel (part B) in the same way.
- Page 8 • ST�P 3 - We're l-lere to Support You Insert two barrel nuts (part S) into a slotted stretcher (part C). Using two long bolts (part Q), attach one side of the slotted stretcher to the base of the left panel assembly, and the other side to the right panel assembly.
- Page 9 STEP 4 - Divide and Conquer Fit the chalkboard (part K) into the slotted stretcher (part C) at the bottom. Fit the divider (part E) on top of the chalkboard. Fit the clock panel (part J) into the divider and place the remaining slotted stretcher (part C) on top.
- Page 10 ST�P 6 - Curtain Call Slide curtains (part G) onto curtain rod (part I=) with straps on outside edge. IM PORT ANT: Curtain str aps are on the outside. ST�P 7 - Top Notch Insert two barrel nuts (part S) into top stretcher (part D no slot).
- Page 11 STE:P 8 - Put Up a Good l=ront Using two binder nut/bolt sets (part T), attach header panel (part I) to the front of the top stretcher. Be sure artwork is facing out. Assembled View...
Need help?
Do you have a question about the Deluxe Puppet Theater and is the answer not in the manual?
Questions and answers