
Related Manuals for Melissa & Doug Mine To Love


Summary of Contents for Melissa & Doug Mine To Love
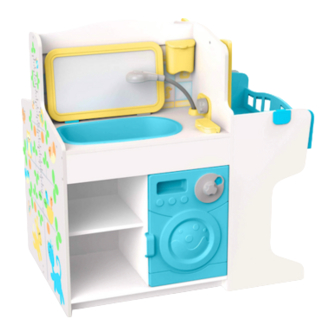
- Page 1 Mine To Love ® Baby Care Activity Center ASSEMBLY INSTRUCTIONS Have a question or need help? Give us a call! 1-800-284-3948 Assembly Instructional Video Available at MelissaAndDoug.com/babycenter Item #31701 Ages 3+ MADE IN CHINA...
- Page 2 THANK YOU! Thank you for choosing the Melissa & Doug Mine to Love® Baby Care Activity Center! It’s a terrific way to help nurture a child’s creativity and imagination, and to inspire story-telling and independent play for years to come.
- Page 3 WOODEN PANELS - Be Smart—Sort Your Parts notched brace side wall floor cradle back divider brace center panel center panel fridge shelf high chair seat baseboard with holes counter upper center panel kitchen shelf rounded laundry bathroom top panel front panel shelf cradle cradle...
- Page 4 OTHER PARTS (continued) bath nozzle cradle side (2) cradle bottom cradle holder (2) shutter (2) window knob bath nozzle bath nozzle & hose bath hose changing mat bathtub attachment stopper diaper door laundry knob laundry laundry door high chair high chair knob divider rail (2)
- Page 6 Helpful Hints and Tips • Note: Some packages of hardware may have extra pieces. • You will need a Phillips head screwdriver to assemble the Baby Care Activity Center. IMPORTANT: Barrel nuts and screws are used to join the main wood panels together. The barrel nuts have been properly aligned at the factory to allow the screws to easily join the panels.
- Page 7 STEP 1 - Every Journey Begins with the First Step Using 2 long screws (part 29), attach the side wall (part A) to the floor (part B). REMINDER: Do not fully tighten screws until unit is fully assembled. Assembled View...
- Page 8 STEP 2 - Get Back Slide the cradle back (part C) into the slots on the floor (part B). IMPORTANT: Make sure the grooves are aligned. Assembled View Melissa & Doug Customer Service: 1-800-284-3948...
- Page 9 STEP 3 - Divide & Conquer • First, insert the 2 door stops (part 1) into the divider (part D). • Second, slide the divider (part D) down into the slots in the floor (part B). • Third, lift divider (part D) slightly to align the hole in divider with the hole in the floor.
- Page 10 STEP 4 - Brace Yourself • First, using 4 long screws (part 29), attach notched brace (part E) between the cradle back (part C) and the divider (part D) under the floor (part B). • Second, using 4 long screws (part 29) attach the brace (part F) between the divider (part D) and the side wall (part A).
- Page 11 STEP 5 - Get Into The Grooves • First, slide the center panel with holes (part G) into the grooves between the cradle back (part C) and the divider (part D). • Second, slide the center panel (part H) into the grooves between the divider (part D) and the side wall (part A).
- Page 12 STEP 6 - Groovy With the small notches on top, slide the fridge shelf (part I) into the grooves between the cradle back (part C) and the divider (part D). Melissa & Doug Customer Service: 1-800-284-3948 Assembled View...
- Page 13 STEP 7 - Have A Seat Slide the high chair seat (part J) into the slots between the divider (part D) and the side wall (part A). Attach with 2 long screws (part 29). IMPORTANT: Finished edge faces up. Assembled View...
- Page 14 STEP 8 - Tipsy • First, stand the center upright. • Second, tip the center onto its side. Using 3 long screws (part 29), attach the baseboard (part K) under the floor (part B). Note the barrel nuts should not face out. •...
- Page 15 STEP 9 - Do It Yourshelf Using 4 long screws (part 29), attach the bathroom shelf (part L) to the divider (part D) and the side wall (part A). Assembled View...
- Page 16 STEP 10 - Counter Attack • First, insert a wooden dowel (part 31) into the counter (part M) near the kitchen sink. • Second, lower the counter onto the doll center. The center panel will fit into the groove on the underside of the counter and the dowel will fit in the hole on the cradle back panel (part C).
- Page 17 STEP 11 - Center Yourself With the mirror over the bathtub opening and the notches on the top, slide the upper center panel (part N) down into the grooves. Assembled View STEP 12 - Clip It Clip the wipe dispenser (part 2) and the double sided hook (part 3) into the notches on the top of the...
- Page 18 STEP 13 - Top Shelf Lower the kitchen shelf (part O) onto the upper center panel. The center panel will fit into the narrow groove underneath the kitchen shelf. Using 4 long screws (part 29), attach the kitchen shelf to the sides (parts A and C). IMPORTANT: Narrow panel should be over changing and bathing...
- Page 19 STEP 15 - Don’t Run Afoul of the Dowels • First, insert 4 wooden dowels (part 31) into the holes in the top of the laundry front panel (part Q). • Second, insert dowel pins into the holes on the underside of the counter (part M).
- Page 20 STEP 16 - Left, Right, Left, Right • First, insert wooden dowels (part 31) into the cradle left panel (part R) and the cradle right panel (part S) and then insert panels into the floor (part B). • Second, using 10 long screws (part 29), attach the cradle left panel (part R) and the cradle right panel (part S) to cradle back (part C) and floor (part B).
- Page 21 STEP 17 - Hang It Up • First, using 2 short screws (part 30), attach the clothing rack holders (part 4) to the insides of the left and right cradle panels (parts R and S). • Second, lower the clothing rack (part 5) into the clothing rack holders.
- Page 22 STEP 18 - Bedtime • First, snap fit the cradle front and back (part 6) to one of the cradle sides (part 7). • Second, slide the cradle bottom (part 8) into the slot along the inside base of the cradle front and back. •...
- Page 23 STEP 19 - Rock-a-Bye Lower the cradle into place. Clip the cradle holders into the slots on top of the cradle left and right panels (parts R and S). Assembled View...
- Page 24 STEP 20 - Throw Wide the Shutters • First, using 4 short screws (part 30) attach the shutters (part 10) to the cradle back (part C). • Second, slide the window card (part 11) into the slots in the shutters. (NOTE: Card is double sided to show either day or night scene.) Melissa &...
- Page 25 STEP 21 - The Knob Will Do The Job • First, insert the bath nozzle knob (part 12) into bath nozzle attachment (part 13). Press knob down until it clicks into place. • Second, lower the bath nozzle attachment into the counter.
- Page 26 STEP 22 - This Is Where The Hose Goes • First, feed bath nozzle & hose (part 14) down through the hole in the bath nozzle attachment. • Second, insert the bath hose stopper (part 15) into hose end underneath the counter. HELPFUL HINT: The bath hose stopper fits very tightly in hose.
- Page 27 STEP 24 - Tub Time • First, lift the changing pad. With the flat side on the left and the curved side on the right, lower the bathtub (part 17) into the large hole in the counter. • Second, insert the diaper door (part 18) into the hole in the counter.
- Page 28 STEP 25 - Add the Door and More • First, insert the laundry knob (part 19) into the laundry door (part 21). From the back of the laundry door, attach the laundry knob connector (part 20) to the back of the laundry knob.
- Page 29 STEP 26 - Take a Seat • First, on the kitchen side, using 2 small screws (part 30), attach the high chair rails (part 22). • Second, snap the high chair divider (part 23) to the bottom of the high chair tray (part 24). •...
- Page 30 STEP 27 - Everything and the Kitchen Sink • First, insert the faucet (part 25) into the faucet hole and secure it with faucet screw (part 26) from beneath the counter. • Second, lower the kitchen sink (part 27) into the hole in the counter.
- Page 31 STEP 27 - What Fun, You’re Done! Attach the fridge door (part 28) by inserting the hinge pins into holes inside the counter and base (insert top pin first). The lower hinge pin flexes to help it attach to the base. IMPORTANT: Insert the top hinge pin first, then flex lower...
- Page 32 ACCESSORIZE The Melissa & Doug Mine to Love® line of dolls and accessories offers lots of options for stocking and play- ing with the Baby Care Activity Center! To find dolls, play sets, and more, visit us at MelissaAndDoug.com!
Need help?
Do you have a question about the Mine To Love and is the answer not in the manual?
Questions and answers