Table of Contents
Advertisement
Quick Links
ITEM #2580 B
Victorian Dollhouse
Assembly Instructions
Melissa & Doug, LLC
All Rights Reserved
www.MelissaAndDoug.com
WARNING:
!
CHOKING HAZARD -
Small parts.
Not for children under 3 years.
CAUTION:
!
Adult assembly required.
We care about your comments.
Please call us! 1-800-284-3948
Advertisement
Table of Contents

Related Manuals for Melissa & Doug Victorian Dollhouse


Summary of Contents for Melissa & Doug Victorian Dollhouse
- Page 1 Victorian Dollhouse Assembly Instructions WARNING: CHOKING HAZARD - Small parts. Not for children under 3 years. CAUTION: Adult assembly required. Melissa & Doug, LLC We care about your comments. All Rights Reserved Please call us! 1-800-284-3948 ITEM #2580 B www.MelissaAndDoug.com...
- Page 2 Parts List Page 2 of 36...
- Page 3 Foundation Components Foundation Panel 1C Foundation Panel 1D Foundation Panel 1B Front Steps 1A Foundation Panel 1G Foundation Panel 1E Foundation Panel 1F Foundation Panel 1H Page 3 of 36...
- Page 4 Floor Panels (upper surface views) Floor Panel 11 (2nd floor) Floor Panel 2 (1st floor) Floor Panel 14 (top floor) Page 4 of 36...
- Page 5 Outer Wall Panels (exterior views) Wall Panel 15 Wall Panel 4 Wall Panel 7 Wall Panel 5 Wall Panel 10 Wall Panel 9 Wall Panel 8 Wall Panel 6 Page 5 of 36...
- Page 6 Inner Wall Panels, Staircases and Assembly Hardware Staircase Assembly 12 Wall Panel 13 (1st floor) Wall Panel 3 Staircase Assembly 16 screw hole plug and cover Screw (2nd floor) Page 6 of 36...
- Page 7 Roof Panels (exterior tiled surface views) Roof Panel 19 Roof Panel 18 Roof Panel 20 Roof Panel 17 Roof Panel 23 Roof Panel 22 Roof Panel 21 Roof Panel 25 Roof Panel 27 Roof Panel 24 Roof Panel 26 Page 7 of 36...
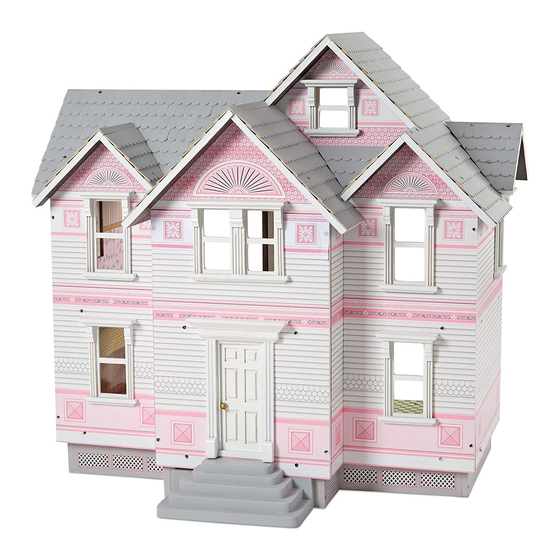
- Page 8 Completed dollhouse views (with component item numbers) rear view top view front view right view isometric front left view Page 8 of 36...
- Page 9 Step 1: Begin by attaching Front Steps 1A to the painted surface of Foundation Panel 1B using 2 screws (item 28), as illustrated. Next, with artwork facing out on all the foundation panels, assemble the foundation as shown in the diagram. Make sure that the screw holes on the long edges of panels 1E and 1H are facing up.
- Page 10 Step 2: Attach Wall Panel 3 to Floor Panel 2 with 2 screws (item 28) inserted through the bottom of Floor Panel 2. Make sure to orient the artwork on the wall and floor panels as described below. pink with purple tile wall artwork on upper half of Wall Panel 3 wood floor artwork on yellow tile artwork on bottom...
- Page 11 Step 3: Attach the floor panel assembly from Step 2 to the foundation assembly from Step 1 using 5 screws (item 28), as illustrated. Step 2 assembly Step 1 assembly Page 11 of 36...
- Page 12 Step 4: Attach Wall Panel 4 to Floor Panel 2 with 2 screws (item 28), as illustrated, making sure the window ornamentation is facing out. Page 12 of 36...
- Page 13 Step 5: Attach Wall Panel 5 to Wall Panel 4 and Floor Panel 2 with 3 screws (item 28), as illustrated, making sure the window ornamentation is facing out. Page 13 of 36...
- Page 14 Step 6: With the pink clapboard artwork facing out, slide Wall Panel 6 into position and secure with 2 screws (item 28), as illustrated. Make sure that interior wall artwork on panels 5 and 6 are aligned after assembly. Page 14 of 36...
- Page 15 Step 7: Attach Wall Panel 7 to Floor Panel 2 with 2 screws (item 28), as illustrated, making sure the window ornamentation is facing out. Page 15 of 36...
- Page 16 Step 8: Attach Wall Panel 8 to Wall Panel 7 and Floor Panel 2 with 3 screws (item 28), as illustrated. Page 16 of 36...
- Page 17 Step 9: With the pink clapboard artwork facing out, slide Wall Panel 9 into position and secure with 2 screws (item 28) to Wall Panel 8, as illustrated. Make sure that the interior wall artwork on panels 9 and 6 (from Step 6) are identical. Page 17 of 36...
- Page 18 Step 10: Place the bottom edge of Wall Panel 10 into the slot behind the front steps. Then attach to Floor Panel 2, Wall Panel 6 and Wall Panel 9 with 6 screws (item 28), as illustrated. The window and door ornamentation should be facing out, and the exterior and interior wall artwork on wall panels 10, 6 and 9 should be aligned.
- Page 19 Step 11: Position Floor Panel 11 as shown below. Next, fit the slot in Floor Panel 11 over the inner Wall Panel 3, and carefully slide it down until the holes on its edges align with the 8 holes in the surrounding Wall Panels 7, 8, 10, 5 and 4. Secure Floor Panel 11 to the surrounding wall panels with 8 screws (item 28), as illustrated in the top view diagram.
- Page 20 Step 12: Attach Staircase Assembly 12 by sliding it down through the opening in Floor Panel 11, as illustrated. Place the staircase flat against Wall Panel 3, with the top landing of the staircase resting on Floor Panel 11 (2nd floor panel) and the bottom edge resting on Floor Panel 2. Secure with 1 screw (item 28) inserted through the opposite side of Wall Panel 3.
- Page 21 Step 13: With the striped wallpaper artwork facing right, align Wall Panel 13 with the two remaining holes in Floor Panel 11 and secure with 2 screws (item 28) inserted from underneath the floor panel, as illustrated. The interior wall artwork on panels 13, 10, 5 and 4 should be aligned. pink striped wallpaper artwork Page 21 of 36...
- Page 22 Step 14: Make sure that the artwork surface of Floor Panel 14 is facing up and the window ornamentation on Wall Panel 15 is facing out, then secure these panels together with 3 screws (item 28) inserted from underneath Floor Panel 14, as illustrated. angled edge artwork surface...
- Page 23 Step 15: Attach the floor assembly just completed in Step 14 to the main dollhouse assembly by aligning the 4 holes in the floor with the 4 holes on inner Wall Panels 3 and 13. The 2 holes on the edge of Floor Panel 14 should also be aligned with the holes on Wall Panel 7, as illustrated.
- Page 24 Step 16: Attach Staircase Assembly 16 by sliding it down through the opening in Floor Panel 14, as illustrated. Place the staircase flat against Wall Panel 3, with the top landing of the staircase resting on Floor Panel 14, and the bottom edge resting on Floor Panel 11.
- Page 25 Step 17: Attach Roof Panel 17 by sliding the notch around the intersecting Wall Panel 8. Then align the hole in Roof Panel 17 with the hole in the top edge of the Wall Panel 10 and secure with 1 screw (item 28), as illustrated. notch Page 25 of 36...
- Page 26 Step 18: Attach Roof Panel 18 by aligning its hole with the hole in the top edge of the Wall Panel 8, as illustrated. Secure with 1 screw (item 28). Page 26 of 36...
- Page 27 Step 19: Attach Roof Panel 19 with 1 screw (item 28) inserted from the interior side of Wall Panel 15, as illustrated. Page 27 of 36...
- Page 28 Step 20: Place Roof Panel 20 onto Wall Panels 15, 8 and 7. Secure with 4 screws (item 28), as illustrated. Page 28 of 36...
- Page 29 Step 21: Place Roof Panel 21 onto Wall Panels 10 and 15, and against Roof Panels 20 and 17. Secure with 6 screws (item 28), as illustrated. Page 29 of 36...
- Page 30 Step 22: Attach Roof Panel 22 by pressing the slot on its underside firmly over the top edge of Wall Panel 4, as illustrated. Secure with 1 screw (item 28). slot Page 30 of 36...
- Page 31 Step 23: Attach Roof Panel 23 by placing its underside slot firmly on the top edge of Wall Panel 4, as illustrated. Secure with 3 screws (item 28). Page 31 of 36...
- Page 32 Step 24: Attach Roof Panel 25 by placing its underside slot firmly on the top edge of Wall Panel 5, as illustrated. Secure with 1 screw (item 28). roof panel underside slot Page 32 of 36...
- Page 33 Step 25: Attach Roof Panel 24 by placing its underside slot firmly on the top edge of Wall Panel 5, as illustrated. Secure with 3 screws (item 28). Page 33 of 36...
- Page 34 Step 26: Attach Roof Panel 26 to the top edge of the Wall Panel 7, as illustrated. Secure with 1 screw (item 28). Page 34 of 36...
- Page 35 Step 27: Attach Roof Panel 27 by placing it on the top edge of the Wall Panel 7, as illustrated. Secure with 3 screws (item 28). Page 35 of 36...
- Page 36 OPTIONAL. PLEASE NOTE - proceeding with Step 28 will prevent the dollhouse from being disassembled without damage. Step 28: For a dollhouse with a more aesthetic appearance, matching hole plugs and covers have been included to conceal both external and internal screw holes. For external holes (roof panels and exterior walls), select the proper color plug and apply a small amount of wood glue to one end, then insert a plug into each screw hole.
Need help?
Do you have a question about the Victorian Dollhouse and is the answer not in the manual?
Questions and answers