Advertisement
- 1 ASSEMBLY
- 2 INTRODUCTION TO THE DEVICE
- 3 DISPLAY
- 4 BATTERY INFORMATION
- 5 CORRECT USE
- 6 CORRECT WAY OF SWEEPING
- 7 QUICK GUIDE
- 8 COMMON AND MODE-BASED SETTINGS
- 9 SEARCH MODES
- 10 SENSITIVITY
- 11 TARGET DEPTH
- 12 MUTE FUNCTION
- 13 FREQUENCY
- 14 TARGET ID
- 15 DISCRIMINATION PATTERNS
- 16 GROUND BALANCE
- 17 PINPOINT
- 18 FERROCHECK
- 19 MINERALIZATION INDICATOR
-
20
SETTINGS
- 20.1 Frequency Shift
- 20.2 Recovery Speed
- 20.3 Iron Filter
- 20.4 Stability for Iron Filter
- 20.5 Stability in Beach Mode
- 20.6 Bottle Cap Rejection
- 20.7 Ground Suppressor
- 20.8 Deep Target Identification
- 20.9 Iron Rejection Feature in Beast Mode
- 20.10 Volume
- 20.11 Audio Gain
- 20.12 Tone Settings
- 20.13 User Profile
- 20.14 Backlight
- 20.15 Vibration
- 20.16 LED Flashlight
- 20.17 Bluetooth
- 20.18 Clock
- 20.19 Time Tracking
- 21 WARNING MESSAGES
- 22 SOFTWARE UPDATE
- 23 HEADPHONES
- 24 TECHNICAL SPECIFICATIONS
- 25 WARNINGS
- 26 Documents / Resources
ASSEMBLY

- After inserting the washers on the lower shaft, place the lower shaft in its location on the search coil. Secure by tightening the screw and nut. Do not overtighten.
- To join the middle rod with the upper and lower rods, open the lever latches and engage the pieces together. After adjusting the length of the device to your height, press the latches to secure.
- Wind the search coil cable on the shaft without stretching too much. Then, plug the connector to the search coil input socket on the system box and secure by tightening the nut. While tightening, you may hear clicks indicating that the connector is secured.
![]()
- If you want to adjust the armrest, first remove the screws. After sliding the armrest up or down one level, align the holes and secure by tightening the screws. You can attach the spare screw to the empty hole if you do not want to lose it.

- Insert the armrest strap as shown in the picture and adjust it to your arm size and tighten.


INTRODUCTION TO THE DEVICE

- LCD Screen
- Power & Settings Button
To turn the device on, press the button for 1 second. To go into or to get out of settings, press once. To turn the device off, press and hold.
Note: While in settings, pressing the button long will not turn the device off. - Pinpoint & Accept/Reject Button
It is used for pinpointing on the main screen. This button has multiple functions in discrimination and other settings which are explained in detail in the related sections of the manual. - Frequency Button
Allows you to select the operating frequency amongst the Multi and single frequencies. - Discrimination Button
Allows you navigate between the discrimination patterns offered by The LEGEND. - Right and Left Buttons
On the main screen, they are used to navigate between the modes and in the settings menu, they are used to navigate through the settings. - Plus (+) and Minus (-) Buttons
On the main screen, they are used to increase or decrease the sensitivity and in the settings menu, they are used to change the value of a setting. - Ground Balance Button
In The LEGEND, you can ground balance the detector in 3 different ways using this button. For details, please read the Ground Balance section. - Speaker
- LED Flashlight
- Search Coil Input Socket
- Wired Headphones and Charging Input Socket

If no headphones or charging cable is plugged in the socket, please keep it closed with the screw cap.
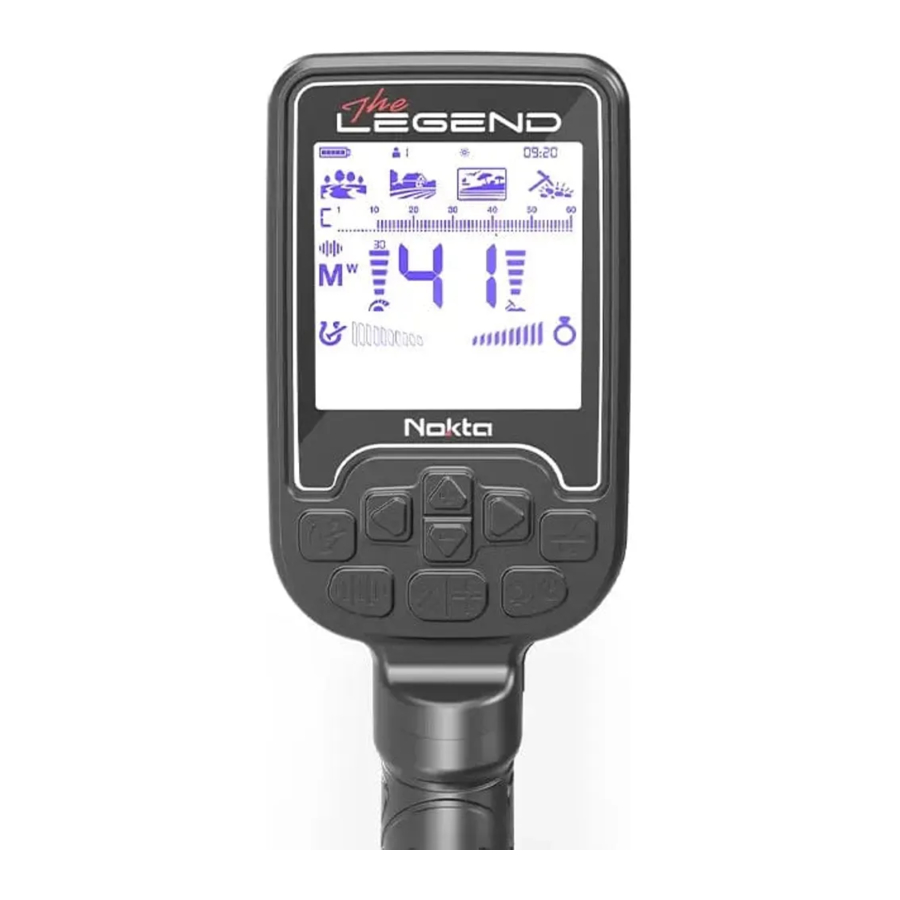
DISPLAY

- Info Bar
- Clock and Time Tracking
- Search Modes
- Target ID Scale and Notched Out IDs
- Operating Frequency
- Sensitivity Indicator
- Target ID
- Depth Indicator
- User Profile Save & Delete
- FerroCheck Bar
- Pinpoint
- Settings
- Sub-settings
BATTERY INFORMATION
The LEGEND has an internal 5050mAh Lithium Polymer battery.
Battery runtime varies between 8-20 hours. Factors such as operating frequency, usage of speaker or wired/wireless headphones, display backlight, LED flashlight etc. will affect battery runtime.
Charging
Charge The LEGEND before initial use. Charging an empty battery will take approximately 3-4 hours.
To charge the battery, insert one of the ends of the cable supplied with the device to the wired headphones / charger input socket and the other end to the charging adapter.
You can use a regular, 5V 2A (minimum) USB power adapter to charge the device. The charging time will increase if you charge the device through the USB port on a PC.

WATERPROOF REPLACEABLE SPARE BATTERY
Included in The LEGEND Pro Pack only and sold separately as well, this battery can be used when the internal battery is empty and you do not have access to charging.
You can attach the spare battery easily as shown in the picture.

When you are using the spare battery, you cannot plug any wired headphones to the device.
You can charge the spare battery easily using the charger it comes with.


If you remove the battery from its housing, do not use the device in the rain or underwater. You must remove the battery housing from the device as well and not leave it on the device should you want to use the device underwater.
Operating with a Powerbank
You can also power and charge the battery with a powerbank. To do this, just insert one of the ends of the cable supplied with the charger to the wired headphones / charger input socket and the other end to the powerbank. Please note that you will not be able to attach wired headphones to the device when a powerbank is attached to the device.
Do NOT use the detector underwater while connected to a power bank.
Low Battery Level
Battery icon on the display shows the battery life status. When the charge decreases, the bars inside the battery icon decrease, too. When battery is depleted, ''Lo'' message appears on display and the device shuts down.

BATTERY WARNINGS
Do not expose the device to extreme temperatures (for example a car's trunk or glove compartment)
Do not charge the battery in temperatures over 35°C (95°F) or below 0°C ( 32°F).
The LEGEND battery can only be replaced by Nokta Detectors or its authorized service centers.
CORRECT USE

It is very important to adjust the shaft to your height correctly to be able to search without discomfort and fatigue.

Adjust the height of the shaft so that you are standing in an upright position, your arm is relaxed and the search coil is approximately 5cm (~2'') above the ground.
CORRECT WAY OF SWEEPING

It is important to keep the search coil parallel to the ground in order to get accurate results.

The search coil must be parallel to the ground at all times.

QUICK GUIDE
- Assemble the device as per the instructions in Assembly section.
- Press and hold the Power & Settings Button for a second to turn on the device. Loading message ''Ld'' will appear on screen and the software version will be displayed at the upper right corner.

- When the device is turned on, it will start in the Park mode and in Multi frequency. You can change the mode based on ground conditions. You can find more details on search modes and frequencies further in this manual.
![]()
- You can increase the sensitivity if needed. Increasing the sensitivity will offer you greater depth. However, if the surroundings or the ground cause excessive noise in the device, you need to lower the sensitivity setting.
![]()
- You can start detecting!


COMMON AND MODE-BASED SETTINGS
Certain settings are common to all modes; changes in these settings will take effect in all modes.
Most of the settings are mode based and they only affect the mode currently selected; changes made in one mode do not affect the others.
Common settings and mode-based settings are marked as below throughout the manual:

SEARCH MODES
The LEGEND has 4 search modes designed for different terrains and targets.
Navigating Through Search Modes
You can navigate through the modes easily by using the right and left buttons. The selected mode will be framed.

PARK
Designed for coin and jewelry hunting in urban areas and parks where there are lots of modern trash (aluminum foil, pull-tabs, bottle caps etc.) present.

This mode is optimized for mid to large coins and jewelry. The default discrimination is set to reject Target IDs up to and including 11 to eliminate iron as well as aluminum foil.

Aluminum foil typically generates a Target ID of 11. However, depending on the shape, its ID can go up to 20.
All single frequencies as well as Multi frequency can be used in this mode. Based on target type, you can choose the frequency you want. Multi frequency in Park mode will allow for maximum depth and separation. Thus, a slight noise can be experienced.
The Park mode is set to Recovery Speed 5 and 2 tones by default. You can change the Recovery Speed as well as the Number of Tones manually if needed.
The FerroCheck bar on the screen shows the ferrous/non- ferrous ratio of the target and thus plays an important role in identifying trash metals. Therefore, when a target is detected while in Park mode, the FerroCheck bar should be observed in addition to the Target ID.
FIELD
Recommended for coin and relic hunting in pasture and cropped/plowed fields.

These fields may contain ferrous trash and coke. To detect coins and relics more easily amongst these trash items, the default discrimination is set to reject Target IDs up to and including 11.

All single frequencies as well as Multi frequency can be used in this mode. Based on target type, you can choose the frequency you want. Multi frequency in Field mode will allow for maximum depth and separation. The Field mode is set to Recovery Speed 5 and 2 tones by default.
The ID resolution of IDs 11-15 is different in Park versus the Field mode. You may get a different ID in each mode for targets that fall within this ID range.
Park and Field modes offer 3 different Multi frequencies as Multi-1 (M1), Multi-2 (M2) and Multi-3 (M3). For details, please refer to the Frequency section.
In park and Field modes different algorithms are run. In trashy sites M3 Multi frequency should be preferred. When a target is isolated underground, the ID will be the same in both modes. However, if the target is next to trash such as aluminum foil, Multi 3 in Park mode will generate a more accurate ID for the target.
BEACH
This mode is optimized for use on dry or wet beach sand as well as for underwater use up to 5m. (16ft.).

The salt typically present in beach sand and sea causes the sand and water to be very conductive generating noise and false signals. Single frequency detectors cannot work in these environments or they underperform. Multi frequency can minimize this noise allowing for maximum performance in these environments.
For these reasons, single frequencies cannot be used in the Beach mode. When Beach mode is selected, the device automatically switches to Multi frequency and single frequencies cannot be selected. In this mode only, the Multi frequency has 2 options: Wet sand/underwater (MW) or dry sand with very low salinity (MD). Each time you press the Frequency Button in the Beach mode, you navigate between the 2 options.
If the sand you are detecting on is dry but has high salinity, you should use the MW option. To identify the salinity level, pump the search coil over the sand while in All Metal Discrimination Pattern (refer to Discrimination Patterns) and check the ID of the sand. If the ID is higher than 2, you should select MW instead of MD.
The ground balance and ID stability has been optimized for different conditions and will vary for each option. In wet beach sand, MW Multi frequency will generate accurate IDs but if you switch to MD, the IDs may be wrong. Similarly, in dry sand with low salinity, you can ground balance the detector in MD but if you switch to MW, you may not be able to ground balance.
The Beach mode is set to Recovery Speed 6 and 2 tones by default.
Black Sand
Some beaches are covered with black sand which contains natural iron. These types of beaches make metal detection almost impossible. Beach mode senses black sand automatically and displays a warning icon on the top of the screen in the info section.

When this icon disappears, the device resumes its normal operation.
After submerging the device underwater and taking it out, the speaker cover may be filled with water and the device's audio may be muffled. This is normal. In such a case, shake off the water that's inside the speaker cover lightly and the audio will go back to normal.
GOLDFIELD
This mode is optimized for use on mineralized goldfields.

Different than the other modes, this mode features a threshold tone which is continuously heard in the background. The volume and the frequency of the audio alert emitted when a target is detected, varies proportionally to the strength of the target signal. Goldfield mode is ideal for detecting shallow and small gold nuggets as well as deeper larger nuggets in mineralized ground.
You can only use the higher single frequencies (20kHz and 40kHz) and the Multi frequency in this mode. In highly mineralized ground, detectors receive a lot of false signals. In addition, there are mineralized rocks -commonly referred to as hot rocks- present in goldfields. Therefore, Multi frequency in this mode offers convenient detection by minimizing the effects of these mineralized rocks and ground.
The Goldfield mode is set to Recovery Speed 5 and 1 tone by default.
BEAST MODE
Very deep targets may have values close to the surrounding soil and therefore may not be detected. Beast mode allows you to detect targets at depths that cannot be detected in other modes.

This mode resets the ground balanced soil, allowing deep coins and large masses to be detected by the detector. However, in this mode, targets at fringe depths may not give an ID or their ID may be unstable.
When switching to Beast mode, All Metal discrimination pattern will be selected automatically. When switching from Beast mode back to Gold Field mode, the last selected discrimination pattern in Gold Field Mode will be restored.
You can access this mode through the Gold Field mode icon but it's a separate mode. To use this mode, simply press the frequency button in Gold Field mode. Beast mode is indicated on the screen by the letters ''bE'' under the multi frequency symbol M.
Recovery Speed setting is common with the Gold Field mode.
SENSITIVITY
Sensitivity is the depth setting of the device. It is also used to eliminate the ambient electromagnetic signals from the surrounding environment and noise signals transmitted from ground.
Sensitivity consists of 30 levels and default setting is 25.
Sensitivity setting is a personal preference. However, It is important to set the sensitivity to the highest level possible where no major popping sounds are heard to avoid missing smaller and deeper targets. For example; if the noise level is suitable for searching and is the same at level 25 and 30, then 30 should be preferred.

Sensitivity is a common setting for all modes and changes to this setting will affect them all.

Adjusting the Sensitivity
On the main screen, use the plus (+) and minus (-) buttons to increase or decrease the sensitivity. Single click to change the values one by one or hold down to change them rapidly.
The Sensitivity Indicator is located on the left side of the Target ID. The exact sensitivity level is shown numerically over the indicator. The indicator consists of 5 levels. Each level represents 6 units of sensitivity.
The sensitivity values corresponding to each level on the Depth Indicator are shown below:

The device always starts with the last adjusted sensitivity level.
To obtain maximum depth performance, to eliminate the noise caused by electromagnetic interference, try shifting the frequency first.
TARGET DEPTH
The device provides an estimated target depth according to the signal strength during detection.
Depth Indicator: It shows the target's proximity to the surface in 5 levels during detection. As the target gets closer, the levels decrease and vice versa.

Depth detection is adjusted presuming that the target is a 2.5cm (1'') coin. Actual depth varies according to the size of the target. For instance, the detector will indicate more depth for a target smaller than a 2.5cm (1'') coin and less depth for a larger target.

As the operating frequency of the device has a direct impact on the device, the estimated depth may vary for the same target during frequency changes.
MUTE FUNCTION
On the main screen, press and hold the Frequency button to mute the device.
Letters "AO" (Audio Off) will appear on the right side. You can unmute by pressing and holding the Frequency button.
Even if muted, the device will revert back to unmute in the custom discrimination pattern (notch), ground balance and settings menus automatically.

FREQUENCY

The LEGEND offers Multi frequency, where a wide range of frequencies work simultaneously, as well as 5 single frequencies.

You can switch between frequencies easily by pressing the Frequency Button.

It is recommended to use Multi frequency in all modes. When Multi frequency is selected the letter ''M'' appears on the screen. When a single frequency is selected, the frequency is shown numerically on the screen.
Frequency only affects the mode currently selected; changes made in one mode do not affect the others.

Single Frequencies
Sometimes using single frequencies may provide an advantage over Multi frequency. For example; if you are looking for larger high conductive targets only, the 4kHz may be a better choice. Similarly, if you are looking for shallow, thin jewelry, 20kHz and 40kHz may provide better results.
In areas where there is electromagnetic interference, single frequencies may be less noisy compared to Multi frequency. However, they will be less sensitive to many targets at the same time.
4kHz will provide more depth specifically for larger silver coins and relics compared to Multi and other frequencies but it will be noisy in certain soil conditions.
Multi Frequency
Multi frequency which runs multiple frequencies simultaneously gives the user the advantage of covering a broader range of targets on all types of terrains.
Multi frequency, compared to single frequencies, typically provides more accurate IDs at depth. In addition, it offers maximum depth for a large range of metals with different sizes on wet salt beach sand and underwater by minimizing ground noise.
Modes and Frequencies
Each search mode has been optimized with frequencies to offer the best performance. For example, Park and Field modes work in all single frequencies as well as Multi. On the other hand, the Beach mode will only perform well in Multi frequency so single frequencies cannot be selected in this mode. In addition, in the Beach mode the Multi frequency has 2 options: Multi Wet (MW) and Multi Dry (MD). When you press the Frequency Button in the Beach mode, you will see a ''W'' or ''D'' next to the letter M.

The Goldfield mode, on the other hand, is optimized to detect smaller low conductive targets and that is why the lower single frequencies (4kHz, 10kHz and 15kHz) cannot be used in this mode.
Different than the other modes, Park and Field modes offer 3 Multi frequencies as Multi-1 (M1), Multi-2 (M2) and Multi-3 (M3). M1 is more sensitive to higher conductors while the M2 detects lower conductors better.
M3 is ideal for humid, wet and/or conductive soils. It reduces the effect of moisture in soils which can cause falses. It also weakens the response of targets generating 10-11 IDs such as coke and aluminum foil.

| PARK | FIELD | BEACH | GOLDFIELD | |
| Multi | ✓ | ✓ | ✓ | ✓ |
| 4 kHz | ✓ | ✓ | X | X |
| 10 kHz | ✓ | ✓ | X | X |
| 15 kHz | ✓ | ✓ | X | X |
| 20 kHz | ✓ | ✓ | X | ✓ |
| 40 kHz | ✓ | ✓ | X | ✓ |
TARGET ID
Target ID is the number produced by the metal detector based on the conductivity of the metals and gives an idea to the user about what the target may be.
Target ID is shown with two digits on the display and ranges between 01-60.

The LEGEND's Target ID scale consists of 60 lines, each of which represents 1 Target ID.

In addition to showing the Target ID in the middle of the screen, the ID is also marked with a small cursor under the ID scale.
Ferrous range is 1-10.
Non-ferrous range is 11-60.
In some cases, the device may produce multiple IDs for the same target. In other words, the IDs may be jumpy. This may result from several factors. Target orientation, depth, purity of the metal, corrosion, mineralization level of the soil etc. Even the direction of the search coil swing may cause the device to generate multiple IDs.
In some cases, the device may fail to provide any ID. The device needs to receive a strong and a clear signal from the target in order to provide an ID. Therefore, it may not be able to provide an ID for targets at fringe depths or smaller targets even if the device detects them.
Keep in mind that Target IDs are "probable", in other words, estimated values and it would not be possible to know the properties of a buried object exactly until it is dug out.
IDs of non-ferrous metals such as copper, silver, aluminum and lead are high. Target ID range of gold is wide and may fall within the same range of metal wastes such as iron, foil, screw caps, and pull tabs. Therefore, if you are looking for gold targets, digging out some trash metals is expected.
Coins searched throughout the world are made of different metals and in different sizes in different geographical locations and historical eras. Therefore, in order to learn the Target IDs of the coins in a specific zone, it is suggested to perform a test with the samples of such coins, if possible.
It may take some time and experience to make best use of the Target ID feature in your search area. Different brands and models of detectors produce different Target ID numbers.
Keep in mind, large targets will ID higher than expected, even though they may be of lower conductance.
DISCRIMINATION PATTERNS
The LEGEND offers advanced discrimination setting to users for an easier operation. By using the Discrimination Button, you can select one of the 4 different discrimination patterns, of which 3 are pre-set and 1 that is totally customizable by the user.
The default discrimination pattern for Park, Field, Beach modes is the ''F'' discrimination pattern which stands for Ferrous Off. In the GoldField Mode, the default discrimination pattern is "G" (Ground Off).
In this pattern, each ID can be rejected or accepted by the user.
The discrimination setting only affects the mode currently selected; changes made in one mode do not affect the others.

 | All Metal Discrimination Pattern In this pattern all ID's are accepted on the ID scale (1-60). In other words, all the lines on the scale are visible and no ID is rejected. The device will emit an audio response for all metals as well as the ground and their IDs will be displayed on the screen. |
 | Ground Off Discrimination Pattern In this pattern, the device will not receive ground noise and will not provide any audio or Target ID for it. Target IDs 1 and 2 are turned off (rejected) and the rest are open (accepted). |
 | Ferrous Off Discrimination Pattern In this pattern, the device will not provide any audio or Target ID for ferrous targets. Target IDs 1 - 10 are turned off (rejected) and the rest are open (accepted). |
 | Custom Discrimination Pattern This pattern allows users to create their own discrimination pattern according to the type of targets they would like to accept and reject. Rejected IDs will vary based on the search mode. |
Accepting and rejecting IDs are also referred to as ''notch''.
The default, accepted and rejected IDs in the Custom Discrimination Pattern for each mode are shown in the table below:
| Rejected IDs | Accepted IDs | |
| PARK | 1-11 | 12-60 |
| FIELD | 1-11 | 12-60 |
| BEACH | 1-10 | 11-60 |
| GOLDFIELD | 1-10 | 11-60 |
Default Discrimination Patterns
| Search Mode | Discrimination Patterns |
| PARK | Ferrous Off (F) |
| FIELD | Ferrous Off (F) |
| BEACH | Ferrous Off (F) |
| GOLDFIELD | Ground Off (G) |
Selecting a Discrimination Pattern
On the main screen, each time you press the Discrimination Button  , the pattern changes and is indicated with a letter in the small box to the left of the Target ID scale.

With the notch feature, you can accept (turn on) and reject (turn off) multiple IDs. The lines for the rejected IDs will be erased and these IDs will be blanked out on the ID scale. The device will not provide an audio response or Target IDs for these targets.
Forming a Customized Discrimination Pattern (Notch)
In the main screen, press and hold the Discrimination Button to open the discrimination menu. The sensitivity level drops down to 5 automatically.
Regardless of which discrimination pattern is selected, the device displays the Custom Discrimination Pattern on screen.
Unused icons will disappear from the screen and the letter ''C'' will be shown framed
There are 2 different ways of forming a Custom Discrimination Pattern: Manual and Automatic.

Manual Notch:
Hold the coil stationary. The last Target ID will be displayed on screen and an arrow cursor will appear under the Target ID scale.

- Move the cursor with the right and left buttons. Each time you press the button, the Target ID will change on screen. Select the ID you want to turn off (reject) or on (accept).
- Press the Pinpoint & Accept/Reject Button. If the ID you selected was turned off (rejected), it will now be turned on (accepted) and vice versa. You can follow the changes on the ID scale.
Automatic Notching:
- In the discrimination menu, swing the coil over the target you want to reject or accept. The cursor underneath the ID scale as well as the Target ID in the middle will show the ID of the target.
- To turn off or to turn on the ID press the Pinpoint & Accept/Reject Button.
Since the sensitivity level drops down to 5 automatically, you may not want the sensitivity to be lowered in automatic notching. In this case, press the Ground Balance button once to revert back to the current sensitivity. Letters "CS" (current sensitivity) will be displayed on the right side.

The LEGEND will not generate an audio response for rejected targets. However, their IDs will be shown in the discrimination menu.
The cursor will appear where you last left it the next time you use the notch discrimination setting.
Exiting the Notch Discrimination:
Press the Discrimination Button once to go back to the main screen. While in this menu, if no button is pressed for 10 seconds, the device will revert back to the main screen automatically.

While in this menu, if no button is pressed for 10 seconds, the device will revert back to the main screen automatically.
GROUND BALANCE
The LEGEND is designed to work without ground balancing on most terrains. However, for experienced users and on highly mineralized grounds, ground balancing will bring extra depth and stability to the device.

Ground balance can be performed in three ways with The LEGEND: Automatic, Manual and Tracking.

Ground balance only affects the mode currently selected; changes made in one mode do not affect the others. The device can perform ground balance within the range of 00-99 in all modes and 00-20 in the Beach mode MW Multi frequency. The ground balance must be performed separately for the Beach MD Multi frequency and for Beach MW Multi frequency options. The ground balance done in MD will not work for MW and vice versa.
Automatic Ground Balance
Automatic ground balance is performed as follows in all search modes:
- Find a spot where there is no metal.
- Push and hold the Ground Balance Button down. The ground balance icon will start blinking in the info section at the top and the ground balance value will be displayed in the middle of the screen. If no ground balancing has been performed before, this value will always be zero (0).

- Start pumping the search coil up and down from about 15-20 cm (~6''- 8'') above the ground down to 3 cm (~1'') off the ground with smooth movements and keeping it parallel to the ground.
![]()
- Continue until the audio reduces in response to the ground. Based on ground conditions, it usually takes about 2-4 pumps for the ground balance to be completed.
- Upon completion of the ground balance, ground balance value is shown in the Target ID section on the display. In order to ensure that the ground balance is proper, ground balance at least 2-3 times and check the ground balance values on the display. In general, the difference between the values shall not be higher than 1-2 numbers.
- If you cannot ground balance, it means that either the ground is too conductive or not mineralized or there is a target right below the search coil. In such a case, retry ground balancing at a different spot.


Manual Ground Balance
Allows you to manually modify the ground balance value. It is not preferred mostly because it takes time. However, it is the preferred option in cases where a successful ground balance cannot be performed using other methods or minor corrections are required to the automatic balance.
- Find a clear spot without metals.
- Push the Ground Balance Button once and release it. The ground balance icon will appear in the info section at the top and the device will switch to ground balancing screen. The ground balance value will be displayed in the middle of the screen.

- You need to listen to the sounds coming from the ground in order to perform manual ground balance. Pump the search coil up and down from about 15-20 cm (~6''- 8'') above the ground down to 3 cm (~1'') off the ground with smooth movements and keeping it parallel to the ground.
- If you are getting a low tone while pumping the coil, it means that that you should increase the ground balance value using the plus (+) button. On the other hand, if you are getting a high tone, you should decrease the ground balance value using the minus (-) button.
- Continue the above process until the ground response is eliminated.
- Press the Ground Balance Button once to exit.

The ground balance value may vary in single frequencies and Multi frequency in certain soil types.
The sound may not be eliminated completely on certain terrains. In this case, if the ground noise is minimized, it means that the ground balance has been done.
Ground Tracking
The device tracks the changes in the ground during detection and updates the ground balance automatically. Ground changes that are not visible to the eye will affect the depth and discrimination performance of the detector.
- To activate ground tracking, press the Ground Balance Button once. The device will go into the ground balance screen and the ground balance icon will appear in the info section at the top of the display.
- Press the Pinpoint & Accept/Reject Button once. In the info section, next to the ground balance icon, ground tracking icon will appear.

Ground tracking is now active. Press the Ground Balance Button once to go back to the main screen.
The device updates the ground balance automatically as long as the search coil is swung over the ground. It does not provide any feedback to the user.
Tracking is suitable for use in areas where different soil structures are present within the same land or in fields where mineralized rocks are scattered widely apart. If you use ground tracking in areas where hot rocks are intensely present, the device may not be able to eliminate these highly mineralized rocks or you may miss the smaller or deeper metals.
When the Tracking feature is activated, the ground balance level flashes on the screen. In Beast mode, when the Ground Balance 2 is activated while the tracking feature is on, the ground balance level will be shown steady to avoid confusion.
Second Ground Balance Feature in Beast Mode
Due to its configuration, Beast mode may cause the device to give false signals to ground changes and mineralized/hot rocks. This may cause discomfort to the user during detection. Beast mode offers users a 2nd Ground Balance feature to overcome mineralized/hot rocks, red bricks and other ground changes in the surrounding environment that have different properties than the soil that's been ground balanced. With the second ground balance, depending on the properties of the hot rock or brick, in some cases, complete silence can be achieved over these falsing targets. In other cases, a broken signal may be heard. Broken sounds indicate that the detected target is a mineralized/hot rock.
To use this feature:
- Press the Ground Balance button to access the setting.
- Activate the 2nd Ground Balance feature by pressing the Frequency button. When the 2nd Ground Balance is activated, the number "2" appears on the screen above the letters Gb.
![]()
- You can perform the 2nd Ground Balance by pressing the pinpoint button.

When Beast mode is selected, 1st and 2nd Ground Balancing can only be performed automatically. Manual ground balancing is not possible.
You can switch from the 2nd Ground Balance to the first one by pressing the Frequency button again.
Resetting the 1st and 2nd Ground Balance Settings in the Beast Mode
While Beast mode is selected, the Ground Balance value is reset by entering the ground balance menu and long pressing the up button. When the button is held down, the animation is shown on the screen. To reset the 2nd Ground Balance value, first activate the 2nd Ground Balance. Reset the 2nd Ground Balance value by pressing the up button again.

PINPOINT
Pinpoint is to find the center or the exact location of a detected target.

The LEGEND is a motion detector. In other words, you are required to move the search coil over the target or the target over the search coil in order for the device to detect the target. The pinpoint mode is a non-motion mode. The device continues to give a signal when the search coil is kept stationary over the target.
When the Pinpoint & Accept/Reject Button is pressed, unused icons are cleared from the screen. The pinpoint icon and the FerroCheck bars are displayed empty.

In the pinpoint mode, the device does not discriminate metals or provide Target IDs.

To perform pinpoint:
- After a target is detected, move the search coil aside where there is no target response and push the pinpoint button.
- Keep the button pressed down and bring the search coil closer to the target slowly and parallel to the ground.
- Signal sound becomes stronger and changes in pitch while getting closer to the target center and the bars in the FerroCheck start filling up from the outside to the inside.
- Mark the position which provides the loudest sound using a tool or your foot.
- Repeat the above procedure by changing your direction 90°. Actions to be performed from a couple of different directions will narrow the target area and provide you with the most exact details of the target location.
When a signal is received, inexperienced users, until they get the experience to perform the procedure mentioned above, can pinpoint by putting the search coil down on the ground and scan over the target while pressing the Pinpoint & Accept/Reject Button.
FERROCHECK
When discriminating metals as ferrous / non-ferrous, the Target ID sometimes is not sufficient. FerroCheck shows the ferrous/non-ferrous ratio of targets graphically on the screen.

FerroCheck is a unique feature of The LEGEND that you will not find on other detectors and it provides the user the ferrous/non-ferrous ratio of the target signal to be able to identify targets more easily.

Ferrous Target
Targets with ferrous signal only will be identified as 100% ferrous both in Target ID and FerroCheck as shown below:

True Non-Ferrous Target
Targets with non-ferrous signal only will be identified as 100% non-ferrous both in Target ID and FerroCheck as shown below:

False Non-Ferrous Target
When targets such as bottle caps -although they generate a non-ferrous Target ID- are checked by the FerroCheck feature, they are identified as alloy which has ferrous (iron) content as shown below:

The target generates a non-ferrous ID. However, it has both ferrous and non-ferrous signal.
For the FerroCheck feature to work, the detector must receive a strong signal. Therefore, FerroCheck is designed to work with shallower targets.
Correct Usage of the FerroCheck
The accuracy of the FerroCheck feature is directly related to correct usage. Therefore, once you detect a target, if you want to check whether the target is ferrous or non-ferrous with the FerroCheck, please pay close attention to the instructions below:
- You MUST sweep the coil with a large angle over the target and make wide scans. Make sure that the search coil leaves the signal completely during the sweeps.
![]()
- You must go around the target and swing the coil over it from different angles, with long sweeps again.
![]()
- The ferrous side does not need to fill up completely. More than 2 bars is enough to identify a target as an alloy containing iron (not a true non-ferrous target).


MINERALIZATION INDICATOR
Ground Mineralization refers to the naturally occurring minerals in the ground that affect a metal detector's performance. There are two main types of ground mineralization: Iron particles and salt such as saltwater beaches. This causes the ground to become conductive. Both produce false signals that mask targets.
In the ground balance menu, press the Discrimination Button to activate the mineralization indicator. Letters GI (Ground Indicator) will appear on the left side. When you press the discrimination button again, it will revert back to Ferro Check and FC will appear.
The 'FC' or 'GI' indicators will be automatically cleared from the screen after 2 seconds.

Left side of the mineralization bar shows iron particle mineralization and the right side shows mineralization due to salt.

The right side works in Multi frequency only!

SETTINGS

To go into the settings menu, press the Power & Settings Button once. Once the button is pressed all the settings will be displayed at the bottom of the screen. The selected setting will be shown framed and its value will be displayed on screen.
Navigation Through Settings
You can navigate through the settings using the right and left buttons.
The selected setting will blink for easier viewing.

Adjusting a Setting
You can adjust the value of a setting using the plus (+) and minus (-) buttons.

Exiting the Settings Menu
Press the Power & Settings Button once to exit the settings menu.

Frequency Shift
It is used to eliminate the electromagnetic interference that the device receives from another detector which operates in the same frequency range nearby or from the surroundings (high voltage power lines, cellular base stations, wireless radios and other electromagnetic devices).

There are 13 channels available for all frequencies including Multi frequency. The default channel is 1.
Frequency Shift only affects the mode and frequency currently selected; changes made in one mode does not affect the other modes or frequencies.

If too much noise is received when the search coil is lifted in the air, this may be caused by the local electromagnetic signals or high sensitivity level.
To obtain maximum depth performance, to eliminate the noise caused by electromagnetic interference, try shifting the frequency first before decreasing the sensitivity.
Detectors may become noisy due to electrical interference and may exhibit erratic behavior such as loss of depth or unstable target ID. The Frequency Shift setting allows you to slightly shift the detector transmit frequency to eliminate unwanted noise.
Frequency Shift can be done in 2 ways in The LEGEND: Manual and Automatic.
In the manual Frequency Shift, the operator listens to each channel and selects the one with the least noise.
In the automatic one, the device scans all the channels and picks the least noisy one itself. This feature is often referred to as Noise Cancellation as well.

Shifting the Frequency
- Hold the coil stationary and away from the ground.
- Press the Power & Settings Button once. Select the Frequency Shift setting using the right and left buttons. The current channel will be displayed on screen.


Manual Use
- Using the plus (+) and minus (-) buttons, go through the frequency channels.
- Select the one you think is the one with the least interference.
Automatic Use
- Before doing a noise cancellation, lift the device UP in the air as shown in the picture and hold it still until the process is completed.
![]()
- Press the Pinpoint & Accept/Reject Button once.
- The device will start scanning all the channels and each channel number will be displayed on screen.
- When the process is done, automatically selected channel number will be displayed and a confirmation sound will be heard.

Press the Power & Settings Button once to go back to the main screen.
Automatic Frequency Shift selects the quietest channel based on various criteria. However, sometimes the selected channel may still present some noise.
Recovery Speed
The Recovery Speed setting adjusts the speed of target response.

It allows for separation between multiple targets in close proximity.
Recovery Speed setting enables you to detect smaller targets among trash or ferrous targets.
The LEGEND Recovery Speed setting can be adjusted between 1 and 10 with 1 being the slowest and 10 being the fastest.
Recovery Speed setting only affects the mode currently selected; changes made in one mode do not affect the others.

When the Recovery Speed setting is set to a low number, the ability of the device to detect targets in close proximity decreases but its depth increases.
Similarly, a high Recovery Speed setting (for example 10) will increase the ability of the device to detect targets in close proximity but will decrease the depth.
It is recommended that you practice with different metals placed close to each other before starting to use this setting.
Adjusting the Recovery Speed
- Press the Power & Settings Button once. Select the Recovery Speed setting using the right and left buttons. The current value will be displayed on screen.

- Change the value of the Recovery Speed using the plus (+) and minus (-) buttons.
- Press the Power & Settings Button once to go back to the main screen.
![]()


Increasing the Recovery Speed allows for a faster sweep rate with less chance of missing targets. Increasing Recovery Speed at the same sweep rate will help to eliminate ground noise but it will decrease detection depth.
If you encounter high levels of ground noise on beach sand or underwater, try increasing the Recovery Speed.
| Default Recovery Speed Settings | |
| Search Mode | Recovery Speed |
| PARK | 5 |
| FIELD | 5 |
| BEACH | 6 |
| GOLDFIELD | 5 |
Iron Filter
Iron filter allows desired non-ferrous targets in trashy sites, previously masked by iron, to be detectable.

Iron Filter (IF) setting ranges between 0-9 in the Park, Field and Gold Field modes and between 1-9 in the Beach mode. The default value is 8. Default value 8, is the same as the previous versions of the LEGEND (v1.05, v1.07) with no Iron Filter setting.
Level 9 will become handy when trying to discriminate some unwanted mid-conductors such as shotgun cartridges as iron.
Lower IF setting will increase the probability of ferrous targets to be classified as non-ferrous targets and vice versa.
When the device is working in Multi frequency, select the Recovery Speed setting and press the pinpoint button.
Letters "IF" (Iron Filter) will appear on the right side.

Stability for Iron Filter
Stability (St) setting is the fine tuning for the Iron Filter (IF) setting.

Stability (St) setting ranges between 1-5 and the default value is 3.
When the IF is set to 8 or 9, the St setting will be inactive in the Park, Field and Gold Field modes.
When the IF is set to any value below 8, the St setting can be activated by pressing the right or left button and can be adjusted by using the plus (+) and minus (-) buttons.

NOTE: The St setting in the beach mode is different than this St setting!
Stability in Beach Mode
With this setting, you can minimize the ground noise and false signals on the beach for a more comfortable metal detecting experience.

The stability can be set between 1 to 5. The default setting is 5. Level 5 will offer maximum stability. As the stability is increased though, the signal of lower conductors such as gold with 11 ID may diminish and the chances of missing these metals will increase. This setting has no effect on mid to high conductors.

Adjusting the Stability
- Press the Power & Settings Button once. Select the Recovery Speed setting using the right and left buttons. The current value will be displayed on screen.

- Press the Pinpoint & Accept/Reject Button once.
![]()
- The stability setting (St) can be activated by pressing the right or left button and can be adjusted by using the plus (+) and minus (-) buttons.
- Press the Pinpoint & Accept/Reject Button once to go back to the Recovery Speed setting.


NOTE: In some environments, 4th level of the stability setting may provide better stability than level 5. This is related to the salinity of the water.
Bottle Cap Rejection
Bottle caps are unwanted targets for detectorists and they are mostly detected as non-ferrous targets by metal detectors. With the Bottle Cap Rejection setting, you can discriminate bottle caps as iron.

Bottle Cap Rejection setting (bC) can be set between 0 to 8 and the default setting is 0. This setting work in Multi frequency only.
Adjusting the Bottle Cap Rejection
Select the Recovery Speed setting and press the pinpoint button. When you navigate with the right and left buttons, you will see the letters ''bC'' appear on the right side of the screen. You can adjust the bC value between 1-8 using the + and – buttons. When the bC is 0, it means that it is off.

Ground Suppressor
It is used to eliminate false ground signals in tough terrains. This setting can be used both in Multi and single frequencies. It is recommended that you leave this setting at off position unless needed.

You can adjust the Ground Suppressor (GS) value between 0-8 and 0 is the default value.
Adjusting the Ground Suppressor
Select the Recovery Speed setting and press the pinpoint button. When you navigate with the right and left buttons, you will see the letters ''GS'' appear on the right side of the screen. You can adjust the GS value between 1-8 using the + and – buttons. When the GS is 0, it means that it is off.

| Default Iron Filter, Stability, Bottle Cap Rejection and Ground Suppressor Settings | ||||
| Search Mode | Iron Filter | Stability | Bottle Cap Rejection | Ground Suppressor |
| PARK | 8 | 3 | 0 | 0 |
| FIELD | 8 | 3 | 0 | 0 |
| BEACH | 8 | 5 | 0 | 0 |
| GOLDFIELD | 8 | 3 | 0 | 0 |
Deep Target Identification
This feature allows non-ferrous deep targets, which are masked or detected as iron (ferrous), to be detected as non-ferrous.

You can adjust the Deep Target Identification (dt) value between 0-6 and 0 is the default value.
This feature can be used in all modes except the Beast mode with both multi-frequency and single frequencies.
When you increase the value of this setting, the stability of the device may diminish.

Adjusting the Deep Target Identification
To access this feature, select the Recovery Speed setting and press the pinpoint button. When you navigate with the right and left keys, the letters "dt" will appear on the right side of the screen. You can change the value of the dt setting between 1-6 by using the plus (+) and minus (-) buttons. When it is at 0, this feature is off.
Iron Rejection Feature in Beast Mode
Beast mode, like the Gold Field mode, produces signals for both non-ferrous and ferrous targets by changing the frequency of the sound according to the strength of the received signal. In order to distinguish ferrous targets, especially those closer to the surface, depending on the signal strength received from the ferrous target, the device emits a lower tone than that of the non-ferrous targets with the frequency varying according to the strength of the signal.

You can adjust the Iron Rejection (Ir) value between 0-5 and 0 is the default value.
When the value is increased, the probability of emitting a ferrous tone for deep non-ferrous targets increases.
Adjusting the Iron Rejection
To access this feature, select the Recovery Speed setting and press the pinpoint button. The letters "Ir" will appear on the right side of the screen. You can change the value of the ''Ir'' setting between 1-5 by using the plus (+) and minus (-) keys. When it is at 0, this feature is off.
| Default Iron Filter, Stability, Bottle Cap Rejection, Ground Suppressor, Deep Target Identification and Iron Rejection Settings | ||||||
| Search Mode | Iron Filter | Stability | Bottle Cap Rejection | Ground Suppressor | Deep Target Identification | Iron Rejection |
| PARK | 8 | 3 | 0 | 0 | 0 | - |
| FIELD | 8 | 3 | 0 | 0 | 0 | - |
| BEACH | 8 | 5 | 0 | 0 | 0 | - |
| GOLDFIELD | 8 | 3 | 0 | 0 | 0 | - |
| BEAST | - | - | - | - | - | 0 |
Volume
This control allows you to increase or decrease the device's volume based on your preference and environmental conditions.

Volume setting consists of 6 levels and it is set to 3 by default. When you turn off and on the device, it will start with the last volume level you chose.
This setting is common to all modes; changes will take effect in all modes.

Adjusting the Volume
- Press the Power & Settings Button once. Select volume using the right and left buttons. The current value will be displayed on screen.

- Change the volume level using the plus (+) and minus (-) buttons.
- Press the Power & Settings Button once to go back to the main screen.

Because the volume level affects power consumption, we recommend you not to increase it more than necessary.
When you change the volume of the device with this setting, the volume of the metal zones adjusted by the Tone Volume setting will also change proportionally.
You can connect wired headphones to the device with the headphones adapter cable sold separately. The volume for the headphones is also adjusted through the volume setting of the device.
When wired headphones are attached, headphones icon will appear in the info section at the top of the screen.

Audio Gain
Audio Gain setting will increase the volume of weak target responses.
The Audio Gain setting only affects the mode currently selected; changes made in one mode do not affect the others.


After selecting the volume, press the pinpoint button. Letters AG will appear on the right side. You can adjust the AG using the plus (+) and (–) buttons between 1-6. The default value is set to 3. Default value 3 is the same as the previous versions of the LEGEND (v1.05, v1.07) with no Audio Gain setting.
Audio Gain does NOT increase depth.
| Default Audio Gain (AG) Settings | |
| Search Mode | Audio Gain (AG) |
| PARK | 3 |
| FIELD | 3 |
| BEACH | 3 |
| GOLDFIELD | 1 |
Tone Settings
These advanced tone settings offer various options to modify the sounds The LEGEND generates for targets.

The tone setting offers 6 sub settings as follows: Number of Tones, Tone Volume, Tone Frequency, Tone Break, Threshold Level, Threshold Frequency.

Press the Power & Settings Button once. Select the tone setting using the right and left buttons.
When tone is selected, you can see all the tone settings in the second row over the settings. To the left of these settings, you will also see the icons of buttons to guide you while adjusting these settings.
When the Number of Tones is 1, there is no tone break point, so the Tone Break setting will not be selectable in the menu.

In the Goldfield mode, the Number of Tones is 1 and cannot be changed. In addition, the Tone Frequency is also not adjustable in this mode. Therefore, these 2 settings will not be active in the tone settings menu when the Goldfield mode is selected.


To go into the tone settings menu, press the plus (+) button once. The selected setting will be shown framed. Using the right and left buttons, you can navigate between the settings. You can go back to the settings by pressing the Pinpoint & Accept/Reject Button once.
To go back to the main screen directly from the tone settings menu, press the Power & Settings Button once.
Tone settings are not present in the Beast mode. Settings will be as shown below:

Number of Tones
The LEGEND divides the Target ID scale into multiple zones allowing the user to make different tone adjustments for targets that fall in each zone.

By changing the Number of Tones, you can decide on how many zones you will divide the ID scale into. Thanks to this feature, you can assign the same tone for all targets or assign a different tone for each Target ID.
You can set the Number of Tones as 1, 2, 4, 6, 60 or P (Tone Pitch).
The Number of Tones setting only affects the mode currently selected; changes made in one mode do not affect the others.

The Number of Tones for the Goldfield mode is 1 and cannot be changed.
Adjusting the Number of Tones
- Press the Power & Settings Button once. Select the tone setting using the right and left buttons.
- The tone settings menu will appear at the top with a plus (+) icon on the left. Press the plus (+) button once.
- Using the right and left buttons, select the Number of Tones setting. The selected setting will be shown framed.

- The current Number of Tones will be displayed on the screen. Select the Number of Tones using the plus (+) or minus (-) buttons.
- To go back to settings, press the Pinpoint & Accept/Reject Button once. To go back to the main screen, press the Power & Settings Button once.

1-Tone
The Target ID scale is not divided into any zones, hence there is only 1 tone zone. The LEGEND generates the same tone volume and tone frequency for all targets.

2-Tone
The Target ID scale is divided into 2 zones as ferrous and non-ferrous. The default point that separates these 2 zones vary based on the selected search mode (see below) and can be changed using the Tone Break setting. The Tone Volume and Tone Frequency can be adjusted for each zone.

4-Tone
The Target ID scale is divided into 4 zones. The Tone Volume and Tone Frequency can be adjusted for each zone.

6-Tone
The Target ID scale is divided into 6 zones. The Tone Volume and Tone Frequency can be adjusted for each zone.

60-Tone
Just like the 2-Tone, the Target ID scale is divided into 2 zones as ferrous and non-ferrous. The default point that separates these 2 zones varies based on the selected search mode (see below) and can be changed using the Tone Break setting.
The Tone Volume and Tone Frequency can be adjusted for each zone.
The difference between the 2-Tone and 60-Tone is that 60-Tone generates a separate tone with a different frequency for each Target ID.
The device generates lower frequency tones for ferrous range and mid to high frequency tones for non-ferrous metals.
For more information, please refer to Tone Frequency setting.

Tone Pitch
Just like the 2-Tone, the Target ID scale is divided into 2 zones as ferrous and non-ferrous. The default point that separates these 2 zones varies based on the selected search mode (see below) and can be changed using the Tone Break setting.
The Tone Volume and Tone Frequency can be adjusted for each zone.
In Tone Pitch, as the coil approaches the target, the audio frequency will change in proportion to the signal strength.

| Default Number of Tones | |
| Search Mode | Number of Tones |
| PARK | 2 |
| FIELD | 2 |
| BEACH | 2 |
| GOLDFIELD | 1 |
Tone Volume
This setting allows you to adjust the volume level for each tone zone.

Especially in trashy sites, you can detect conveniently by turning off or lowering the volume of unwanted targets' audio responses.
The Tone Volume can be adjusted for each target zone. For example; in 1-Tone you can adjust the volume for 1 zone but in 6-Tone, you can adjust the volume of each zone separately.
Tone Volume setting range is from 0 to 10.
Tone Volume setting only affects the mode currently selected; changes made in one mode do not affect the others.

Tone Volume setting does not work in the Goldfield mode.
Adjusting the Tone Volume
- Press the Power & Settings Button once. Select the tone setting using the right and left buttons.
- The tone settings menu will appear at the top with a plus (+) icon on the left. Press the plus (+) button once.
- Using the right and left buttons, select the Tone Volume setting. The selected setting will be shown framed.

- Press the plus (+) button to go into the Tone Volume setting.
- The Tone Volume of the selected zone will be displayed on screen. To the left of the ID scale, the selected zone will be displayed numerically.

- Using the right and left buttons, select the zone of which you want to change the Tone Volume.
- Once the zone is selected, you can change the Tone Volume using the plus (+) and minus (-) buttons.
- Once you are done, you can go back to tone setting by pressing the Pinpoint & Accept/Reject Button once or back to the main settings menu by double clicking it. To go back to the main screen, press the Power & Settings Button once.


Tone Frequency
This setting allows you to adjust the Tone Frequency for each tone zone.

This setting enables the users to easily identify targets by audio.
The Tone Frequency can be adjusted for each target zone. For example; in 6-Tone, you can adjust the Tone Frequency of each of the 6 zones separately.
Tone Frequency setting range is from 1 to 30.
Tone Frequency setting only affects the mode currently selected; changes made in one mode do not affect the others.

Tone Frequency setting does not work in the Goldfield mode.
Adjusting the Tone Frequency
- Press the Power & Settings Button once. Select the tone setting using the right and left buttons.
- The tone settings menu will appear at the top with a plus (+) icon on the left. Press the plus (+) button once.
- Using the right and left buttons, select the Tone Frequency setting. The selected setting will be shown framed.

- Press the plus (+) button to go into the setting.
- The Tone Frequency of the selected zone will be displayed on screen. To the left of the ID scale, the selected zone will be displayed numerically.

- Using the right and left buttons, select the zone of which you want to change the Tone Frequency.
- Once the zone is selected, you can change the Tone Frequency using the plus (+) and minus (-) buttons.
- Once you are done, you can go back to tone setting by pressing the Pinpoint & Accept/Reject Button once or back to the main settings menu by double clicking it. To go back to the main screen, press the Power & Settings Button once.


Differences between 2-Tone and 60-Tone
The Target ID scale is divided into 2 zones as ferrous and non-ferrous both in 2-Tone and 60-Tone.
The Tone Frequency can be adjusted for both Zone-1 (Z-1) and Zone-2 (Z-2) to any number between 1-30. The user may even set both zones to the same number. However, this setting is used differently in the 60-tone.
In the 60-Tone, the Tone Frequency value set for Zone-1 (Z-1) must be lower than the Tone Frequency value set for Zone-2 (Z-2). For example; if the Tone Frequency value set for Zone-2 is 20, the Tone Frequency level for Zone-1 should be between 1 and 19. This applies to P-Tone Pitch as well.
To be able to distinguish between ferrous and non-ferrous targets, the Tone Frequency levels selected should be further away from each other.


Tone Break
The Tone Break setting allows you to move the point that separates the target zones.

The default Tone Break points may not provide you with the distinction you need between the targets you are looking for. With the Tone Break setting, you can adjust the start/end points of target zones.
Tone Break setting only affects the mode currently selected; changes made in one mode do not affect the others.

When the Number of Tones is 1, Tone Break adjustment cannot be made. Therefore, Tone Break setting does not work in the Goldfield mode.
Adjusting the Tone Break
- Press the Power & Settings Button once. Select the tone setting using the right and left buttons.
- The tone settings menu will appear at the top with a plus (+) icon on the left. Press the plus (+) button once.
- Using the right and left buttons, select the Tone Break setting. The selected setting will be shown framed.

- Press the plus (+) button to go into the setting.
- The Tone Break point of the selected zone will be displayed on screen. To the left of the ID scale, the selected zone will be displayed numerically.

- Using the right and left buttons, select the zone of which you want to change the Tone Break.
- Once the zone is selected, you can change the Tone Break point using the plus (+) and minus (-) buttons.
- Once you are done, you can go back to tone setting by pressing the Pinpoint & Accept/Reject Button once or back to the main settings menu by double clicking it. To go back to the main screen, press the Power & Settings Button once.


Threshold Level
This setting enables the users to identify targets more easily and this feature makes the sounds of weaker signals of small targets such as gold nuggets more hearable.

When the Threshold Level setting is activated, The LEGEND generates a sound which is continuously heard in the background and this sound is called the ''threshold''.
Threshold Level range is from 0 to 30.
The frequency of the threshold tone can be adjusted by the Threshold Tone Frequency setting (please see Threshold Frequency section).
Threshold Level setting only affects the mode currently selected; changes made in one mode do not affect the others.

Adjusting the Threshold Level
- Press the Power & Settings Button once. Select the tone setting using the right and left buttons.
- The tone settings menu will appear at the top with a plus (+) icon on the left. Press the plus (+) button once.
- Using the right and left buttons, select the Threshold Level setting. The selected setting will be shown framed.

- The current Threshold Level will be displayed on screen. Select the Threshold Level using the plus (+) or minus (-) buttons.
- To go back to settings, press the Pinpoint & Accept/Reject Button once. To go back to the main screen, press the Power & Settings Button once.

Threshold Tone for Rejected Targets
In Park, Field and Beach modes
The Threshold tone will blank to indicate detection of a rejected target.

In Goldfield mode
When The LEGEND detects a rejected target the threshold tone continues in the background.

| Default Threshold Levels | |
| Search Mode | Threshold Level |
| PARK | 0 |
| FIELD | 0 |
| BEACH | 0 |
| GOLDFIELD | 12 |
The Threshold Level directly impacts the detection depth of smaller and deeper targets. If the threshold is set too low (0), weak signals of smaller or deeper targets may be missed. On the contrary, if the threshold is set too high (30), the device will be noisier, the threshold sound will be loud and the target responses will not be distinguished. Therefore, it is recommended to adjust it to a level where you can still hear the slight audio variations caused by a target.

Threshold Frequency
This setting is used to adjust the tone frequency of the background hum. It offers a very wide frequency range. Threshold Frequency range is from 1 to 30.

Threshold Frequency only affects the mode currently selected; changes made in one mode do not affect the others.

Adjusting the Threshold Frequency
- Press the Power & Settings Button once. Select the tone setting using the right and left buttons.
- The tone settings menu will appear at the top with a plus (+) icon on the left. Press the plus (+) button once.
- Using the right and left buttons, select the Threshold Frequency setting. The selected setting will be shown framed.

- The current Threshold Frequency will be displayed on screen. Select the Threshold Frequency using the plus (+) or minus (-) buttons.
- To go back to settings, press the Pinpoint & Accept/Reject Button once. To go back to the main screen, press the Power & Settings Button once.

| Default Threshold Frequencies | |
| Search Mode | Threshold Frequency |
| PARK | 10 |
| FIELD | 10 |
| BEACH | 10 |
| GOLDFIELD | 13 |

User Profile
The LEGEND offers 4 user profiles where you can save your settings and create 4 different user profiles.

This is a great feature for users to keep their optimized settings and to access them instantly later.
All user profiles have The LEGEND's default settings.
User profile 1 is the default user profile.
The active user profile in use is shown in the info section at the top of the screen.

User Profile Menu
- Press the Power & Settings Button once. Select the User Profile setting using the right and left buttons.

- The plus (+) icon will appear on the screen. Press the plus (+) button once.


Changing the Active User Profile
By using the plus (+) and minus (-) buttons, you can change the user profile in the User Profile menu and the selected user profile number will be displayed.

The selected user profile will only become active when you exit the User Profile menu. Press the Pinpoint & Accept/Reject Button once to go back to the settings.
Saving a User Profile
The LEGEND tracks all changes made in the settings and even if you do not save them in a user profile, the device always starts with the last saved settings when you turn it off and on again.
However, if you would like to save your settings for a specific location, you can save them in a user profile.
- Once you select the user profile number in the User Profile menu, press and hold the Pinpoint & Accept/Reject Button to save your settings to the selected user profile.
Once the user profile is saved, you will see a check mark in the user icon.
![]()
- Press the Pinpoint & Accept/Reject Button once to go back to settings.

Once you save a user profile, if you use that profile as the active user profile, all changes you make will be saved automatically.
To keep your saved settings, you must choose another user profile as the active user profile.
Resetting the User Profile
- In the User Profile menu, use the plus (+) and minus (-) buttons to choose the saved user profile you want to reset.
- When a saved profile is selected the right and left buttons become functional. For unsaved user profiles these buttons are not functional.
- When the right and left buttons are pressed, you can see the save and reset icons.
![]()
- Select the reset icon and press and hold the Pinpoint & Accept/Reject Button to reset the user profile. The check mark in the user icon profile will disappear.
- Press the Pinpoint & Accept/Reject Button once to go back to settings.

Save your favorite settings for different locations and/or targets separately in every mode for each of the 4 user profiles totaling 16 different sets of settings!

NOTE: When you save a user profile, all settings in all modes will be saved. You cannot save the settings in a specific mode only.
Reverting Back to Factory Defaults
After selecting the user profile in the settings menu, press and hold the Pinpoint & Accept/Reject Button until letters Fd appear on screen. Fd will disappear after 2 seconds.

Backlight
It enables you to adjust the display backlight level according to your personal preference.

It ranges from 0 to 6 and A1 to A6. At 0 level, the backlight is off. At 1-6 levels, it will be continuously lit. At A1-A6 levels, it lights up only for a short period of time when a target is detected or while navigating the menu and then it goes off.
This setting is common to all modes; changes will take effect in all modes.

The continuous operation of the backlight will affect power consumption, which is not recommended. The backlight setting is restored to the final saved setting when the device is turned off and on again. This setting is common in all modes; change made in any mode also applies to the other modes.
Adjusting the Backlight
- Press the Power & Settings Button once. Select backlight using the right and left buttons. The current value will be displayed on screen.

- Change the backlight level using the plus (+) and minus (-) buttons.
- Press the Power & Settings Button once to go back to the main screen.
When the backlight is on, the backlight icon will be displayed in the info section at the top of the screen.


Vibration
This feature provides feedback to the user by producing a vibration effect when a target is detected.

It can be used independently or together with the audio response. When audio response is disabled, all responses during target detection are provided to the user as vibration only.
Vibration setting ranges from 0-5. At 0 vibration is off. The magnitude of the vibration effect can vary according to the depth of the target and the swinging speed. This setting is common in all search modes.
This setting is common to all modes; changes will take effect in all modes.

When you turn off and on the device, it will start with the last vibration level you chose.
Adjusting the Vibration
- Press the Power & Settings Button once. Select vibration using the right and left buttons. The current value will be displayed on screen.

- Change the level using the plus (+) and minus (-) buttons.
- Press the Power & Settings Button once to go back to the main screen.
When the vibration is on, the vibration icon will be displayed in the info section at the top of the screen.


Even if the vibration is on, it will not generate a response for targets while in the settings menu but only in the detection screen.
LED Flashlight
It is the headlight used for lighting the area you are scanning while detecting at night or in dark locations.

LED Flashlight does not operate when the device is off. It is recommended to turn it on only when necessary since its operation consumes extra battery power.
LED Flashlight setting can be set to 0 (off) or to 1 (on). The LED Flashlight will be off at each start up.
Turning the LED Flashlight On/Off
- Press the Power & Settings Button once. Select LED Flashlight using the right and left buttons. The current value will be displayed on screen: 0 (off) or 1 (on).

- Turn the flashlight on/off using the plus (+) and minus (-) buttons.
- Press the Power & Settings Button once to go back to the main screen.
When the LED Flashlight is on, the flashlight icon will be displayed in the info section at the top of the screen.


Bluetooth
This setting is used to turn on and off the wireless Bluetooth® connection.

Bluetooth setting can be set to 0 (off) or to 1 (on). When you turn off and on the device, it will start with the last setting you chose.
Turning the Bluetooth Connection On/Off
- Press the Power & Settings Button once. Select Bluetooth® using the right and left buttons. The current value will be displayed on screen.

- Change the value using the plus (+) and minus (-) buttons.
- When the wireless connection is turned on, the Bluetooth Headphones icon will start blinking in the info section at the top of the screen.
The device will search for the headphones it has been paired with initially and try to connect to those. This will prevent the device from connecting to other Bluetooth devices when the Bluetooth setting is on. If you want to pair the device with different Bluetooth® headphones (other than those it was initially paired with) you must delete them from memory.
Once it pairs with any Bluetooth® headphones (Nokta BT Headphones or other), one of the icons below will be displayed in the info section:

 | Standard Bluetooth® headphones connected. |
 | aptX Low Latency headphones connected. |
- Press the Power & Settings Button once to go back to the main screen.
For more detailed info about the Nokta BT Headphones, please read the instructions included with the headphones.
Clearing Paired Headphones List
While in Bluetooth setting, if the Pinpoint & Accept/Reject Button is pressed long, the letters ''Fd'' will be displayed on screen for 2 seconds and the list of headphones that were paired with the device before will be deleted. If you want to pair a new pair of headphones after this, you must follow the pairing instructions again.

Once the headphones are paired with the device, if no sound is transmitted to the headphones for 14 minutes, the headphones will shut down automatically to save power.
Hearing the audio through the speaker and the Bluetooth® headphones at the same time
When the Bluetooth setting is selected, if the Bluetooth headphones are paired, press the up button and select 2.
Displaying the Bluetooth chip version
When the Bluetooth headphones are paired with the device and the Bluetooth® setting is selected, press and hold the Discrimination button. The Bluetooth chip version will be displayed in the clock section. When the button is released, the clock will be displayed again.
532 is the current Bluetooth® software version.
530 is the previous Bluetooth® software version.
Clock
The LEGEND has a built in clock that is located in the right upper corner of the screen.

Setting the Clock
- Press the Power & Settings Button once. Select the clock setting using the right and left buttons.

- The plus (+) icon will appear on the screen. Press the plus (+) button once.
- You will see numbers and a small line underneath them in the upper right corner. The line will be under the clock section. Using the plus (+) and minus (-) buttons, first choose between 24-hour or 12-hour clock options (if 12-hour clock is selected, letter A for AM or letter P for PM will come up).

- Then using the right and left buttons select the hour and minutes and set the time using the plus (+) and minus (-) buttons.
- Press the Pinpoint & Accept/Reject Button once to go back to settings.
- Press the Power & Settings Button once to go back to the main screen.


Time Tracking
The LEGEND offers a unique feature for the users; time tracking. Starting from the initial power-up it saves the usage time and displays it on screen when this setting is selected.

When Time Tracking is selected in the settings, the user can see how much time he/she has spent with The LEGEND in year/month/day/hour format.
Displaying the Usage Time
- Press the Power & Settings Button once. Select Time Tracking using the right and left buttons.

- In the upper right corner, you can see how long the device has been running. For example, the usage time in the screen above is 1 year, 2 months, 20 days and 5 hours.
- Press the Power & Settings Button once to go back to the main screen.

WARNING MESSAGES
The device will shut down shortly after one of the below messages is displayed on screen:
 | Check Coil (CC) It indicates an interruption in the search coil transmitter signal. The search coil connector may be unattached, loose or disconnected. If you own another detector with the same coil connector, please be sure that you have not attached the wrong coil by mistake. If none of the above exists, the search coil or its cable may have a defect. If the issue continues when you change the search coil, there may be an issue in the coil control circuit. |
 | Low Battery (Lo) When battery is depleted, ''Lo'' message appears on display and the device shuts down. |
 | System Error (SE) Turn the device back on if the device shuts down after this warning. If the problem persists, reset the device by pressing and holding the Power & Settings Button for 30 seconds. If the problem still exists, contact technical service. |
SOFTWARE UPDATE
The LEGEND has software update capability. All software updates made after the device is released to the market will be announced on the product's web page along with updating instructions.
System Version Information:
The software version of The LEGEND will be displayed at the upper right corner each time you turn the detector on.
NOTE: After the device is updated, if E5 E5 error code comes up where the software version is displayed, this means that the update has not been installed correctly. You need to reload the software again in such a case.

HEADPHONES
The LEGEND comes with Bluetooth wireless headphones. The Bluetooth headphones are NOT waterproof and should not be exposed to water.
The wireless connection will work as long as the system box of the device is not submerged in the water. In other words, you can use your wireless headphones while searching in shallow water with the coil submerged underwater. Please remember though, that the wireless headphones should not contact with water.
In case of the system box being submerged underwater, the wireless connection will not work. In this case, you need to purchase our optional Nokta Waterproof Headphones for land and underwater use. If you will not submerge the headphones underwater but just the system box, then you can also purchase our Nokta Koss Headphones with waterproof connector.
For land use only, you can also purchase our optional headphones adapter should you want to use The LEGEND with your own wired headphones.
TECHNICAL SPECIFICATIONS
| Operating Frequencies | Multi (2), 4kHz, 10kHz, 15kHz, 20kHz, 40kHz |
| Audio Frequencies | 100Hz - 1200Hz adjustable |
| Search Modes | 5 (Park / Field / Beach / Gold Field / Beast) |
| Custom User Profiles | 4 |
| Audio Tones | 60 |
| Tone Volume | Yes |
| Tone Break | Yes |
| Tone Frequency | Yes |
| Adjustable Threshold | Yes |
| Notch Filter | Yes |
| Ground Balance | Automatic / Manual / Tracking |
| Pinpoint | Yes |
| Frequency Shift | Yes |
| Noise Cancellation | Yes |
| Vibration | Yes |
| Sensitivity Setting | 30 levels |
| Target ID | 01-60 |
| Search Coil | The LEGEND WHP: LG30 30 cm x 23 cm (12" x 9") DD The LEGEND Pro Pack: LG30 30 cm x 23 cm (12" x 9") DD & LG15 15 cm (6'') DD |
| Display | Custom LCD |
| Backlight | Yes |
| LED Flashlight | Yes |
| Weight | 1.4 kg (3.0lbs.) including the search coil |
| Length | 63 cm - 132 cm (25" - 52") adjustable |
| Battery | 5050mAh Lithium Polymer |
| Warranty | 3 years |
WARNINGS
- The LEGEND is a state-of-the-art electronic device. Do not assemble or operate the device before reading the user manual.
- Do not store the device and search coil under extremely low or high temperatures for extended periods. (Storage Temperature: -20°C to 60°C / - 4°F to 140°F)
- The device has been designed with IP68 rating as a waterproof unit up to 5 meters / 16ft. (except for the Bluetooth® headphones).
- Pay attention to the items below after using the device especially under salty water:
- Wash the system box, shaft and the coil with tap water and be sure no salt water is left in the connectors.
- Do not use any chemicals for cleaning and/or for any other
- Wipe the screen and the shaft dry with a soft, non-scratch cloth.
- Protect the detector against impacts during normal use. For shipping, carefully place detector in original carton and secure with shock resistant packaging.
- The LEGEND metal detector may only be disassembled and repaired by Nokta Authorized Service Centers. Unauthorized disassembly/intrusion into the metal detector control housing for any reason voids the warranty.
- Do not use the device indoors. The device may constantly give target signals indoors where there are many metals present. Use the device outdoors, in open fields.
- Do not let another detector or an electromagnetic device come in close proximity (10m (30ft.)) to the device.
- Do not carry any metal objects while using the device. Keep the device away from your shoes while walking. The device may detect the metals on you or inside your shoes as targets.
Documents / Resources
References
Download manual
Here you can download full pdf version of manual, it may contain additional safety instructions, warranty information, FCC rules, etc.
Advertisement


Need help?
Do you have a question about the LEGEND and is the answer not in the manual?
Questions and answers