PAX S80 - Pos System Manual
Also See for S80:
- User manual (247 pages) ,
- Quick reference manual (9 pages) ,
- Setup manual (6 pages)
Advertisement
Table of Contents
Contents
- 1 What's included in the box
- 2 Installation
- 3 Loading the receipt paper
- 4 Initial power on of the device
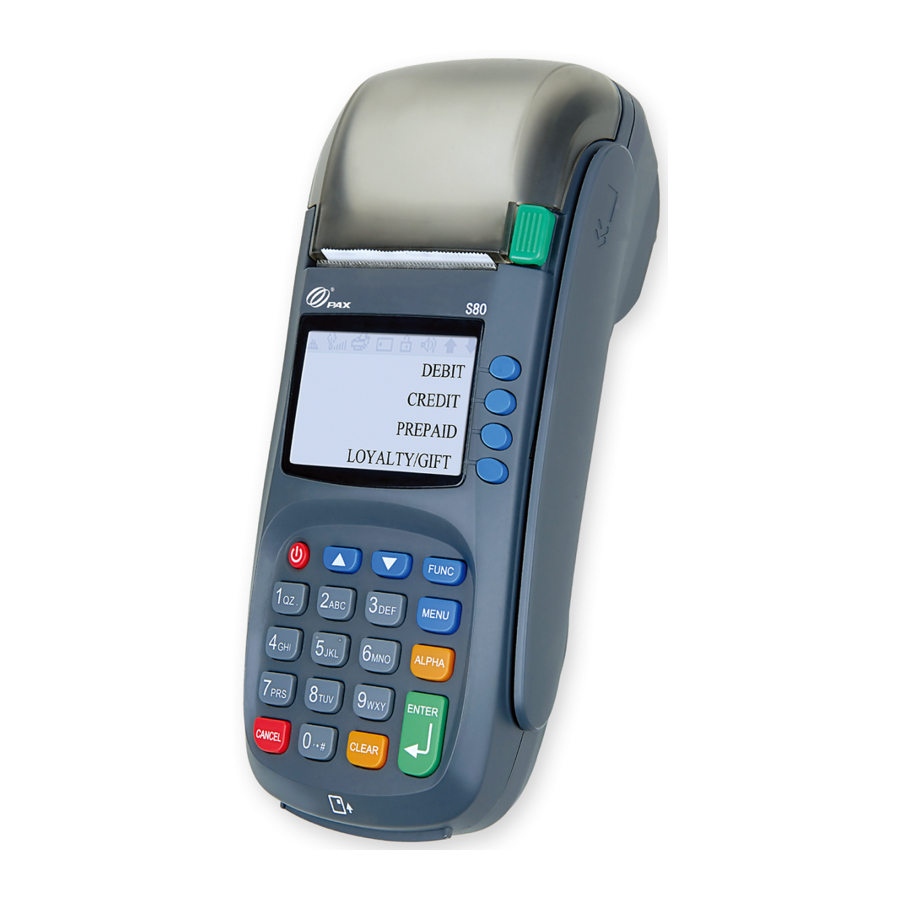
- 5 Keypad Layout
- 6 Set the Date/ Time
- 7 Process a sale using a stand-alone terminal
- 8 Process a Return
- 9 Void a Transaction
- 10 Force an Authorization
- 11 Add a Tip
- 12 Force Close a Batch
- 13 Print Current Report
- 14 View Current Transaction Totals
- 15 Sample Batch Report print-outs Types
- 16 Change S80 from normal mode to demo mode
- 17 Turn off "Beep on Key Press"
- 18 Documents / Resources
PAX S80 - Pos System Manual
What's included in the box
- S80 Device
- AC Power Adapter
- AC Power Cable
- Telephone Cable
- Thermal Receipt Paper roll
- Product Manual
If the S80 is intended to be integrated with a computer, it will also include:
- Serial cable for S80
- Prolific Serial-to-USB Cable
Installation
If the SUO is intended to be a stand-alone unit:
- (If using Dial-up) Connect Phone cable to LINE Port.
- (If using Pin Debit) Connect Pin pad to PINPAD Port.
- (If using Broadband) Connect Ethernet cable to LAN/RS232B
- Connect Power cable to POWER port,
If the S80 is intended to be integrated (connected to a computer) complete steps 1-4 as well as:

- Connect Prolific Serial-to-USB cable to S80 Serial Cable
- Connect Serial Cable end to S80 RS232A Port and Prolific Serial-to USB to computer USB port.
Loading the receipt paper

- Press the green button on the top right of the device to spring open the receipt paper roll holder cover
- Open the cover fully
- Load the receipt paper roll with the sheet coming from the bottom, underneath the roll
- Hold the end of the receipt paper with one hand while closing the cover with the other hand
- While holding the unit with one hand, rip the excess paper off by pulling down and to a side
Initial power on of the device
- Press the red power button
![]() in the top left corner of the pin pad and hold until the screen lights up.
in the top left corner of the pin pad and hold until the screen lights up. - Once powered on, the unit will reach out to Broad POS to check for updates. If no updates are found, it will continue to the main screen.
- The main screen displays "Ready" if it is connected to a computer, or "Input Amount" if it is being used as a stand-alone terminal
 in the top left corner of the pin pad and hold until the screen lights up.
Keypad Layout

- Soft buttons Fl-F4 used to make selections
- Scroll buttons used to scroll through to display additional menu options
- Function button used to select different types of transactions such as refund or pre authorization
- Menu button used to display menu options
- Enter button used to enter/confirm information entered or selected
- Clear button used to: —backspace when entering information into the screen reverse direction when scrolling through menus
- Cancel button used to cancel last selection
- Power button used to switch terminal on/off
Set the Date/ Time
| Step | Action | Display |
| 1 | Press the [MENU] button | |
| 2 | Enter the current password and press [ENTER] |  |
| 3 | From the mam menu, press [S] to access System Settings |  |
| 4 | From System Options screen, press [1] to access Date/Time Setup |  |
| 5 | Verify that the current Date and/or Time are correct. If incorrect, input the correct date using MM/DD/YY format. Press [ENTER] |  |
| 7 | Input the correct hour and minute using Military (24-hour) Format. Press [ENTER] when finished |  |
Process a sale using a stand-alone terminal
| Step | Action | Display |
| | From the main screen, insert the amount of the sale and press [ENTER] |  |
| | Swipe the card or enter the card number manually if the card is not present and press [ENTER] | |
| | If the card was manually entered input the expiration date in the format MMYY and press [ENTER] |  |
| | Press [1] if the card is present. OR Press [2] if the card is not present. |  |
| | Enter the CVV code from the back of the credit card and press [ENTER] |  |
| | Enter the street address and press [ENTER] ire.: if the billing address is 123 Main St., enter 123 |  |
| | Enter the ZIP Code and press [ENTER] |  |
| | The terminal contacts the Host Processor for an approval and prints a receipt | |
| | Tear off the receipt and then press any key for the customer receipt to be printed. If a second receipt is not wanted press [CANCEL] |  |
Process a Return
| Step | Action | Display |
| | From the main screen, press the [FUNC] button |  |
| | Press [8] for Return | |
| | Enter password and press [ENTER] |  |
| | Select the payment type. Press [1] for a Credit return or [2] for a Debit return |  |
| | Enter the amount of the return and then press [ENTER] |  |
| | Swipe the card or enter the card number manually if the card is not present and press [ENTER] | |
| | If the card was manually entered, input the expiration date in the format MMYY and press [ENTER] |  |
| | Press [1] if the card is present OR Press [2] if the card is not present. |  |
| | Tear off the receipt and then press any key for the customer receipt to be printed. If a second receipt is not wanted, press [CANCEL] |  |
Void a Transaction
| Step | Action | Display |
| | From the main screen, press the [FUNC] button |  |
| | Press [7] for Void | |
| | Enter password and press [ENTER] |  |
| | Input the transaction # to be voided and press [ENTER] |  |
| | The terminal searches the database for a transaction that matches the criteria. If the terminal does not find the transaction, it displays "TRANS. NOT FOUND" and reverts back to the function menu. | |
| | View the transaction on the display to verify it is the correct transaction then Press [ENTER] |  |
| | Press [ENTER] to void or [CANCEL] to cancel | |
| | Tear off the receipt and then press any key for the customer receipt to be printed. If a second receipt is not wanted, press [CANCEL] |  |
Force an Authorization
| Step | Action | Display |
| | From the main screen, press "SALE" [F4] button until FORCED displays |  |
| | Enter the amount of the forced sale and then press [ENTER] within 5 seconds or a timeout will occur and the terminal will return to the main screen |  |
| | Swipe the card or enter the card number manually if the card is not present and press [ENTER] | |
| | If the card was manually entered, input the expiration date in the format MMYY and press [ENTER] |  |
| | Input the authorization number previously obtained and press [ENTER] |  |
| | Tear off the receipt and then press any key for the customer receipt to be printed. If a second receipt is not wanted, press [CANCEL] |  |
Add a Tip
*This transaction can be used to adjust the final amount of a transaction. It is supported by RESTAURANTS ONLY. This is used AFTER the transaction has finished, a receipt has been printed and signed by the customer, and the customer has filled out the tip portion of the receipt.
| Step | Action | Display |
| | From the main screen, press the [FUNC] button |  |
| | Scroll down to [10] for Ti Menu | |
| | Select [1] Add Tips |  |
| | Select Method of finding transaction |  |
| | In most cases, Trans # is the best way to search if the receipt is available due to the Trans # being printed on the receipt. In ut the transaction # to be adjusted |  |
| | View the transaction on the display to verify it is the correct transaction then press [ENTER] |  |
| | The current tip is displayed in the first line. Input new tip amount then press [ENTER]. |  |
| | Press [ENTER] to accept the tip amount OR Press [CANCEL] to cancel the transaction. |  |
Force Close a Batch
| Step | Action | Display |
| | From the main screen, press the [FUNC] button |  |
| | Press [2] for Batch | |
| | Press [1] to close the batch and print the report |
Print Current Report
| Step | Action | Display |
| | From the main screen, press the [FUNC] button |  |
| | Press [1] for Report | |
| | Enter password and press [ENTER] |  |
View Current Transaction Totals
| Step | Action | Display |
| | From the main screen, press the [FUNC] button |  |
| | Press [3] for Review | |
| | Enter password and press [ENTER] |  |
Sample Batch Report print-outs Types
| Report | Definition |
| Condensed Report | This type of report will print the transaction number, card type, transaction type, last four digits of the account number, and the amount of the transaction. |
| Short Report | This type of report will print the transaction type and the amount of the transaction. |
| Journal Report | This type of report will print a full co of each transaction |
| Totals Only | This type of report will print daily totals only |

Change S80 from normal mode to demo mode
| Step | Action | Display |
| | Press the [MENU] button |  |
| | Press [3] for Operation Settings |  |
| | Press [3] for Operation Mode |  |
| | Enter password and press [ENTER] |  |
| | The default setting is Normal. Press [2] to put the terminal in Demo Mode. |  |
| | Press [ENTER] to accept or [CANCEL] to cancel. |  |
Turn off "Beep on Key Press"
| Step | Action | Display |
| | Press the [MENU] button |  |
| | Press [3] for Operation Settings |  |
| | The default is on. Press [1] to disable the buzzer or [2] to enable the buzzer. |  |
Documents / ResourcesDownload manual
Here you can download full pdf version of manual, it may contain additional safety instructions, warranty information, FCC rules, etc.
Advertisement


Need help?
Do you have a question about the S80 and is the answer not in the manual?
Questions and answers