Thrustmaster T.Flight Stick X - Game Controller Manual
- User manual (85 pages) ,
- User manual (86 pages) ,
- User manual (14 pages)
Advertisement
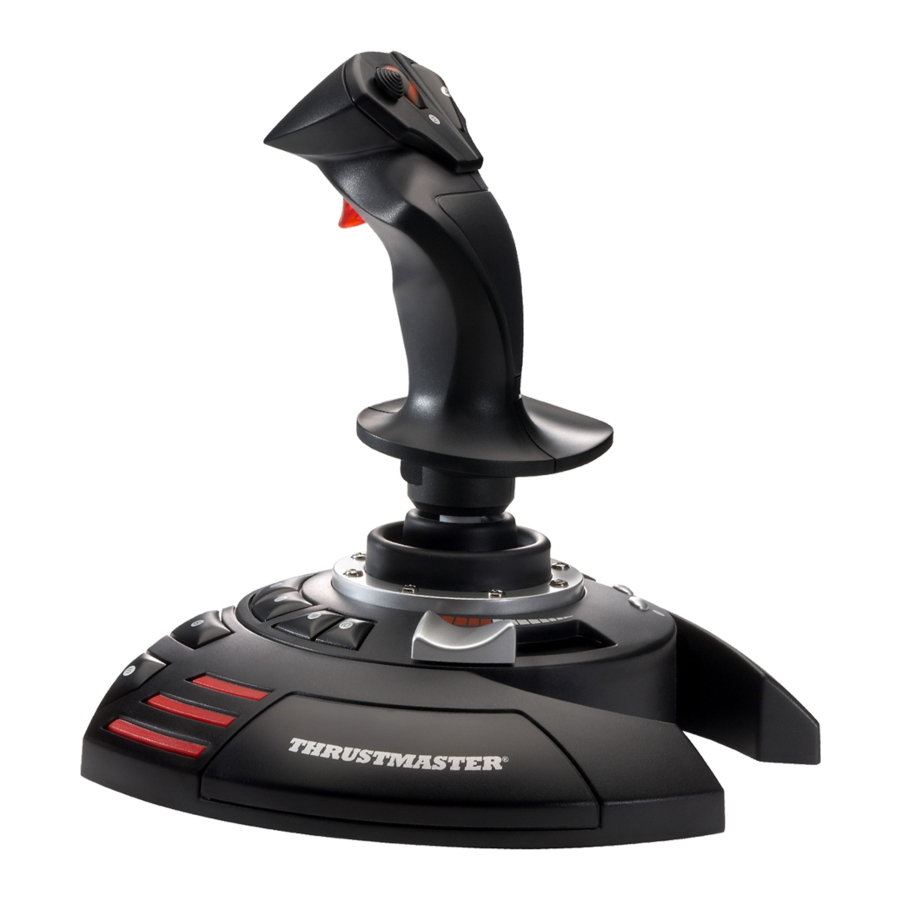
TECHNICAL FEATURES

- USB selector (PC / PS3)
- PC and PlayStation®3 USB connector
- Multidirectional "Point Of View" hat-switch
- 12 action buttons
- Rudder function via twisting handle with locking screw
- Sliding thumb throttle
- LED
- PRESET button (to select programming)
- Handle resistance adjustment dial
PC
INSTALLATION ON PC
- Set your joystick's USB selector (1) to the "PC" position.
- Connect the USB connector (2) to one of your computer's USB ports. Windows will automatically detect the new device.
- The drivers are installed automatically. Follow the on-screen instructions to complete the installation.
- ClickStart/Settings/Control Panel and then double-click Game Controllers.
The Game Controllers dialog box displays the joystick's name with OK status. - In the Control Panel, click Properties to configure your joystick.
Test device: Lets you test and view all of your joystick's functions.
You are now ready to play!
IMPORTANT NOTES FOR PC
- Your joystick's USB selector(1) must always be set to the "PC" position before connecting your joystick.
- When connecting your joystick: Leave the handle and rudder centered and do not move them (to avoid any calibration problems).
"AUTOMATIC PRESET" CONFIGURATION - PC
"AUTOMATIC PRESET" diagram on PC

This preset corresponds to the default configurations for most aerial simulation games on PC.
It will therefore allow you to start playing your game right away, without having to reconfigure your joystick.
PLAYSTATION®3
INSTALLATION ON PLAYSTATION®3
- Set your joystick's USB selector (1) to the "PS3" position.
- Connect the USB connector (2) to one of your console's USB ports.
- Switch on your console.
- Launch your game.
You are now ready to play!
USING THE "HOME / PS" BUTTON
Your joystick's "Home / PS" button allows you to exit your games, access menus and directly switch off your PlayStation®3 system.
IMPORTANT NOTES FOR PLAYSTATION®3
- Your joystick's USB selector(1) must always be set to the "PS3" position before connecting your joystick.
- In "1 Player" mode: If your official gamepad is on, you must switch it to "controller port 2" in order for your joystick to be functional.
- On PlayStation®3, the joystick is only compatible with PlayStation®3 games (and will not function with PlayStation® 2 games).
- When connecting your joystick: Leave the handle, rudder and throttle centered and do not move them (to avoid any calibration problems).
"AUTOMATIC PRESET" CONFIGURATION - PLAYSTATION®3
"AUTOMATIC PRESET" diagram on PlayStation®3

This preset corresponds to the default configurations for most aerial simulation games on PlayStation®3. It will therefore allow you to start playing your game right away, without having to reconfigure your joystick.
The 4 handle directions: Correspond to the 4 directions on your gamepad's left mini-stick.
The throttle (6): Corresponds to the Up/Down directions on your gamepad's right mini-stick.
The rudder (5): Corresponds to the Left/Right directions on your gamepad's right mini-stick.
MAPPING button: Simultaneously press SELECT (SE) + START (ST).
HOME / PS button: Simply press the button.
GETTING TO KNOW YOUR JOYSTICK
Adjustable handle resistance
Depending on your gaming style, you may prefer to have an ultra-sensitive joystick, which responds to the slightest movement, or a firmer joystick, which offers a certain resistance when you use it.
Your joystick's handle resistance is adjustable, in order to adapt to all gamers. To adjust it, use the handle resistance adjustment dial (9) located under your joystick's base.
Throttle
The throttle is in the form of a thumb slider (6), easily accessible with your left hand resting on the base of your joystick.
Rudder function
Your joystick features a rudder function, which in a plane corresponds to the pedals used by the pilot to turn the steering, allowing the plane to pivot around its vertical axis (therefore making the plane turn left or right). This rudder function is accessible on your joystick by rotating the handle to the left or right.
If you are not using the rudder function in your games (or if you have programmed it onto action buttons), you can disable handle rotation thanks to the locking screw (5) located on the handle's base.
Use a flat head screwdriver to change the screw's position and thus lock/unlock the rudder function.
Multidirectional "Point Of View" hat-switch
Your joystick features a "Point Of View" hat-switch (3) which, as its name indicates, allows you (in games which permit) to instantly view everything that's going on around your plane. To do so, simply go to your game's configuration menu and program the different views (rear view, left view, right view, and also external views) onto the directions of the "Point Of View" hat-switch.
Of course, you can also use the "Point Of View" hat-switch for other functions instead (firing, etc.).
2 PROGRAMMING MODES
The PRESET button (8) and LED (7) allow you to view the type of programming selected:
AUTOMATIC (preprogrammed) or MANUAL (programmed by yourself).
A single press of this button will allow you to switch from one programming mode to the other, even during the course of a game.
- AUTOMATIC PRESET: RED LED
This represents the default programming: the axes, positions of the buttons and of the hatswitch are preprogrammed.
PLEASE REFER TO THE "AUTOMATIC PRESET" CONFIGURATION DIAGRAMS.
- MANUAL PRESET: GREEN LED
This represents your own person programming:- The buttons, axes and the hat-switch can be switched between themselves.
- You can modify the programming to suit your taste and whenever you like.
- Programming is automatically saved in your joystick (even when it is disconnected).
- When your "MANUAL PRESET" is blank, it is identical to the "AUTOMATIC PRESET".
PROGRAMMING / MAPPING
You can program your joystick using the MAPPING button.
 Attention: This button is not located in the same position on PC and PS3 (please refer to the diagrams):
- On PC: Directly press the button in question.
- On PS3: Simultaneously press START (ST) + SELECT (SE).
- Examples of possible applications:
- Switching the positions of buttons.
- Switching axes between themselves = directions of the handle, of the throttle or of the rudder (In this case, you must map the 2 directions of the first axis to those of the second.)
- Switching the 2 directions of the same axis.
- Switching buttons with a direction of an axis or of the hat-switch.
- Exception:
On PlayStation®3, the START (ST) and SELECT (SE) buttons also correspond to the MAPPING button (and therefore may not be reprogrammed).
PROGRAMMING PROCEDURE
| Steps | Action | LED |
| 1 | Enable MANUAL PRESET (8) by pressing the button. | GREEN |
| 2 | Press and release the MAPPING button. | OFF |
| 3 | Press and release the button or direction to program. | FLASHES GREEN |
| 4 | Press and release the button or direction onto which you wish to place your function. | GREEN |
Your "MANUAL PRESET" is now enabled and up to date (with your programming carried out).
EEPROM MEMORY
- Your joystick features an internal chip which saves all of your "MANUAL PRESET" programming in memory (even when the joystick is switched off or unplugged for a long period of time).
- You can save a different "MANUAL PRESET" for each platform used (one for PC and one for PlayStation®3).
ERASING A "MANUAL PRESET"
| Steps | Action | LED |
| 1 | Enable your MANUAL PRESET (8). | GREEN |
| 2 | Press and hold the MAPPING button for 2 seconds. | FLASHES GREEN 2 SECONDS |
Your "MANUAL PRESET" is now blank (and once again identical to the "AUTOMATIC PRESET").
RETURNING TO "FACTORY SETTINGS"
You can erase all of your programming or settings carried out on both PC and PlayStation®3 with a single step:
| Step | Action | LED |
| 1 | Simultaneously press the buttons MAPPING + 11 (SE) + 12 (ST) | FLASHES GREEN/RED 2 SECONDS |
All of your "MANUAL PRESETS" (PC + PS3) or settings are now blank.
Note: This operation will completely restart your joystick (on PC, we therefore recommend that you do this outside of games).
TROUBLESHOOTING AND WARNING
- My joystick doesn't function correctly or appears to be improperly calibrated:
- Switch off your computer or your console, disconnect your joystick, reconnect your joystick and then re-launch your game.
- When connecting your joystick: Leave the handle, rudder and throttle centered and do not move them (to avoid any calibration problems).
- Exit your game, disconnect your joystick, verify that the USB selector (PC / PS3) (1) is set to the proper position, then reconnect your joystick.
- I can't configure my joystick:
- In your game's "Options / Controller / Gamepad or Joystick" menu: Select the most appropriate configuration or completely reconfigure the controller options.
- Please refer to your game's user manual or online help for more information.
- You can also use your joystick's "MAPPING" function to resolve this type of problem.
- My joystick is too sensitive or not sensitive enough:
- Your joystick self-calibrates on its own after you have made a few movements on the different axes.
- In your game's "Options / Controller / Gamepad or Joystick" menu: Adjust the sensitivity or dead zones for your controller (if this option is available).
- Adjust the handle resistance using the dial (9) located under your joystick's base.
TECHNICAL SUPPORT
https://support.thrustmaster.com
Documents / Resources
References
![support.thrustmaster.com]() Thrustmaster - Technical support website
Thrustmaster - Technical support website![www.thrustmaster.com]() Thrustmaster | Wheels, Joysticks and Gamepads for video games
Thrustmaster | Wheels, Joysticks and Gamepads for video games
Download manual
Here you can download full pdf version of manual, it may contain additional safety instructions, warranty information, FCC rules, etc.
Download Thrustmaster T.Flight Stick X - Game Controller Manual
Advertisement


Need help?
Do you have a question about the T.Flight Stick X and is the answer not in the manual?
Questions and answers