Thrustmaster MFD Cougar - USB Panels Manual
- User manual (145 pages) ,
- User manual (19 pages)
Advertisement
- 1 Box contents
- 2 Technical features
- 3 Assembling an MFD
- 4 Installation on PC
- 5 Customization
- 6 Identification of the MFDs
- 7 Attaching an MFD to a cockpit or a screen
- 8 Using more than two MFDs simultaneously
- 9 T.A.R.G.E.T advanced programming software
- 10 FAQs and technical support
- 11 Documents / Resources
PC (Windows® 10/11)
 Carefully read the instructions provided in this manual before installing the product, before any use of the product and before any maintenance. Be sure to follow the safety instructions. Failure to follow these instructions may result in accidents and/or damage. Keep this manual so that you can refer to the instructions in the future. Carefully read the instructions provided in this manual before installing the product, before any use of the product and before any maintenance. Be sure to follow the safety instructions. Failure to follow these instructions may result in accidents and/or damage. Keep this manual so that you can refer to the instructions in the future. |
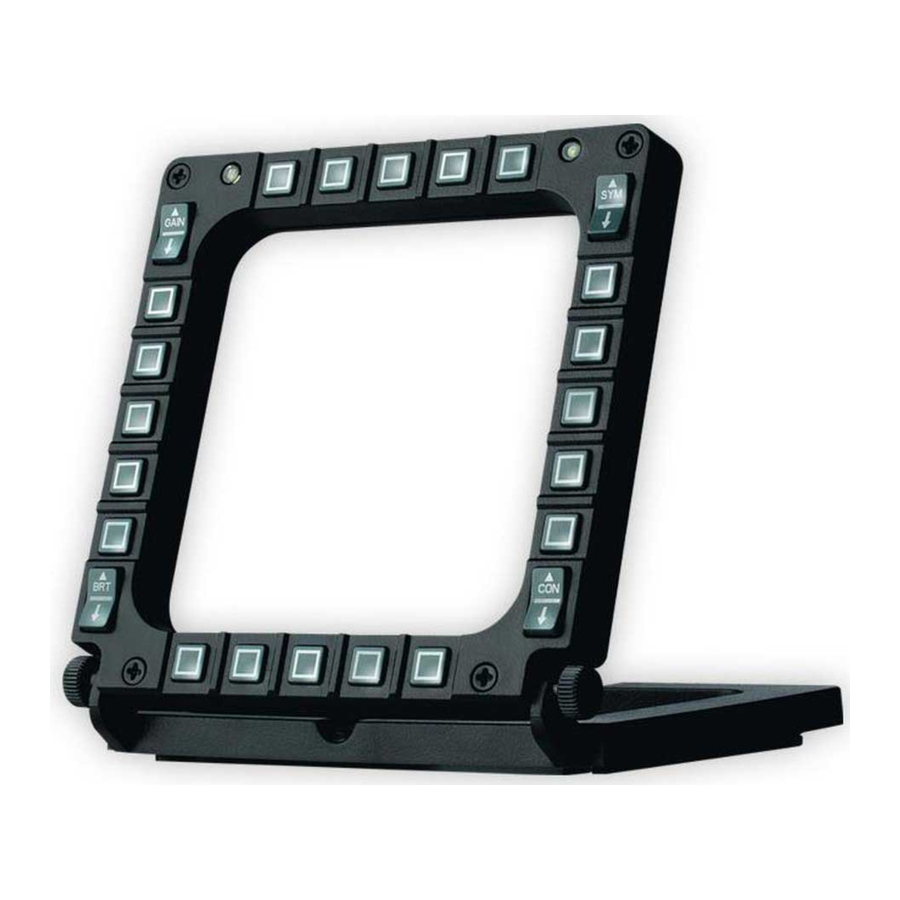
THRUSTMASTER MFD COUGAR PACK is an exact replica of the MFDs found in U.S. Air Force F-16 fighter aircraft.
Each MFD includes 20 buttons and 4 switches, for a total of 28 buttons per MFD. This extensive set of features lets you replace some of the advanced keyboard or mouse controls and simulate various flight instruments, for enhanced realism.
Box contents

Technical features

- 28 backlit programmable buttons
- Screw hole covers
- Programmable identification LEDs
- Detachable base
- Attachment thumbscrews
- USB connector
- Attachment system for bars
- Removable bar
- Removable bar attachment screws

- Adjustable attachment bar
- Plexiglas window
- Cardboard inserts
Layout of buttons

Assembling an MFD
- Clip the top of each attachment bar (10), shaped like a T, into the attachment system (7). Next, position the bottom of each attachment bar in the corresponding holes at the back of the base.

- Insert the two Plexiglas windows (11) into the slot at the top of the MFD.

- Insert a cardboard insert (12) between the two Plexiglas windows.


Installation on PC
- Before connecting your two MFDs, please visit:
https://support.thrustmaster.com/product/mfdcougar.
![]()
- Download and install the drivers for PC.
![]()
- Restart the PC.
![]()
- Connect each MFD's USB connector (6) to a USB port on your PC.

*Not included


Customization
You can customize your MFDs according to your own personal preferences (screen's angle of inclination, cardboard inserts, backlighting).
Each MFD features an internal memory. All settings (MFD name and number, backlighting intensity, status of identification LEDs) are automatically saved in this internal memory. In this way, your settings and preferences are preconfigured if you use your MFDs on another computer.
Adjusting an MFD's angle of inclinationon its base
When the MFD is attached to the base (4), the screen can be set at a 72°, 54° or 39° angle of inclination.


The attachment bars (10) are each composed of two bars that can be positioned in a specific direction or separated:
- One long bar featuring the indications 72 DEGREE and 54 DEGREE.
- One short bar featuring the indication 39 DEGREE.
Inclination at 72°
- Position the two attachment bars (10) with the 72DEGREE indication at the bottom of the bars.
If necessary, you can slightly loosen the center screw to facilitate angle adjustment.

- Clip the top of each attachment bar (10), shaped like a T, into the attachment system (7). Next, position the bottom of each attachment bar in the corresponding holes at the back of the base.

- Retighten the two attachment thumbscrews (5).


Inclination at 54°
- Position the two attachment bars (10) with the 54DEGREE indication at the bottom of the bars.
If necessary, you can slightly loosen the center screw to facilitate angle adjustment.

- Clip the top of each attachment bar (10), shaped like a T, into the attachment system (7). Next, position the bottom of each attachment bar in the corresponding holes at the back of the base.

- Retighten the two attachment thumbscrews (5).


Inclination at 39°
- Unscrew the center screw, then separate all of the bars.

- Keep the short attachment bars with the 39DEGREE indication, and put the bars with the 72DEGREE indication and the screws in a safe place where they won't be lost.
![]()
- Clip the top of each attachment bar (10), shaped like a T, into the attachment system (7). Next, position the bottom of each attachment bar in the corresponding holes at the back of the base.

- Retighten the two attachment thumbscrews (5).


Changing the cardboard inserts
- Remove the cardboard insert positioned between the two Plexiglas windows.
![]()
- Insert another cardboard insert of your choice between the two Plexiglas windows.


|
Please visit: |
Backlighting intensity
The intensity of the backlighting for all of the buttons and the two identification LEDs can be adjusted with the MFD (directly in the game), or with the Thrustmaster Control Panel.
Adjustment with the MFD
- To increase the intensity, simultaneously press buttons 14, 15 and 25.

- To decrease the intensity, simultaneously press buttons 14, 15 and 26.


Adjustment with the Control Panel
- To access the Control Panel, selectStart / Thrustmaster MFD Cougar / Control Panel.
- The Game Controllers window opens. Click Properties to open the Control Panel.
- Move the Backlit / LED Intensity slider to adjust the intensity of the backlighting.


|
Configuration
- To access the Control Panel, selectStart / Thrustmaster MFD Cougar / Control Panel.
- The Game Controllers window opens, and displays the default names of the two MFDs (F16 MFD 1 and F16 MFD 2) along with OK status.
![]()
- Click Properties to open the Control Panel and configure your MFD: identify the MFD, test and view the buttons and switches, select the MFD's number and whether the right or left LED lights up, and adjust the intensity of the backlighting.
![]()


|
Identification of the MFDs
Each MFD has two identification LEDs (3), allowing you to easily distinguish the MFDs from one another.
When you open the Control Panel, one of the two identification LEDs or both identification LEDs of the MFD in question will flash for two seconds, allowing you to visually distinguish that particular MFD from any others.
You can also click the Identify button in the Control Panel to manually make one or both identification LEDs flash, allowing you to visually distinguish the MFD in question.
|
By default, the two LEDs turn on and off according to the MFD's name and number:
| Name and number of MFD | Left LED | Right LED | Location in a cockpit |
| F16 MFD 1 |  | ● | Left MFD #1 |
| F16 MFD 2 | ● |  | Right MFD #1 |
| F16 MFD 3 |  |  | Left MFD #2 |
| F16 MFD 4 | ● | ● | Right MFD #2 |
| F16 MFD 5 |  | ● | Left MFD #3 |
| F16 MFD 6 | ● |  | Right MFD #3 |
| F16 MFD 7 |  | | Left MFD #4 |
| F16 MFD 8 | ● | ● | Right MFD #4 |
It is possible to modify this default mode by ticking or not ticking Left LED and Right LED in the Thrustmaster Control Panel.

Attaching an MFD to a cockpit or a screen
- Unclip the attachment bars (10).

- Completely unscrew the two attachment thumbscrews (5) to separate the MFD from its base.


- Completely unscrew the two attachment screws (9) to remove the removable bar (8) located at the back of the MFD.

![]()
- Remove the four screw hole covers (2) by pushing them out from the back, using a thin screwdriver or a pin.

- You can now attach the MFD using the four screw holes (2).


A complete MFD blueprint is available at: https://support.thrustmaster.com/product/mfdcougar.

Using more than two MFDs simultaneously
The Thrustmaster Control Panel lets you adjust and control up to eight MFDs connected to the same PC simultaneously. In this way, each MFD is customized and identifiable.
- To access the Control Panel, selectStart / Thrustmaster MFD Cougar / Control Panel.
- The Game Controllers window opens. Click Properties to open the Control Panel.
- In the event that you are using more than two MFDs simultaneously (and only in that case), go to theF16 MFD drop-down menu and select the MFD number of your choice.
![]()
- Click OK. The Game Controllers window opens.
- Once this procedure has been carried out, the MFD in question automatically disconnects from the computer and then reconnects with its new number.
- In the Game Controllers window, click Properties to configure the MFD of your choice.
![]()


|
T.A.R.G.E.T advanced programming software

T.A.R.G.E.T (Thrustmaster Advanced pRogramming Graphical EdiTor) is an innovative, high-performance software suite allowing for improvements to most Thrustmaster flight controllers, and the sharing of profiles with the Thrustmaster community.
Installation
- Visit https://support.thrustmaster.com.
- Select Joysticks / MFD Cougar Pack, then select Software.
- Download and install the T.A.R.G.E.T advanced programming software.
Main features
- Various possible configurations of your controller's axes.
- Multiple programming levels available: Basic, Advanced and Script.
- Use of the Drag and Drop principle.
- The ability to combine MFDs with other Thrustmaster flight simulation accessories (Hotas Cougar*, Hotas Warthog*, T.16000M FCS*, TWCS*, TFRP*, TCA range* — all of which are also compatible with T.A.R.G.E.T), allowing them to be recognized as a single USB device.
- Access to advanced profiles created by the Thrustmaster community.
*Sold separately
FAQs and technical support
The MFDs are not recognized, or disconnect unexpectedly.
Power off your computer, disconnect your MFDs, then reconnect them and restart your computer.
If the problem persists, connect the MFDs to other USB ports, or connect them directly to a USB hub powered by an electrical outlet.
 Avoid connecting your MFDs to a USB hub that is not powered by an electrical outlet. |
I'm unable to configure my MFD in games.
In your game's Options / Controller / Gamepad or Joystick menu, manually configure each of the MFD's buttons with the function of your choice.
Please refer to your game's user manual or online help for more information.
 Be sure to install the latest updates available for your game. |
Do you have questions regarding MFD Cougar Pack, or are you experiencing technical problems? If so, visit the Thrustmaster technical support website:
https://support.thrustmaster.com/product/mfdcougar.

Documents / Resources
References
Download manual
Here you can download full pdf version of manual, it may contain additional safety instructions, warranty information, FCC rules, etc.
Advertisement


Need help?
Do you have a question about the MFD Cougar and is the answer not in the manual?
Questions and answers