Advertisement
Table of Contents
- 1 Technical Features
- 2 Getting to Know Your Hotas Joystick
- 3 Adjustable Handle Resistance
- 4 Rudder Function
- 5 Multidirectional "Point of View" Hat-Switch
- 6 Important Notes for Pc
- 7 "Automatic Preset" Configuration - Pc
- 8 Advanced Functions
- 9 Programming Modes
- 10 Eeprom Memory
- 11 Programming Procedure
- 12 Preset Led
- 13 Troubleshooting and Warnings
- 14 Consumer Warranty Information
- 15 Environmental Protection Recommendation
- 16 Technical Support
- Download this manual
Advertisement
Table of Contents

Related Manuals for Thrustmaster T.Flight Hotas X


Summary of Contents for Thrustmaster T.Flight Hotas X
- Page 1 Europe, Middle East North America/ Norteamérica ENGLISH FRANÇAIS ENGLISH DEUTSCH FRANÇAIS NEDERLANDS ESPAÑOL ITALIANO Latin America/ ESPAÑOL América Latina PORTUGUÊS ENGLISH ESPAÑOL ČESTINA PORTUGUÊS TÜRKÇE POLSKI Asia Paci c SVENSKA 日本語 SUOMI 繁體中文 SLOVENCINA 한국어 MAGYAR NYELV ENGLISH...
-
Page 2: Technical Features
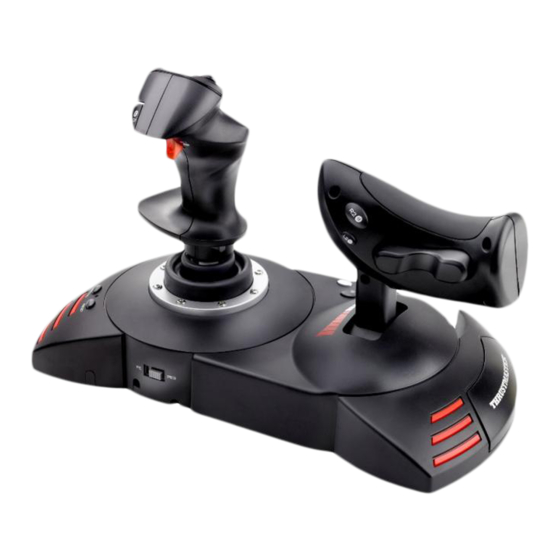
––++ Compatible: PC User Manual TECHNICAL FEATURES Throttle Allen key to install or separate the USB connector throttle USB selector Handle resistance adjustment dial Rudder function via twisting handle Rudder via rocking button (or 5 Axis) Rudder locking screw on handle Action buttons PRESET button... -
Page 3: Getting To Know Your Hotas Joystick
GETTING TO KNOW YOUR HOTAS JOYSTICK THROTTLE Your joystick features a large throttle which you can use to easily control the acceleration of your aircraft. The throttle is detachable and may be positioned in 2 different ways, either: Detached and separated from the joystick (to re-create authentic piloting conditions) Attached to the joystick (for greater stability and to take up less space). -
Page 4: Rudder Function
RUDDER FUNCTION Your joystick features a rudder function, which in a plane corresponds to the pedals used by the pilot to turn the steering, allowing the plane to pivot around its vertical axis (therefore making the plane turn left or right). This rudder function is accessible on your joystick by rotating the handle to the left or right. -
Page 5: Important Notes For Pc
INSTALLATION ON PC 1. Set your joystick’s USB selector (3) to the “PC” position. 2. Connect the USB connector (2) to one of your computer’s USB ports. Windows will automatically detect the new device. 3. The drivers are installed automatically. Follow the on-screen instructions to complete the installation. -
Page 6: "Automatic Preset" Configuration - Pc
“AUTOMATIC PRESET” CONFIGURATION - PC “AUTOMATIC PRESET” diagram on PC RED HOME LED = 4 AXES MODE GREEN HOME LED = 5 AXES MODE The "4 axes" mode preset corresponds to the default configurations for most aerial simulation games on PC. It will therefore allow you to start playing your game right away, without having to reconfigure your joystick. -
Page 7: Advanced Functions
ADVANCED FUNCTIONS 2 PROGRAMMING MODES The PRESET button (6) and its LED allow you to view the type of programming selected: AUTOMATIC (preprogrammed) or MANUAL (programmed by yourself). A single press of this button will allow you to switch from one programming mode to the other, even during the course of a game. - Page 8 PROGRAMMING/MAPPING Your programming is carried out using the MAPPING button (7). • Examples of possible applications: - Switching the positions of buttons. - Switching axes between themselves = directions of the handle, of the throttle or of the rudder (in this case, you must map the 2 directions of the first axis to those of the second.) - Switching the 2 directions of the same axis.
-
Page 9: Programming Procedure
PROGRAMMING PROCEDURE SAVING A "MANUAL PRESET" Steps Action PRESET LED Enable MANUAL PRESET (6) GREEN by pressing the button. FLASHES GREEN Press and release the MAPPING button (7). SLOWLY FLASHES GREEN Press and release the button or direction to program. QUICKLY Press and release the button or direction onto which you GREEN... -
Page 10: Troubleshooting And Warnings
TROUBLESHOOTING AND WARNINGS • My joystick doesn’t function correctly or appears to be improperly calibrated: - Switch off your computer or your console, disconnect your joystick, reconnect your joystick and then re-launch your game. - When connecting your joystick: Leave the handle, rudder and throttle centered and do not move them (to avoid any calibration problems). -
Page 11: Consumer Warranty Information
Thrustmaster product according to applicable laws of the country in which the consumer was domiciled on the date of purchase of the Thrustmaster product (if no such action exists in the corresponding country, then the warranty period shall be one (1) year from the original date of purchase of the Thrustmaster product). - Page 12 (including, but not limited to, any damages caused directly or indirectly by any software, or by combining the Thrustmaster product with any unsuitable element, including in particular power supplies, rechargeable batteries, chargers, or any other elements not supplied by Guillemot for this product).
-
Page 13: Environmental Protection Recommendation
COPYRIGHT © 2019 Guillemot Corporation S.A. All rights reserved. Thrustmaster® is a registered trademark of Guillemot Corporation S.A. Windows® is a registered trademark of Microsoft Corporation in the United States and/or other countries. All rights reserved. All other trademarks are the property of their respective owners.
Need help?
Do you have a question about the T.Flight Hotas X and is the answer not in the manual?
Questions and answers