Thrustmaster RGT Force Feedback CLUTCH - Racing Wheel Manual
- User manual (148 pages)
Advertisement
- 1 TECHNICAL FEATURES
- 2 INSTALLING THE WHEEL
- 3 PLAYSTATION3
- 4 INSTALLATION FOR PC
- 5 INSTALLING THE DRIVERS
- 6 AUTOMATIC CALIBRATION OF WHEEL AND PEDALS
- 7 AXIS SELECTION (2, 3 or 5 AXES)
- 8 RE-CENTERING FUNCTION SETTING
- 9 FORCE FEEDBACK EFFECTS SETTING
- 10 PROGRAMMING THE "GEARBOX"
- 11 ADJUSTING THE PEDALS
- 12 TROUBLESHOOTING
- 13 SAFETY RECOMMENDATIONS AND INFORMATION
- 14 TECHNICAL SUPPORT
- 15 Documents / Resources
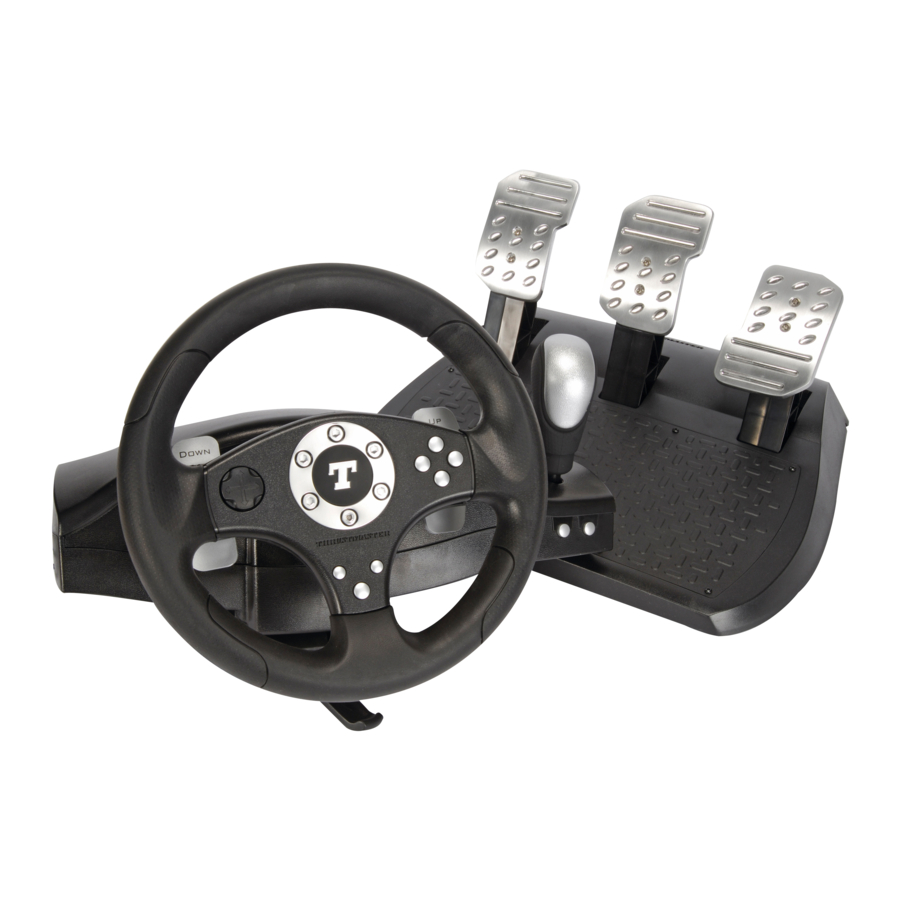
TECHNICAL FEATURES

- 2 digital gearshift levers
- Digital gearshift knob
- Mode LED
- Digital action buttons
- Digital D-pad
- Force button
- 2 connectors for 3 pedals pedal set
- Axis 1: Analog steering wheel
- Axis 4: Progressive left lever
- Axis 5: Progressive right lever

- Axis 4: Progressive clutch pedal
- Axis 3: Progressive brake pedal
- Axis 2: Progressive gas pedal
- Table clamp
- USB PC connector
- Pedal set cable (with switch)
- 2 RJ45 connectors for pedal set
- Power adapter connector
- Power adapter
INSTALLING THE WHEEL
Fixing the wheel in place
- Place the wheel on a table or other flat surface.
- Place the clamp screw in the table clamp (14) and then screw the clamping unit counter-clockwise into the hole on the underside of the wheel until firmly fixed in place.
Connecting the "3 Pedals" pedal set to the wheel
- Connect cable 1 to connector 1 located at the back of the wheel.
- Connect cable 2 to connector 2 located behind the gearshift knob.


Using the switch
The switch, located on the cable of the "3 Pedals" pedal set, allows you at any time (even during the course of a game) to enable (or disable):
- either the third pedal (C)
- or the 2 progressive levers located behind the wheel.
Switch set to "2 L"
The 2 progressive levers are enabled (and the third pedal disabled).
Switch set to "3 P"
The third pedal is enabled (and the 2 progressive levers disabled).
IN THE "3 P" POSITION, YOUR WHEEL AUTOMATICALLY SWITCHES TO "5 AXIS" MODE.
Connecting the wheel
Connect the power adapter (19) to the adapter connector (18) and plug the adapter into an electrical outlet.
PLAYSTATION®3
On PlayStation®3, in the general menu, use your official gamepad (not your racing wheel) to navigate and start your games. The wheel will work only when the game is started.
INSTALLATION FOR PC
System requirements: PC (Windows 98 SE, Me, 2000, XP, Vista or 7) equipped with USB port.
INSTALLING THE DRIVERS
The CD-ROM included with this product allows you to install the Force Feedback drivers.
- Insert the installation CD-ROM into your CD-ROM drive. Follow the on-screen instructions to install the Force Feedback drivers. Once the installation is complete, click Finish and restart your computer.
- Once your computer has restarted, connect the USB connector (15) to one of your computer's USB ports. Windows 98/Me/2000/XP/Vista/7 will automatically detect the new device. (If you are connecting a USB device for the first time, Windows may ask you to insert the Windows CD-ROM during the installation procedure in order to install the required system files.)
- Driver installation:
Windows 98: the Add New Hardware Wizard will search for the appropriate drivers. Click Next. Follow the on-screen instructions to complete the installation.
Windows Me/2000/XP/Vista/7: the drivers are installed automatically. - Select Start/All Programs/Thrustmaster/Force Feedback driver/Control Panel.
The Game Controllers dialog box displays the wheel's name with OK status. - In theControl Panel, click Properties to configure your wheel:
- Page 1 = Test input: allows you to test and view the buttons, D-pad and 5 axes (wheel, brake pedal, gas pedal, clutch pedal, left and right progressive levers).
- Page 2 = Test forces: allows you to test 8 Force effects and configure the Force Feedback and automatic re-centering settings.
AUTOMATIC CALIBRATION OF WHEEL AND PEDALS
The wheel auto-calibrates independently once the power adapter and USB connector have been connected (this involves the wheel making movements on its own). The pedals auto-calibrate once they have been pressed a few times.
You can also carry out manual calibration by downloading the "Thrustmaster Calibration Tool v 1.03" software from our website: http://ts.thrustmaster.com
AXIS SELECTION (2, 3 or 5 AXES)
- Axis selection via "Software" ("Control Panel")
Click the mode you wish to use and then click OK. - Axis selection via "Hardware"
Press the gas and brake pedals and the Force button simultaneously (13) + (12) + (6).
Axis selection via hardware must always be carried out outside of the Control Panel! This allows you to select your mode directly in your game's "Controls" option.
AXIS SELECTION VIA "HARDWARE" IS ONLY AVAILABLE
WHEN THE SWITCH ON YOUR PEDAL SET IS IN THE "2 L" POSITION
- 2 AXIS mode (LED is orange)
In this mode, your wheel's gas and brake controls function in "combined" mode (and are combined with the 2 progressive levers):- Axis 1 = X axis (Steering wheel)
- Axis 2 = Y axis (Pedals/progressive levers)
- 3 AXIS mode (LED is red)
In this mode, your wheel's gas and brake controls function in "separate" mode.
= the pedals are combined with the 2 progressive levers (switch set to "2 L")
= the clutch pedal is combined with the brake pedal (switch set to "3 P")- Axis 1 = X axis (Steering wheel)
- Axis 2 = Y axis (Brake pedal / Progressive left lever / Clutch pedal)
- Axis 3 = RZ axis (Gas pedal / Progressive right lever)
- 5 AXIS mode (LED is green)
In this mode, your wheel's gas and brake controls function in "separate" mode, as do the 2 progressive levers and the clutch pedal, which are independent:
Option 1 (with pedal set switch set to "2 L")
- Axis 1 = X axis = Steering wheel
- Axis 2 = Y axis = Brake pedal
- Axis 3 = RZ axis = Gas pedal
- Axis 4 = Slider 1 axis = Progressive right lever
- Axis 5 = Slider 0 axis = Progressive left lever
Option 2 (with pedal set switch set to "3 P")
- Axis 1 = X axis = Steering wheel
- Axis 2 = Y axis = Brake pedal
- Axis 3 = RZ axis = Gas pedal
- Axis 4 = Slider 1 axis = Disabled
- Axis 5 = Slider 0 axis = Clutch pedal
The exclusive 5 axis mode allows you to enjoy all of the advanced options offered in most simulation-type racing games. For the first time ever, you can now manage these new functions "progressively" (as opposed to digitally), providing full immersion for fans of car racing simulations!
Various examples:
- Assignment of the clutch pedal or progressive left lever to the "clutch" function (in "manual gearshift with manual clutch" mode)
- Assignment of the progressive right lever or clutch pedal to the "handbrake" function
- Assignment of the progressive left lever to the "left interior view" function
- Assignment of the progressive right lever to the "right interior view" function
 Note:
Note:
- When you select 2 axis mode, the LED is Orange.
- When you select 3 axis mode, the LED is Red.
- When you select 5 axis mode, the LED is Green.
If your game does not accept all 5 axes, switch your wheel to "3 axis" mode (or "2 axis" mode, if the problem persists).
RE-CENTERING FUNCTION SETTING
Wheel re-centering (Auto-center) is disabled by default.
Most recent games now offer their own re-centering mode.
You are strongly advised to disable wheel re-centering (in most cases), to allow the game to handle it. The Force Feedback will then be of greater quality.
When enabled, re-centering mode is especially useful in games that do not feature Force Feedback or which use weak re-centering.
- Setting via "Software" (see "Control Panel")
- to disable re-centering, click "By the game".
- to enable re-centering, click "By the wheel".
In this mode, you can adjust re-centering intensity from 0 to 100%.
- Setting via "Hardware"
To enable or disable re-centering directly in your game, simply press your wheel's Force button (6). When enabled, the intensity of re-centering corresponds to the percentage selected previously in the "By the wheel" setting of the "Control Panel".
Note:
- When Auto-center is enabled, the LED flashes.
- When Auto-center is disabled, the LED does not flash
(Recommended mode for Force Feedback games)
FORCE FEEDBACK EFFECTS SETTING
(see "Control Panel") 4 settings can be set from 0 to 150%:
- Master Forces
- Static Forces
- Dynamic Forces
- Aggressiveness
PROGRAMMING THE "GEARBOX"
(see "Control Panel")
This function allows you to "separate" (default mode) or "combine" the digital gearshift levers (1) and the digital gearshift knob (2).
Note: Always remember to completely close the "Control Panel" before staring your game!
You are now ready to play!
ADJUSTING THE PEDALS
Each of the 3 aluminum pedals can be positioned to your liking in either a "Standard" or "Vertical" setting. This adjustment allows you to adapt your pedal set not only to your style of driving (using "heel-and-toe style" or not), but also to your seating position ("seat" or "cockpit "style).
- Using a small screwdriver, unscrew the two screws (one short and one long) for the pedal you wish to adjust.
- Set the pedal into the position of your choice.
- Replace the 2 screws.
Note: In the "Standard" position, place the large screw on the bottom; in the "Vertical" position, place the large screw on top.
Examples:

D = "Standard" gas / "Vertical" brake and clutch

E = "Vertical" gas, brake and clutch

F = "Standard" gas, brake and clutch

G = "Vertical" gas / "Standard" brake and clutch

TROUBLESHOOTING
- My wheel doesn't work correctly or appears to be improperly calibrated.
Switch off your PC, completely disconnect your wheel, reconnect all the cables (including power adapter and pedal set), switch your PC back on and restart the game.
If the calibration problem persists, download the "Thrustmaster Calibration Tool v 1.03 " manual calibration software available on our website: http://ts.thrustmaster.com - My wheel moves by itself during the game.
This is normal and is the re-centering function featured in some games. To stop these movements, just place your hands on the wheel or reduce the Force Feedback intensity. - My wheel stays turned to one side (left or right) after launching a game.
This is normal in some games. The wheel will re-center itself once you have identified it as a wheel in the game's setup options. - My wheel is detected by my computer but doesn't work in the game.
Access your game's options interface to configure your wheel. Please refer to your game's user manual or online help for more information. - My game doesn't accept 5 axis mode.
Select 3 axis mode (or 2 axis mode, if the problem persists), then configure your wheel again in your game's options interface. - Force Feedback doesn't react properly.
In the Thrustmaster Control Panel, reset all forces to their default values (= to 100%) and disable automatic re-centering (the LED should not be flashing).
In some games you will also have to reverse the forces (select "Negative Forces" in the game's options or set the slider to "-100%"). In other games forces should not be reversed (in this case select "Positive Forces" or "+100%"). - My pedals or levers are not functioning properly.
Your game does not accept the axis mode you have selected. Exit the game and select a new axis mode. Re-launch the game and then configure your wheel again in your game's options interface.
SAFETY RECOMMENDATIONS AND INFORMATION
- When connecting the wheel and during auto-calibration: to prevent any incorrect calibration, never turn the wheel, press the pedals or buttons.
- When not in use for extended periods and to avoid any unwanted power consumption or deterioration, disconnect the wheel's power adapter. Reconnect it before going back to the game.
- Your wheel features Force Feedback: NEVER leave the wheel within the reach of young children, especially during the auto-calibration phases.
For safety reasons, never use the pedal set with bare feet or while wearing only socks on your feet.
THRUSTMASTER® DISCLAIMS ALL RESPONSIBILITY IN THE EVENT OF INJURY RESULTING FROM USE OF THE PEDAL SET WITHOUT SHOES.
TECHNICAL SUPPORT
If you encounter a problem with your product, please go to http://ts.thrustmaster.com and click Technical Support. From there you will be able to access various utilities (Frequently Asked Questions (FAQ), the latest versions of drivers and software) that may help to resolve your problem. If the problem persists, you can contact the Thrustmaster products technical support service ("Technical Support"):
By email:
In order to take advantage of technical support by email, you must first register online. The information you provide will help the agents to resolve your problem more quickly. Click Registration on the left-hand side of the Technical Support page and follow the on-screen instructions. If you have already registered, fill in the Username and Password fields and then click Login.
By telephone (if you do not have Internet access):
United Kingdom:
08450800942 Charged at local rate
Monday to Saturday from 8 a.m. to 7 p.m.
United States:
1-866-889-5036 Free
Monday to Friday from 9 a.m. to 8 p.m.
Saturday from 8 a.m. to 2 p.m. (Eastern Standard Time)
Monday to Friday from 6 a.m. to 5 p.m.
Saturday from 5 a.m. to 11 a.m. (Pacific Standard Time)
Canada
1-866-889-2181 Free
Monday to Friday from 9 a.m. to 8 p.m.
Saturday from 8 a.m. to 2 p.m. (Eastern Standard Time)
Monday to Friday from 6 a.m. to 5 p.m.
Saturday from 5 a.m. to 11 a.m. (Pacific Standard Time)
Hours of operation and telephone numbers are subject to change. Please visit http://ts.thrustmaster.com for the most up-to-date Technical Support contact information.
Documents / Resources
References
![ts.thrustmaster.com]() Thrustmaster - Technical support website
Thrustmaster - Technical support website![www.thrustmaster.com]() Thrustmaster | Wheels, Joysticks and Gamepads for video games
Thrustmaster | Wheels, Joysticks and Gamepads for video games
Download manual
Here you can download full pdf version of manual, it may contain additional safety instructions, warranty information, FCC rules, etc.
Download Thrustmaster RGT Force Feedback CLUTCH - Racing Wheel Manual
Advertisement


Need help?
Do you have a question about the RGT Force Feedback CLUTCH and is the answer not in the manual?
Questions and answers