cecotec PERFECTSTEAK 4250 STAND (03049) - Electrical Barbeque Manual
- Instruction manual (32 pages) ,
- Instruction manual (44 pages) ,
- Instruction manual (33 pages)
Advertisement
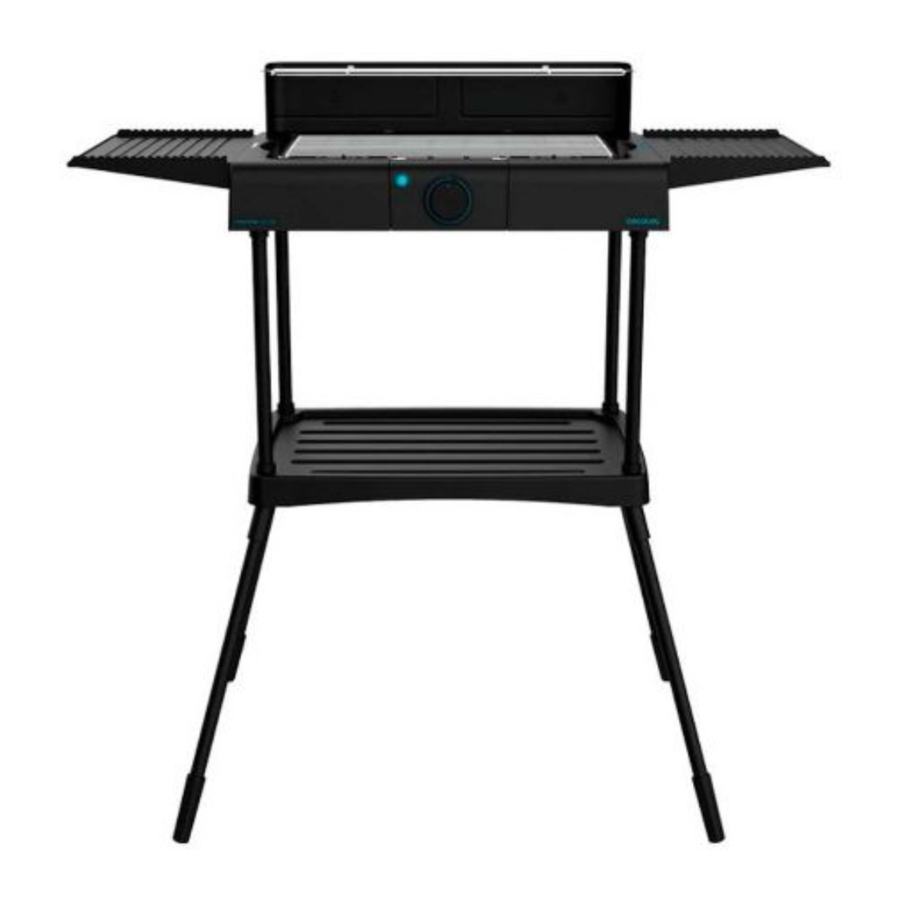
PARTS AND COMPONENTS

Fig. 1
- Main body
- Grease-collection tray
- Heating elements
- Grill
- Side trays
- Containment perimeters
- Upper tray
- Upper legs
- Lower tray
- Tube connectors
- Lower legs
- Legs support
- Power cord
- Temperature light indicator
- Temperature knob
NOTE:
The graphics in this manual are schematic representations and may not exactly match the product.
BEFORE USE
- This device is packaged in a way as to protect it during transport. Take the device out of its box and remove all packaging materials. You can keep the original box and other packaging elements in a safe place. This will help you prevent product damage when transporting it in the future. In case the original packaging is disposed of, make sure all packaging materials are recycled accordingly.
- Make sure all parts and components are included and in good conditions. If there is any piece missing or in bad conditions, contact the official Cecotec Technical Support Service immediately.
- Use a soft, damp cloth to clean the grill (4), upper tray (7) and the fat-drip tray (2).

Smoke might be observed during the first use due to residual manufacture waste. Make sure the grease-collection tray and the grill itself are clean and dry before switching the latter on.
PRODUCT ASSEMBLY

Fig. 2
- Always place the product on a flat, dry, and stable surface.
- Insert the fat-drip tray in the product's main body.
- Place the heating element inside the fat-drip tray.
- Place the grid on the heating element and the grease-collection tray, and adjust it as desired.
- Insert the side trays into the side rails as shown in figure 3. Press lightly until they are secured in place.
- Insert the containment perimeters into the back guides as shown in figure 3. Press down lightly to make sure they are secured in place.

Fig. 3 - Insert one of the lower legs into one part of the tube connectors and press until it is correctly fixed. Repeat this step for the remaining 3 legs. Fig. 4

Fig. 4 - When all the legs are properly engaged in the lower tray, place the product on the upper legs making sure that they are aligned with the holes on the bottom of the product to ensure the stability of the product.
- Insert the upper legs into the holes at the top of the lower tray. Repeat this step with the remaining 3 top legs and make sure they are fitted correctly. Fig. 5

Fig. 5


OPERATION
Once the product is properly assembled, fill in the grease-collection tray with water up to the "MAX" mark.
Always fill the tray with water during use in order to avoid the appearance of flames due to food's fat burning.
Set the thermostat to the desired temperature:
- Low or medium temperature for warming foods.
- High temperature for fast cooking or grilling.
- The light indicator will turn on when set and will turn off when the desired temperature is reached.
- Place food directly on the grid.
- Do not place plates, trays or aluminium foil directly on the grid.
- Grilling time will vary depending on the food thickness and type.
- It is suggested to turn over foods during the grilling process.
- When the cooking process is complete, remember to turn the temperature selector to "0" and unplug the power cord from the wall socket.
CLEANING AND MAINTENANCE
- Unplug the product and allow it to cool down before cleaning.
- Do not hold or transport the device while it is hot.
- Do not immerse the product in water or any other liquid.
- Never use strong detergents, petrol, abrasive powders, or a metal brush to clean any part of the product.
- Clean the product after every use. Use a soft, damp cloth to clean the grill (4), upper tray (7) and the fat-drip tray (2).
TROUBLESHOOTING
The heating elements are fitted with a safety switch which prevents them from operating outside the fat-drip tray. If the heating elements do not switch on, please check the connection in order to make sure that they are properly fitted into the housing.
TECHNICAL SPECIFICATIONS
Model: PerfectSteak 4250 Stand
Product reference: 03049
Power: 2200-2400 W
Voltage: 220-240 V~
Frequency: 50/60 Hz
Technical specifications may change without prior notification to improve product quality.
Documents / ResourcesDownload manual
Here you can download full pdf version of manual, it may contain additional safety instructions, warranty information, FCC rules, etc.
Download cecotec PERFECTSTEAK 4250 STAND (03049) - Electrical Barbeque Manual
Advertisement


Need help?
Do you have a question about the PERFECTSTEAK 4250 STAND and is the answer not in the manual?
Questions and answers