Advertisement
BOX CONTENTS
- STEREO|iO
- USB Cable
- Software CD
- Quickstart Guide
- Safety Instructions & Warranty Information booklet
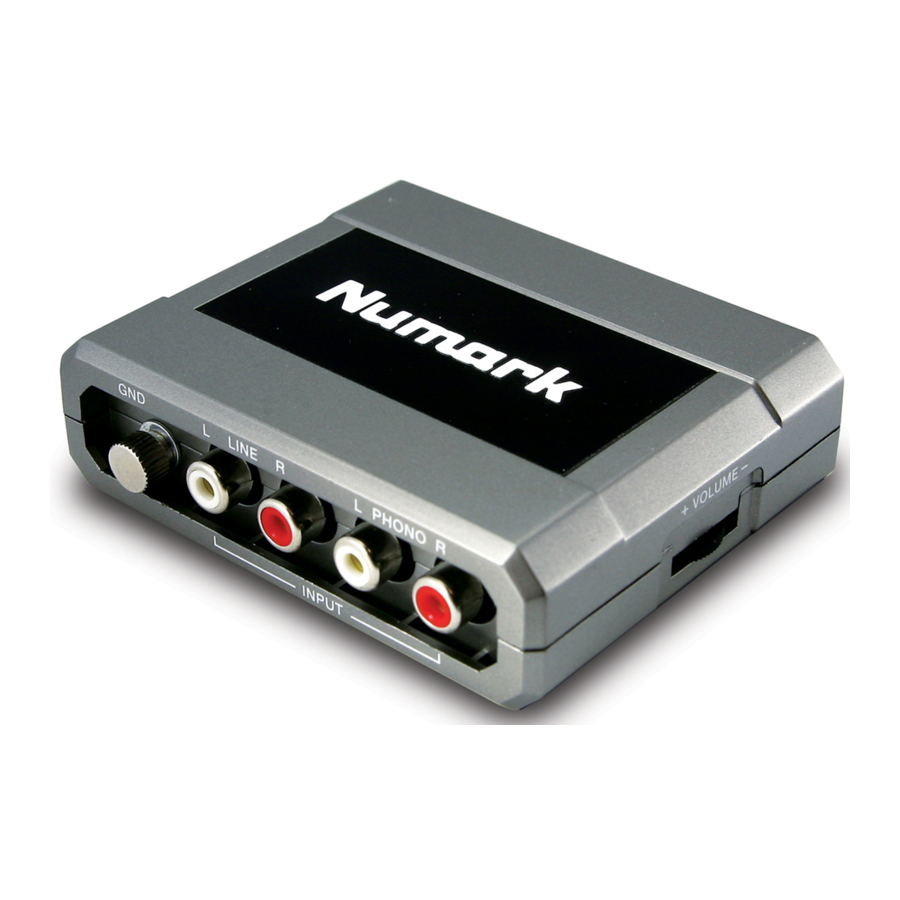
FEATURES

- PHONO INPUTS (RCA) – Connect phono-level devices, such as turntables, to these inputs.
- GROUNDING TERMINAL – If using phono-level turntables with a grounding wire, connect the grounding wire to these terminals. If you experience a low "hum" or "buzz", this could mean that your turntables are not grounded.
Note: Some turntables have a grounding wire built into the RCA connection and, therefore, nothing needs to be connected to the grounding terminal. - LINE INPUTS (RCA) – Connect line-level devices, such as CD players, samplers or audio interfaces, to these inputs.
- LINE | PHONO SWITCH – Flip this switch to the appropriate position, depending on the device connected to the LINE and PHONO INPUTS. If you are using phono-level turntables, set this switch to "PHONO" to provide the additional amplification needed for phonolevel signals. If using a line-level device, such as a CD player or sampler, set this switch to "LINE."
- LINE OUTPUTS (RCA) – Use standard RCA cables to connect this output to a speaker or amplifier system. The level of this output is controlled by the VOLUME dial.
- USB – Please use the supplied USB cable to connect this port to an available USB port on your computer. When plugged into your computer, the unit will draw power from the USB connection.
- USB LED – Illuminates when connected to your computer.
- VOLUME – Adjusts the audio level of the LINE OUTPUTS.
CONNECTION DIAGRAM
Be sure your audio software program is set up to receive audio via the STEREO|iO. This can usually be done in your software's "Preferences" or "Device Setup." Please consult your software manual for more information.

INCLUDED SOFTWARE
We have included two software applications to aid you in converting your recordings to digital music:
EZ Vinyl/Tape Converter (PC only) is the quickest and easiest way to turn your recordings into digital media. EZ Vinyl/Tape Converter conveniently saves your recordings in your iTunes* library. Novice users may find this application preferable. On the CD, we have included a handy Quickstart Guide with step-by-step instructions on software installation and operation.
EZ Audio Converter (Mac only) is a basic converter application for Mac OS X and is ideal for novice users. Please refer to the included Software Quickstart Guide for step-by-step instructions on software installation and operation.
AUDIO SETUP
WINDOWS 7:
- Use the included cable to connect the STEREO|iO to your computer.
- Go to Start Menu
![]() Control Panel
Control Panel ![]() Hardware and Sound
Hardware and Sound ![]() Sound.
Sound. - Click the Playback tab and select USB Audio Codec* as the default device.
- Click the Recording tab and select USB Audio Codec* as the default device.
- Click Properties in the lower right-hand corner.
- In the new window, click the Advanced tab and select 2-channel, 16-bit, 44100 Hz (CD Quality) as the default format.
- Uncheck both boxes under Exclusive Mode.
- Click the Levels tab and set the slider to "4."
- Click OK to close the Properties window.
- Click OK to close the Sound control panel.
 Control Panel
 * If you have other USB audio devices connected to your computer, which may have identical names, you may need to try selecting each one until the STEREO|iO is recognized.
If you experience too much latency after adjusting your software latency settings, we recommend the free ASIO4ALL (Audio Stream Input/Output) driver for PC at www.asio4all.com. ASIO drivers generally perform better and with lower latency since they create a more efficient communication between audio devices and software.
WINDOWS VISTA:
- Use the included cable to connect the STEREO|iO to your computer.
- Go to Start Menu
![]() Control Panel
Control Panel ![]() Sound. (If you don't see Sound, select Switch to Classic View, and the Sound Control Panel should become available.)
Sound. (If you don't see Sound, select Switch to Classic View, and the Sound Control Panel should become available.) - Click the Playback tab and select USB Audio Codec* as the default device.
- Click the Recording tab and select USB Audio Codec* as the default device.
- Click Properties in the lower right-hand corner.
- In the new window, click the Advanced tab and select 2-channel, 16-bit, 44100 Hz (CD Quality) as the default format.
- Uncheck both boxes under Exclusive Mode.
- Click OK to close the Properties window.
- Click OK to close the Sound control panel.
WINDOWS XP:
- Use the included cable to connect the STEREO|iO to your computer.
- Go to Start Menu
![]() Control Panel
Control Panel ![]() Sounds and Audio Devices.
Sounds and Audio Devices. - Click the Audio tab.
- Under Sound Playback and Sound Recording, select USB Audio Codec* as the default device.
- Click OK.
MAC:
- Use the included cable to connect the STEREO|iO to your computer.
- Go to Applications
![]() Utilities
Utilities ![]() Audio MIDI Setup.
Audio MIDI Setup. - In the Audio Devices tab under System Settings, select USB Audio Codec* as your Default Input and Default Output.
- Close the window.
Documents / Resources
References
Download manual
Here you can download full pdf version of manual, it may contain additional safety instructions, warranty information, FCC rules, etc.
Download Numark Stereo|iO - Analog-to-Digital DJ Interface Manual
Advertisement


Need help?
Do you have a question about the Stereo|iO and is the answer not in the manual?
Questions and answers