Numark Mixdeck Express Manual
- Quick start manual (52 pages) ,
- Quick start manual (11 pages)
Advertisement
Introduction
Box Contents
Mixdeck Express
Power Cable
USB Cable
Software Download Card
User Guide
Safety & Warranty Information Booklet
Support
For the latest information about this product (system requirements, compatibility information, etc.) and product registration, visit numark.com.
For additional product support, visit numark.com/support.
Quick Start
- Make sure all items listed in the Box Contents section are included in the box.
- READ SAFETY & WARRANTY INFORMATION BOOKLET BEFORE USING THE PRODUCT.
- Study the connection diagram in this guide.
- Place mixer in an appropriate position for operation.
- Make sure all devices are turned off and all faders and gain knobs are set to "zero."
- Connect all stereo input sources as indicated in the diagram.
- Connect the stereo outputs to power amplifier(s), tape decks, and/or other audio sources.
- Plug all devices into AC power.
- Switch everything on in the following order:
- Audio input sources (i.e. turntables, CD players, etc.)
- Mixer
- Last, any amplifiers or output devices
- When turning off, always reverse this operation by turning off:
- Amplifiers
- Mixer
- Last, any input devices
Connection Diagram
Here is an example of how to use your Mixdeck Express in your setup. Items not listed in Introduction > Box Contents are sold separately.

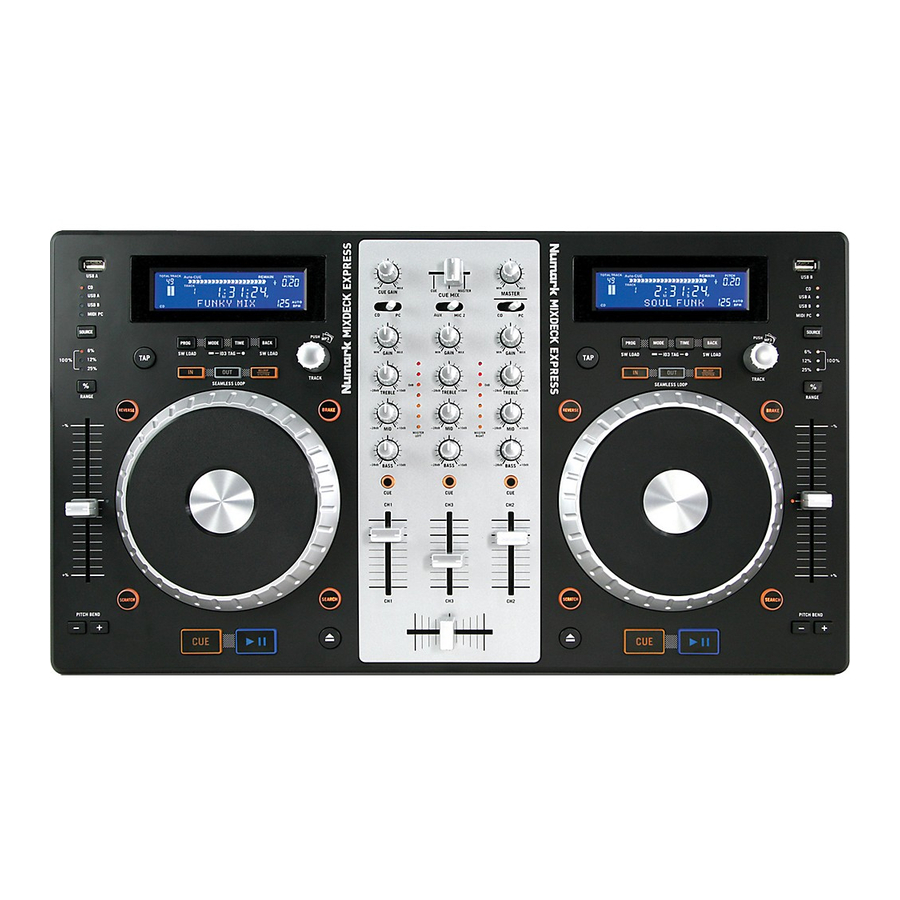
Features
Rear and Front Panel

- POWER BUTTON – Press this to turn the unit on and off.
- POWER IN – Use the included power adapter to connect the mixer to a power outlet. While the power is switched off, plug the power supply into the mixer first, then plug the power supply into a power outlet.
- USB SLAVE – Connect the Mixdeck Express to a computer via this USB jack and your Mixdeck Express can be used as a software controller device using USB MIDI protocol. You can also use Mixdeck Express as your computer's soundcard. (Remember to select Mixdeck Express as the playback device in your computer's sound settings. You can use Mixdeck Express as a soundcard with or without using it as a software controller.)
Note: The mixer controls do not have any MIDI function. - MASTER OUTPUT (BALANCED) –Connect this low-impedance XLR output to a PA system or powered monitors. The level of this output is controlled with the MASTER VOLUME on the top panel.
- MASTER OUTPUT (RCA) – Use standard RCA cables to connect this output to a speaker or amplifier system. The level of this output is controlled by the MASTER VOLUME on the top panel.
- AUX INPUTS (RCA) – Connect audio sources to these inputs. These inputs can accept both line and phono-level signals.
- LINE | PHONO SWITCH – Flip this switch to the appropriate position, depending on the device connected to the AUX INPUTS. If you are using phono-level turntables, set this switch to "PHONO" to provide the additional amplification needed for phono-level signals. If using a line-level device, such as a CD player or sampler, set this switch to "LINE."
- GROUNDING TERMINAL – If using phono-level turntables with a grounding wire, connect the grounding wire to these terminals. If you experience a low "hum" or "buzz", this could mean that your turntables are not grounded.
Note: Some turntables have a grounding wire built into the RCA connection and, therefore, nothing needs to be connected to the grounding terminal. - MIC 2 INPUT – Connect a 1/4" microphone to this input.
- STEREO / MONO – Adjusts the Program mix for stereo or mono operation.
- HEADPHONES – Connect your 1/4" or 1/8" headphones to this output for cueing and mix monitoring. Headphone output controls are located on the top panel.
- MIC INPUT – Connect a 1/4" microphone to this input.
- MIC GAIN – Adjusts the audio level of the microphone signal.
- MIC BASS – Adjusts the low (bass) frequencies of the microphone channel.
- MIC TREBLE – Adjusts the high (treble) frequencies of the microphone channel.
Tip: If you experience feedback when using a microphone at loud levels, try turning down the high frequencies.
Mixer

Note: The mixer controls do not have any MIDI function.
- MASTER VOLUME – Adjusts the output volume of the Program mix.
- CHANNEL GAIN – Adjusts the channel's pre-fader and pre-EQ gain level.
- CHANNEL TREBLE – Adjusts the high (treble) frequencies of the corresponding channel.
- CHANNEL MID – Adjusts the mid-range frequencies of the corresponding channel.
- CHANNEL BASS – Adjusts the low (bass) frequencies of the corresponding channel.
- INPUT SELECTOR – Selects the input source to be routed to the corresponding channel. Input jacks are located on the rear panel (plus the USB port on the top panel).
- CUE – Press this button to send this channel's pre-fader signal to the Cue Channel for monitoring. When engaged, the button will be lit.
- CHANNEL FADER – Adjusts the audio level on the corresponding channel.
- CROSSFADER – Blends audio playing between Channels 1 and 2. Sliding this to the left plays Channel 1 and sliding to the right plays Channel 2.
Note: The crossfader is user-replaceable if it should ever wear out. Simply remove the facepanel, then remove the screws holding it in position. Replace the fader with a quality authorized replacement from your local Numark retailer only. - CUE SLIDER – Previews the audio playing on Channels 1 and 2. Sliding this to the left plays Channel 1. Sliding to the right plays Channel 2.
- CUE GAIN – Adjusts the level of the headphone audio.
- LED METERS – Monitors the audio level of the Program mix.
Deck

- EJECT – Press this button to eject the CD. If a CD is currently playing, this button will have no effect.
- USB – Connect your favorite USB storage device to this connector to allow the Mixdeck Express to read and play back your music files. The Mixdeck Express only supports the MP3 format so please make sure that your audio files are encoded as MP3s if you would like to use them with the Mixdeck Express.
Note: Mixdeck Express supports the HFS+, FAT and NTFS files systems. HFS+ GUID Partition Table is not supported at this time. - SOURCE – Press the SOURCE button to choose which audio source you want to play; CD, USB A, USB B, or you can use the Mixdeck Express as a USB MIDI controller. This button will not function if the Mixdeck Express is currently playing.
- TRACK KNOB – Used to skip from track to track, for folder navigation and as an "enter" button.
- BACK – When navigating a CD or device with folders, this button will take you back to the previous level (folder).
- PLAY / PAUSE – Starts or resumes playback if the Deck is paused. Pauses playback if the Deck is playing.
- CUE – Returns and pauses the music at the last set cue point. The cue point is the last place in which the unit was paused and then PLAY was pressed. Pressing and holding a second time allows for temporary play of this point. You can easily edit the cue point by turning the wheel. As you rotate the wheel the music will sound. By stopping the wheel and pressing PLAY a new point is set.
- JOG WHEEL – The jog wheel serves many functions depending on its current mode.
- If a track is not playing, the JOG WHEEL will search slowly through a track's frames. To set a new cue point, rotate the JOG WHEEL then begin playback when you have determined the proper position. Press CUE to return to that cue point.
- If a track is playing, the JOG WHEEL will temporarily bend the pitch of the track. Rotating the JOG WHEEL clockwise temporarily speeds it up while rotating it counterclockwise slows it down. This is a useful tool for beatmatching.
- When the SEARCH button has been activated, rotating the JOG WHEEL will scan rapidly through the track.
- When the SCRATCH button has been activated, rotating the JOG WHEEL will "scratch" over the audio of the track, like a needle on a record.
- SCRATCH – Turns scratch mode on or off. If scratch mode is on, the button will light up and the center part of the jog wheel will scratch like a turntable when you spin it. If scratch mode is off, the center part of the jog wheel will pitch bend when you spin it.
- SEARCH – When engaged, search mode will allow you to use the center of the jog wheel to quickly scan through the current track. If you do not touch the wheel for 10 seconds you will automatically exit search mode.
- REVERSE – Press this button to reverse playback of the track (the button will be lit). Press it again to return to normal playback.
- BRAKE – Press this button to activate braking (the button will be lit). When braking is activated, pausing the track will cause playback to slow down before stopping, simulating the effect of stopping the motor of a turntable. Adjust the braking time by holding BRAKE (when braking is activated) and turning the JOG WHEEL.
- TAP – Pressing this button in time with the beat will help the built-in BPM counter detect the proper tempo. Holding the button for 2 seconds will cause the BPM counter to reset and recalculate.
- PITCH – The pitch button controls the range of the pitch fader. Press and release the pitch button to cycle through pitch fader settings of +/- 6%, 12%, 25% and 100%. You can also disable the pitch fader by pressing the pitch button again after selecting 100%.
- PITCH FADER – This controls the speed of the music. Moving towards the "+" will speed the music up, while moving towards the "-" will slow it down. The percentage of pitch adjustment is shown on the display.
- PITCH BEND – Allows you to briefly adjust the speed of the music faster or slower for as long as the button is held. Useful for quick speed adjustments to help match the beats of two songs that might be at the same tempo but have beats that hit at slightly different times.
- LOOP IN / OUT / RELOOP – These buttons are used to define your beginning and ending loop points (LOOP IN and LOOP OUT) or to replay or restart your loop (RELOOP). For more information about this feature please see the looping section of this manual.
- PROG (Program) – This button helps you create a program – a sequence of tracks to play continuously:
To create a program:- Press PROGRAM. "P–##" will flash on the LCD ("##" indicates what number that track occupies in the program – "P– 01," "P– 02," etc.)
- Turn the TRACK KNOB to select a track then press the TRACK KNOB to enter it into the program. Repeat this process to add more songs to the program.
- When finished, press PLAY to play the program or press PROGRAM to exit and return to normal play mode. (When a program is stored, "PROG" will be shown on the LCD.)
To play the program:- With a program stored, press PROGRAM. "P–##" will flash on the LCD. The total number of tracks in the program will be displayed to the left of the LCD (as "P##").
- Press PLAY to play the first track of the program. When playing a program, "PROG" will flash on the LCD.
To delete a program:- Press PROGRAM. "P– ##" will flash in the LCD.
- Press and hold PROGRAM. "PROG" will disappear from the LCD and you will return to the first playable track on your CD/device.
You can press and hold PROG and turn the TRACK KNOB to activate/deactivate fader start.
"FADER OFF": Fader start is deactivated. Both decks must be set to this for fader start to be deactivated.
"FADER PAU": Moving the crossfader towards one deck will start playback on that deck while pausing playback on the other deck. When the crossfader is moved back to the other deck, playback will resume from that point.
"FADER CUE": Moving the crossfader towards one deck will start playback on that deck while the opposite deck returns to its last set cue point. When the crossfader is moved back to the other deck, playback will resume from that cue point. Each deck must be set to "FADER CUE" for this feature to be enabled on that deck.
- TIME – Toggles the display to show elapsed time, time remaining on the current song, or time remaining of an entire audio CD.
To view ID3 tag information when playing MP3s, hold (PLAY) MODE and press TIME. - (PLAY) MODE – There are two playback modes:
Auto-Cue: Plays the selected song, then pauses and cues the next track.
Continuous: Plays all songs on the CD in order then repeats at the beginning.
Activate or deactivate Relay Play by holding MODE and turning the TRACK KNOB. When activated, Relay Play will cause the opposite deck to start playing whenever the currently playing deck stops. Playback will alternate between the two decks until one of the decks reaches the end of its disc or until Relay Play is deactivated. - LCD DISPLAY – All information and functions are displayed here.
LCD

- PLAY / PAUSE – This shows when the unit is playing or paused.
- CUE – Lit continuously when the unit is paused at a cue point.
- CD / USB / PC – Indicates whether you are playing tracks from a loaded CD (CD) or a connected USB device (USB). You can also connect the Mixdeck Express to a computer via USB to use the Mixdeck Express's CD decks as controllers for software programs that are compliant with USB MIDI protocol (PC).
- TRACK / FOLDER NUMBER – Shows the current track or folder number. When viewing or playing a program, the number will have a "P" in front of it ("P01," "P02," etc.), indicating the number of that track in the program.
- TOTAL TRACK – Displays the total number of tracks available on the CD or USB device. (When in Folder View, it will display the total number of folders available on the USB device.)
- MINUTES – Shows the minutes elapsed or remaining depending on mode setting.
- SECONDS – Shows the seconds elapsed or remaining depending on mode setting.
- FRAMES – The CD player breaks down a second into 75 frames for accurate cueing. This shows the frames elapsed or remaining depending on mode setting.
- TIME MODE – Indicates whether the time shown on the LCD is the elapsed time for the track, remaining time for the track, or total remaining time for the entire CD.
- TIME BAR – Shows either time remaining or elapsed depending on the setting of the TIME button.
- PLAY MODE – Shows when the unit is set to Auto-Cue Mode (the deck will stop at the end of each track) or Continuous Play Mode (the entire disc will be played without interruption). This function is controlled by the MODE button.
- RELOOP – Indicates when a loop is programmed.
- BPM – Displays the tempo in BPM (beats per minute) of the current track. When "AUTO BPM" is displayed, it is a tempo that has been automatically detected.
- PITCH – Shows the percentage change in pitch.
- PROG – Indicates that a program is playing.
- TEXT DISPLAY – Displays the folder name or file name when navigating MP3s.
Looping
The Mixdeck Express has a seamless looping feature, which means that if you define a loop, there is no delay when the music loops back to the beginning. This looping feature allows you to be very creative with your mixes, allowing you to extend desired sections of a song for as long as you want, or create remixes on the fly!
There are three buttons used for looping:
LOOP IN: This is the point where you would like a loop to start. By default, a "loop in" point is automatically set at the beginning of the song. To define a new "loop in" point, press the LOOP IN button when the song reaches the desired point where you would like a loop to begin. The LOOP IN button will light, indicating a new "loop in" point has been set. The RELOOP/STUTTER button will also illuminate indicating that you can now press it to immediately go back to the "loop in" point and begin playing. If you wish to change the "loop in" point, just press the LOOP IN button again.
LOOP OUT: Sets the end point of the loop. The first time you press LOOP OUT while a song is playing, the LOOP OUT button will blink, and the song will begin playing in a seamless loop, starting from the "loop in" point and ending at the "loop out" point. To release, or end the loop, press LOOP OUT a second time and play will continue forward when the song passes the previously set loop out point. The LOOP OUT button will then be continuously lit, indicating that the loop is now in memory for re-looping purposes.
RELOOP / STUTTER: Repeats play or "stutters" (if repeatedly tapped) from the loop in point. If a loop has previously been set, it plays and repeats that loop, until the loop is released by pressing the LOOP OUT button.
Press LOOP IN to set the beginning of the loop, then press LOOP OUT to set the end point of the loop. Once you press LOOP out, the Mixdeck Express will loop between these two points. If you press LOOP OUT again, the Mixdeck Express will exit the loop and continue playing normally.

If you press LOOP IN but then decide you want to set a different "loop in" point, just press LOOP IN again. Then press LOOP OUT to start looping between the IN and OUT points.

The "loop in" point can also be used as a way to "stutter" play beginning from a certain point in a song. Just press LOOP IN to set the "stutter point", then press RELOOP to begin play from the stutter point. Each time you press RELOOP the Mixdeck Express will jump back to the stutter point and play from that point.

USB Master Mode
By connecting a USB mass storage class device such as a USB hard drive, thumb drive or portable media player to the MASTER USB connector on the top of the Mixdeck Express, you can access, play, and scratch your music files in the same way you might play a normal audio CD.
Note: Mixdeck Express supports the HFS+, FAT and NTFS files systems. HFS+ GUID Partition Table is not supported at this time.
To access your USB device:
- First make sure it is connected to the USB MASTER connector on the top panel of the Mixdeck Express.
- Press the SOURCE button to choose which source you want to play: USB A or USB B.
- Press down on the TRACK knob.
- After the Mixdeck Express has first analyzed the partition structure (max 9 partitions), then analyzed the folder structure (max 999 folders) of the USB device, you can then navigate through your USB device by following the instructions below.
USB Mass Storage Device
To access files on a USB mass storage class device, use the TRACK knob to choose which folder you want to open, then press down on the knob to enter that folder. You can then use the TRACK knob to either navigate to another folder level or choose an audio file in the current folder that you want to play.
Hint: To organize a large music collection you might consider creating a separate folder for each artist.
Please note:
- Because not all MP3 devices are USB mass storage class, not every player will be compatible with the Mixdeck Express.
- If there are no MP3 files inside a folder you are browsing on your external device, the Mixdeck Express will display "No MP3 files in this folder, PLS try another one."
Tips For Using USB Devices With Your Mixdeck Express
- When disconnecting a USB device from the Mixdeck Express, always make sure to use the SOURCE button to switch to CD/MP3 Mode before disconnecting. Make sure that the letters "USB" are not blinking on the display when disconnecting a USB device.
- Disconnecting a USB device while the Mixdeck Express is in USB MASTER Mode could possibly cause data on the USB device to become corrupted and unreadable.
- Note: There is a limit of 999 songs per folder or playlist. Use multiple folders or playlists to separate large numbers of songs.
- We do not recommend using MP3 files over 300MB as this may affect the performace of the Mixdeck Express.
- For large capacity HD, the Mixdeck Express can read a maximum of 9 disc partitions. Each partition is limited to 999 folders, and each folder is limited to 999 songs.
USB MIDI Mode
You can also connect the Mixdeck Express to a computer via USB to use the Mixdeck Express's CD decks as controllers for software programs that are compliant with USB MIDI protocol. Check with your software manufacturer to find out if your software supports a USB MIDI controller.
Note: The mixer controls do not have any MIDI function.
To activate USB MIDI mode, connect a USB cable from the Mixdeck Express USB SLAVE connector to a USB port on your computer. Then press SOURCE to select "MIDI-PC" and press down on the TRACK KNOB.
Serato DJ Intro Map
If your Mixdeck Express came with Serato DJ Intro (or if you already own this version), refer to this control map to see what software features can be controlled by Mixdeck Express. (Note: The mixer controls do not have any MIDI function.)

- Play/Pause
- Cue
- Scratch Mode
- Search Mode
- Reverse
- Jog Wheel
- Pitch Fader
- Pitch Bend
- Pitch Range
- Play Mode
- Time Display
- Browser Back
- Loop In
- Loop Out
- Reloop
- Track Select (Push to enter)

VideosNumark Mixdeck Express Overview Video
Documents / Resources
References
Download manual
Here you can download full pdf version of manual, it may contain additional safety instructions, warranty information, FCC rules, etc.
Advertisement


Need help?
Do you have a question about the Mixdeck Express and is the answer not in the manual?
Questions and answers