Numark PT01 Scratch - Portable Turntable Manual
- User manual ,
- Quick start owner's manual (20 pages) ,
- Quick start owner's manual (12 pages)
Advertisement
Introduction
Box Contents
PT01 Scratch
USB Cable
Power Adapter
Software Download Card
User Guide
Safety & Warranty Manual
Support
For the latest information about this product (system requirements, compatibility information, etc.) and product registration, visit numark.com.
For additional product support, visit numark.com/support.
Setup
Items not listed under Introduction > Box Contents are sold separately.

PT01 Scratch can be powered by 6 D-cell batteries. Insert them into the battery compartment with their positive (+) poles toward the handle.

Alternatively, use the included power adapter to connect the power input to a power outlet.
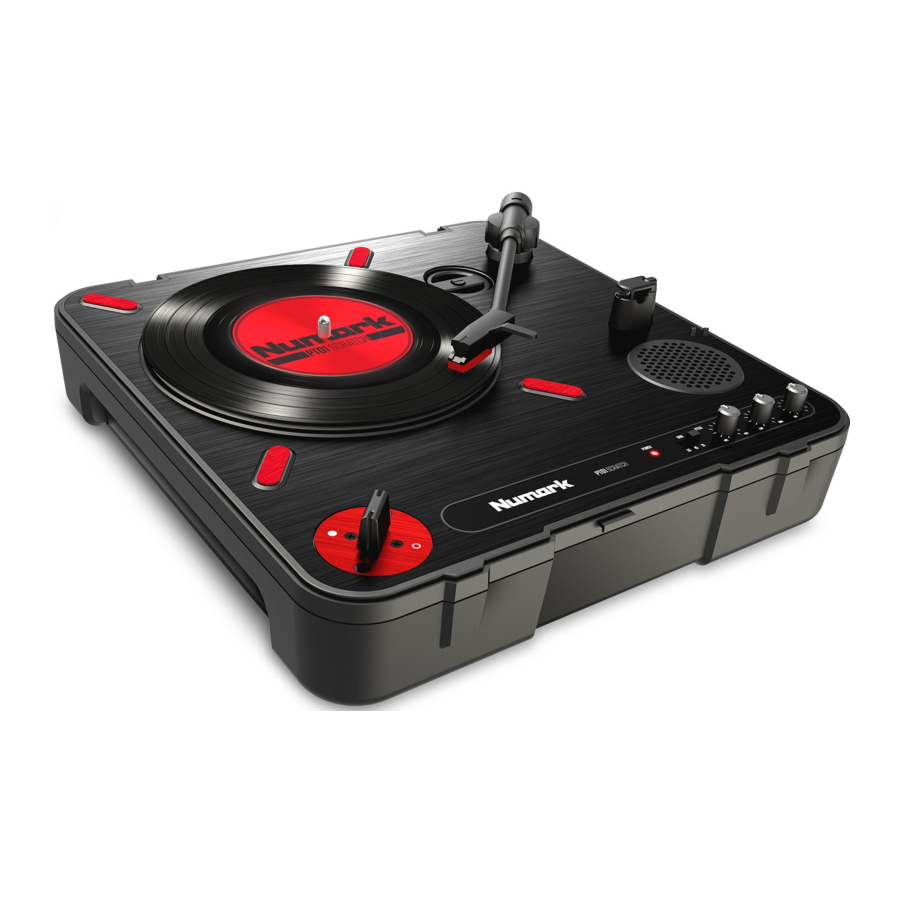
Features
Top Panel

- Power LED: This LED remains lit while the unit is powered on. To avoid wasting battery power, make sure the power is off when storing or transporting the unit.
- Platter: Place your record on the platter.
- Tonearm: This is a ready-to-use pre-balanced tonearm and cartridge. The cartridge is user-replaceable.
To play a record, unclip the tonearm clip, gently move the tonearm over your record on the platter, and lower the tonearm onto the record. The platter starts spinning once the tonearm is lifted over the record.
![]()
Remove the plastic cover from the cartridge before using it. - Tonearm Clip: Use this clip to secure the tonearm when storing and transporting the unit.
- RPM Selector: Use this switch to select the speed of the platter: 33⅓, 45, or 78 RPM. Please select the appropriate setting for the record you are playing; if the music comes out at an unusual pitch, this may indicate that the wrong RPM setting is selected.
- 45 RPM Adapter: Use this adapter when playing 45 RPM records.
- Pitch: Turn this knob to adjust the pitch of the music ±10%. In the center position, the pitch is 0%.
- Tone: Turn this knob to adjust the low and high frequency audio levels.
- Audio: Turn this knob to adjust the volume of the speaker, headphone outputs, and line outs.
Note: Make sure the Audio knob is set to Off when connecting any alternate audio output devices. - Speaker: This speaker outputs audio signal from the record and stereo input.
- Scratch Switch: Move this crossfader-style switch to mute or unmute the volume of the speaker, headphones outputs, and line outs. This emulates the DJ technique of "cutting" from one deck (turntable) to another.
Note: To adjust the angle of the Scratch switch, use a #5 screwdriver (screws have a 3.0 mm diameter) to remove the screws on either side of the switch, gently lift the circular plate upward, turn it to the desired angle, and reinsert the screws securely.

Side Panels

- Power Input: Use the included power adapter to connect this input to a power outlet, and then power on the unit. Alternatively, insert 6 D-cell batteries (not included) into the battery compartment on the underside of the turntable.
- Power Switch: Use this switch to turn power on and off.
- Line Outs (RCA): Connect these line-level outputs to the inputs of an external audio device (mixer, PA system, powered speaker, etc.). Use the Audio knob to control the level of the output signal.
- Headphone Outputs (1/4", 1/8" / 6.35 mm, 3.5 mm): Connect stereo headphones to either of these audio outputs.
![]()
To avoid hearing damage, set the Audio knob to the Off position before connecting headphones to either of these outputs. - Gain: Turn this knob to adjust the gain level of the stereo input. If the audio signal is too quiet or too loud, use this knob to adjust the gain.
- Stereo Input (1/8" / 3.5 mm): Connect this input to an additional audio device (computer, smartphone, tablet, etc.). Use the Gain knob and your audio device's volume control to set the level of the input signal. While using this input, make sure that your line outs are connected to an external audio device and that the cables are not in contact with metal.
Note: The stereo input signal is sent to the line outs, not to your computer (through the USB port). - USB Port: Use the included USB cable to connect this USB port to your computer. Please note that the turntable cannot be powered through the USB connection. The signal from the stereo input is not sent over this connection.
Documents / Resources
References
Download manual
Here you can download full pdf version of manual, it may contain additional safety instructions, warranty information, FCC rules, etc.
Advertisement


Need help?
Do you have a question about the PT01 Scratch and is the answer not in the manual?
Questions and answers