Numark Stealth Control - DJ Controller Manual
- Quick start manual (25 pages) ,
- Quick start manual (25 pages)
Advertisement
INTRODUCTION
This Quickstart Guide explains how to quickly setup and begin using the Numark STEALTH CONTROL DJ system. Please take a few minutes to go through this Quickstart and get familiar with the setup procedure and basic controls.
We have designed STEALTH CONTROL as a complete system for software-based DJs. STEALTH CONTROL is a MIDI-compliant device and can be used with any software which supports the MIDI protocol. We have included two software packages – Native Instruments' Traktor LE and MixMeister Fusion Live – enabling you to DJ right out of the box.
We also highly recommend reading the software reference manuals, included on the installation disc, in order to take full advantage of STEALTH CONTROL. Happy DJing!
A NOTE ABOUT MIDI CONTROL
The Stealth Control was designed as a MIDI-compliant device, allowing you to control any computer application which supports the MIDI protocol. This means that you can not only use the Stealth Control with the included software, but can also use the controller with a variety of other music and video applications as well. In order to use the Stealth Control with your favorite software, you will have to enable the Stealth Control as a MIDI input device in your software's preferences. Please note that depending on your software, the Stealth Control may not necessarily show up as "Stealth Control" in the MIDI preferences.
Please Note: If you are using the Stealth Control with a USB hub, we recommend that you either use a powered hub, or the optional 6V 1A power adapter. This will ensure proper operation.
BOX CONTENTS
- „STEALTH CONTROL
- „ QUICKSTART MANUAL
- SAFETY & WARRANTY INFORMATION
- USB CABLE
- „TRAKTOR LE CD
- „MIXMEISTER FUSION LIVE COUPON
CONNECTION DIAGRAM

Please study the connection diagram above.
Connect the STEALTH CONTROL's USB PORT to an available USB port on your computer, using the included USB cable. The STEALTH CONTROL will be powered through your computer's USB bus.
(Optional) You can power the STEALTH CONTROL by connecting an optional 6V 1A power adapter to the DC IN input on the STEALTH CONTROL. Please note that it is not necessary to have the adapter plugged in for the STEALTH CONTROL to work. However, you should connect this adapter if your computer is not able to supply enough power to the STEALTH CONTROL.
REAR PANEL CONNECTIONS

- USB PORT – Please use the supplied USB cable to connect this port to an available USB port on your computer. When plugged into your computer, the unit will draw power from the USB connection.
- DC IN – If your computer does not supply enough power through the USB bus, you may wish to power the unit externally by connecting an optional 6V/1A adapter to this input and plugging the adapter into a power supply.
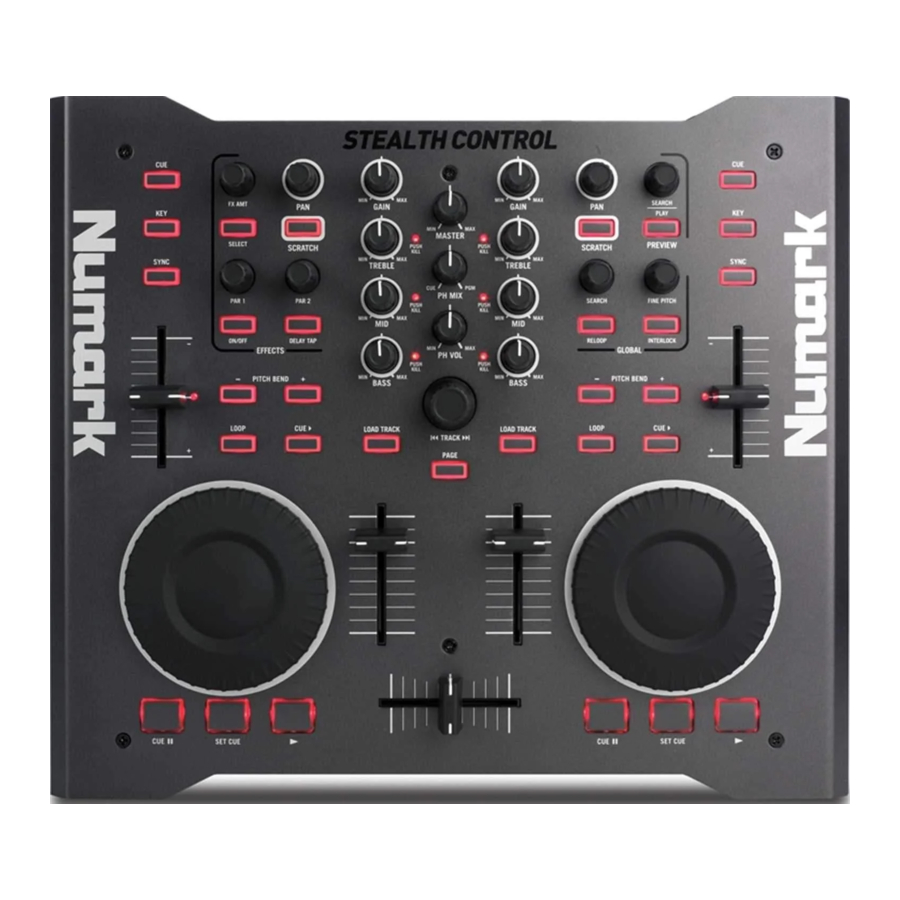
TRAKTOR LE CONTROLLER MAPPING

- TRACK – You can use the TRACK knob to scroll through the music on your computer. Press down on the TRACK knob to preview the selected track.
- DIRECTORY – Pressing this button toggles between the Browser Tree Window and List Window so you can browse and select your tracks within the folders.
- LOAD TRACK – Each virtual deck features a LOAD TRACK button. Selecting a track and pressing the LOAD TRACK button will load the track to the corresponding deck.
- CUE – The CUE button will return and pause the track at the last set cue point. For temporary play of the cue point, you can hold down the CUE button. The track will play for as long as the button is held down and will return to the cue point once it has been released.
- SET CUE - You can use this button to set a new cue point.
- PLAY / PAUSE – Press to begin playing or to pause the track.
- JOG WHEEL – When the deck is stopped, the JOG WHEEL will scratch the selected track. When the deck is playing, the JOG WHEEL will bend the track's pitch.
- VOLUME – Adjusts the volume of the corresponding deck.
- CROSSFADER – Fades between the two tracks playing on the virtual decks. If the crossfader is in the left-most position, you will only hear the audio from Deck A. If the crossfader is in the right-most position, you will only be able to hear the audio from Deck B. When the crossfader is in a point between the two, you will hear both Decks.
- GAIN – Adjusts the gain level of the corresponding deck.
- EQ – Use these knobs to adjust the levels of the Treble, Mid, and Bass frequencies on each deck. Pressing down on an EQ knob makes it function like a "kill switch," removing that frequency band from the music on that deck. The LED next to the knob will illuminate when the Kill feature is engaged. To disengage it press the knob again.
- MASTER – Controls the Master level, allowing you to change the overall volume of the mix.
- PH MIX – Adjusts the balance between the Monitor and Master channels in the headphones. Please note that, unless you are using a multiple output audio interface, the Monitor and Master Mix channels will be the same.
- PH VOL – This knob adjusts the headphone mix level. Please note that, unless you are using a multiple-output audio interface, the Monitor and Master Mix channels will be the same.
- PFL – Press the PFL button to send the music playing on the deck to the Monitor channel. Please note that if you are not using a multiple-output audio interface, the Monitor and Master Mix channels will be the same.
- PITCH – Changes the pitch or tempo of the music playing on that deck.
- FINE PITCH – Makes fine pitch adjustments to the music on the deck.
- TAP – Tap this button in time with the beats of the music on that deck. This will enter a new BPM ("beats per minute") reading for that track.
- KEY – Engages the Master Tempo feature, which locks the musical key of the track to the original key (as if it were playing with 0% pitch adjustment). You can then adjust the tempo of the track without affecting its key or pitch.
- SYNC – Synchronizes the music playing on that deck to the music playing on the other deck.
- PITCH BEND -/+ – You can use these two pitch bend buttons to temporarily adjust the pitch and tempo of the music playing on the corresponding deck. Pitch bend is typically used to make small adjustments when mixing two tracks so their beats occur synchronously.
- LOOP IN – Press this button to set the starting point of a loop.
- LOOP OUT – Press this button (after pressing LOOP IN) to set the ending point of a loop. Once you press it, you will jump back to the Loop In point and the loop will be active. To turn a loop off, simply press LOOP OUT again.
- FX AMT – Adjusts how much of the selected effect will be heard in the Master Mix. If the knob is all the way down, you will hear only the original ("dry") sound. If the knob is all the way up, you will hear the maximum amount of effected ("wet") sound.
- SELECT – Selects an effect to be applied to the Master Mix.
- PAR – Adjusts the amount of the designated Effect Parameter. Please note that this parameter will vary depending on the selected effect.
- ON / OFF – Press this button to turn the master effect on and off.
- FILTER AMT – Adjusts the amount of filter applied to the music on that deck. The center position is zero. Turning the knob clockwise will increase the amount of high-pass filter. Turning the knob counter-clockwise will increase the amount of low-pass filter.
- FILTER ON / OFF – Activates or deactivates the filter on that deck.
Documents / ResourcesDownload manual
Here you can download full pdf version of manual, it may contain additional safety instructions, warranty information, FCC rules, etc.
Advertisement


Need help?
Do you have a question about the Stealth Control and is the answer not in the manual?
Questions and answers