Advertisement
This assembly manual contains important safety information. Please read and keep for future reference.
Useful Hints Before You Start
1. Read each step carefully before starting.
2. Before beginning assembly, identify, sort and count the parts.
3. Using the wrong screw will cause damage.
4. Using incompatible hardware might cause damage to product.
5. It is important that each step is performed in correct order to avoid difficulties.
6. Assemble your furniture on packaging cardboard to prevent scratches or damage.
7. Do not tighten any screws or bolt until the unit is completely assembled.
8. Keep all hardware parts out of reach of children.
Distributed exclusively by COE Distributing!
Tel: 800-388-8202 (Mon-Fri | 9am-5pm EST.)
Model No.:
OSHA2001
Description:
2 Leg Square Single Stage Single
Motor w/ Conventional Base
Customer Service
Advertisement
Table of Contents

Related Manuals for OfficeSource OSHA2001


Summary of Contents for OfficeSource OSHA2001
- Page 1 Customer Service Tel: 800-388-8202 (Mon-Fri | 9am-5pm EST.) This assembly manual contains important safety information. Please read and keep for future reference. Model No.: OSHA2001 Description: 2 Leg Square Single Stage Single Motor w/ Conventional Base Useful Hints Before You Start 1.
-
Page 2: Hardware List
Please read completely through the instructions and verify that all listed parts and hardware are present before beginning assembly. Hardware List M6× 12X) M6× 3 M ×20 12X) ST2.9×13(2X) ST3.5×16(2X) Allen Key (1x) Parts List Left Leg (1x) Right Leg (1x) Beam (1x) Foot (2x) Connecting Rod (1x) - Page 3 Use Screws (A) to secure the Beam (3) to the Left & Right Leg (1&2) by using the Allen Key (F). Use Screws (B) to attach the Side Beam (4) to the Left & Right Leg (1&2). Distributed exclusively by COE Distributing!
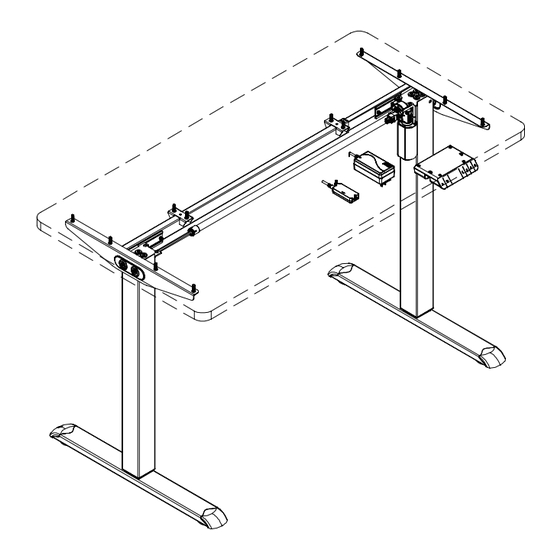
- Page 4 Assembling the Connecting Rod (6): 1. Insert the hexagonal rod at the left end of the Connecting Rod (6) into the hole of the Left Leg (1). The hole end of the Left Leg (1) has a buckle. 2. Pull the fastener on the right end of the Connecting Rod (6) to wrap the connector of the hexagonal rod on the Right Leg (2).
- Page 5 Fix the desktop to the base by using Screws (C). Attach Hand Control (8) by using Screws (D) and Gyro (9) by using Screws (E). Plug Gyro (9) into Hand Control (8) using supplied cord. Plug Power (7) into the wall to complete setup. Distributed exclusively by COE Distributing!
-
Page 6: Care And Maintenance
Maximum Recommended Weight Loads 176 lbs. (Includes Desk Top) Care & Maintenance ▪ Check bolts/screws periodically and tighten them if necessary. ▪ Use a soft, clean cloth that will not scratch the surface when dusting. ▪ Clean the product with mild cleanser using a soft damp cloth. Do not use harsh or abrasive cleanser. ▪... - Page 7 Handset Control Manual A. Definitions of Functions Distributed exclusively by COE Distributing!
- Page 8 Distributed exclusively by COE Distributing!
-
Page 9: Initialization Steps
Handset Control Manual B. Handset Normal Operation Manual 1. Initialization Steps 1. The Initialization procedure must be completed before first running after the table is installed or parts replaced 2. Any interruption in initialization will cause system to stop and request re-initialization 2. - Page 10 5. Set up stroke limit of rising and lowering 5a. Lock the up stroke The column cannot run higher than the locking height Setting the highest stroke limit will erase memory positions higher than the locking height. You must reset the memory positions The locking height will not be unlocked after initialization 5b.
- Page 11 8. Exchange of imperial system and metric system 9. Correct display height to office table height 1. Check whether the handset display format matches the measured height data, either in centimeters or inches. in imperial display format, the minimum height adjustment unit is 0.5 inches. In metric display format, the minimum height adjustment unit is 1cm.
- Page 12 10. Error code Distributed exclusively by COE Distributing!
Need help?
Do you have a question about the OSHA2001 and is the answer not in the manual?
Questions and answers