Advertisement
- 1 Before Use
- 2 Connections
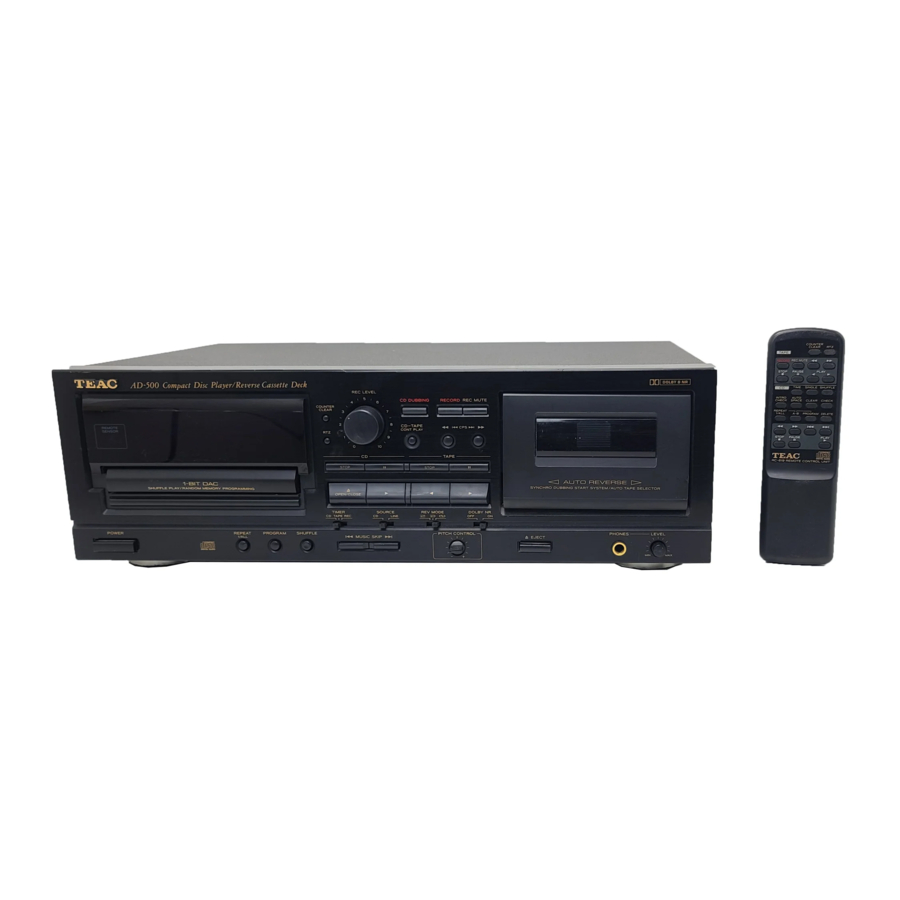
- 3 Name of Each Control
- 4 CD Player
- 5 Cassette Deck Operation
- 6 Copying from CD to Tape
- 7 Continuous Playback between CD and Tape
- 8 Timer-controlled operation
-
9
Troubleshooting
- 9.1 No power when POWER is pressed
- 9.2 Hum
- 9.3 Noise in tuner
- 9.4 No audio output
- 9.5 Remote control unit operation is impossible
- 9.6 No playback when disc is loaded
- 9.7 No audio output
- 9.8 No CD output
- 9.9 A single tune can only be played
- 9.10 No program playback
- 9.11 Mistracking (sound jumping)
- 9.12 Low sound quality
- 10 Maintenance
- 11 Specifications
- 12 IMPORTANT SAFETY INSTRUCTIONS
- 13 SAFETY INFORMATION
- 14 Documents / Resources
Before Use
Read This Before Operating
- Choose the installation location of your unit carefully. Avoid placing it in direct sunlight or close to a source of heat. Also avoid locations subject to vibrations and excessive dust, heat, cold or moisture. Keep away from such sources that hum, such as transformers or motors.
- Do not open the cabinet as this might result in damage to the circuitry or electrical shock. If a foreign object should get into the set, contact your dealer.
- When removing the power plug from the wall outlet, always pull directly on the plug, never yank the cord.
- Be sure not to handle discs with dirty fingers. Never insert a disc which has a crack on the surface.
- Do not attempt to clean the unit with chemical solvents as this might damage the finish. Use a clean, dry cloth.
- Keep this manual in a safe place for future reference.
Handling the Tapes
Do not store tapes in the following places:
- On top of heaters, exposed to direct sunlight or in any other places with high temperatures.
- Near speakers, on TV sets or amplifiers or where they would be exposed to strong magnetic fields.
- Where humidity is high and in dirty, dusty places.
- Avoid dropping or subjecting cassettes to excessive shocks.
- As C-120 tapes are physically weak and could become entangled in the transport mechanism, do not use them.
Cassette Tape
Tape Selection:
For the automatic tape select function to work properly, metal and chrome (cobalt) tapes must have identification holes.
*Dolby noise reduction manufactered under license from Dolby Laboratories Licensing Corporation.
Handling the Discs
This unit has been designed specifically for reproduction of compact discs bearing the " " mark. No other discs can be reproduced.
- Always place the compact disc in the disc tray with the label facing upward. (Compact discs can be played only on one side.)
- To remove a disc from its storage case, press down on the center of the case and lift the disc out, holding it carefully by the edges.
![]()
- Fingerprints and dust should be carefully wiped off the disc's recorded surface with a soft cloth.
![]()
- Do not use thinner, benzine or alcohol as they damage the surface of the disc's plastic surface.
- Discs should be returned to their cases after use to avoid serious scratches that could cause the laser pickup to "skip."
- Do not expose discs to direct sunlight or high humidity and temperature for extended periods. Long exposure to high temperatures can warp the disc.
- Do not stick paper or write anything with a ballpoint pen on the surface of the label side.


Remote control unit
When operating the remote control unit, point it towards the remote sensor on the front panel of the unit.
Battery Installation

- Remove the battery compartment cover.
- Insert two "AA" (R6, SUM-3) dry batteries.
Make sure that the batteries are inserted with their positive![]() and negative
and negative ![]() poles positioned correctly.
poles positioned correctly. - Close the cover until it clicks.
 and negative
  poles positioned correctly.
Battery Replacement.
If you notice that the distance between the remote control unit and the unit for correct operation becomes shorter, it indicates that the batteries are exhausted. In this case replace the batteries with new ones.
Precautions concerning batteries
- Be sure to insert the batteries with correct positive
![]() and negative
and negative ![]() polarities.
polarities. - Use batteries of the same type. Never use different types of batteries together.
- Rechargeable and non-rechargeable batteries can be used. Refer to the precautions on their labels.
- When the remote control unit is not to be used for a long time (more than a month), remove the batteries from the remote control unit to prevent them from leaking. If they leak, wipe away the liquid inside the battery compartment and replace the batteries with new ones.
- Do not heat or disassemble batteries and never dispose of old batteries by throwing them in fire.
Voltage Conversion
(For general export models)
Be sure to remove the power cord from the AC outlet before repositioning the voltage converter switch.
- Locate the voltage selector on the rear panel.
- Using a flat-bladed screwdriver, set to the appropriate 230 V or 120 V position according to your area.

(for U.K. Customers)
DO NOT cut off the mains plug from this equipment. If the plug fitted is not suitable for the power points in your home or the cable is too short to reach a power point, then obtain an appropriate safety approved extension lead or consult your dealer.
If nonetheless the mains plug is cut off, remove the fuse and dispose of the plug immediately, to avoid a possible shock hazard by inadvertent connection to the mains supply.
If this product is not provided with a mains plug, or one has to be fitted, then follow the instructions given below:
DO NOT make any connection to the larger terminal which is marked with the letter E or by the safety earth symbol ç or coloured GREEN or GREEN-and-YELLOW.
The wires in the mains lead on this product are coloured in accordance with the following code:
| BLUE: | NEUTRAL |
| BROWN: | LIVE |
As these colours may not correspond with the coloured markings identifying the terminals in your plug proceed as follows:
The wire which is coloured BLUE must be connected to the terminal which is marked with the letter N or coloured BLACK.
The wire which is coloured BROWN must be connected to the terminal which is marked with the letter L or coloured RED.
When replacing the fuse only a correctly rated approved type should be used and be sure to re-fit the fuse cover.
IF IN DOUBT — CONSULT A COMPETENT ELECTRICIAN.
Connections
- Before connection, turn off all components and pay special attention to left (L) and right (R) channel indications.
- Read the owner's manual of each component you intend to use with this unit.
Signal cords
LINE IN / OUT terminals
Connect the LINE IN terminals to the TAPE REC terminals and connect the LINE OUT terminals to the TAPE PLAY terminals of the stereo amplifier using RCA pin plug cords.
- LINE OUT terminals output the compact disc or cassette deck tape signal. When both compact disc and tape are played back, the tape sound has priority.
CD LINE OUT terminals
Connect the CD LINE OUT terminals to the CD, DAT or AUX terminals of the stereo amplifier using RCA pin plug cords.
- CD LINE OUT terminals always output the disc signal.

If the CD player interferes with the tuner, TV reciever, etc., allow a reasonable distance between them.
Power cord
Be sure to connect the power cord to an AC outlet which supplies the correct voltage.
Headphones
When using headphones, connect the headphone plug into the PHONES jack.
- Adjust the level of the signals output from the phones jack.

Name of Each Control


- POWER switch
- REMOTE SENSOR
- Multi-function display window
- REPEAT indicator
- Auto space indicator (A. SPACE)
- DELETE indicator
- Time mode indicator
- Program indicator (PGM)
- SHUFFLE indicator
- CD input indicator (IN)
- TAPE/CD indicator
- REC indicator
- Tape PLAY indicator
- Level meter
- Tape counter
- INTRO play indicator
- CD pause/play indicator (
![]() )
) - Track indicator
- Time counter
- DUB indicator
- Tape reverse/pause/forward indicator (
![]() )
) - Music calendar
- OPEN/CLOSE button
- CD play button (
![]() )
) - CD STOP button
- CD pause button (
![]() )
)

 )
) 

- Return-To-Zero button (RTZ)
- Counter clear button (CLEAR)
- REC LEVEL control
- Continuous play button (CD-TAPE CONT PLAY)
- CD DUBBING button
- RECORD button
- REC MUTE button
- Rewind and fast forward/CPS buttons (
![]() CPS
CPS![]() )
) - Tape STOP button
- Tape pause button (
![]() )
) - Cassette holder
- Disc tray
- REPEAT 1/ALL button
- PROGRAM button
- SHUFFLE button
- TIMER switch
- MUSIC SKIP buttons (
![]() )
) - SOURCE switch
- Reverse mode switch (REV MODE)
- PITCH CONTROL knob
- DOLBY NR switch
- EJECT button
- Tape play buttons (
![]() )
) - PHONES jack
- Headphones LEVEL knob
- TIME button
- INTRO CHECK button
- AUTO SPACE button
- A-B button
- CD SEARCH buttons (
![]() )
) - SINGLE button
- CHECK button
- CLEAR button
- DELETE button
 CPS
CPS )
)  )
) CD Player
Basic Operation
- Press the POWER switch.
![]()
- Press the OPEN/CLOSE button.
![]()
The disc tray will slide out. Place the disc gently on the tray with its label side facing upward. The disc is set within the disc guides at the center of the tray.
![]()
- Press the OPEN/CLOSE button again.The disc tray will close. Several seconds later, the following information is displayed.
![]()
- Press the CD PLAY (
![]() ) button.
) button.
Disc playback starts from the first track, and the![]() (play) indicator will light.
(play) indicator will light.
![]()
- During playback, the number of the currently played tune blinks on the music calendar.
- When tunes have been played, their numbers will disappear from the Music Calendar display.


Even if the disc tray is open...
When the  button is pressed:
The disc tray will close and playback starts from the first track.

To stop playback
Press the STOP button. The player enters the Stop mode.

To unload the disc:
Press the OPEN/CLOSE button; playback stops and the disc tray will slide out, and all functions are reset to their initial settings.

To temporarily suspend playback (Pause mode):
Press the  button. Playback stops at the current position and the indicator lights steadily. To resume playback from the same position, press the or button.

- Do not force the tray by hand during opening and closing operations.
Music Search Operation
Music search using MUSIC SKIP buttons ( )
)
The beginning of any tune can be easily located using the MUSIC SKIP buttons. This operation is indicated clearly in the TRACK display.
- This operation is possible even in the Program Playback mode. However, only programmed tunes will be detected.
To skip to the next tune
Press the button.
The player will skip ahead to the next tune each time the button is pressed. The player can be advanced to the last tune this way, but once the beginning of the last tune is reached, the player will not advance even if the button is pressed.

To skip back to the previous tune
Press the  button.
The player will skip back one tune each time the button is pressed. If this button is pressed in the middle of a tune, the player will skip back to the beginning of the current tune. To make it skip back to the previous tune, the button must be pressed twice. In this way, the player can be returned to the beginning of the first tune on the disc.

Music search using SEARCH buttons ( )
)
During playback or in the Pause mode, hold down the  button of the remote control or the button of the main unit to move the playing position quickly in the forward direction, and hold down the
  button of the remote control or the button of the main unit to move quickly in the reverse direction.
During the manual search operation, sound will be audible but the output level will be lowered. This lets you search for any required portion while checking the sound. When the desired position is reached, release the button to reenter the previous mode.

Program Playback
The program playback function allows you to program up to 20 tunes (tracks) for playback in any desired order.
Programming required tunes
Example
To program tunes in the order 5  2 8 in the Stop mode.
- Press the STOP button.
- Press the PROGRAM button.
The player enters the Program mode. The PGM indicator lights in the display.
![]()
- Alternately press the
![]() MUSIC SKIP
MUSIC SKIP ![]() button(s) and the PROGRAM button in the following order.
button(s) and the PROGRAM button in the following order.
![]()
- Press the
![]() button. Programmed playback starts from the first programmed tune.
button. Programmed playback starts from the first programmed tune.
![]()


- Programming tunes is possible only when the player is in the Stop mode.
- The programmed contents will be held in memory even after programmed playback has been completed or when programmed playback is stopped by pressing the STOP button.
- When the STOP button is pressed in the stop mode, the contents of the program are erased.
- To release the program mode, press the program button again.
- During program playback, the TOTAL REMAIN time display shows the total remaining time of the programmed tunes, from the current position.
- If tunes with numbers higher than 32 are programmed, TOTAL time may not appear in the display. ("nn: nn" appears in the display)
To display the total program time
In the Program mode, press the TIME button to display the total program time. Pressing the TIME button again will return the CD player to the Program mode.
![]()
To review the program contents
- Press the CHECK button in the Programmode.
The first programmed track number will light and "P-01" will blink in the display. - Each time the CHECK button is pressed, the next programmed track number will light.
"P-XX (Program number)" will blink in the display.
- When the last programmed track number is displayed, pressing the CHECK button will return the CD player to the Program mode, allowing you to add tracks to the program.
- The track numbers stored in the program memory will be displayed on the Music Calendar. However, please note that the Calendar can handle only up to track 20. If higher track numbers are entered in the Program memory, the OVER indicator will light.
To cancel a programmed track
Pressing the CLEAR button will cancel the last programmed track.
![]()
Delete programming
This is the opposite to normal programming, and is used to program tunes which are not to be played. Use it when there are tunes on the disc you don't want to listen to.
- Press the STOP button.
- Press the DELETE button.The CD player enters the Delete Program mode.
The "DELETE" and "PGM" indicators light in the display. - Alternately press the
![]() MUSIC
MUSIC![]() button(s) and the PROGRAM button in any desired order.
button(s) and the PROGRAM button in any desired order. - Press the PLAY button.
Delete-programmed playback starts.
- In the Delete-Program mode, pressing the TIME button will display the total time of the non-deleted tracks. Pressing the TIME button again will return the player to the Delete-Program mode.
- Pressing the CHECK button in the Delete-Program mode will display the first deleted track number.
Each time the CHECK button is pressed, the next deleted track number will be displayed. When the last deleted track number is displayed, pressing the CHECK button will return the player to the Delete-Program mode, allowing you to delete other tracks. - Pressing the CLEAR button will cancel the last delete-programmed track.
- Pressing the STOP button when the player is stopped will clear the deleteprogram memory.
RANDOM Playback
- Press the SHUFFLE button in the Stop mode.
The SHUFFLE indicator lights in the display.
![]()
- Press the CD PLAY button.Tracks will be randomly selected and played back.
![]()

- Press the
![]() button with the random play function engaged to select a tune at random. Press the
button with the random play function engaged to select a tune at random. Press the ![]() button to replay the currently played tune from its beginning.
button to replay the currently played tune from its beginning. - A tune cannot be replayed after it has been played in this mode.
- To release the random play function while it is engaged, press the SHUFFLE button again. Tunes will play back in their normal designated order, starting from the currently played tune.
Repeat Function
The repeat function allows repeat playback of any single tune, the entire disc, or any desired portion on the disc designated by two (start and end) points.
- The repeat functions can be released by pressing the repeat button again.
To repeat one tune (Single Repeat mode)
- Press the REPEAT 1/ALL button. The REPEAT and SINGLE indicators light.
![]()
- Select the required tune by pressing the
![]() button.
button.
The selected tune is played, then when the end of the tune is reached, the player will return to the beginning of the tune and playback starts again. In this way, the selected tune will be played back repeatedly.
![]()
To repeat an entire disc (All Repeat mode)
- Press the REPEAT 1/ALL button twice.The REPEAT and ALL indicators light.
- Press the PLAY button. Playback starts and, when the end of the disc is reached, the player will return to the beginning of the first tune, and then playback continues repeatedly.
To repeat a designated section (A-B Repeat mode)
- Start playback from any point before the section to be designated.
- Designate the point at which repeat playback should start (point A) by pressing the A-B button.
The REPEAT and A - indicators light and the B indicator blinks to show that point A has been entered.
![]()
- When the portion at which repeat playback should end is reached, press the A-B button again to designate point B.
The B indicator is changed to light steadily to show that the A-B repeat function has been activated.
The player automatically returns to point A and restarts playback. When play reaches point B, the player returns to point A and starts playback again, repeatedly.
- After designating point A, when quick searching point B, use the
![]() or
or![]() button instead of playing back normally.
button instead of playing back normally. - When the A-B button is pressed again during block repeat play, block repeat playback will be released.
![]()

Programmed repeat playback
The repeat function can be activated even in the Programmed Playback mode. To repeat all the programmed tunes, press the 1/ALL button twice. (At this time, check that the REPEAT and ALL indicators light.)

Time Counter Display
The time counter shows various time readouts, as follows.
![]()

- Total disc playback time After the disc tray is closed with a disc loaded, the total disc playback time and total number of tunes on the disc are displayed.
- Elapsed time display
When playback begins, the elapsed time of the tune being played is displayed in minutes and seconds. - Remaining time display (REMAIN) Displayed when the TIME button is pressed once. This provides an easy check of the remaining time of the tune being played.
- Total remaining time display
(TOTAL REMAIN) Displayed when the TIME button is pressed twice. The time displayed is the total remaining playback time from the position being played, to the end of the disc; the counter counts down to "00:00" during playback.
- Displayed after the TIME button is pressed three times. The time displayed is the elapsed playback time 2.
- In Normal Playback mode, if a tune with a number higher than 32 is being played, the remaining time will not be displayed in the time counter even when the TIME button is pressed. Instead, "nn: nn" will be indicated on the time indicator.
Auto Spacing
When this function is activated, an interval of approx. 4 seconds will be inserted between tunes automatically, so they are played back with a fixed spacing. To activate this, press the AUTO SPACE button so that the A.SPACE indicator lights in the display.
When the auto space button is pressed again, the indicator goes off and the auto spacing function is released.
![]()
Intro Check Function
The intro check function allows only the beginning of each track to be played for 10 seconds.
- Press the INTRO CHECK button. The INTRO and
![]() indicators will be indicated.
indicators will be indicated. - Press the INTRO CHECK button again to clear the intro check function.
- The intro check function also works together with SHUFFLE, PROGRAM and REPEAT ALL functions.
![]()
Single Playback
- Press the single button. The SINGLE indicator will light in the display.
- Press the
![]() MUSIC SKIP buttons corresponding to the required tune.
MUSIC SKIP buttons corresponding to the required tune. - A single tune will be played back, afterwhich the player will enter the stop mode.
- To release the Single mode, press the SINGLE button again.
![]()
Cassette Deck Operation

Playback
- Press the POWER switch ON.
- Set the REV MODE switch to the required tape travel mode.
![]()
- Load a pre-recorded cassette with its open edge facing down and side A facing toward you.
- Select ON/OFF of the DOLBY NR system.
- Press the
![]() or
or ![]() button to start playback.
button to start playback. - Adjust the volume with the amplifier's volume control.

 or
or - To stop playback, press the STOP button.
Loading a Cassette Tape

- Use your finger or a pencil to turn thecassette's hub and take up any slack tape.
Note: Avoid touching the tape.
Fingerprints attract dust and dirt. - Press the eject button (
![]() )* to open the cassette compartment door.
)* to open the cassette compartment door. - Load the cassette tape with its openedge facing down.
- Gently close the compartment door.
 )* to open the cassette compartment door.
*Notes:
- The cassette holder cannot be opened during recording or playback.
- If the power has been switched off during play or recording, ejecting the cassette may be impossible. In such a case, switch the power on and press the eject button again.
Recording
- Press the POWER switch ON.
- Set the REV MODE switch.
- If you want to make a bi-directional recording, set the REV MODE switch to the
![]() or
or ![]() position.
position. - When starting to record with
![]() , one side recording is performed.
, one side recording is performed. - Set to the
![]() position if recording is to be made on a single side of the tape.
position if recording is to be made on a single side of the tape.
 or
or  position.
 , one side recording is performed.
 position if recording is to be made on a single side of the tape.
- Load a recordable cassette.
- Check that the safety tabs on the spine of the cassette are in place. If they have been broken off, block the holes with adhesive tape.
- Select the SOURCE switch.
- When selecting "CD", the built-in CD player's output is selected as a source.
- When selecting "LINE", the external signal from "LINE IN" is selected as a source.
- Select ON/OFF of the DOLBY NR system.
- Press the RECORD button and the deck enters the Record-Pause mode (REC and
![]() indicators light).
indicators light). - Adjust the recording level with the RECLEVEL control so that the loudest sound to be recorded just makes the meters briefly reach around the "0 dB" point (for Normal or Chrome tapes) or the "+3 dB" point (for Metal tapes).
![]()
- Press the
![]() PAUSE button again to start recording.
PAUSE button again to start recording. - To stop recording temporarily, press the
![]() PAUSE button. To restart the tape, press the
PAUSE button. To restart the tape, press the ![]() PAUSE button or
PAUSE button or ![]() play button. During the Record-Pause mode, if the button whose
play button. During the Record-Pause mode, if the button whose ![]() ,
,![]() indicator is lit is pressed, recording will start; however, if the button whose
indicator is lit is pressed, recording will start; however, if the button whose ![]() ,
, ![]() indicator is not lit is pressed, only the tape direction will change; to restart the tape, press the button again.
indicator is not lit is pressed, only the tape direction will change; to restart the tape, press the button again. - To stop recording, press the STOP button.
- To stop recording temporarily, press the

 play button. During the Record-Pause mode, if the button whose
 Erasing
Anything previously recorded on the tape will automatically be erased when you make a new recording on it. It can also be erased by "recording" on it with the REC LEVEL control set to "0".
Recording pre-recorded tapes, records, or other published or broadcast material may infringe copyright laws. Check before recording.
Tape Counter
The tape counter counts up when the tape is moving forward and down when the tape is being rewound. The display can be cleared by pressing the COUNTER CLEAR button, which resets the counter index to "0000".
RTZ (Return To Zero) Function
By pressing the RTZ (Return To Zero) button, the tape will locate the "0000" point and stop.
![]()
- The RTZ function does not work when the tape counter indicates a number between "9996" and "0004".
Pitch Control
You can change the tape speed during playback, allowing to change the pitch of the reproduced sound.

By turning the PITCH CONTROL to the right, the tape speed becomes faster, resulting in higher pitch. By turning it to the left, the tape speed becomes slower, resulting in lower pitch.
- At the fully clockwise position, the tape speed is approx. 12% faster.
- At the fully counter-clockwise position, the tape speed is approx. 12% slower.
Fast Wind
In the Stop mode, the buttons act as fast forward and rewind buttons.
- In the Playback mode, these buttons act as CPS buttons.
![]()

CPS (Computomatic Program Search)
CPS allows the selection and playback of any tune up to 15 tunes ahead or before the one being played. This function operates by detecting blank spaces of at least 4 seconds between tunes. These blanks can be created using the REC MUTE function.
Notes:
- In the following steps 1 and 2, to simplify the description, the explanation is given for "forward playback" (
![]() direction). A similar procedure should be used for "reverse playback".
direction). A similar procedure should be used for "reverse playback". - The
![]() (Fast Forward) and
(Fast Forward) and ![]() (Rewind) buttons act as CPS buttons during playback. This is why the main unit indicates "
(Rewind) buttons act as CPS buttons during playback. This is why the main unit indicates "![]() CPS
CPS ![]() " for these buttons, while the remote control unit shows just "
" for these buttons, while the remote control unit shows just "![]() ". In the following explanation, these buttons are described as just "
". In the following explanation, these buttons are described as just "![]() " and "
" and "![]() ".
".
- During forward playback, press the
![]() or
or ![]() button repeatedly until the number of tunes to be skipped appears in the counter display. Use the
button repeatedly until the number of tunes to be skipped appears in the counter display. Use the ![]() button for searching a tune following the current tune and
button for searching a tune following the current tune and ![]() button for a tune before the current tune. Refer to the chart "How to Select any Required Tune Using CPS".
button for a tune before the current tune. Refer to the chart "How to Select any Required Tune Using CPS". - If, by using the
![]() , the required CPS number setting is exceeded, use the
, the required CPS number setting is exceeded, use the ![]() button to count down the CPS number until the required CPS number is displayed.
button to count down the CPS number until the required CPS number is displayed. - When the
![]() button is pressed, the next tune is counted as "1" and when the
button is pressed, the next tune is counted as "1" and when the ![]() button is pressed, the current tune is counted as "1".
button is pressed, the current tune is counted as "1".
- If, by using the
- The tape is fast-wound to detect blanks between tunes until the required tune is reached. Then playback starts from the beginning of the designated tune.
Notes on CPS
CPS operates by detecting and counting blanks of about 4 seconds, the standard interval between tunes. Therefore, with the following types of tapes, search functions may not work correctly.
- When the intervals between tunes cannot be detected.
- Intervals of less than 4 seconds.
- High levels of noise in intervals.
- Long low level sections (in classical music, etc.)
How to Select Any Required Tune Using CPS
Ex: See (1). To select the 3rd tune past the current tape position, select "CP03".

Record Muting Operation
Automatic spacing operation for 4-second blanks (during recording)
Press the REC MUTE button during recording. The tape movement continues and a blank space of about 4 seconds is recorded (the RECORD indicator blinks). The deck then enters the Record-Pause mode automatically (both the RECORD and PAUSE indicators light).
To restart recording, press the PAUSE button (the PAUSE indicator goes off).
Automatic spacing operation for 4second blanks (during record-pause)
In the Record-Pause mode, pressing the REC MUTE button will initiate the above record-muting operation automatically. The deck then returns to the RecordPause mode.
For a blank of more than 4 seconds
During recording, hold the REC MUTE button depressed for longer than 4 seconds. A blank space will be left as long as the button is pressed. Release the button to enter the Record-Pause mode. To restart recording, press the PAUSE button.
- During record muting operation (while the RECORD indicator is blinking), pressing the REC MUTE button again will release the record muting operation and recording will restart without stopping the tape.
Copying from CD to Tape
Using the CD DUBBING function, a CD-totape copy can be done easily and simply.
- Load a compact disc.
- Load a recordable cassette.
- Select ON/OFF of the DOLBY NR system.
- In the CD DUBBING mode, the REC LEVEL control has no effect, as the recording level is automatically adjusted internally.
To record from the beginning of the tape
Press the CD DUBBING button in the Stop mode.
![]()
The tape is rewound to the beginning of Side A and the counter is reset to "0000", while the CD player is in the Pause mode at the beginning of the first CD track. After mute-recording for approx. 10 seconds (to avoid the leader tape), the cassette deck drops into the Recording mode while the CD player starts playback.
To record from any desired position of the tape
- Move the tape to the desired position and press the STOP button.
- Press the RECORD button. The deck enters the Record-Pause mode.
- Press the CD DUBBING button. CD-to-tape copying starts from the current tape position.
- While CD DUBBING is engaged, only the STOP (CD), STOP (TAPE), OPEN/CLOSE and TIME buttons are operational.
Designating CD tracks to be recorded on Side A or Side B (A-B Program Dubbing)
By using the A-B Program Dubbing function, you can designate CD tracks to be recorded on Side A or Side B.
- Press the PROGRAM button.
![]()
- Press the A-B button.
"A-" blinks and "B" lights in the display, indicating that the CD player is now in the "Side A program" mode.
![]()
- Program tracks to be recorded on SideA of the tape.
Perform the procedures described in step 3 in the "Program Playback" section.- To display the total program time, press the TIME button in the Program mode. It will help you to fit the total recording time to the tape length. Pressing the TIME button again will return the CD player to the Program mode.
- Press the A-B button.
"A-" lights and "B" blinks in the display, indicating that the CD player is now in the "Side B program" mode. - Program tracks to be recorded on SideB of the tape.
- Pressing the A-B button in the Side B Program mode will return the CD player to the Side A Program mode.
- Press the CD DUBBING button.
The tape is rewound to the beginning of side A and the counter is reset to "0000", while the CD player is in the Pause mode at the first track of the Side A program.
After mute-recording for approx. 10 seconds (to avoid the leader tape), the cassette deck drops into the Recording mode while the CD player starts the program playback.

- If you press the RECORD button before pressing the CD DUBBING button, the recording will start from the current tape position (without rewinding the tape to the beginning).
- If the tape on Side A ends before 01:30 (1 minute 30 seconds) of the current CD track has been played, the recording of Side B will start with that track. (except with A-B Program Dubbing)
- When the CD player finishes playback, the CD DUBBING mode is released.
- If the tape comes to the end of Side B before the CD player finishes playback, the CD DUBBING mode is canceled.
Continuous Playback between CD and Tape
In the Continuous Playback mode, once either the CD player or cassette deck finishes (or stops) playback, the other starts playback automatically.
- Press CD-TAPE CONT PLAY button.
"TAPE" and "CD" blink in the display.
![]()
- (For example) Press the CD Play button.
The CD player starts playback. "CD" blinks in the display.
![]()
- When the CD player stops, the cassettedeck automatically starts playback.
"TAPE" blinks in the display.
Afterward, when one stops, the other starts.
- Regardless of whether one machine (CD player or cassette deck) is stopped forcibly by pressing the STOP button or automatically at the end of playback, the other machine starts playback.
- You may change the CD or tape while it is in Stop mode.
- To release the Continuous Playback mode, press the CD-TAPE CONT PLAY button again.
Timer-controlled operation
The unit has a timer controlled function. This lets you start playback or recording operations at any desired time when an optional audio timer is used.
Timer Playback of CD or Cassette
- Connect the unit and your stereo system to an audio timer as shown in the diagram.
- Set the power switches of all components to ON.
- Load a disc or a prerecorded cassette.
- Set the timer switch to the CD or TAPEposition.
![]()
- Set the audio timer to the required start(power on) and stop (power off) times. When this setting is completed, the power to all components will be switched off.
- When the preset start time is reached, power will be supplied and playback will start automatically.

Timer Recording
- Select the amplifier's input which this deck is capable of recording.
- Select the source to be recorded (FM, AM, etc.).
- Load a recordable cassette and set the[TIMER] switch to [REC].
![]()
- Set the audio timer to the required start(power on) and stop (power off) times.
When this setting is completed, the power to all components will be switched off. - When the preset start time is reached, power will be supplied and recording will start automatically.

Timer Connection

Troubleshooting
Basic troubleshooting of this unit is similar to troubleshooting of any other electrical or electronic equipment. Always check the most obvious possible causes first. To give you a few ideas of what to look for, check the following:
| Problem | Probable cause | Remedy |
| General | ||
No power when POWER is pressed | Power plug not inserted securely. | Plug in securely. |
Hum | Pin-cord plug not connected securely. | Re-connect plug securely. |
Noise in tuner | Too close to tuner. | Keep a reasonable distance between them or switch off the power of this unit. |
No audio output | Connection to stereo system is incorrect. | Check connections. |
Remote control unit operation is impossible | POWER switch set to OFF. | Set switch to ON. |
| Batteries not inserted in remote control. | Insert batteries. | |
| CD player | ||
No playback when disc is loaded | Disc loaded with label side down. | Load with label side up. |
| Disc dirty. | Clean disc surface. | |
No audio output | Connection to stereo system is incorrect. | Check connections. |
No CD output | The cassette deck is in Playback mode. | Stop the deck. Or connect the CD output with the amplifier. |
A single tune can only be played | SINGLE button engaged. | Press button to disengage it. |
No program playback | PROGRAM button not pressed. | Press button to display PGM. |
Mistracking (sound jumping) | Player receiving vibration or shock. | Change the installation position of this unit. |
| Disc dirty. | Clean disc surface. | |
| Cassette deck | ||
Low sound quality | The heads are dirty. | Clean the heads. |
| The heads are magnetized. | Demagnetize the heads using the TEAC E-3. | |
| The position of the Dolby NR switch is not correct. | Change the position. | |
| Strange sound | The pitch control has been changed. | Set the pitch control pot to the center position. |
| Impossible to record | The record protection tabs of the cassette are broken off. | Put adhesive tape on the tab hole. |
| The heads are dirty. | Clean the heads. | |
| Recording level is too low. | Turn the REC LEVEL pot to the right. | |
Maintenance
The heads and tape path should be cleaned and demagnetized periodically.
Cleaning tape path
- Apply head cleaning fluid* to a cotton bud or soft cloth, and lightly rub the heads, capstan and all metal parts in the tape path.
- Also clean the pinch roller using rubber cleaning fluid*.
* Both are available in TEAC Tape Cleaning Kits HC-2 and RC-2 in the U.S.A. or TZ-261 in other areas.
![]()

Demagnetizing heads
Be sure that the power is off, then demagnetize the heads using a TEAC E-3 demagnetizer. For details of its use, read its instructions.
Specifications
CD player section
(Audio)
Number of channels: 2
Frequency response: 10 - 20,000 Hz ± 0.5 dB
Signal-to-noise ratio: 90 dB
Dynamic range: 90 dB
Total harmonic distortion: 0.02% (1 kHz)
Wow and flutter: Unmeasurable (quartz accuracy)
Channel separation: 75 dB
Output: 2 Vrms
Digital filter: 4-times oversampling
Analog filter: 3rd order
(Signal format)
Sampling frequency: 44.1 kHz
D/A converter: 16-bit linear/channel
Channel bit rate: 4.3218 Mb/sec.
Channel modulation code: EFM
Error correction: CIRC
(Pickup)
Type: Objective lens drive, optical 3-beam laser pickup.
Objective Lens: 2-dimensional parallel drive
Laser Type: GaAIAs type semiconductor laser
Wave length: 780 nm
Cassette section
Track system: 4-track 2-channel stereo
Heads: Record/playback x 1 (rotary reverse), erase x 1
Type of tape: Cassette tape C-60, C-90
Tape speed: 4.76 cm/sec.
Motor: DC servo motor x 1
Wow and flutter: 0.08% (W. RMS)
Frequency response (overall):
50 – 15,000 Hz ± 3 dB, metal
50 – 15,000 Hz ± 3 dB, chrome
50 – 14,000 Hz ± 3 dB, normal
Signal-to-noise ratio (overall):
59 dB (Dolby NR off, 3% THD level, weighted), 69 dB (DOLBY NR on, over 5 kHz)
Fast winding time: Approx. 120 sec. (with C-60)
Input: Line; 87 mV (input impedance of 50 kohms or more)
Output: Line; 0.46 V (load impedance of 50 kohms or more)
Headphones; 1 mV/8 ohms
General
Power requirements:
120/230 V AC, 50–60 Hz
(U.S.A./Canada/general export model)
230 V AC, 50 Hz (Europe/U.K. model)
240 V AC, 50 Hz (Australia model)
Power consumption: 14 W
Dimensions (W x H x D):
435 x 145 x 290 mm (17-1/8" x 5-3/4" x 11-7/16")
Weight: 5.3 kg (11.7 lbs.)
Standard Accessories
Wireless remote control RC-619,
Pin plug cord x 2,
Battery (SUM-3, "AA", "R6" type) x 2
- Improvements may result in specification or feature changes without notice.
- Photos and illustrations may differ slightly from production models.
IMPORTANT SAFETY INSTRUCTIONS

TO REDUCE THE RISK OF ELECTRIC SHOCK, DO NOT REMOVE COVER (OR BACK). NO USER-SERVICEABLE PARTS INSIDE. REFER SERVICING TO QUALIFIED SERVICE PERSONNEL.
 The lightning flash with arrowhead symbol, within an equilateral triangle, is intended to alert the user to the presence of uninsulated "dangerous voltage" within the product's enclosure that may be of sufficient magnitude to constitute a risk of electric shock to persons.
 The exclamation point within an equilateral triangle is intended to alert the user to the presence of important operating and maintenance (servicing) instructions in the literature accompanying the appliance.
This appliance has a serial number located on the rear panel. Please record the model number and serial number and retain them for your records.
Model number
Serial number

TO PREVENT FIRE OR SHOCK HAZARD, DO NOT EXPOSE THIS APPLIANCE TO RAIN OR MOISTURE.
- Read all of these Instructions.
- Save these Instructions for later use.
- Follow all Warnings and Instructions marked on the audio equipment.
- Read Instructions — All the safety and operating instructions should be read before the product is operated.
- Retain Instructions — The safety and operating instructions should be retained for future reference.
- Heed Warnings — All warnings on the product and in the operating instructions should be adhered to.
- Follow Instructions — All operating and use instructions should be followed.
- Cleaning — Unplug this product from the wall outlet before cleaning. Do not use liquid cleaners or aerosol cleaners. Use a damp cloth for cleaning.
- Attachments — Do not use attachments not recommended by the product manufacturer as they may cause hazards.
- Water and Moisture — Do not use this product near water _ for example, near a bath tub, wash bowl, kitchen sink, or laundry tub; in a wet basement; or near a swimming pool; and the like.
- Accessories — Do not place this product on an unstable cart, stand, tripod, bracket, or table. The product may fall, causing serious injury to a child or adult, and serious damage to the product. Use only with a cart, stand, tripod, bracket, or table recommended by the manufacturer, or sold with the product. Any mounting of the product should follow the manufacturer's instructions, and should use a mounting accessory recommended by the manufacturer.
- A product and cart combination should be moved with care. Quick stops, excessive force, and uneven surfaces may cause the product and cart combination to overturn.
![]()
- Ventilation — Slots and openings in the cabinet are provided for ventilation and to ensure reliable operation of the product and to protect it from overheating, and these openings must not be blocked or covered. The openings should never be blocked by placing the product on a bed, sofa, rug, or other similar surface. This product should not be placed in a built-in installation such as a bookcase or rack unless proper ventilation is provided or the manufacturer's instructions have been adhered to.
- Power Sources — This product should be operated only from the type of power source indicated on the marking label. If you are not sure of the type of power supply to your home, consult your product dealer or local power company. For products intended to operate from battery power, or other sources, refer to the operating instructions.
- Grounding or Polarization — This product may be equipped with a polarized alternating-current line plug (a plug having one blade wider than the other). This plug will fit into the power outlet only one way. This is a safety feature. If you are unable to insert the plug fully into the outlet, try reversing the plug. If the plug should still fail to fit, contact your electrician to replace your obsolete outlet. Do not defeat the safety purpose of the polarized plug.
- Power-Cord Protection — Power-supply cords should be routed so that they are not likely to be walked on or pinched by items placed upon or against them, paying particular attention to cords at plugs, convenience receptacles, and the point where they exit from the product.
- Outdoor Antenna Grounding — If an outside antenna or cable system is connected to the product, be sure the antenna or cable system is grounded so as to provide some protection against voltage surges and built-up static charges. Article 810 of the National Electrical Code, ANSI/NFPA 70, provides information with regard to proper grounding of the mast and supporting structure, grounding of the lead-in wire to an antenna discharge unit, size of grounding conductors, location of antenna-discharge unit, connection to grounding electrodes, and requirements for the grounding electrode.

"Note to CATV system installer:
This reminder is provided to call the CATV system installer's attention to Section 820-40 of the NEC which provides guidelines for proper grounding and, in particular, specifies that the cable ground shall be connected to the grounding system of the building, as close to the point of cable entry as practical.
Example of Antenna Grounding as per
National Electrical Code, ANSI/NFPA 70

- Lightning — For added protection for this product during a lightning storm, or when it is left unattended and unused for long periods of time, unplug it from the wall outlet and disconnect the antenna or cable system. This will prevent damage to the product due to lightning and power-line surges.
- Power Lines — An outside antenna system should not be located in the vicinity of overhead power lines or other electric light or power circuits, or where it can fall into such power lines or circuits. When installing an outside antenna system, extreme care should be taken to keep from touching such power lines or circuits as contact with them might be fatal.
- Overloading — Do not overload wall outlets, extension cords, or integral convenience receptacles as this can result in risk of fire or electric shock.
- Object and Liquid Entry — Never push objects of any kind into this product through openings as they may touch dangerous voltage points or short-out parts that could result in a fire or electric shock. Never spill liquid of any kind on the product.
- Servicing — Do not attempt to service this product yourself as opening or removing covers may expose you to dangerous voltage or other hazards. Refer all servicing to qualified service personnel.
- Damage Requiring Service — Unplug this product from the wall outlet and refer servicing to qualified service personnel under the following conditions:
- when the power-supply cord or plug is damaged.
- if liquid has been spilled, or objects have fallen into the product.
- if the product has been exposed to rain or water.
- if the product does not operate normally by following the operating instructions. Adjust only those controls that are covered by the operating instructions as an improper adjustment of other controls may result in damage and will often require extensive work by a qualified technician to restore the product to its normal operation.
- if the product has been dropped or damaged in any way.
- when the product exhibits a distinct change in performance _ this indicates a need for service.
- Replacement Parts — When replacement parts are required, be sure the service technician has used replacement parts specified by the manufacturer or have the same characteristics as the original part. Unauthorized substitutions may result in fire, electric shock, or other hazards.
- Safety Check — Upon completion of any service or repairs to this product, ask the service technician to perform safety checks to determine that the product is in proper operating condition.
- Wall or Ceiling Mounting — The product should be mounted to a wall or ceiling only as recommended by the manufacturer.
- Heat — The product should be situated away from heat sources such as radiators, heat registers, stoves, or other products (including amplifiers) that produce heat.
SAFETY INFORMATION
This product has been designed and manufactured according to FDA regulations "title 21, CFR, chapter 1, subchapter J, based on the Radiation Control for Health and Safety Act of 1968", and is classified as a class 1 laser product. There is no hazardous invisible laser radiation during operation because invisible laser radiation emitted inside of this product is completely confined in the protective housings. The label required in this regulation is shown  .
.

- DO NOT REMOVE THE PROTECTIVE HOUSING USING A SCREWDRIVER.
- USE OF CONTROLS OR ADJUSTMENTS OR PERFORMANCE OF PROCEDURES OTHER THAN THOSE SPECIFIED HEREIN MAY RESULT IN HAZARDOUS RADIATION EXPOSURE.
- IF THIS PRODUCT DEVELOPS TROUBLE, CONTACT YOUR NEAREST QUALIFIED SERVICE PERSONNEL, AND DO NOT USE THE PRODUCT IN ITS DAMAGED STATE.
Optical pickup:
| Type | KSS-212B |
| Manufacturer | SONY Corporation |
| Laser output | Less than 0.4 mW on the objective lens: |
| Wavelength | 760-800nm |

- THIS LABEL IS ATTACHED TO THE PLACE AS ILLUSTRATED TO INFORM THAT THE APPARATUS CONTAINS A LASER COMPONENT.
Documents / ResourcesDownload manual
Here you can download full pdf version of manual, it may contain additional safety instructions, warranty information, FCC rules, etc.
Advertisement


Need help?
Do you have a question about the AD-500 and is the answer not in the manual?
Questions and answers