Teac A-H01 - Stereo Amplifier Manual
- Owner's manual (48 pages) ,
- Owner's manual (27 pages) ,
- Install manual (2 pages)
Advertisement
What's in the Box
If one of the following is missing or damaged, contact your dealer or our customer service/ technical support (stated on the back cover).
Power cord x 1
Remote control unit (RC-1268) x 1
Batteries (AAA) x 2
Owner's manual (this document) x 1
Warranty card x 1
Before Use
Placement of the unit

- Avoid placing it in high temperature environments such as in direct sunlight or close to a source of heat. Also, do not place the unit on an amplifier or any other device that generates heat. Doing so may cause discoloration, deformation, or malfunction.
- When the unit is turned on, switching on the TV may cause lines to appear on the TV screen, depending on the wave frequency of the TV broadcast. This is not a malfunction in the unit or the TV. If you see such lines, place this unit far away from the TV set.
Maintenance
If the surface of the unit gets dirty, wipe it with a soft cloth or use diluted mild liquid soap. Do not use thinner, benzene or alcohol as they could damage the surface of the unit.
 For safety, disconnect the power cord from the socket before cleaning.
Sound Etiquette
What is music to you may be noise to others. Even a little sound can be clearly heard on a silent night. Low sound passes through floors and walls easily, and may annoy others unintentionally.
Enjoy music at an appropriate volume, close the window, or use headphones to ensure a pleasant living environment.
Remote Control Unit
The included remote control allows this unit to be operated from a distance.
Point the remote control unit at the main unit's remote sensor within 16 feet/5 meters of the main unit.
- Remote control operation may be impossible if there are any obstacles between the unit and the remote control.
- If direct sunlight or strong artificial illumination shines on the remote sensor, the remote control might not function. If that is the case, move this unit to another location.
- If the remote control unit is operated near other appliances which generate infrared rays, or if other remote control devices using infrared rays are used near the unit, it may operate incorrectly. And conversely, the other appliances may operate incorrectly.
Battery Installation
- Remove the battery compartment cover.
- Insert two "AAA" (R03, UM-4) dry batteries. Make sure that the batteries are inserted with their positive "+" and negative "–" poles positioned correctly.
![]()
- Close the cover.

Battery Replacement
If the effective range decreases, the batteries are exhausted. In this case, replace the batteries with new ones.
For detailed information about collection of batteries, please contact your local municipality, your waste disposal service or the point of sale where you purchased the items.
Precautions concerning batteries
 Misuse of batteries could cause them to rupture or leak leading to fire, injury or the staining of nearby things. Please read and observe the following precautions carefully.
- Be sure to insert the batteries with correct positive "+" and negative "_" polarities.
- Use batteries of the same type. Never use different types of batteries together.
- Rechargeable and non-rechargeable batteries can be used. Refer to the precautions on their labels.
- When the remote control unit is not to be used for a long time (more than a month), remove the batteries from the battery compartment to prevent them from leaking. If they leak, wipe away the liquid inside the battery compartment and replace the batteries with new ones.
- Do not heat or disassemble batteries and never dispose of old batteries by throwing them in a fire.
Connections
After all connections are complete, connect the power cord's plug to the AC wall socket.
- Read the instructions of each device that you intend to use with this unit.
- To avoid hum and noise, do not bundle the connection cords.
- Be sure to connect each plug securely.

- Analog audio input terminals
Input 2-channel analog audio signals. Connect an audio output device such as cassette deck or CD player to these terminals by using RCA cables. Use commercially available cables.
Connect the R and L terminals on this unit to the right (R) and left (L) terminals on an audio output device respectively.
![]()
- USB input terminal
Inputs digital audio from a computer. Connect to the USB port of a computer. Use a commercially available USB cable.- Install dedicated TEAC driver software on the computer before connecting the unit. (See "Installing dedicated TEAC driver software on a computer")
- Note that connection cables indicated other than the power cord are not included with this product. All other connection cables are available from your retail dealer.
- Subwoofer terminal
If you want to use a subwoofer, connect it to this terminal. - Digital audio input terminals
Inputs digital audio. Connect to the digital audio output terminals of digital audio output devices.
COAXIAL: RCA digital coaxial cable
OPTICAL: Optical digital cable (TOS) - Power cord connector
Connect the supplied power cord to the power cord receptacle.
After all other connections are complete, connect the power cord's plug to the wall socket.


Do not use any power cords other than the one included with this unit. Use of other power cords may result in fire or electric shock. Unplug the power cord when you are not going to use the unit for several weeks.
Speaker Connection

Before connection
- After all other connections are complete, connect the power cord's plug to the wall socket.
- Read the instructions of each device that you intend to use with this unit.
- Check the impedance of your speakers. Connect speakers with an impedance of between 4 ohms and 8 ohms.
- The red speaker terminals are + (positive) and the black speaker terminals are – (negative).
Generally, the + side of the speaker cable is marked to make it distinguishable from the – side of the cable. Connect the marked side to the + terminal and the unmarked side to the black – terminal. ![]()
The metal portions of the two separate wires should not touch or an electrical short may occur. Shorted wires can create a fire hazard or induce a failure in your equipment.- Be sure to insert each plug securely. To prevent hum and noise, avoid bundling the cables together with the AC power cord or other cables.


How to connect:
- Turn the terminal cap counterclockwise to loosen it. The speaker terminal caps cannot be fully removed from the product.
- Insert the wire into the terminal and turn the terminal cap clockwise to securely connect it:
- Make sure none of the wire insulation is under the terminal and only the bare, stripped wire is touching the terminal.
- Make sure the cable is fastened firmly by pulling the cable lightly.
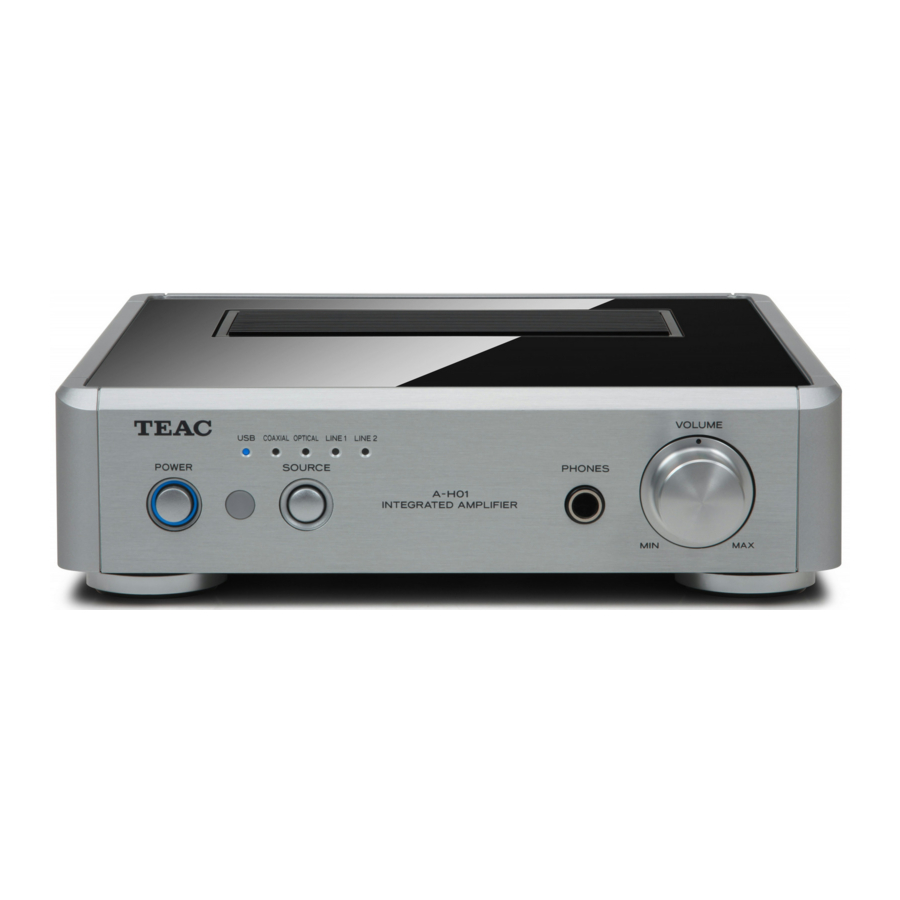
Identifying the Parts
Main Unit

- POWER
Press this button to turn the unit on and off. The blue indicator lights when the unit is turned on. - Remote control light sensor
Receives signals from the remote control unit. When operating the remote control unit, point it at this sensor. - SOURCE
Each time this button is pressed, the source changes. - Input indicators
The source being selected lights up.
These indicators will blink when the input signal is not digital audio data or the format of the audio signal is not compatible with this unit, such as Dolby Digital, dts, or AAC. - PHONES
Connect a headphone's 6.5 mm stereo plug to this connector. - VOLUME
Use this knob to adjust the volume. To increase the volume, turn the knob clockwise. To decrease the volume, turn the knob counterclockwise.
Remote Control Unit

Using the remote control unit RC-1268, you can control the A-H01 and DS-H01.
Only the buttons used for the A-H01 are explained in this document.
- SOURCE
Use this button to select the source you want to play. - VOLUME (+/–)
Use these buttons to adjust the volume. - MUTING
Press the MUTING button to mute the sound temporarily. To restore the sound, press the MUTING button again.
Playback
- Press the POWER button to turn the unit ON.
![]()
- If a power amplifier is connected, turn on the power amplifier last.
- Press the SOURCE button repeatedly to select a source.
Each time the SOURCE button is pressed, the source changes as follows:
![]()


The input indicator of the selected source lights up.
- The input indicator blinks when the input signal is not digital audio data or the format of the audio signal is not compatible with this unit, such as Dolby Digital, dts, or AAC. If this happens, set the digital OUT setting of the connected device to PCM audio output.
- To select "USB" to play back music files stored on a computer, install dedicated TEAC driver software on the computer before connecting the unit. (See "Installing dedicated TEAC driver software on a computer")
- Start playback on the connected source device.
See the connected device's manual for detailed information about using the device. - Adjust the volume.
Turn the volume knob (VOLUME) or use the VOLUME buttons on the remote control unit to adjust the volume to the appropriate level.
![]()

Playing Back Music Files Stored on a Computer
Installing dedicated TEAC driver software on a computer
To play back music files stored on a computer with this unit, you must download dedicated driver software from our website and install it on the computer before making your USB connections.
<Website address for downloading the dedicated driver software>
http://www.teac.co.jp/audio/software_teac_e.html
This unit can be connected through USB and used with a computer running Windows XP (32bit), Windows Vista, Windows 7, Mac OS X 10.6.4 or later. Use with a computer running a different operating system cannot be guaranteed.
Note
Install dedicated TEAC driver software before connecting to the computer through USB.
If you connect the unit to the computer before installing the driver, the unit will not function properly. Moreover, when using Windows XP (32-bit), the computer could become remarkably slower and require restarting in some cases.
- For detailed information about how to install dedicated driver software, see our website.
- Depending on the computer's hardware and software configuration, the unit might not function even when used with one of the operating systems listed above.
Connect the unit to the computer using HIGH SPEED asynchronous mode.
Sampling frequencies that can be transmitted are 32 kHz, 44.1 kHz, 48 kHz, 88.2 kHz, 96 kHz, 176.4 kHz and 192 kHz.
If the connection has been made properly, "TEAC USB HS ASYNC AUDIO" will be selectable as an audio output destination.
- In asynchronous mode, jitter that occurs during transfer is suppressed because the clock signal of this unit is used for playback of the audio data transmitted from the computer.
Playing back music files stored on the computer
- Connect the unit to the computer using a USB cable.
![]()
- Use a cable with a connector that fits the USB port on the unit.
- Turn the computer on.
- Confirm that the operating system has started properly.
- Press the POWER button to turn the unit on.
![]()
- Press the SOURCE button repeatedly to select "USB".
![]()
- Start playback of the music file on the computer.
Even better sound quality can be achieved by setting the volume on the computer to maximum and adjusting the volume on the volume knob (VOLUME) on this unit.
Using the same knob on this unit, set the volume to the minimum at the beginning of playback and gradually increase the volume level.


- You cannot use the computer to control this unit or use this unit to control the computer.
- When playing back a music file using the USB connection, do not attempt any of the following operations. Doing so could cause the computer to behave irregularly. Always stop music playback software on your computer before doing any of the following:
- Disconnecting the USB cable
- Turning the unit off
- Changing the input source
- When playing back a music file using the USB connection, computer operation sounds will also be played through this unit. To avoid this, make appropriate settings on the computer. To help to minimize noise, glitches or other playback interference, when streaming music from a PC, it is advised to turn off auto defrag software, anti-virus software, auto update functions, etc.
- If you connect this unit to your computer or you set this unit's input to "USB" after starting music playback software, music files might not play back properly. If this occurs, restart the music playback software or restart the computer.
Troubleshooting
If you experience any problems with the unit, please take a moment to look through this chart before asking for repairs. If you still have a problem, contact your dealer or TEAC customer service/technical support (stated on the back cover).
| General | No power | Check the connection to the AC power source. If the AC source is a switched outlet, make sure that the switch is turned on. |
| Make sure power is supplied to the AC outlet by plugging in another item such as a lamp or a fan. | ||
| Connections with computer | This unit is not recognized by computer | This unit can be connected through USB and used with a computer running one of the following operating systems: Use with a computer running a different operating system cannot be guaranteed. |
| Dedicated driver software must be installed. (See "Installing dedicated TEAC driver software on a computer") | ||
Noise occurs | Starting other applications during playback of a music file may interrupt playback or cause noise. Do not start other applications during playback. | |
| When the unit is connected to a computer via USB hub, noise may be heard. Connect directly to the computer. | ||
Music files cannot be played | Connect this unit to the computer, and set this unit's input to "USB" before starting music playback software to start playback. If you connect this unit to the computer or you set this unit's input to "USB" after starting music playback software, music files might not play back properly. | |
| Dedicated driver software must be installed. (See "Installing dedicated TEAC driver software on a computer") |
Since this unit uses a microcontroller, external noise and other interference can cause the unit to malfunction. If this occurs, unplug the power cord, wait for a while, and then turn the power back on to restart operations.
Specifications
| Amplifier Section | ||
Maximum power output | 30 W + 30 W (8 Ω, 1 kHz, JEITA) | |
| 60 W + 60 W (4 Ω, 1 kHz, JEITA) | ||
| Rated power output | 22 W + 22 W (8 Ω, 1 kHz, 0.1%) | |
| 43 W + 43 W (4 Ω, 1 kHz, 0.1%) | ||
| Total Harmonic Distortion | 0.0 5% (1 kHz, 4 Ω, 40 W) | |
| S/N Ratio | LINE IN: 100 dB (IHF-A/input short) | |
| Frequency Response | 10 Hz - 80 kHz (–3 dB) | |
| Digital audio input | ||
| RCA terminal x 1 (input impedance 75 Ω) | 0.5 Vp-p | |
| Optical digital terminal x 1 | –24.0 to –14.5 dBm peak | |
| USB port – B connector | USB 2.0 | |
| Data sampling frequency | 32/44.1/48/88.2/96/176.4/192 kHz | |
| Data bit length | 16/24 bits | |
| General | ||
| Power supply | Europe model | AC 230V, 50 Hz |
| U.S.A./Canada model | AC 120V, 60 Hz | |
| Power consumption | 34 W | |
| External dimensions (W x H x D) | 215 x 61 x 258 mm (including protrusions) | |
| Weigh | 1.6 kg | |
| Operating temperature | +5°C to +35°C | |
| Operating humidity | 5% to 85% (no condensation) | |
| Storage temperature | –20°C to +55°C | |
Accessories
Power cord x 1
Remote control unit (RC-1268) x 1
Batteries (AAA) x 2
Owner's manual (this document) x 1
Warranty card x 1
- Design and specifications are subject to change without notice
- Illustrations may differ slightly from production models.
The nameplate is located on the bottom of the unit as shown below.

IMPORTANT SAFETY INSTRUCTIONS

TO REDUCE THE RISK OF ELECTRIC SHOCK, DO NOT REMOVE COVER (OR BACK).
NO USER-SERVICEABLE PARTS INSIDE. REFER SERVICING TO QUALIFIED SERVICE PERSONNEL.
The lightning flash with arrowhead symbol, within an equilateral triangle, is intended to alert the user to the presence of uninsulated "dangerous voltage" within the product's enclosure that may be of sufficient magnitude to constitute a risk of electric shock to persons.
The exclamation point within an equilateral triangle is intended to alert the user to the presence of important operating and maintenance (servicing) instructions in the literature accompanying the appliance.
- Read these instructions.
- Keep these instructions.
- Heed all warnings.
- Follow all instructions.
- Do not use this apparatus near water.
- Clean only with dry cloth.
- Do not block any ventilation openings. Install in accordance with the manufacturer's instructions.
- Do not install near any heat sources such as radiators, heat registers, stoves, or other apparatus (including amplifiers) that produce heat.
- Do not defeat the safety purpose of the polarized or grounding-type plug. A polarized plug has two blades with one wider than the other. A grounding type plug has two blades and a third grounding prong. The wide blade or the third prong are provided for your safety. If the provided plug does not fit into your outlet, consult an electrician for replacement of the obsolete outlet.
- Protect the power cord from being walked on or pinched particularly at plugs, convenience receptacles, and the point where they exit from the apparatus.
- Only use attachments/accessories specified by the manufacturer.
- Use only with the cart, stand, tripod, bracket, or table specified by the manufacturer, or sold with the apparatus. When a cart is used, use caution when moving the cart/apparatus combination to avoid injury from tip-over.
![]()
- Unplug this apparatus during lightning storms or when unused for long periods of time.
- Refer all servicing to qualified service personnel. Servicing is required when the apparatus has been damaged in any way, such as power-supply cord or plug is damaged, liquid has been spilled or objects have fallen into the apparatus, the apparatus has been exposed to rain or moisture, does not operate normally, or has been dropped.

- Do not expose this apparatus to drips or splashes.
- Do not place any objects filled with liquids, such as vases, on the apparatus.
- Do not install this apparatus in a confined space such as a book case or similar unit.
- The apparatus draws nominal non-operating power from the AC outlet with its POWER or STANDBY/ON switch not in the ON position.
- The apparatus should be located close enough to the AC outlet so that you can easily grasp the power cord plug at any time.
- The appliance coupler is used as the disconnect device, the disconnect device shall remain readily operable.
- An apparatus with Class I construction shall be connected to an AC outlet with a protective grounding connection.
- If the product uses batteries (including a battery pack or installed batteries), they should not be exposed to sunshine, fire or excessive heat.
![]()
Caution should be taken when using earphones or headphones with the product because excessive sound pressure (volume) from earphones or headphones can cause hearing loss.

TO PREVENT FIRE OR SHOCK HAZARD, DO NOT EXPOSE THIS APPLIANCE TO RAIN OR MOISTURE.
- DO NOT REMOVE THE EXTERNAL CASES OR CABINETS TO EXPOSE THE ELECTRONICS. NO USER SERVICEABLE PARTS ARE WITHIN.
- IF YOU ARE EXPERIENCING PROBLEMS WITH THIS PRODUCT, CONTACT TEAC FOR A SERVICE REFERRAL. DO NOT USE THE PRODUCT UNTIL IT HAS BEEN REPAIRED.
Documents / Resources
References
Download manual
Here you can download full pdf version of manual, it may contain additional safety instructions, warranty information, FCC rules, etc.
Advertisement


Need help?
Do you have a question about the A-H01 and is the answer not in the manual?
Questions and answers