Table of Contents
Advertisement
Available languages
Available languages
Advertisement
Table of Contents

Related Manuals for Philips HQ8140


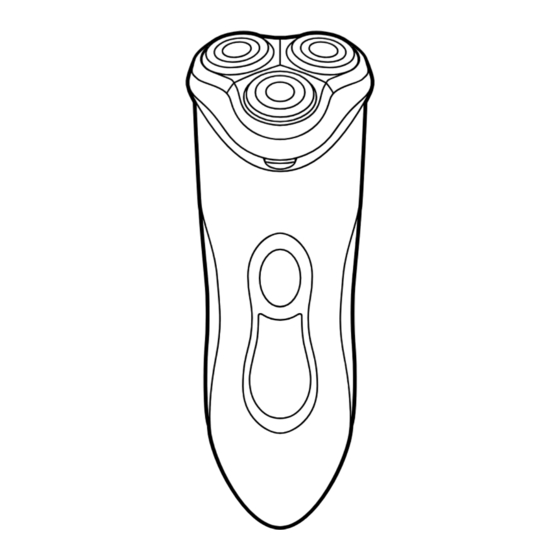
Summary of Contents for Philips HQ8140
- Page 1 ENGLISH 4...
- Page 2 ENGLISH Important Read these instructions for use carefully before using the appliance and save them for future reference. ◗ Only use the powerplug supplied. ◗ The powerplug transforms 100-240 volts to a safe low voltage of less than 24 volts. ◗...
- Page 3 ENGLISH ◗ Do not immerse the shaver in water. ◗ Water may leak from the socket at the bottom of the appliance, when you rinse it. This is normal and not dangerous because all electronics are enclosed in a sealed shell inside the shaver.
-
Page 4: Battery Fully Charged
ENGLISH Battery fully charged ◗ When the battery has been fully charged, the top light blinks green. Battery running low (HQ8150 only) ◗ When the battery is running low, the bottom light burns red. When you switch the shaver off, this light blinks a few times. -
Page 5: Using The Appliance
- Shaving on a dry face gives the best results. - Your skin may need 2 or 3 weeks to get accustomed to the Philips shaving system. Switch the shaver off by pressing the on/off button once. The blue light ring around the on/off button goes... - Page 6 ENGLISH Clean the shaver (see chapter 'Cleaning and maintenance'). Put the protection cap on the shaver every time you have used it, to prevent damage. Trimming For grooming sideburns and moustache. Open the trimmer by pushing the slide downwards. The trimmer can be activated while the motor is running.
- Page 7 ENGLISH Water may leak from the socket at the bottom of the appliance when you rinse it.This is normal and not dangerous. Every day: shaving unit and hair chamber Switch the shaver off, remove the powerplug from the wall socket and pull the appliance plug out of the shaver.
- Page 8 ENGLISH Every six months: shaving heads Open the shaving unit, turn the lock anticlockwise (1) and remove the retaining frame (2). Clean the cutters and guards with the brush supplied. Do not clean more than one cutter and guard at a time, since they are all matching sets.
- Page 9 ◗ The appliance can be stored in the pouch supplied. ◗ The shaver can be stored in the charging stand, if provided. Replacement Replace the shaving heads every two years for optimal shaving results. Replace damaged or worn shaving heads with HQ9 Philips shaving heads only.
- Page 10 Make sure that the projections of the shaving heads fit exactly into the recesses. Close the shaving unit. Accessories The following accessories are available: - HQ8000 powerplug. - HQ9 Philips shaving heads. - HQ110 Philips shaving head cleaner (shaving head cleaning spray). - HQ8010 car cord.
- Page 11 Dispose of the battery at an official collection point for batteries. If you have trouble removing the battery, you can also take the appliance to a Philips service centre, which will remove the battery for you and will dispose of it in an environmentally safe way.
- Page 12 Care Centre in your country (you will find its phone number in the worldwide guarantee leaflet). If there is no Customer Care Centre in your country, turn to your local Philips dealer or contact the Service Department of Philips Domestic Appliances and Personal Care BV.
-
Page 13: Troubleshooting
ENGLISH Troubleshooting Reduced shaving performance. Cause 1: the shaving heads are dirty.The shaver has not been rinsed long enough or the water used was not hot enough. ◗ Clean the shaver thoroughly before you continue shaving. See chapter 'Cleaning and maintenance'. - Page 14 ENGLISH ◗ Put the powerplug in the wall socket. The shaving unit has come off the shaver. The shaving unit has not been placed correctly. ◗ If the shaving unit becomes detached from the shaver, you can easily put it back by inserting the hinge into the slot in the rim of the hair chamber and pushing it home until it locks into place ('click').
- Page 15 ◗ ◗ ◗ ◗ ◗ ◗ ◗ ◗ ◗ ◗ ◗...
- Page 16 ◗ ◗ ◗ ◗ ◗...
- Page 17 ◗ ◗...
- Page 18 ◗ ◗...
- Page 20 ◗...
- Page 22 ◗ ◗...
- Page 23 ◗...
- Page 24 ◗...
- Page 26 ◗ ◗...
- Page 27 ◗ ◗ ◗ ◗...
- Page 28 ◗ ◗ ◗ ◗ ◗ ◗ ◗ ◗ ◗ ◗...
- Page 29 ◗ ◗ ◗ ◗ ◗...
- Page 30 ◗ ◗ ◗...
- Page 31 ◗ ◗...
- Page 34 ◗...
- Page 36 ◗ ◗ ◗...
- Page 38 ◗...
- Page 40 ◗ ◗...
- Page 41 ◗ ◗ ◗ ◗...
- Page 42 ◗ ◗ ◗ ◗ ◗ ◗ ◗ ◗ ◗ ◗ ◗...
- Page 43 ◗ ◗ ◗ ◗ ◗...
- Page 44 ◗ ◗...
- Page 45 ◗ ◗...
- Page 47 ◗...
- Page 49 ◗ ◗ ◗...
- Page 51 ◗...
- Page 53 ◗ ◗...
- Page 54 ◗ ◗ ◗ ◗...
- Page 55 ◗ ◗ ◗ ◗ ◗ ◗ ◗ ◗ ◗ ◗ ◗ ◗ ◗...
- Page 56 ◗ ◗ ◗ ◗ ◗...
- Page 57 ◗ ◗...
- Page 60 ◗...
- Page 61 ◗ ◗...
- Page 62 ◗...
- Page 63 ◗...
- Page 65 ◗ ◗ ◗ ◗ ◗...
- Page 66 ◗...
- Page 67 ◗ ◗ ◗ ◗ ◗ ◗ ◗ ◗ ◗ ◗ ◗...
- Page 68 ◗ ◗ ◗ ◗ ◗...
- Page 69 ◗ ◗...
- Page 70 ◗ ◗...
- Page 72 ◗...
- Page 74 ◗ ◗ ◗...
- Page 76 ◗...
- Page 78 ◗ ◗ ◗...
- Page 79 ◗ ◗ ◗...
- Page 80 ◗ ◗ ◗ ◗ ◗ ◗ ◗ ◗ ◗ ◗ ◗...
- Page 81 ◗ ◗ ◗ ◗ ◗...
- Page 82 ◗ ◗...
- Page 83 ◗ ◗...
- Page 85 ◗...
- Page 87 ◗ ◗ ◗...
- Page 89 ◗...
- Page 91 ◗ ◗ ◗ ◗ ◗...
- Page 92 ◗...
- Page 106 ◗ ◗ ◗ ◗ ◗ ◗ ◗ ◗ ◗ ◗ ◗ ◗ ◗...
- Page 107 ◗ ◗ ◗ ◗...
- Page 108 ◗ ◗...
- Page 109 ◗...
- Page 110 Atunci când clătiţi aparatul, este posibil ca apa să curgă prin partea inferioară. Acest lucru este normal şi nepericulos.
- Page 111 ◗...
- Page 113 ◗ ◗ ◗...
- Page 114 Nu amestecaţi cuţitele şi sitele de protecţie, pentru a asigura performanţe optime.
- Page 115 ◗...
- Page 117 Cauza 1: Capetele de bărbierire sunt murdare. Aparatul nu a fost clătit de foarte mult timp sau apa pentru clătire nu a fost suficient de caldă. ◗ Cauza 2: Fire lungi de păr blochează capetele de bărbierire. ◗ Cauza 3: Capetele de bărbierire sunt deteriorate sau uzate.
- Page 118 ◗ Unitatea de bărbierire nu a fost corect poziţionată. ◗...
- Page 119 ◗ ◗ ◗ ◗ ◗ ◗ ◗ ◗ ◗ ◗ ◗...
- Page 120 ◗ ◗ ◗ ◗ ◗...
- Page 121 ◗ ◗...
- Page 122 ◗ ◗...
- Page 124 ◗...
- Page 126 ◗ ◗ ◗...
- Page 128 ◗...
- Page 130 ◗ ◗ ◗ ◗...
- Page 131 ◗ ◗...
- Page 132 ◗ ◗ ◗ ◗ ◗ ◗ ◗ ◗ ◗ ◗ ◗...
- Page 133 ◗ ◗ ◗ ◗ ◗...
- Page 134 ◗ ◗...
- Page 135 ◗ ◗...
- Page 137 ◗...
- Page 139 ◗ ◗ ◗...
- Page 141 ◗...
- Page 143 ◗ ◗...
- Page 144 ◗ ◗ ◗ ◗...
- Page 145 ◗ ◗ ◗ ◗ ◗ ◗ ◗ ◗ ◗ ◗ ◗...
- Page 146 ◗ ◗ ◗ ◗...
- Page 147 ◗ ◗ ◗...
- Page 148 ◗ ◗...
- Page 150 ◗...
- Page 152 ◗ ◗ ◗...
- Page 154 ◗...
- Page 156 ◗ ◗...
- Page 157 ◗ ◗ ◗ ◗...
- Page 158 ◗ ◗ ◗ ◗ ◗ ◗ ◗ ◗ ◗ ◗ ◗...
- Page 159 ◗ ◗ ◗ ◗ ◗...
- Page 160 ◗ ◗...
- Page 161 ◗ ◗...
- Page 163 ◗...
- Page 165 ◗ ◗...
- Page 166 ◗...
- Page 167 ◗...
- Page 169 ◗ ◗ ◗...
- Page 170 ◗ ◗ ◗...
- Page 171 ◗ ◗ ◗ ◗ ◗ ◗ ◗ ◗ ◗ ◗ ◗ ◗...
- Page 172 ◗ ◗ ◗ ◗...
- Page 173 ◗ ◗...
- Page 174 ◗ ◗...
- Page 176 ◗...
- Page 178 ◗ ◗ ◗...
- Page 179 ◗...
- Page 181 ◗...
- Page 182 ◗ ◗ ◗ ◗ ◗...
- Page 183 ◗ ◗ ◗ ◗ ◗ ◗ ◗ ◗ ◗ ◗ ◗...
- Page 184 ◗ ◗ ◗ ◗...
- Page 185 ◗ ◗ ◗...
- Page 186 ◗ ◗...
- Page 189 ◗...
- Page 191 ◗ ◗ ◗...
- Page 193 ◗...
- Page 195 ◗ ◗...
- Page 196 ◗ ◗ ◗ ◗...
- Page 197 ◗ ◗ ◗ ◗ ◗ ◗ ◗ ◗ ◗ ◗ ◗ ◗...
- Page 198 ◗ ◗ ◗ ◗...
- Page 199 ◗ ◗...
- Page 200 ◗ ◗...
- Page 202 ◗...
- Page 204 ◗ ◗ ◗...
- Page 206 ◗...
- Page 208 ◗ ◗ ◗...
- Page 209 ◗ ◗ ◗...
- Page 212 4222 002 48171...
Need help?
Do you have a question about the HQ8140 and is the answer not in the manual?
Questions and answers