Table of Contents
Advertisement
Quick Links
Advertisement
Table of Contents

Related Manuals for Ness iCentral SYSTEM ONE M200


Summary of Contents for Ness iCentral SYSTEM ONE M200
- Page 1 iCentral System One Music/Video/Intercom system. M200/M250 User Manual Products covered System One System One System One System One System One M250 Traditional Master D200 Door Stations Alloy Video Door R200 Room Stations K200 Desktop Stations M200 Compact Master Video & Non-Video Station Rev4.4...
- Page 2 All rights reserved. No part of this publication may be reproduced, transmitted or stored in a retrieval system in any form or by any means, electronic, mechanical, photocopying, recording, or otherwise, without the prior written permission of Ness. Ness reserves the right to make changes to features and specifications at any time without prior notification in the interest of ongoing product development and improvement.
-
Page 3: Table Of Contents
CONTeNTS INTRODUCTION ............................. 4 FeATUReS .............................. 4 SPeCIFICATIONS ........................... 4 Key FUNCTIONS ..........................5-7 INITIAl POWeR-UP..........................8 RADIO/ClOCK FUNCTIONS – AM/FM VeRSION .................. 8 Setting the clock ..........................8 Radio operation ..........................8 Tuning the radio ..........................8 Storing radio presets ......................... 8 Using the wake-up alarm ........................ -
Page 4: Introduction
INTRODUCTION The System One Home Communication System can be installed using up to 20 stations offering great flexibility and convenience. This total Home Communications System continues to set the highest standards of quality and performance for which name has become well known. the System One FEATURES Colour video display with menu driven programming *... -
Page 5: Key Functions
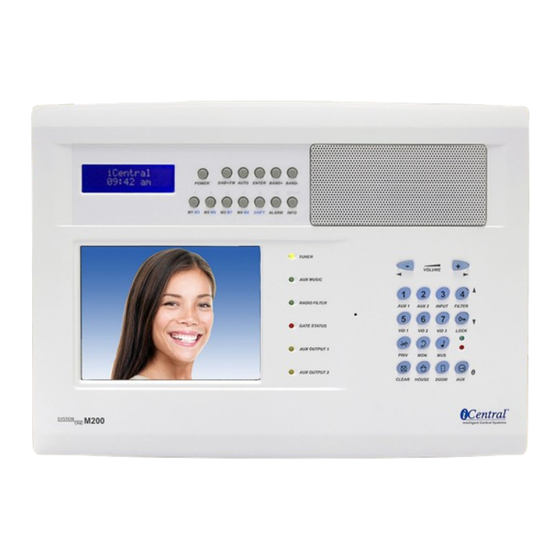
KEY FUNCTIONS 1. Display for Clock/Radio 2. Volume Buttons 3. Numbered Call Buttons – for calling individual stations 4. Lock Release Button 5. LED Indicators - Intercom Functions GREEN Talk/Monitor/Privacy Music/In Use/Audio Off 6. Mode Buttons PRIV Turns Privacy mode on/off Turns Monitor mode on/off Turns Music mode on/off 7. - Page 6 TUNER AUX MUSIC AM/FM FILTER GATE STATUS AUX OUTPUT 1 AUX OUTPUT 2 iCentral M250 Intelligent Central Systems M250 Master Station...
-
Page 8: Initial Power-Up
INITIAL POWER-UP On power up the master displays a blue welcome screen showing the applicable software version. Press the CLEAR button to clear screen the screen. RADIO/CLOCK FUNCTIONS – AM/FM VERSION SETTING THE CLOCK Clock and radio setup applies only to ... -
Page 9: Radio/Clock Functions - Dab+/Fm Version
... -
Page 10: Bluetooth Operation
BLUETOOTH OPERATION (for applicable models) PAIRING • Press the POWER button at the master station to turn the radio ON (The time is displayed when radio is turned off) • Repeatedly press the DAB+/FM button until Bluetooth is displayed • Open Bluetooth settings on your mobile phone or other Bluetooth audio device. • Press the AUTO button on the master station for 3 seconds. (PAIRING will flash on the on the master station’s radio display) • Follow the appropriate pairing procedure on your Bluetooth audio device LISTENING TO AUDIO FROM A BLUETOOTH DEVICE • Ensure the radio is ON and set to BLUETOOTH mode as per first two steps above • Ensure the green TUNER indicator is illuminated at the master station (Press AUX then 3 if the green TUNER indicator is not illuminated) • Press the MUS button at individual intercom station(s) to enable Music mode at stations where music is required (The red light will be ON when Music mode is enabled) • Select and play music from your Bluetooth audio device • The volume setting on your Bluetooth audio device should be adjusted to give a comfortable music volume throughout the system. • The music volume can then be adjusted individually at each station using the VOLUME buttons. • To turn music off at individual stations, press the MUS button again at the applicable station to exit Music mode (The red light will be OFF when Music mode is disabled) ADDITIONAL FEATURES (available with most Bluetooth devices) • Use the BAND+ and BAND- buttons to select previous or next track from intercom master... -
Page 11: Intercom Operation
INTERCOM OPERATION DOOR/GATE STATION OPERATION When the Doorbell button is pressed at the front door station, the electronic chime is heard at all stations. On systems equipped with door camera and master, a video image of the visitor will appear at the master station for 20 seconds. -
Page 12: Select Calls
SELECT CALLS A Select Call allows you to make an intercom call to a particular station or group of stations. Your installer will preset each of your room stations with a number and a numbering format (Single or Double Digit). ... -
Page 13: Audio Off Mode
AUDIO OFF MODE The VOLUME buttons at each station control the audio volume for that station however some audio will still be heard even with the volume adjusted to minimum. To completely turn off all audio at any station, press and hold the MUS button until the red light begins to flash slowly. -
Page 14: Audio Input Selector
AUDIO INPUT SELECTOR Press AUX button followed by 3 button at master to change the audio input source (Radio or Auxiliary Music) The TUNER LED or AUX MUSIC LED will illuminate indicating the active input NOTE: On systems configured for double digit operation, the 7 button may be used instead of the AUX button to conform with cases where the 7 button is used to activate the auxiliary outputs. -
Page 15: Wireless Audio Input
To set up and operate for systems not using a master: Ensure the audio source is connected to the Input Jack using the appropriate lead Ensure the radio is turned off using the Power button Turn on the audio source, (iPod, MP3, CD, DVD, Tape, Computer) ...
Need help?
Do you have a question about the iCentral SYSTEM ONE M200 and is the answer not in the manual?
Questions and answers