Advertisement
Quick Links
COMMUNITY TABLE
22
21
20
19
22
21
20
19
ASSEMBLY INSTRUCTIONS
DO NOT THROW AWAY!
Revised: 18 Jul 2024
18
17
16
15
18
17
16
15
14
13
12
11
14
13
12
11
INSTRUCCIONES DE
ENSEMBLAJE
NO LA TIRE
10
9
8
7
10
9
8
7
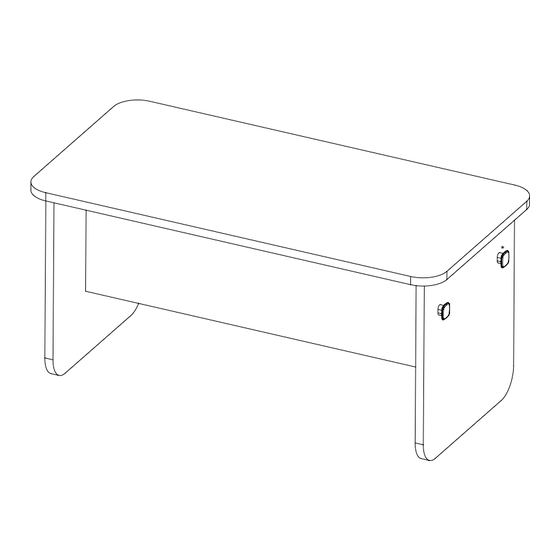
* Side panels shown with
optional bag hooks
INSTRUCTIONS DE
MONTAGE
NE PAS JETER
6
5
4
3
*
UNLESS OTHERWISE SPECIFIED:
FINISH:
D
DIMENSIONS ARE IN MILLIMETERS
B
SURFACE FINISH:
E
TOLERANCES:
LINEAR:
ANGULAR:
NAME
SIGNATURE
DATE
DRAWN
CHK'D
APPV'D
MFG
Q.A
MATERIAL:
WEIGHT:
6
5
4
3
Page 1 of 6
Advertisement

Related Manuals for Mooreco COMMUNITY TABLE


Summary of Contents for Mooreco COMMUNITY TABLE
- Page 1 COMMUNITY TABLE UNLESS OTHERWISE SPECIFIED: FINISH: DIMENSIONS ARE IN MILLIMETERS SURFACE FINISH: TOLERANCES: LINEAR: ANGULAR: NAME SIGNATURE DATE DRAWN CHK'D APPV'D MATERIAL: WEIGHT: * Side panels shown with optional bag hooks INSTRUCCIONES DE INSTRUCTIONS DE ASSEMBLY INSTRUCTIONS ENSEMBLAJE MONTAGE DO NOT THROW AWAY!
-
Page 2: Parts List
Parts List Hardware Cam Bolt x 16 Cam Insert x 16 Dowel Insert x 16 Side Panel (shown with optional bag hooks) UNLESS OTHERWISE SPECIFIED: FINISH: DEBURR AND DIMENSIONS ARE IN MILLIMETERS BREAK SHARP Modesty Panel SURFACE FINISH: EDGES TOLERANCES: LINEAR: ANGULAR: NAME... - Page 3 STEP 1 Install cam bolt hardware into both side panels. For each panel: a. Dowel inserts go into the four central holes, followed by cam bolts threading into the dowel inserts. b. Cam inserts go into the four holes along the top edge of the side panel.
- Page 4 STEP 3 Slide modesty panel onto cam bolts on one of the side panels and tighten cam locks. Repeat process for the second modesty panel. *NOTE* Hardware to face inwards. STEP 4 Slide second end panel into opposite end of modesty panels and tighten cam locks.
- Page 5 STEP 5 Install cam bolt hardware into underside of table top. Dowel inserts go into each hole, followed by cam bolts threading into the dowel inserts. STEP 6 Flip assembly over and add top to base assembly. * Side panels shown with optional bag hooks UNLESS OTHERWISE SPECIFIED: FINISH:...
- Page 6 STEP 7 Tighten all remaining cam locks attaching the top to the base assembly. * Side panels shown with optional bag hooks UNLESS OTHERWISE SPECIFIED: FINISH: DEBURR AND DIMENSIONS ARE IN MILLIMETERS BREAK SHARP SURFACE FINISH: EDGES TOLERANCES: LINEAR: ANGULAR: COMPLETE NAME SIGNATURE...
Need help?
Do you have a question about the COMMUNITY TABLE and is the answer not in the manual?
Questions and answers