Table of Contents
Advertisement
Available languages
Available languages
Quick Links
NL
Handleiding
FR
Mode d'emploi
DE
Gebrauchsanleitung
EN
Instruction booklet
ES
Manual de instrucciones
IT
Istruzioni per l'uso
CZ
Návod k použití
SK
Návod na použitie
DO1150K
Volautomatische espressomachine
Machine à expresso automatique
Vollautomatische Espresso-Maschine
Fully automatic espresso machine
Cafetera completamente automática
Macchina per caffè espresso completamente automatica
Plně automatické espresso
Plne automatické espresso
www.domo-elektro.be
PRODUCT OF
Advertisement
Table of Contents

Related Manuals for Linea 2000 Domo DO1150K


Summary of Contents for Linea 2000 Domo DO1150K
- Page 1 DO1150K Handleiding Volautomatische espressomachine Mode d’emploi Machine à expresso automatique Gebrauchsanleitung Vollautomatische Espresso-Maschine Instruction booklet Fully automatic espresso machine Manual de instrucciones Cafetera completamente automática Istruzioni per l’uso Macchina per caffè espresso completamente automatica Návod k použití Plně automatické espresso Návod na použitie Plne automatické...
- Page 2 www.domo-elektro.be...
- Page 3 Lees aandachtig alle instructies. Bewaar deze handleiding voor latere raadpleging. Lisez attentivement les instructions. Gardez le mode d’emploi pour utilisation ultérieure. Lesen Sie genau die Anweisungen. Bewahren Sie die Gebrauchsanleitung für spätere Referenz auf. Read all instructions carefully. Save this instruction manual for future reference. Lea detenidamente todas las instrucciones.
-
Page 4: Garantie
GARANTIE Beste klant, Hartelijk dank voor je vertrouwen in DOMO. Wij wensen je veel plezier toe met je nieuwe aankoop. Al onze producten ondergaan een strenge kwaliteitscontrole voor ze bij jou terechtkomen. Mocht je desondanks toch problemen ondervinden met je toestel, dan betreuren we dat oprecht en staan we voor je klaar om dit zo snel mogelijk op te lossen. - Page 5 VEILIGHEIDSVOORSCHRIFTEN Wanneer je elektrische toestellen gebruikt, moeten volgende veiligheidsinstructies in acht genomen worden. Ongevallen of schade veroorzaakt door het niet volgen van deze regels zijn op eigen risico. Noch de fabrikant, de importeur, noch de leverancier kan daar dan verantwoordelijk voor geacht worden. •...
- Page 6 I ELEKTRISCHE WAARSCHUWINGEN • Om ongevallen te vermijden, mag dit toestel niet bediend worden door een externe bediening, zoals een externe timer of een aparte afstandsbediening, of op een net aangesloten worden dat regelmatig op- en afgezet wordt. • Trek de stekker uit het stopcontact wanneer het toestel niet in gebruik is, vooraleer onderdelen te monteren of demonteren en vooraleer het toestel te reinigen.
- Page 7 • Zet dit toestel nooit op of in de buurt van een gasvuur of elektrisch vuur of op een plaats waar het in contact zou kunnen komen met een warm toestel. I GEBRUIK • Gebruik het toestel enkel voor het doel waarvoor het bestemd is. •...
- Page 8 • Wees voorzichtig om geen vloeistof te morsen op de voedingskabel. • Gebruik altijd koud water, of water op kamertemperatuur, om het waterreservoir te vullen. Gebruik nooit heet water of andere vloeistoffen dan water! • Overschrijd de MAX-indicatie niet bij het vullen van het waterreservoir.
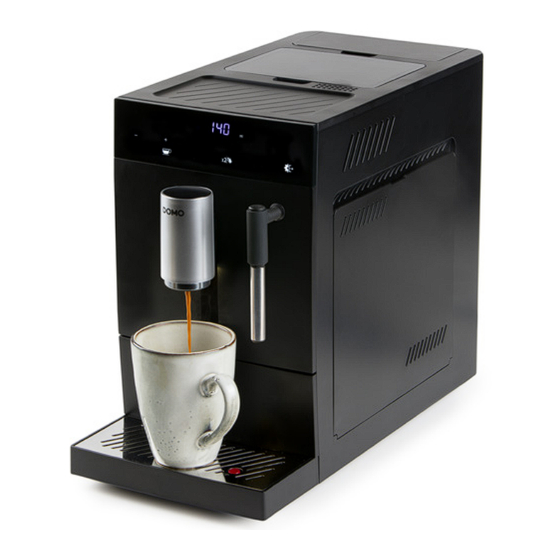
- Page 9 ONDERDELEN 1. Waterreservoir 10. Lekschaal 2. Deksel koffiebonenreservoir 11. Aan/uit-knop 3. Koffiebonenreservoir 12. Koffiedikopvangbak 4. Draaiknop maalgraadkeuze 13. Stoompijp 5. Kopjeswarmer 14. Zetgroep 6. Bedieningspaneel 15. Zijpaneel 7. Koffie-uitloop 16. Reinigingsborsteltjes: 1 fijn en 1 grof 8. Rooster lekschaal 17. Set reserve-afdichtingsringen 9.
- Page 10 BEDIENINGSPANEEL Toets Omschrijving Espresso (kleine, straffe koffie) Lungo (grote espresso, mildere koffie) of Americano (espresso aangelengd met extra water) Heet water 2 koppen | Spoelen Stomen | Bevestigen Instellingen | Afsluiten Indicatielampje Probleem Het koffiebonenreservoir is leeg Er worden achtereenvolgens 2 koppen gezet Het zijpaneel is open Het waterreservoir is leeg of niet (goed) geplaatst Constant: toestel dient ontkalkt te worden...
-
Page 11: Voor Het Eerste Gebruik
VOOR HET EERSTE GEBRUIK 1. Verwijder alle verpakkingsmaterialen en eventuele promotionele stickers. 2. Plaats het toestel op een vlakke, stabiele ondergrond. Zorg voor voldoende ruimte rondom het toestel voor ventilatie. 3. Plaats de lekschaal en koffiedikopvangbak. Zorg ervoor dat deze correct geïnstalleerd zijn. 4. - Page 12 Voor de optimale koffietemperatuur is het aangeraden om je kopje vooraf op te warmen op de kopjeswarmer, bovenop het toestel. Je kan je kopjes hier ook bewaren, zodat je steeds een warm kopje klaar hebt staan. BEREID EEN ESPRESSO 1. Pas de hoogte van de koffietuit aan en plaats er een kopje onder. 2.
- Page 13 • Druk tijdens stap 2 (op het display wordt "2" en en de huidig ingestelde waterhoeveelheid weergegeven in "ml") op + of - om de hoeveelheid extra heet water aan te passen. Om de koffiebereiding vroegtijdig te stoppen, druk je op de -toets.
- Page 14 1. INSTELLINGEN VOOR KOFFIEBEREIDINGEN Eenmaal in de instellingeninterface knipperen de pictogrammen voor espresso en lungo/americano. Espresso • Druk op de espresso-toets • Pas de hoeveelheid gemalen koffie aan (op het display wordt deze in “g” weergegeven). Druk op + of - om de hoeveelheid te verhogen of te verlagen. •...
- Page 15 3. Plaats het waterreservoir in het toestel en plaats een bakje van minimaal 1100 ml onder de koffie-uitloop. 4. Druk in de standby-modus gedurende 3 seconden op de -toets om de instellingeninterface te openen en druk vervolgens 4x op de -toets tot het -icoon oplicht.
-
Page 16: Reiniging En Onderhoud
• Als de koffiebonen niet goed worden gemalen, zijn de koffiebonen mogelijk te nat of zit er te veel koffieboonvet in de molen. Voeg in het laatste geval molenreiniger toe aan het koffiebonenreservoir en volg de instructies op de verpakking van de molenreiniger. REINIGING EN ONDERHOUD Het is aangeraden stap 1 tot en met stap 6 dagelijks uit te voeren. - Page 17 6. Reinig het stoompijpje na elk gebruik zoals eerder beschreven in deze handleiding. Verwijder dagelijks het pijpje en spoel het grondig onder stromend water. 7. Spoel het waterreservoir om de 3 dagen onder stromend water. 8. Reinig het koffiebonenreservoir wekelijks. Haal de resterende bonen uit het bakje (of doe de reiniging wanneer het reservoir leeg is) en veeg het schoon met een zachte doek.
-
Page 18: Problemen En Oplossingen
Indicatielampje/ Betekenis Oplossing Waarschuwing De koffiedikopvangbak is vol of de Leeg de koffiedikopvangbak (na elke koffiedikopvangbak of lekschaal zijn 8 kopjes, wanneer het toestel de niet (goed) geplaatst. waarschuwing geeft of wanneer het toestel voor lange tijd niet gebruikt zal worden) en installeer het bakje en de lekschaal correct in het toestel. - Page 19 PROBLEMEN OPLOSSINGEN Het toestel maalt en brouwt, maar er komt • Controleer of er voldoende water in het geen koffie uit de uitloop. reservoir aanwezig is. • Controleer of alle onderdelen correct geplaatst zijn. • Reinig alle onderdelen grondig. • Ontkalk het toestel zoals beschreven in deze handleiding.
- Page 20 RICHTLIJNEN Dit symbool op het product of op de verpakking wijst erop dat dit product niet als huishoudafval mag worden behandeld. Het moet naar een plaats worden gebracht waar elektrische en elektronische apparatuur wordt gerecycleerd. Als je ervoor zorgt dat dit product op de correcte manier wordt verwijderd, voorkom je mogelijk voor mens en milieu negatieve gevolgen die zich zouden kunnen voordoen in geval van verkeerde afvalbehandeling.
-
Page 21: Garantie
GARANTIE Chère cliente, cher client, Merci de faire confiance à DOMO. Nous espérons que vous apprécierez votre nouvel achat. Tous nos produits sont soumis à un contrôle de qualité strict avant de vous être livrés. Si vous rencontrez néanmoins des problèmes avec votre appareil, nous le regrettons sincèrement et nous nous engageons à... -
Page 22: Consignes De Sécurité
CONSIGNES DE SÉCURITÉ Les consignes de sécurité suivantes doivent être respectées lors de l’utilisation de tout appareil électrique. Les accidents ou dommages causés par le non-respect de ces consignes sont à vos propres risques. Ni le fabricant, ni l’importateur, ni le fournisseur ne peuvent, dans ce cas, en être tenus pour responsables. - Page 23 I AVERTISSEMENTS ÉLECTRIQUES • Pour éviter tout accident, cet appareil ne peut pas être actionné via une commande externe comme un minuteur extérieur ou une commande à distance séparée, ni être raccordé à un réseau régulièrement mis sous tension ou hors tension. •...
- Page 24 • Ne placez jamais cet appareil sur ou à proximité d’un feu au gaz ou d’un feu électrique où il pourrait entrer en contact avec un appareil chaud. I UTILISATION • N’utilisez l’appareil que pour l’usage auquel il est destiné. •...
- Page 25 de l’appareil. • Assurez-vous de ne pas renverser de liquide sur le cordon d’alimentation. • Utilisez toujours de l’eau froide ou à température ambiante pour remplir le réservoir d’eau. N’utilisez jamais d’eau chaude ou de liquides autres que de l’eau ! •...
- Page 26 PARTIES 1. Réservoir à eau 9. Indicateur de débordement 2. Couvercle du réservoir à grains 10. Bac de récupération 3. Réservoir à grains 11. Bouton de marche/arrêt 4. Molette pour la sélection de finesse de 12. Bac à marc de café broyage 13.
-
Page 27: Panneau De Commande
PANNEAU DE COMMANDE Touche Description Espresso (petit café fort) Lungo (grand expresso, café plus doux) ou Americano (expresso dilué avec de l’eau) Eau chaude 2 tasses | Rinçage Vapeur | Confirmer Réglages | Quitter Voyants Problème lumineux Le réservoir à grains est vide Deux tasses couleront consécutivement Le panneau latéral est ouvert Le réservoir d’eau est vide ou n’est pas (correctement) inséré... -
Page 28: Avant La Première Utilisation
AVANT LA PREMIÈRE UTILISATION 1. Enlevez tous les éléments d’emballage et les éventuels autocollants promotionnels. 2. Posez l’appareil sur une surface plane et stable. Prévoyez un espace suffisant tout autour de l’appareil pour assurer la ventilation. 3. Installez le bac d’égouttage et le bac à marc de café. Veillez à ce que ceux-ci soient installés correctement. - Page 29 Conseil Pour bénéficier d’une température de café optimale, il est recommandé de réchauffer votre tasse à l’avance sur le chauffe-tasse, situé sur le dessus de l’appareil. Vous pouvez également y ranger vos tasses, afin d’avoir toujours une tasse chaude prête à l’emploi. PRÉPARER UN EXPRESSO 1.
-
Page 30: Faire Mousser Le Lait
Pour arrêter prématurément la préparation du café, appuyez sur la touche DOUBLE PRÉPARATION Appuyez sur la touche pour préparer deux tasses de café à la suite. Cette fonction peut être activée avant et pendant la préparation du café. L’icône s’allume à l’écran. Tant qu’il est allumé, l’appareil effectuera la préparation sélectionnée deux fois à... -
Page 31: Réglage De La Température
1. RÉGLAGES POUR LES PRÉPARATIONS DE CAFÉ Une fois dans l’interface de réglage, les icônes pour l’expresso et le lungo/americano clignotent. Espresso • Appuyez sur la touche expresso • Réglez la quantité de café moulu (l’écran l’affiche en « g »). Appuyez sur + ou - pour augmenter ou diminuer celle-ci. -
Page 32: Informations Sur Le Produit
2. Versez le produit détartrant dans le réservoir d’eau vide et diluez-le avec de l’eau propre jusqu’à ce que le réservoir soit complètement rempli jusqu’au repère MAX. 3. Insérez le réservoir d’eau et placez un récipient d’au moins 1 100 ml sous l’écoulement du café. 4. -
Page 33: Nettoyage Et Entretien
• Si les grains de café ne sont pas moulus correctement, il se peut qu’ils soient trop humides ou qu’il y ait trop de graisse de grains de café dans le moulin. Dans ce dernier cas, ajoutez du nettoyant pour broyeur dans le récipient à grains de café et suivez les instructions figurant sur l’emballage du nettoyant pour broyeur. - Page 34 6. Nettoyez la buse à vapeur après chaque utilisation, comme décrit précédemment dans ce manuel. Retirez la buse quotidiennement et rincez-la soigneusement à l’eau courante. 7. Rincez le réservoir d’eau à l’eau courante tous les 3 jours. 8. Nettoyez le réservoir à grains de café chaque semaine. Retirez les grains restants du bac (ou effectuez le nettoyage lorsque le réservoir est vide) et nettoyez-le à...
-
Page 35: Problèmes Et Solutions
Témoin / Signification Solution Avertissement L’unité de brassage n’est pas Installez correctement l’unité de positionnée (correctement). brassage dans l’appareil. Lors de l’insertion de l’unité de brassage, vous devez entendre un déclic. Tant que vous ne l’entendez pas, l’unité de brassage n’est pas correctement positionnée. - Page 36 PROBLÈMES SOLUTIONS Le café est trop léger ou trop liquide. • La mouture est trop grossière. Tournez le sélecteur de mouture pour obtenir une mouture plus fine pendant que l’appareil moud. • Les grains de café sont peut-être trop humides ou il y a trop de graisse de grain de café...
- Page 37 PROBLÈMES SOLUTIONS L’unité de brassage ne fonctionne pas. • Ouvrez le panneau latéral, puis appuyez sur le bouton expresso pendant 3 secondes pour réinitialiser l’unité de pressage. • Si cela ne suffit pas, contactez le service clientèle de DOMO ou le magasin d’achat. L’unité...
- Page 38 GARANTIE Sehr geehrte Kundin, sehr geehrter Kunde, herzlichen Dank für Ihr Vertrauen in DOMO. Wir wünschen Ihnen viel Freude mit Ihrer neuen Anschaffung. Alle unsere Produkte werden einer strengen Qualitätskontrolle unterzogen, bevor sie bei Ihnen eintreffen. Sollten Sie dennoch Probleme mit Ihrem Gerät haben, bedauern wir dies aufrichtig und sind bestrebt, das Problem so schnell wie möglich zu beheben.
- Page 39 SICHERHEITSVORKEHRUNGEN Wenn Sie elektrische Geräte verwenden, müssen folgende Sicherheitshinweise beachtet werden. Für Unfälle oder Schäden, die durch die Nichtbefolgung dieser Regeln verursacht werden, haften Sie selbst. Weder der Hersteller noch der Importeur oder der Lieferant können in solchen Fällen zur Verantwortung gezogen werden.
- Page 40 I ELEKTRISCHE WARNHINWEISE • Zur Vermeidung von Unfällen sollte das Gerät nicht mit einem externen Zusatzgerät, wie z. B. über einen externen Timer oder Fernbedienung, oder an einen Stromkreislauf angeschlossen werden, der regelmäßig ein- und ausgeschaltet wird. • Netzstecker ziehen, wenn das Gerät nicht in Gebrauch ist, bevor Teile montiert oder abmontiert werden und vor der Reinigung.
- Page 41 • Stellen Sie das Gerät immer auf eine stabile, flache und trockene Oberfläche. • Stellen Sie das Gerät nicht in der Nähe oder auf einer Gasflamme, einer elektrischen Platte oder an einer Stelle ab, auf der es in Kontakt mit einem Elektroofen oder einem anderen heißen Gerät kommen kann.
- Page 42 • Bewegen oder kippen Sie das Gerät niemals, während es in Betrieb ist oder noch warm ist. Schalten Sie das Gerät aus, ziehen Sie den Netzstecker und lassen Sie es immer abkühlen, bevor Sie es bewegen. • Stellen Sie sicher, dass der Wassertank und die Auffangschale leer sind, bevor Sie das Gerät bewegen.
- Page 43 TEILE 1. Wassertank 10. Auffangschale 2. Deckel für Kaffeebohnenbehälter 11. Ein-/Aus-Taste 3. Kaffeebohnenbehälter 12. Kaffeesatzbehälter 4. Drehknopf für die Mahlgradauswahl 13. Dampfdüse 5. Tassenwärmer 14. Brühgruppe 6. Bedienfeld 15. Seitenteil 7. Kaffeeauslauf 16. Reinigungsbürsten: 1 feine und 1 grobe 8. Gitterrost Auffangschale 17.
- Page 44 BEDIENFELD Tasten Beschreibung Espresso (kleiner, starker Kaffee) Lungo (großer Espresso, milderer Kaffee) oder Americano (Espresso mit extra Wasser verdünnt) Heißes Wasser 2 Tassen | Spülung Dampfvorgang | Bestätigen Einstellungen | Beenden Kontroll- Problem leuchten Der Kaffeebohnenbehälter ist leer Zwei Tassen Kaffee werden nacheinander gebrüht Das Seitenteil ist offen Der Wassertank ist leer oder nicht (richtig) eingesetzt Konstant: Gerät muss entkalkt werden...
-
Page 45: Vor Der Ersten Inbetriebnahme
VOR DER ERSTEN INBETRIEBNAHME 1. Sämtliches Verpackungsmaterial und mögliche Werbeaufkleber entfernen. 2. Stellen Sie das Gerät auf einen flachen, stabilen Untergrund. Achten Sie darauf, dass um das Gerät herum genug Freiraum für ausreichende Belüftung vorhanden ist. 3. Setzen Sie die Auffangschale und den Kaffeesatzbehälter ein. Stellen Sie sicher, dass diese korrekt eingesetzt sind. - Page 46 Tipp Für eine optimale Kaffeetemperatur empfiehlt es sich, die Tasse vorher auf dem Tassenwärmer auf der Oberseite des Geräts zu erwärmen. Hier können Sie auch Ihre Tassen aufbewahren, so dass Sie immer eine warme Tasse zur Hand haben. EINEN ESPRESSO ZUBEREITEN 1.
-
Page 47: Milch Aufschäumen
• Während Schritt 1 (auf dem Display erscheint „1“ und die aktuell eingestellte Wassermenge in „ml“), drücken Sie + oder -, um die Menge des gebrühten Kaffees einzustellen. • Während Schritt 2 (auf dem Display erscheint „2“ und die aktuell eingestellte Wassermenge in „ml“), drücken Sie + oder -, um die Menge an zusätzlichem heißen Wasser einzustellen. - Page 48 EINSTELLUNGEN UND KONFIGURATION Drücken Sie im Standby-Modus die -Taste 3 Sekunden lang, um die Einstellungsoberfläche zu öffnen. Drücken Sie nach jedem Schritt erneut auf die -Taste, um zum nächsten Schritt in der Einstellungsoberfläche zu gelangen. Um in den Standby-Modus zurückzukehren, drücken Sie die -Taste mehrmals, um alle Schritte schnell zu durchlaufen.
-
Page 49: Informationen Zum Produkt
5. ENTKALKUNG Wenn das -Symbol aufleuchtet, muss das Gerät entkalkt werden. Verwenden Sie dazu ein für Espressomaschinen geeignetes Entkalkungsmittel. 1. Lösen Sie den Entkalker in Wasser auf. Befolgen Sie dabei die Anweisungen auf der Verpackung des Entkalkers. 2. Füllen Sie das Entkalkungsmittel in den leeren Wassertank und verdünnen Sie es mit sauberem Wasser, bis der Tank vollständig bis zur MAX-Anzeige gefüllt ist. -
Page 50: Reinigung Und Wartung
• Wenn Sie den Mahlgrad gröber einstellen, erhalten Sie säuerlichere Aromen. Wenn Sie einen feineren Mahlgrad verwenden, erhalten Sie bitterere Aromen. • Füllen Sie den Bohnenbehälter nicht zu voll und lassen Sie die Kaffeebohnen nicht zu lange darin liegen, damit sie nicht zu nass werden und ihre Frische verlieren (besonders an feuchten Tagen). - Page 51 5. Reinigen Sie das Gehäuse und das Bedienfeld außen und innen mit einem weichen, feuchten Tuch. 6. Reinigen Sie die Dampfdüse nach jedem Gebrauch wie oben in dieser Anleitung beschrieben. Nehmen Sie die Düse täglich heraus und spülen Sie sie gründlich unter fließendem Wasser ab. 7.
-
Page 52: Probleme Und Lösungen
Anzeigeleuchten/ Bedeutung Lösung Warnhinweise Die Brühgruppe ist nicht (richtig) Setzen Sie die Brühgruppe richtig eingesetzt. in das Gerät ein. Beim Einsetzen der Brühgruppe sollten Sie ein Klickgeräusch hören. Solange das nicht der Fall ist, ist die Brühgruppe nicht richtig eingesetzt. Der Kaffeesatzbehälter ist voll oder Leeren Sie den Kaffeesatzbehälter der Kaffeesatzbehälter oder die... - Page 53 PROBLEME LÖSUNGEN Wenn Sie Tasten auf dem Bedienfeld drücken, • Das Bedienfeld ist schmutzig. Reinigen Sie reagiert das Gerät nicht oder nur verzögert. es mit einem weichen Tuch. Der Kaffee ist zu dünn oder wässrig. • Dann ist der Mahlgrad zu grob. Drehen Sie den Mahlgradregler auf einen feineren Mahlgrad, während das Gerät mahlt.
- Page 54 PROBLEME LÖSUNGEN Die Milch schäumt nicht auf. • Es kommt kein Dampf aus der Dampfdüse. Reinigen Sie sie gründlich und versuchen Sie es erneut. • Die verwendete Milch ist nicht zum Aufschäumen geeignet. Verwenden Sie fettreiche Milch. Die Brühgruppe funktioniert nicht. •...
-
Page 55: Warranty
WARRANTY Dear Customer, Thank you for your confidence in DOMO. We do hope you enjoy your new purchase. Before reaching you, all our products undergo a strict quality inspection. Should you still encounter problems with your appliance, then we are truly sorry and will do everything possible to resolve the situation quickly. -
Page 56: Safety Instructions
SAFETY INSTRUCTIONS When using electrical appliances, basic safety precautions should always be taken, including the following. Any injury or damage caused by failure to comply with these rules are at your own risk. Neither the manufacturer, importer, or the supplier may be held liable. - Page 57 separate remote control, or connected to a circuit that is regularly switched on and off by the utility. • The appliance must be disconnected from its power source when not in use, during service and when replacing parts. If present, first turn all the buttons to the 'off' position, then pull the plug out of the socket by grasping the plug itself.
- Page 58 • Do not operate the appliance with wet hands. • The use of accessories that are not recommended or sold by the manufacturer can cause fire, electrical shock or injuries. Only use the utensils delivered with the appliance. I CLEANING AND MAINTENANCE •...
- Page 59 • Use the grinder to grind natural coffee beans only. Never add ground coffee, instant coffee, caramelised or frozen coffee beans, or other ingredients to the coffee bean hopper. SAVE THESE INSTRUCTIONS FOR FUTURE REFERENCE All images and descriptions in this manual are purely indicative and may differ slightly from the actual device.
-
Page 60: Control Panel
CONTROL PANEL Touch button Description Espresso (small, strong coffee) Lungo (large espresso, milder coffee) or Americano (espresso diluted with extra water) Hot water 2 cups | Rinse Steam | Confirm Settings | Exit Indicator light Issue The coffee bean hopper is empty 2 cups are prepared in succession The side panel is open The water tank is empty or not inserted (correctly) -
Page 61: Before The First Use
BEFORE THE FIRST USE 1. Remove all packaging materials and any promotional stickers. 2. Place the appliance on a flat, stable surface. Provide adequate space around the appliance for ventilation. 3. Insert the drip tray and coffee grounds collection tray. Make sure these are positioned correctly. 4. -
Page 62: Preparing An Espresso
To achieve the optimal coffee temperature, we recommend that you prewarm your cup using the cup warmer on top of the appliance. You can also store your cups here, so you always have a warmed cup ready to use. PREPARING AN ESPRESSO 1. -
Page 63: Settings And Configuration
DUAL PREPARATION Press the button to brew two cups of coffee in succession. This can be done both prior to brewing the coffee and while the coffee is brewing. The icon will light up on the display. While this is lit, the appliance will always brew 2x the selected preparation. Press the button again to turn off this function. -
Page 64: Temperature Setting
Espresso • Press the espresso button • Adjust the quantity of ground coffee (indicated in ‘g’ on the display). Press + or - to increase or decrease the quantity. • Then press the button to set the coffee volume (this is shown in ‘ml’ on the display). Press + or - to increase or decrease the coffee volume. -
Page 65: Product Information
6. Once the water tank is empty, rinse it, fill it again with clean water and insert the tank back into the appliance. Repeat this step until the appliance stops dispensing water and the descaling process is finished. The icon will turn off and the appliance will return to standby mode. 6. - Page 66 3. Open the side panel. Remove the brewing unit by pressing the button on the side of the brewing unit and pulling the brewing unit towards you. Rinse the brewing unit thoroughly under running water and dry. Never clean the brewing unit in the dishwasher! 4.
- Page 67 9. Place all parts back in their original position. If a part is not (properly) installed, the appliance will indicate this on the display (see ‘Indicator lights and warnings’). Do not immerse unit, cord, or plug in water or other liquid. Never use aggressive or abrasive cleaning agents.
-
Page 68: Problems And Solutions
PROBLEMS AND SOLUTIONS PROBLEM SOLUTION The appliance does not turn on when the on/ • Check the plug is placed in the socket. off button is pushed. • Check the appliance is connected to a working wall socket. The display shows a dotted rectangle. •... - Page 69 PROBLEM SOLUTION The grinder is not working. • Check there are no foreign objects blocking the grinder. Remove these if present. • The coffee beans may be too wet or there may be too much coffee bean oil in the grinder.
- Page 70 GUIDELINES This symbol on the product or on its packaging indicates that this product may not be treated as household waste. Instead it must be brought to the applicable collection point for recycling of electrical and electronic equipment. By ensuring this product is disposed of correctly, you will help prevent potential negative consequences for the environment and human health, which could otherwise be caused by inappropriate waste handling of this product.
- Page 71 GARANTIA Estimado cliente, Muchas gracias por depositar su confianza en DOMO. Esperamos que disfrute de su nueva compra. Todos nuestros productos se someten a un estricto control de calidad antes de llegar a sus manos. Si, a pesar de todo, experimenta algún problema con su dispositivo, lo lamentamos sinceramente y estamos dispuestos a solucionarlo lo antes posible.
-
Page 72: Instrucciones De Seguridad
INSTRUCCIONES DE SEGURIDAD Cuando utilice aparatos eléctricos, se deben seguir las instrucciones de seguridad mencionadas a continuación. Los accidentes o los daños ocasionados por el no seguimiento de estas normas son su propia responsabilidad. Ni el fabricante, ni el importador ni el distribuidor pueden ser considerados responsables a este respecto. - Page 73 I ADVERTENCIAS ELÉCTRICAS • Para evitar peligros, el aparato no debe ser controlado con un dispositivo externo, como un temporizador externo o un mando a distancia separado, ni debe conectarse a una red que se encienda y se apague con frecuencia. •...
- Page 74 • No encienda nunca el aparato cerca de una estufa de gas o eléctrica, ni en un lugar donde pueda entrar en contacto con un horno eléctrico o con otro aparato caliente. I USO • Utilice el aparato únicamente para el fin para el que está destinado.
- Page 75 • No abra el panel lateral ni el depósito de agua cuando el aparato esté en funcionamiento. Tampoco retire el depósito de agua del aparato. • Tenga cuidado de no derramar líquido sobre el cable de alimentación. • Utilice siempre agua fría, o agua a temperatura ambiente, para llenar el depósito de agua.
- Page 76 PIEZAS 1. Depósito de agua 9. Indicador de desbordamiento 2. Tapa del recipiente de café en grano 10. Bandeja de goteo 3. Recipiente de café en grano 11. Botón de encendido/apagado 4. Botón giratorio de selección del grado de 12. Recipiente de posos de café molido 13.
-
Page 77: Panel De Control
PANEL DE CONTROL Teclas Descripción Espresso (café pequeño, fuerte) Lungo (espresso grande, café más suave) o Americano (espresso diluido con más agua) Agua caliente 2 tazas | Enjuaguar Vapor | Confirmar Ajustes | Salir Lámpara Problema indicadora El depósito de granos de café está vacío Se preparan 2 tazas consecutivas El panel lateral está... -
Page 78: Antes Del Primer Uso
ANTES DEL PRIMER USO 1. Retire todos los materiales de embalaje y, en su caso, los adhesivos promocionales. 2. Coloque el aparato sobre una superficie plana y estable. Deje suficiente espacio alrededor del aparato para garantizar una buena ventilación. 3. Inserte la bandeja recogegotas y el recogedor de posos de café. Asegúrese de que están correctamente instalados. - Page 79 Consejo Para obtener la temperatura óptima del café, se recomienda calentar previamente la taza en el calienta tazas situado en la parte superior de la máquina. También puede guardar aquí sus tazas, para tener siempre una taza caliente lista para usar. PREPARAR UN ESPRESSO 1.
-
Page 80: Preparación Del Agua Caliente
PREPARACIÓN DOBLE Pulse el botón para preparar dos tazas de café seguidas. Esta función puede activarse antes o durante la preparación del café. En la pantalla se enciende el icono . Mientras esté encendido, la cafetera realizará la preparación seleccionada dos veces cada vez. Pulse de nuevo el botón para desactivar esta función. -
Page 81: Ajuste De La Temperatura
Espresso • Pulse el botón Espresso • Ajuste la cantidad de café molido (la pantalla la muestra en "g"). Pulse + o - para aumentar o disminuir la cantidad. • A continuación, pulse el botón para ajustar el volumen de café (en la pantalla se muestra en "ml"). -
Page 82: Información Del Producto
4. En modo de espera, pulse el botón durante 3 segundos para abrir la interfaz de ajustes y, a continuación, pulse el botón 4 veces hasta que se encienda el icono 5. Pulse el botón de confirmación para iniciar la descalcificación. 6. -
Page 83: Limpieza Y Mantenimiento
• Si los granos de café no se muelen correctamente, es posible que los granos de café estén demasiado húmedos o que haya demasiada grasa para granos de café en el molinillo. En este último caso, añada limpiador de molinillos al recipiente de granos de café y siga las instrucciones del envase del limpiador de molinillos. - Page 84 6. Limpie la boquilla de vapor después de cada uso como se describe anteriormente en este manual. Retire la boquilla diariamente y enjuáguela a fondo bajo el grifo. 7. Enjuague el depósito de agua bajo el grifo cada 3 días. 8.
-
Page 85: Problemas Y Soluciones
Luz indicadora/ Significado Solución Advertencia El grupo de preparación no está Instale el grupo de preparación insertado (correctamente). correctamente en la máquina. Al insertar el grupo de preparación, debe oír un clic. Si no es así, el grupo de preparación no se ha introducido correctamente. - Page 86 PROBLEMA SOLUCION El café es demasiado ligero o aguado. • El molido es demasiado grueso. Gire el selector de molido a un molido más fino mientras la máquina está moliendo. • Es posible que el café en grano esté demasiado húmedo o que haya demasiada grasa de café...
- Page 87 PROBLEMA SOLUCION El grupo de preparación no funciona. • Abra el panel lateral y pulse el botón de espresso durante 3 segundos para reiniciar la unidad de prensado. • Si esto no ayuda, póngase en contacto con el servicio de atención al cliente de DOMO o con la tienda donde compró...
-
Page 88: Garanzia
GARANZIA Gentile cliente, grazie di cuore per la fiducia accordata a DOMO. Ci auguriamo che il tuo nuovo acquisto sarà di tuo gradimento. Tutti i nostri prodotti sono sottoposti a un rigoroso controllo di qualità prima di arrivare a casa tua. Tuttavia, se si dovessero verificare problemi con l'apparecchio, ce ne rammarichiamo vivamente e provvederemo a risolverli il prima possibile. -
Page 89: Indicazioni Di Sicurezza
INDICAZIONI DI SICUREZZA Quando si utilizzano dispositivi elettrici, è necessario tenere presenti le seguenti istruzioni di sicurezza. Gli incidenti o i danni causati dalla mancata osservanza delle presenti istruzioni sono responsabilità dell’utilizzatore. Non possono essere ritenuti responsabili per tali danni né il produttore, né l’importatore, né il fornitore. - Page 90 I AVVERTENZE ELETTRICHE • Per evitare il rischio di incidenti, l’apparecchio non deve essere utilizzato con strumenti esterni, come ad esempio un timer o un sistema di telecomando separato e non deve essere collegato a una rete che viene accesa e spenta in continuazione. •...
- Page 91 • Utilizzare sempre l’apparecchio su una superficie stabile, asciutta e in piano. • Non posizionare mai l’apparecchio sopra o vicino a un fornello a gas o elettrico oppure in luoghi in cui possa venire a contatto con apparecchi a elevate temperature. I UTILIZZO •...
- Page 92 • Fare attenzione a non versare nessun liquido sul cavo di alimentazione. • Riempire sempre il serbatoio dell'acqua con acqua fredda o a temperatura ambiente. Non utilizzare mai acqua calda o liquidi diversi dall'acqua! • Non superare l'indicazione MAX quando si riempie il serbatoio dell'acqua.
- Page 93 COMPONENTI 1. Serbatoio dell’acqua 10. Cassetto scarti 2. Coperchio del serbatoio per caffè in grani 11. Pulsante di accensione/spegnimento 3. Serbatoio per caffè in grani 12. Vaschetta di raccolta per fondi di caffè 4. Manopola di selezione del grado di 13.
-
Page 94: Pannello Di Controllo
PANNELLO DI CONTROLLO Pulsanti Descrizione Caffè espresso (caffè espresso in tazzina) Caffè lungo (espresso abbondante, caffè più delicato) o caffè americano (espresso diluito con più acqua) Acqua calda 2 tazzine | Risciacqua Vaporizza | Conferma Impostazioni | Esci Indicatori Problema luminosi Il serbatoio per caffè... -
Page 95: Prima Dell'uso
PRIMA DELL’USO 1. Rimuovere tutti i materiali di imballaggio ed eventuali adesivi promozionali. 2. Posizionare l’apparecchio su una superficie piana e stabile. Assicurarsi che ci sia abbastanza spazio attorno all’apparecchio per un’adeguata ventilazione. 3. Inserire il cassetto scarti e la vaschetta di raccolta dei fondi di caffè. Accertarsi che siano installati correttamente. - Page 96 Suggerimento Per una temperatura ottimale del caffè, si consiglia di riscaldare prima la tazzina sullo scaldatazzine, posto sulla parte superiore dell'apparecchio. Inoltre, è possibile riporvi le tazzine, in modo da avere sempre una tazzina calda a disposizione. PREPARARE UN CAFFÈ ESPRESSO 1.
-
Page 97: Preparare L'acqua Calda
Per interrompere in anticipo la preparazione del caffè, premere il tasto DOPPIA PREPARAZIONE Premere il tasto per erogare due tazzine di caffè in successione. Può essere acceso sia prima che durante l'erogazione del caffè. Sul display si accende l'icona . Finché è accesa, l'apparecchio esegue sempre 2 volte la preparazione selezionata. -
Page 98: Impostazione Della Temperatura
1. IMPOSTAZIONI PER LE PREPARAZIONI DI CAFFÈ Una volta effettuato l'accesso all'interfaccia delle impostazioni, le icone del caffè espresso e del caffè lungo/americano lampeggiano. Caffè espresso • Premere il tasto caffè espresso • Regolare la quantità di caffè macinato (è indicata sul display in "g"). Premere + o - per aumentare o diminuire la quantità. -
Page 99: Informazioni Sul Prodotto
2. Versare il prodotto decalcificante nel serbatoio dell'acqua vuoto e diluirlo con acqua pulita fino a raggiungere l'indicazione MAX. 3. Inserire il serbatoio dell'acqua nell'apparecchio e collocare una vaschetta di almeno 1100 ml sotto l'ugello caffè. 4. In modalità standby, premere il tasto per 3 secondi per aprire l'interfaccia delle impostazioni, quindi premere il tasto 4 volte finché... -
Page 100: Pulizia E Manutenzione
• Se i chicchi di caffè sono umidi, svuotare la vaschetta, asciugarla con un panno morbido e riempirla con chicchi di caffè nuovi per un gusto migliore. Per prima cosa, impostare il selettore del grado di macinatura al massimo e provare a macinare i chicchi di caffè. Se la macchina per caffè... - Page 101 6. Dopo ogni utilizzo, pulire la lancia vapore come descritto in precedenza in questo manuale. Rimuovere quotidianamente il tubicino e sciacquarlo accuratamente sotto l'acqua corrente. 7. Sciacquare il serbatoio dell'acqua sotto l'acqua corrente ogni 3 giorni. 8. Pulire il serbatoio per caffè in grani ogni settimana. Rimuovere i chicchi rimanenti dalla vaschetta (o pulirla quando il serbatoio è...
-
Page 102: Problemi E Soluzioni
Indicatore luminoso/ Significato Soluzione avvertenza Il gruppo erogatore non è inserito Installare correttamente il gruppo (correttamente). erogatore nell'apparecchio. Quando si inserisce il gruppo erogatore, si dovrebbe sentire un clic. Altrimenti, il gruppo erogatore non è stato inserito correttamente. La vaschetta di raccolta dei fondi di Svuotare la vaschetta di raccolta caffè... - Page 103 PROBLEMI SOLUZIONI Il caffè è troppo leggero o acquoso. • Il grado di macinatura è troppo grossolano. Ruotare il selettore del grado di macinatura su una gradazione più fine mentre l'apparecchio macina. • È possibile che i chicchi di caffè siano troppo umidi o che il macinino contenga troppo grasso di caffè.
-
Page 104: Linee Guida
PROBLEMI SOLUZIONI Il gruppo erogatore non funziona. • Aprire il pannello laterale, quindi premere il tasto caffè espresso per 3 secondi per reimpostare l'unità di pressatura. • Se non dovesse risolvere il problema, rivolgersi al servizio clienti DOMO o al negozio di acquisto. - Page 105 ZÁRUKA Drazí zákazníci, Děkujeme za vaši důvěru ve značku DOMO. Doufáme, že se vám nový spotřebič bude líbit. Všechny naše produkty jsou před prodejem podrobeny přísné kontrole kvality. Pokud i přesto narazíte na nedostatky nebo problémy u vašeho zakoupeného přístroje, tak věřte, že nás to mrzí.
-
Page 106: Bezpečnostní Pokyny
Záruka zaniká: • při použití spotřebiče jinak, než v je uvedeno v manuálu (nesprávným postupem) • při provádění opravy nebo změny na spotřebiči osobou jinou než pověřenou naším servisem Projeví-li se vada v průběhu 12 měsíců od převzetí, má se za to, že zboží... - Page 107 • Děti si s přístrojem nesmějí hrát. • Údržba a čištění smí být prováděny jen osobami starších 16 let. Mladší děti nesmí přístroj čistit ani s ním jinak zacházet. • Čistění a běžnou údržbu smí provádět pouze osoby starší 16 let a při tom být pod dohledem.
- Page 108 I UPOZORNĚNÍ – UMÍSTĚNÍ A INSTALACE • Nikdy neumisťujte přístroj do blízkosti hořlavých ani vznětlivých materiálů. • Nepoužívejte přístroj venku. • Přístroj vždy používejte pouze na stabilním, suchém a rovném místě. • Nikdy neumisťujte přístroj do blízkosti plynového, nebo elektrického sporáku, či trouby, ani do blízkosti jiného zdroje tepla.
- Page 109 • Před přemisťováním kávovaru vždy zkontrolujte, zda je prázdný zásobník na vodu i odkapávací miska. • Pokud je kávovar zapnutý, neotvírejte postranní panel ani zásobník na kávová zrna. Pokud je kávovar zapnutý, neodstraňujte z něj zásobník na vodu. • Dávejte pozor, aby se na napájecí kabel nerozlila tekutina. •...
- Page 110 ČÁSTI 1. Zásobník vody 9. Indikátor přetečení 2. Víko zásobníku na kávová zrna 10. Podstavec odkapu a zásobníku 3. Zásobník na kávová zrna 11. Hlavní spínač on/off 4. Otočný knoflík pro volbu stupně hrubosti 12. Nádoba na kávovou sedlinu mleté kávy 13.
-
Page 111: Ovládací Panel
OVLÁDACÍ PANEL Tlačítko Popis Espresso (malá, silná káva) Lungo (velké espresso, jemnější káva) nebo americano (espresso a voda navíc) Horká voda 2 šálky | Vypláchnout Spařit | Upevnit Nastavení | Zavřít Světelné Problém kontrolky Zásobník na kávová zrna je prázdný Uvaří... -
Page 112: Před Prvním Použitím
PŘED PRVNÍM POUŽITÍM 1. Před použitím odstraňte z přístroje veškeré obalové materiály a reklamní samolepky. 2. Přístroj postavte na rovný a stabilní povrch tak, aby kolem byl stále dostatečný prostor na odvětrání. 3. Vraťte odkapávací misku a nádobu na kávovou sedlinu na místo. Dbejte na to, aby byly umístěny správně. -
Page 113: Příprava Espressa
Doporučení Pro optimální teplotu kávy se doporučuje šálek předem zahřát na ohřívači šálků nahoře na přístroji. Zde můžete šálky také uchovávat, takže budete mít vždy k dispozici teplý šálek. PŘÍPRAVA ESPRESSA 1. Upravte výšku kávové trysky a umístěte pod ni šálek. 2. -
Page 114: Napěnění Mléka
DVA ŠÁLKY KÁVY ZA SEBOU Stiskněte tlačítko pro přípravu dvou šálků kávy za sebou. To je možné nastavit jak před přípravou kávy, tak během ní. Na displeji se zobrazí ikona . Dokud tato ikona svítí, připraví přístroj vždy 2x zvolenou variantu kávy. Stiskněte znovu tlačítko pro vypnutí... -
Page 115: Nastavení Teploty
• Upravte množství namleté kávy (na displeji je zobrazeno v gramech). Stiskněte „+“ nebo „-“ pro zvýšení nebo snížení množství kávy. • Následně stiskněte tlačítko pro nastavení objemu kávy (na displeji se zobrazí v mililitrech). Stiskněte „+“ nebo „-“ pro zvýšení nebo snížení objemu kávy. •... -
Page 116: Informace O Výrobku
6. Jakmile je zásobník na vodu prázdný, vypláchněte ho, znovu ho naplňte čistou vodou a vraťte ho do přístroje. Opakujte tento krok, dokud se kávovar nepřestane proplachovat vodou a proces odvápňování není ukončen. Ikona zhasne a přístroj se vrátí do režimu „standby“. 6. -
Page 117: Čištění A Údržba
ČIŠTĚNÍ A ÚDRŽBA Kroky 1 až 6 je vhodné provádět každý den. Každodenní údržba je důležitá pro prodloužení životnosti kávovaru a dosažení lepších výsledků při přípravě kávy. 1. Kávovar vypněte a vytáhněte zástrčku ze zásuvky. 2. Odstraňte odkapávací misku. Vyprázdněte nádobu na kávovou sedlinu. Vyčistěte jak odkapávací misku a rošt, tak také... - Page 118 6. Parní trysku vyčistěte po každém použití podle návodu uvedeného výše. Trysku každý den vyjměte a důkladně ji vypláchněte pod tekoucí vodou. 7. Zásobník na vodu vypláchněte jednou za tři dny pod tekoucí vodou. 8. Jednou za týden vyčistěte zásobník na kávová zrna. Odstraňte ze zásobníku zbývající kávová zrna (nebo provádějte čištění...
-
Page 119: Problémy A Řešení
Indikační kontrolka / Význam Řešení Upozornění Nádoba na kávovou sedlinu je plná Vyprázdněte nádobu na kávovou / nádoba na kávovou sedlinu nebo sedlinu (vždy po 8 šálcích, pokud odkapávací miska není na (správném) kávovar vydává upozornění nebo místě. pokud ho nebudete dlouho používat), vraťte nádobu a odkapávací... - Page 120 PROBLÉMY ŘEŠENÍ Káva je příliš světlá nebo vodová. • Mlýnek mele příliš hrubou kávu. V době, kdy kávovar mele kávu, otočte knoflíkem pro nastavování hrubosti mletí směrem k jemnějšímu mletí. • Kávová zrna jsou možná příliš vlhká nebo je v mlýnku příliš tuku z kávových zrn. Místo vlhkých zrn použijte suchá, vyčistěte mlýnek vhodným čisticím prostředkem nebo kontaktujte zákaznický...
- Page 121 PROBLÉMY ŘEŠENÍ Spařovací jednotka se zasekla a nelze ji z • Otevřete boční panel a následně držte po přístroje vyjmout. dobu 3 sekund stisknuté tlačítko espresso . Tím se resetuje spařovací jednotka. • Pokud tento postup nepomůže, zavřete boční panel a vypněte a znovu zapněte přístroj tlačítkem pro zapnutí/vypnutí.
- Page 122 ZÁRUKA Drahí zákazníci, Ďakujeme za vašu dôveru v značku DOMO. Dúfame, že sa vám nový spotrebič bude páčiť. Všetky naše produkty sú pred predajom podrobené prísnej kontrole kvality. Pokiaľ aj napriek tomu narazíte na nedostatky alebo problémy u vášho zakúpeného prístroja, tak verte, že nás to mrzí.
-
Page 123: Bezpečnostné Pokyny
Záruka zaniká: • pri použití spotrebiča inak, než v je uvedené v manuáli (nesprávnym postupom) • pri vykonávaní opravy alebo zmeny na spotrebiči osobou inou ako poverenou naším servisom Ak sa prejaví vada v priebehu 12 mesiacov od prevzatia, má sa za to, že tovar bol chybný... - Page 124 • Údržba a čistenie smie byť vykonávané len osobami staršími ako 16 rokov. Mladšie deti nesmú prístroj čistiť ani s ním inak zaobchádzať. • Čistenie a bežnú údržbu môžu vykonávať len osoby staršie ako 16 rokov a pri tom byť pod dohľadom. •...
- Page 125 I UPOZORNENIE - UMIESTNENIE A INŠTALÁCIA • Nikdy neumiestňujte prístroj do blízkosti horľavých ani zápalných materiálov. • Nepoužívajte prístroj vonku. • Prístroj vždy používajte iba na stabilnom, suchom a rovnom mieste. • Nikdy neumiestňujte prístroj do blízkosti plynového, alebo elektrického sporáka, či rúry, ani do blízkosti iného zdroja tepla. I UPOZORNENIE –...
- Page 126 • Pred premiestnením spotrebiča sa uistite, že sú nádržka na vodu a odkvapkávacia miska prázdne. • Neotvárajte bočný panel ani nádobku na kávové zrná, keď je spotrebič v prevádzke. Taktiež nevyberajte nádobu na vodu zo spotrebiča. • Dávajte pozor, aby ste na napájací kábel nevyliali tekutinu. •...
- Page 127 ČASTI 1. Zásobník vody 10. Podstavec odkvapu a zásobníka 2. Kryt na nádobu na kávové zrná 11. Hlavný spínač on/off 3. Nádoba na zrnkovú kávu 12. Nádoba na kávovú usadeninu 4. Otočný gombík na výber stupňa mletia 13. Nadstavec na horúcu paru 5.
- Page 128 OVLÁDACÍ PANEL Tlačidlo Popis Espresso (malá, silná káva) Lungo (veľké espresso, jemnejšia káva) alebo Americano (espresso zriedené vodou) Horúca voda 2 šálky | Oplachovať Naparenie | Potvrdiť Nastavenia | Zatvoriť Svetelné Problém kontrolky Het nádoba na zrnkovú kávu je prázdna Po sebe sa pripravujú...
-
Page 129: Pred Prvým Použitím
PRED PRVÝM POUŽITÍM 1. Pred použitím odstráňte z prístroja všetky obalové materiály a reklamné samolepky. 2. Prístroj postavte na rovný a stabilný povrch tak, aby okolo bol stále dostatočný priestor na odvetranie. 3. Vložte odkvapkávaciu misku a nádobu na kávovú usadeninu. Dbajte na to, aby boli nainštalované... - Page 130 Na dosiahnutie optimálnej teploty kávy sa odporúča šálku vopred ohriať na ohrievači šálok na hornej strane spotrebiča. Môžete tu tiež uložiť svoje šálky, aby ste mali vždy pripravenú horúcu šálku. PRÍPRAVA ESPRESSA 1. Nastavte výšku dávkovača kávy a umiestnite podeň šálku. 2.
- Page 131 DVOJITÁ PRÍPRAVA Stlačením tlačidla pripravíte dve šálky kávy po sebe. Túto funkciu môžete zapnúť buď pred prípravou kávy, alebo počas nej. Na displeji sa rozsvieti ikona . Pokiaľ svieti, kávovar vykoná zvolenú prípravu vždy dvakrát. Opätovným stlačením tlačidla túto funkciu vypnete. NAPENENIE MLIEKA 1.
-
Page 132: Nastavenie Teploty
• Nastavte množstvo mletej kávy (na displeji sa zobrazí v gramoch „g“). Stlačením tlačidla + alebo - zvýšte alebo znížte množstvo. • Potom stlačením tlačidla nastavte objem kávy (na displeji sa zobrazuje v mililitroch „ml“). Stlačením tlačidla + alebo - zvýšte alebo znížte objem kávy. •... -
Page 133: Informácie O Produkte
5. Stlačením potvrdzovacieho tlačidla spustite odstraňovanie vodného kameňa. 6. Keď je nádržka na vodu prázdna, vypláchnite ju, naplňte ju čistou vodou a nádržku opäť vložte do spotrebiča. Tento krok opakujte, kým spotrebič neprestane vypúšťať vodu a proces odstraňovania vodného kameňa sa nedokončí. Indikátor ikony zhasne a spotrebič... -
Page 134: Čistenie A Údržba
ČISTENIE A ÚDRŽBA Kroky 1 až 6 denne sa odporúča vykonávať denne. Každodenná údržba je dôležitá na predĺženie životnosti kávovaru a dosiahnutie lepších výsledkov. 1. Vypnite spotrebič a odpojte napájací kábel. 2. Vyberte odkvapkávaciu misku. Vyprázdnite nádobu na kávovú usadeninu. Vyčistite odkvapkávaciu misku, mriežku a zásobník čistou vodou. - Page 135 6. Po každom použití vyčistite nadstavec na horúcu paru tak, ako je to popísané vyššie v tomto návode. Nadstavec na horúcu paru každý deň vyberte a dôkladne ju opláchnite pod tečúcou vodou. 7. Nádobu na vodu oplachujte pod tečúcou vodou každé 3 dni. 8.
-
Page 136: Problémy A Riešenia
Indikátor/ Význam Riešenie Varovanie Hlava kávovaru nie je vložená Správne nainštalujte hlavu kávovaru (správne). do spotrebiča. Pri vkladaní hlavy kávovaru musíte počuť cvaknutie. Pokiaľ zvuk nebudete počuť, hlava kávovaru nie je vložená správne. Nádoba na kávovú usadeninu je plná Vyprázdnite nádobu na kávovú alebo nádoba na kávovú... - Page 137 PROBLÉMY RIEŠENIA Káva je príliš riedka alebo vodnatá. • Stupeň mletia je príliš nahrubo. Počas mletia spotrebiča otočte volič stupňa mletia na jemnejšie mletie. • Kávové zrná môžu byť príliš vlhké alebo je v mlynčeku príliš veľa tuku. Vymeňte kávové zrná a vložte suché, vyčistite mlynček čistiacim prípravkom na mlynček určený...
- Page 138 PROBLÉMY RIEŠENIA Hlava kávovaru nefunguje. • Otvorte bočný panel a potom stlačte tlačidlo espressa na 3 sekundy, čím resetujete lisovaciu jednotku. • Ak to nepomôže, obráťte sa na zákaznícky servis spoločnosti DOMO alebo na predajňu, v ktorej ste tovar zakúpili. Hlava kávovaru je zaseknutá...
- Page 139 www.domo-elektro.be...
- Page 140 WEBSHOP DO0000X - AUT VELLABO. NEQUE NUS ET ALITIUNT. Op zoek naar extra accessoires of is er een onderdeel stuk? BESTEL de originele DOMO-accessoires en -onderdelen via onze webshop. À la recherche d’accessoires supplémentaires ou une pièce est cassée ? COMMANDEZ d’authentiques accessoires et pièces DOMO via notre webshop.
Need help?
Do you have a question about the Domo DO1150K and is the answer not in the manual?
Questions and answers