Table of Contents
Advertisement
Quick Links
Technical Support and E-Warranty Certificate www.vevor.com/support
HEAT PRESS MACHINE
We continue to be committed to provide you tools with competitive price.
"Save Half", "Half Price" or any other similar expressions used by us only represents an
estimate of savings you might benefit from buying certain tools with us compared to the major
top brands and does not necessarily mean to cover all categories of tools offered by us. You
are kindly reminded to verify carefully when you are placing an order with us if you are
actually saving half in comparison with the top major brands.
Advertisement
Table of Contents

Related Manuals for VEVOR SJY-H15151P


Summary of Contents for VEVOR SJY-H15151P
- Page 1 Technical Support and E-Warranty Certificate www.vevor.com/support HEAT PRESS MACHINE We continue to be committed to provide you tools with competitive price. "Save Half", "Half Price" or any other similar expressions used by us only represents an estimate of savings you might benefit from buying certain tools with us compared to the major top brands and does not necessarily mean to cover all categories of tools offered by us.
- Page 2 HEAT PRESS MACHINE MODEL:SJY-H15151P/JY-H12151P NEED HELP? CONTACT US! Have product questions? Need technical support? Please feel free to contact us: Technical Support and E-Warranty Certificate www.vevor.com/support - 1 -...
-
Page 3: Correct Disposal
This is the original instruction, please read all manual instructions carefully before operating. VEVOR reserves a clear interpretation of our user manual. The appearance of the product shall be subject to the product you received. Please forgive us that we won't inform you again if there are any technology or software updates on our product. - Page 4 5)Do not use this machine in a hazardous-location. 6)Do not use when the machine is not working properly. 7)Do not disassemble and repair this machine. 8)Do not use an unsuitable AC Outlet. 9)Do not touch the heating plate when the machine is heating 10)Do not use in humid environment or contact with water Do not infiltrate liquid in the machine to prevent fire or electric shock caused by short circuit.
-
Page 5: Fcc Information
Please turn off the power when plug or unplug the connector FCC INFORMATION CA UTIO N: Changes or modifications not expressly approved by the party responsible for compliance could void the user's authority to operate the equipment! This device complies with Part 15 of the FCC Rules. Operation is subject to the following two conditions: 1) This product may cause harmful interference. -
Page 6: Specification
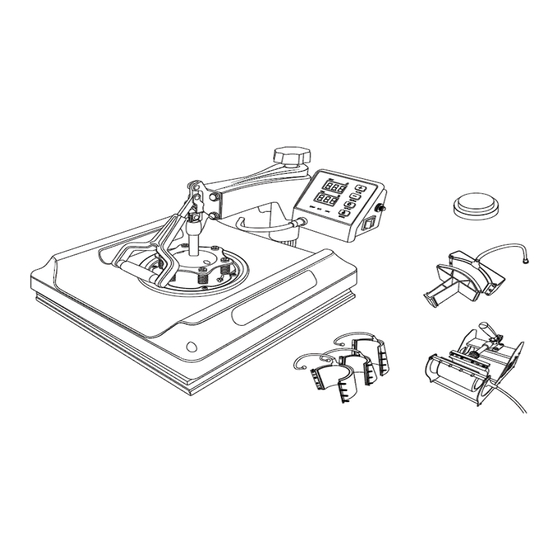
· Consult the dealer or an experienced radio/TV technician for assistance. SPECIFICATION Model SJY-H15151P SJY-H12151P Heat Size 15x15inch 12x15inch Temperature 32-480°F(0-250℃) 32-480°F(0-250℃) Range Time Range 0-999 Seconds 0-999 Seconds Voltage 120V~ 60Hz 220-240V~ 50Hz 120V~ 60Hz... - Page 7 Power 1150W 1050W 950W 900W MACHINE STRUCTURE PRESENTATION - 6 -...
-
Page 8: Parts List
PARTS LIST - 7 -... - Page 9 CUP BAKING MACHINE PACKING LIST - 8 -...
- Page 10 Picture Component Quantity ① 5*6mm round head screws Round tube ② side panel ③ ④ four-hole billiards ⑤ straight handle ⑥ Heating elements for cups 8*12mm Yuan machine ⑦ screws ⑧ Adjustment knob ⑨ plane strip INSTALLATION STEPS FOR CUP BAKING MACHINE - 9 -...
-
Page 11: Installation Steps
1. Installation steps - 10 -... -
Page 12: Installation Complete
Installation complete - 11 -... -
Page 13: Operation
OPERATION METHOD 1: (1) CLOTH (FLAT ITEMS) PRINTING ASSEMBLY Insert the cable into the aviation plug (2)PLATE ELEMENT Place the plate element between cloth heating board and plates - 12 -... - Page 14 METHOD 2: OTHER ELEMENTS ASSEMBLY (1) HAT ELEMENTS Remove 15x15/12x15 Heating Plate ASSEMBLY Place the hat element on the Heating board and the Loose the screws by hand bottom bracket. Push it to bracket will be departed the end HAT ELEMENTS ASSEMBLY Put another hat element under the upper bracket.
- Page 15 Accessories installation diagram Please perform all operations after power off Plate transfer process 1.Select one side that matches the size of the plate to be sleeved with a silica gel pad, and remove the silica gel pad on the other side; Keep the side without silica gel pad facing upwards and heat it on the machine for 15 minutes;...
- Page 16 Cap heat press machine 1. Connect the cap heat press to the main machine and set the time and temperature. 2. Stick the transferred picture on the hat. 3. When the temperature reaches, put the hat into the machine and press it tightly. - 15 -...
- Page 17 Pen heat press machine 1. Connect the pen heat press to the main machine and set the time and temperature. 2. Stick the transferred picture on the pen. 3. When the temperature reaches, put the pen into the pen heat press and press tightly. - 16 -...
- Page 18 Shoe heat press machine 1. Connect the shoe heat press to the main machine and set the time and temperature. 2. Stick the transferred picture on the shoe. 3. When the temperature reaches, put the shoe into the shoe printing machine and press tightly.
- Page 19 This mug heat press machine is matched with 5 in 1 and 6 in 1. 1. Connect the mug heat press to the main machine and set the time and temperature. 2. Stick the transferred picture on the mug. 3. When the temperature reaches, put the mug into the mug heat press and press tightly.
- Page 20 This mug heat press machine is matched with 8 in 1,10 in 1,11 in 1. 1. Connect the mug heat press to the main machine and set the time and temperature. 2. Stick the transferred picture on the mug. 3. When the temperature reaches, put the mug into the mug heat press and press tightly.
-
Page 21: Parameter Setting
Parameter setting 1.HOW TO TURN ON/OFF AND HOW TO START? Press the switch button on the side of the digital box to start the machine. After setting temperature, press "MODE" button once to count down, and press again to reset. 2.HOW TO SET THE TEMPERATURE/TIME? Press once to set the temperature, press twice to set the time, press three times to change temperature unit and press again to exit. -
Page 22: Troubleshooting
HOW TO HEAT PRESSING?(FOR EXAMPLE,T-SHIRT PRINTING) 1.Make sure the wire is well connected, and the power plug is well connected to the wall socket, then press the power switch to turn on. 2.Rotate the pressure knob to get the right pressure required. 3.Set the temperature and the time you want. - Page 23 3.Printed effect: print color is pale or faded image The pressure is not high enough or the temperature is too low, pressing time is too short. Please adjust the pressure/temperature or increase the heating time. 4.Printed effect: print color is too darkened, deep or blurred Reason 1: The temperature is too high /or pressing time is too long.
- Page 24 - 23 -...
- Page 26 Technical Support and E-Warranty Certificate www.vevor.com/support...
Need help?
Do you have a question about the SJY-H15151P and is the answer not in the manual?
Questions and answers