Advertisement
Quick Links
Advertisement

Related Manuals for Cardin Elettronica ZEN 60E


Summary of Contents for Cardin Elettronica ZEN 60E
- Page 1 CARDIN ELETTRONICA spa V.06.2010 ZEN60/100E Via del lavoro, 73 – Z.I. Cimavilla 31013 Codognè (TV) Italy Tel: +39/0438.404011 Fax: +39/0438.401831 email (Italy): Sales.office.it@cardin.it email (Europe): Sales.office@cardin.it Http: www.cardin.it ZEN 60E GARÁZSKAPU MOZGATÓ MOTOR ZEN 100E...
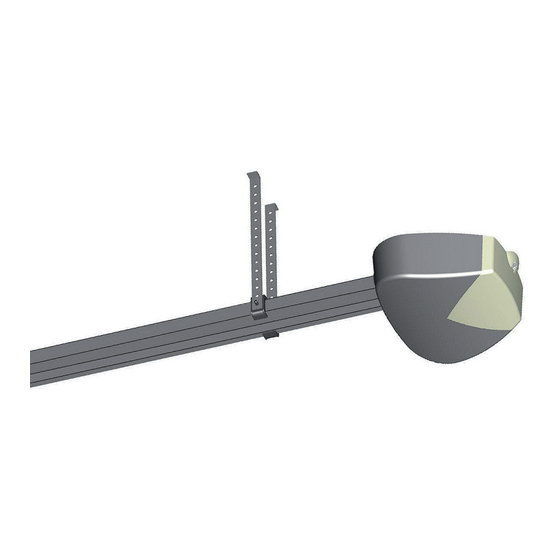
- Page 2 ZEN60E és ZEN100E ZEN60E: Önzáró garázskapu automatika, 24Vdc motorral (maximum 600N), beépített vezérléssel és fényjelzővel ZEN100E: Önzáró garázskapu automatika, 24Vdc motorral (maximum 1000N), beépített vezérléssel és fényjelzővel A ZEN szériához több típusú vezetősínt is szerelhet, a helyi adottságoknak megfelelően. Mind láncos, mind bordásszíjas kivitelt rendelhet hozzá.
-
Page 3: Műszaki Adatok
MŰSZAKI ADATOK ZEN 60E ZEN 100E Motor tápellátás 24 Vdc 24 Vdc Max. kapu méret 9 m 2 12 m 2 Nyitási idő 20 sec 20 sec Max. áramfelvétel (230Vac) 1.1 A 1.2 A Max. teljesítmény 230 W 260 W Max. - Page 4 The manufacturer: Telcoma srl via L. Manzoni, 11 - 31015 - Z.I. Campidui Conegliano (TV) - ITALY DECLARES that the products: GEARMOTOR ZEN 60E and GEARMOTOR ZEN 100E comply with the following EC directives: -EMC Directive 2004/108/CE with reference to the following standards: EN 55014-1;...
- Page 5 VEZETŐSÍN FELSZERELÉSE In the case of 1060mm or 1600mm modular profiles, assemble the guide as specified in the procedure. - Prepare an adequate area to hold the entire guide. - Loosen nut D and remove the drive support F (fig. 2) - Rotate the assembled guides with chain/belt to form a single profile.
-
Page 6: Telepítési Útmutató
TELEPÍTÉSI ÚTMUTATÓ SECTIONAL DOOR: fix the transmission guide at the centre of the sectional door, directly above the spring post using suitable screws and plugs. The guide should ideally be installed at approx. 40 mm. above the section door transit area (fig. 7 and 8). Level the guide and lock by means of the guide supports and relative brackets (fig.9). Fix the leaf connection bracket at the highest end of the door. - Page 7 Z124 ELECTRONIC CONTROL UNIT The automations ZEN 100E and ZEN 60E are equipped on board with a control board model Z124, from which all electrical connections are made (motor, encoder, power supply, etc.) with a connector for a radio receiver mod.
- Page 8 Z124 VEZÉRLŐEGYSÉG (14-es ábra) 1) 230 V connection terminal board (line, primary transformer and flashing light) 2) T2A 230V line fuse 3) T10A 24V power fuse 4) Motor connection terminal board, 24 V and secondary transformer (22V) 5) Terminal board for courtesy light 12V 10W 6) Encoder connector 7) Connector for optional radio receiver mod.
- Page 9 VEZÉRLŐEGYSÉG: BEKÖTÉSEK For connections, refer to tables 1 and 2 and figure 15. In the case of existing systems a general check should be made of the condition of wiring (section, insulation, contacts) and auxiliary equipment (photocells, receivers, pushbutton panels, key-operated switches etc.). 1) For power supply, use the 2x0,75 mm cable with plug supplied.
- Page 10 TAB. 2 Connection of edge with Normally closed contact Connection of edge with Normally open contact In compliance with standard EN 12978 Input not used. Connect terminal 11 with terminal 10 and set dip-switch no. 10 to OFF Antenna c.c. 11 10 c.c.
- Page 11 PROGRAMOZÁS This procedure enables manoeuvring as required of the door connected to the gearmotor, to prepare the system for programming and to check gearmotor connections. During this operation, the pushbuttons work in “hold-to-run” mode and safety devices are ignored. ✓ Procedure: 1) Keep the PROG key pressed.
-
Page 12: Idő Beállítása
MUNKA- ÉS SZÜNETIDŐ PROGRAMOZÁSA This procedure is compulsory in new installations, to ensure that the control unit memorises the manoeuvre times and a number of parameters used for obstacle detection. During the self-learning phase, the key S/S is pressed repeatedly (detail 14 of fig 14), alternatively the control S/S control can be used (terminal 14, fig. - Page 13 Advanced programming - Dip 6 and DIP 9 set to ON Programmable pause and deceleration times 1) Hold down the STOP/PROG button for about 5 seconds until LED LD1 lights up. 2) Press the PP button: the motor will open as far as the opening stop – FIG. 2A. 3) Wait for the required pause interval, then press PP again: the motor now performs the closure movement.
- Page 14 FIG.1 CLOSURE STOP – FIG. 1A...
- Page 15 FIG.2 OPENING STOP – FIG. 2A...
- Page 16 DIP KAPCSOLÓK BEÁLLÍTÁSA (FUNKCIÓK) The various options described can be selected by means of the function dip-switch (detail 19 of fig.14). - Bear in mind that to ensure that the control unit “learns” a variation to settings, it must be switched off and on again;...
- Page 17 OC2 VEVŐEGYSÉG (OPCIONÁLIS) The receivers are “self-learn” type and can memorise several codes on the same channel. The functions of the two radio channels are: Channel 1 Step/step Channel 2 N.O. To memorise the transmitters proceed as follows: - Insert the receiver in the connector (detail 7 of fig. 14) - Power up the control unit and wait for the receiver leds to turn off.
Need help?
Do you have a question about the ZEN 60E and is the answer not in the manual?
Questions and answers