Advertisement
Quick Links
Children have died from furniture tipover. Tip restraints
have been included with this product; you must install
the tip restraints according to these instructions in order
to minimize the risk of furniture tipping. If you have any
questions about this product or the tip restraint, please
send us an email at
tip_restraint_help@Noblehousefurniture.com
NEVER allow children to climb or hang on furniture,
including drawers or cabinet doors.
In addition to installing the restrains,to help prevent
tip-over
1. NEVER put a TV or other heavy objects on top of
this product.
2. Do not stand on the product.
Noble House Home Furnishings LLC
WARNING!!
WARNING
Children have died from furniture tipover. To reduce
the risk of furniture tipover:
1. ALWAYS install tipover restraint provided.
2. NEVER put a TV on this product.
3. NEVER allow children to stand,climb or hang on drawers,
doors,or shelves.
4. NEVER open more than one drawer at a time.
5. Place heaviest items in the lowest drawers.
6. Do not defeat or remove the drawer interlock system.
This is a permanent label. Do not remove!
Page 1
Advertisement

Related Manuals for Noble House Home Furnishings CONSOLE TABLE


Summary of Contents for Noble House Home Furnishings CONSOLE TABLE
- Page 1 4. NEVER open more than one drawer at a time. 5. Place heaviest items in the lowest drawers. 6. Do not defeat or remove the drawer interlock system. This is a permanent label. Do not remove! Page 1 Noble House Home Furnishings LLC...
-
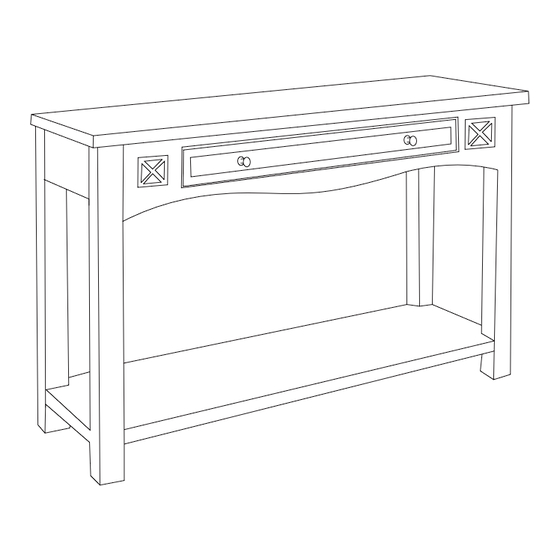
Page 2: Parts List
Assembly Instructions Caution: You must read this before you proceed CONSOLE TABLE Parts List Label Picture Description Table Top Table Shelf Table Leg Table Leg Table Leg Table Leg Page 2 Noble House Home Furnishings LLC... -
Page 3: Assembly Preparation
Beginning Assembly: Read instructions,cover to cover Have 2 adults on hand for assembly Do not assemble on flooring or carpet Assemble on a clean non-marring surface (packing foam) Save all packaging until finished Page 3 Noble House Home Furnishings LLC... - Page 4 Table Leg (C) Table Shelf (B) Table Leg (D) FRONT FACING This Console Table has multiple parts and may require up to some 30 minutes to assemble.The above picture is to help you in putting various parts into perspective.Please read through the instructions below to familiarise yourself with the parts and steps before assembly.
- Page 5 Washer ( ),Bolt ( ),Allen Wrench ( ). DO NOT TIGHTEN THE BOLTS. Step 3 Repeat “Step 2” to assemble all the other three Table Legs(C,D,E)to Table Top(A). DO NOT TIGHTEN THE BOLTS. Page 5 Noble House Home Furnishings LLC...
- Page 6 Step 4 Carefully Attach Table Shelf (B) to the Table Legs using Washer ( ),Bolt ( ),Allen Wrench( ). DO NOT TIGHTEN THE BOLTS. Step 5 Turn the Console Table right side up. Page 6 Noble House Home Furnishings LLC...
- Page 7 This would help to aligh all the parts at all the joint areas. In a sequential manner,proceed to tighten all Bolts. To tighten the Bolts at the base of the Console Table, do secure assistance from your adult partner (s).
- Page 8 Put out the drawers and deassemble the knobs with the help of screw driver( ) in Anti- clockwise direction. Step 7 Install the Knobs on the drawer with the help of screwdriver ( ) in Clockwise as picture above. Page 8 Noble House Home Furnishings LLC...
- Page 9 See product instructions for more ways to help prevent furniture tip-over. Usage For Tipover Restraint Device: To secure Console Table against wall, attach two Brackets( ) on wall and product, use Tipover Restraint Strap( ) to connect the Brackets( ).
- Page 10 Step 9 9.1) Drill four holes on wall at same height as Brackets( ) on Console Table with Power Drill( ). You can mark these points in two ways as below: 1) Move the Console Table back to the wall. Mark four points same height as Console Table on the wall.
- Page 11 Move Console Table to the wall. Pull the Tipover Restraint Straps( ) through the Brackets( ) on the wall and Console Table one by one, and pull the Tipover Restraint Straps( ) tight. This Console Table is now ready to use.
- Page 12 Page 12 Noble House Home Furnishings LLC...
Need help?
Do you have a question about the CONSOLE TABLE and is the answer not in the manual?
Questions and answers