
Related Manuals for Haier HWM65-728


Summary of Contents for Haier HWM65-728
- Page 1 User's manual Fully automatic washing machine This manual is for HWM65-728 Please read this manual carefully before using. 0030808138 Retain it for future reference.
-
Page 2: Table Of Contents
Contents Names of the parts Meaning and description of the symbols Safety precautions Installation and adjustment Usage of the drain hose Installation the water inlet hose Preparation before washing Put in the laundries Usage of the detergent Close the top lid Use the operation buttons Finish washing Disposal after washing... -
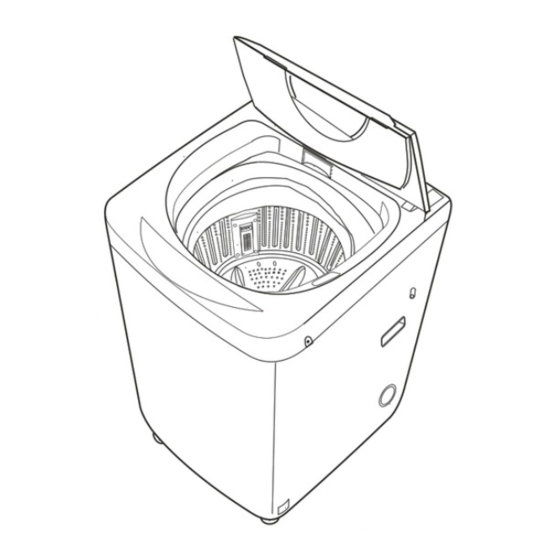
Page 3: Names Of The Parts
Names of the parts Ú Water inlet valve Water absorption cushion Top lid component Back control board Detergent box Power line Control panel seat Outer tub cover Lint filter (2 pieces) Balance ring Screw cover(left) Inner tub Cabinet handle Filter cover (2 pieces) Drain hose Pulsator... -
Page 4: Safety Precautions
Safety precautions When the machine is normally Please insert the power cord into using, please put the power plug special receptacle with rated vol- at the location easily to be insert- tage.Be sure to use single-phase ed and extracted by hand. Be sure three pins receptacle.The earthing to pull the plug off when there's terminal of the receptacle must be... - Page 5 Safety precautions Do not stretch hands into the working Do not decompose, repair or alter the machine. It is dangerous even if the machine by yourself. rotation is slow. Take special care of the children. Do not put any hot or heavy items (such Do not wash laundries with volatile as the kettle with hot water ) on the materials (such as thinner, petrol etc.)
-
Page 6: Installation And Adjustment
Installation and adjustment Please install and adjust the machine according to the requirement of the manual. It is very important to your security and correct operating the machine. Install the bottom plate After opening the package, please lean the washing machine gently down on soft items (like towel cloth,blanket, etc.). -
Page 7: Usage Of The Drain Hose
How to change the direction of the drain hose 3.Dismantle the protecting cover of the drain 1.Dismantle the back cover of the washing machine. outlet at the other side Install the bushing as per indicated in Figure 2. 2.Take off the drain hose frame. Put down the drain hose , put the drain hose into the 4.Extend the drain hose from the other side. -
Page 8: Installation The Water Inlet Hose
Installation the water inlet hose Confirm the water faucet water faucet, suitable water faucet, not suitable The exit end face of the faucet It is required that the front end shall be longer than 10mm. The exit end face of the faucet shall be flat and smooth. If not please file it to avoid leakage. Connection between the water inlet hose jointer and the water faucet 1.Press the lower end of the lock lever and push down the slider. -
Page 9: Connection Between The Water Inlet Hose And The Washer
Connection between the water inlet hose and the washer 1.Do not take off the water absorption cushion. Please check if the nut of the water cushion is dropped or damaged before each usage. If it happens inlet hose please contact our after-sale department immediately. 2 Put the nut of the water inlet hose on the valve jointer. -
Page 10: Preparation Before Washing
1 Preparation before washing Preparation before washing 1.Connect the water inlet hose. Open the water faucet. 2.Confirm that the washing machine is earthed reliably. Then insert the power plug into the receptacle. The earth terminal shall not link to gas pipeline and faucet water pipeline. 3.Put down the drain hose. -
Page 11: Put In The Laundries
2 Put in the laundries The capacity of washing and spinning of he machine refer to the largest weight of the standard laundries under dry condition that can be washed or spinned in one time. One time washing quantity shall be lower than the rated capacity. -
Page 12: Use The Operation Buttons
5 Use the operation buttons RESERVE(HOURS) MAXIMUM HIGH STANDARD BLANKET SOAK POWER MEDIUM COTTON HEAVY ON/OFF WASH GENTLE WOOL RINSE EXTRA LOW TUB DRY QUICK SPIN PROCESS Mode and meaning of the indicators The light is off Flashing: indicate the running program or indicate the water level On: indicate the program about to run, or indicate the selected mode or indicate the water level A POWER ON/OFF button "... -
Page 13: Water Level Button
C "PROCESS"button You can choose one or more process among soak, wash, rinse, spin. The button is invaid if you choose QUICK or TUB DRY program. PROCESS You can not choose soak process if you choose WOOL program. D WATER LEVEL button "... - Page 14 Steps of using the operation buttons and description of each step. RESERVE(HOURS) MAXIMUM HIGH BLANKET STANDARD POWER SOAK MEDIUM COTTON HEAVY ON/OFF WASH GENTLE WOOL EXTRA LOW RINSE TUB DRY QUICK SPIN PROCESS Push the "POWER ON/OFF " button to switch on the power. POWER ON/OFF It has the special power resume function.
-
Page 15: Finish Washing
3.Push the "PROCESS" button to select suitable procedure . Procedure program selection method( PROCESS select state Contents (the lighted indicators Selected procedure Times of pushing the Applicable circumstance indicate the programs about to run) PROCESS button programe SOAK WASH RINSE SPIN WASH RINSE SPIN... -
Page 16: Disposal After Washing
7 Disposal after washing After using, please clean the lint and foreign materials of the lint filter etc. in time. Otherwise it may Influence your using the machine. Please first pull off the power plug from the receptacle before cleaning. The lint filter must be used during washing. -
Page 17: Trouble-Shooting Answer To Question
Trouble-shooting Answer to question (If there's breakdown, please pull off the power plug before checking) The following phenomena are not breakdowns sometimes. Please confirm again before sending it to repair. If there are real breakdowns, please come to the special maintenance department or after-sale service department of our company. -
Page 18: Packing List
Packing list Name Quantity One piece User's manual Warranty card One piece Water inlet hose The end connecting to the washing machine One piece Jointer connecting the water inlet hose to the water faucet The end connecting to the water inlet hose jointer One piece Bottom plate Put between the up gasket...
Need help?
Do you have a question about the HWM65-728 and is the answer not in the manual?
Questions and answers