
Related Manuals for Struers Minitom Remote


Summary of Contents for Struers Minitom Remote
- Page 1 Minitom Remote Instruction Manual Original Instructions Doc. no.: 16987025_B_en Date of release: 2021.06.15...
- Page 2 Copyright The contents of this manual are the property of Struers ApS. Reproduction of any part of this manual without the written permission of Struers ApS is not allowed. All rights reserved. © Struers ApS 2021.06.14. Minitom Remote...
-
Page 3: Table Of Contents
Table of Contents 1 About this manual 2 Safety 2.1 Intended use 2.2 Minitom Remote safety precautions 2.2.1 Read carefully before use 2.3 Safety messages 2.4 Safety messages in this manual 3 Getting started 3.1 Device description 3.2 Overview 3.3 Accessories and consumables 4 Transport and storage 4.1 Storage... - Page 4 7 Maintenance and service - Minitom Remote 7.1 Daily 7.1.1 Cutting machine 7.1.2 Cleaning the cutting area 7.1.3 Cleaning the cooling tank 7.2 Weekly 7.2.1 Control box 7.2.2 The cut-off wheel spindle and bushing 7.3 Monthly 7.3.1 Specimen holder arm 7.3.2 Cutting machine...
-
Page 5: About This Manual
1 About this manual About this manual Instruction Manuals Struers equipment must only be used in connection with and as described in the instruction manual supplied with the equipment. Note Read the instruction manual carefully before use. Note If you wish to view specific information in detail, see the online version of this manual. -
Page 6: Minitom Remote Safety Precautions
In case of fire, alert bystanders and the fire brigade.Use a powder fire extinguisher.Do not use water. Struers equipment must only be used in connection with and as described in the instruction manual supplied with the equipment. The equipment is designed to be used only with Struers consumables specifically designed for this purpose and this type of machine. -
Page 7: Safety Messages
2 Safety Safety messages Signs used in safety messages Struers uses the following signs to indicate potential hazards. ELECTRICAL HAZARD This sign indicates an electrical hazard which, if not avoided, will result in death or serious injury. DANGER This sign indicates a hazard with a high level of risk which, if not avoided, will result in death or serious injury. -
Page 8: Getting Started
General safety precautions WARNING Struers equipment must only be used in connection with and as described in the instruction manual supplied with the equipment. ELECTRICAL HAZARD Switch off the electrical power supply before installing electrical equipment. -
Page 9: Overview
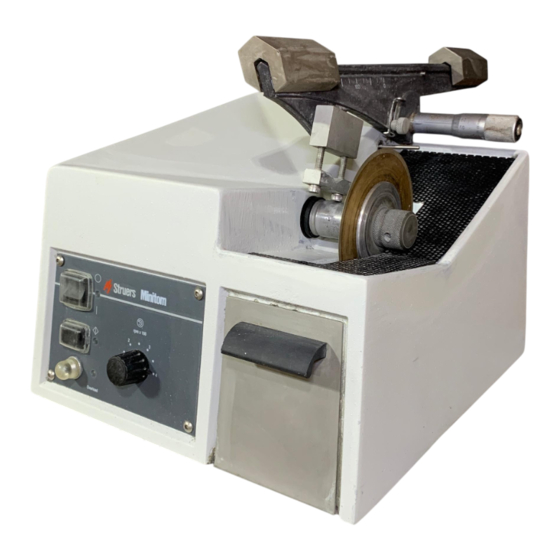
Part II, the control box, must be placed next to the operator outside the closed, secured location. Minitom Remote can cut a majority of solid and stable (non-explosive) materials, primarily non- metals. It has a built-in cooling tank which is filled with water and cutting additive before use. - Page 10 A Specimen holder arm B Micrometer screw C Adjustable stop plate D Lock (for micrometer screw) E Specimen holder F Cut-off wheel G Nut H Flange Shutter for cooling tank Rear view A Connection - X1 B Connection - X2 Minitom Remote...
-
Page 11: Accessories And Consumables
The Struers Website (http://www.struers.com) Consumables The equipment is designed to be used only with Struers consumables specifically designed for this purpose and this type of machine. Other products may contain aggressive solvents, which dissolve e.g. rubber seals. The warranty may not cover damaged machine parts (e.g. seals and tubes), where the damage can be directly related to the use of consumables not supplied by Struers. -
Page 12: Transport And Storage
Insufficient packaging could cause damage to the unit and will void the warranty. Contact Struers Service. • Struers recommends that all original packaging and fittings are kept for future use. Storage CRUSHING HAZARD Take care of your fingers when handling the machine. -
Page 13: Installation
5 Installation Lift the machine by the lifting eye. Installation WARNING Struers equipment must only be used in connection with and as described in the instruction manual supplied with the equipment. Unpacking CRUSHING HAZARD Take care of your fingers when handling the machine. -
Page 14: Checking The Packing List
Optional accessories may be included in the packing box. The packing box contains the following items: Pcs. Description Minitom Remote Control box Panel for mounting the control box in a rack Specimen holder arm with universal specimen holder Splash guard... -
Page 15: Location
The electrical power supply socket must be easy to access. The electrical power supply socket must be located at a height ranging from 0.6 m to 1.9 m (2½” to 6’) above floor level. Not higher than 1.7 m (5’ 6”) is recommended. Minitom Remote... - Page 16 Switch off the electrical power supply before installing electrical equipment. The machine must be earthed (grounded). Make sure that the actual electrical power supply voltage corresponds to the voltage stated on the type plate of the machine. Incorrect voltage can damage the electrical circuit. Minitom Remote...
-
Page 17: Connecting To The Control Box
Keep the specimen holder arm in horizontal position. Make sure that the locking screw (A) is aligned with the hole in the micrometer screw (B). Tighten the fitting. A Locking screw B Hole in micrometer screw Minitom Remote... -
Page 18: Filling The Cooling Tank
6 Operating the device Filling the cooling tank CAUTION The equipment is designed to be used only with Struers consumables specifically designed for this purpose and this type of machine. Pull out the shutter for the cooling tank. Fill the cooling tank with a 250 ml mix of water and Struers additive in the correct mixing ratio. -
Page 19: Changing The Specimen Holder
Use a 4 mm Allen key to fasten the specimen in the specimen holder. It must be fastened tightly to prevent vibrations during cutting. For a round specimen, flip the specimen holder allowing the large notch to secure it. Minitom Remote... -
Page 20: Mechanical Settings
Loosen the micrometer locking screw. (A) Adjust the position of the cut by turning the micrometer screw. When the position has been adjusted, turn the lock clockwise to lock the screw. A Locking screw - micrometer B Micrometer screw Minitom Remote... -
Page 21: Basic Operation
This machine must be operated and maintained only by skilled/trained personnel. CAUTION Do not operate the machine by hand. Use manipulators. CAUTION Disconnect power cables if you approach the machine physically. 6.5.1 Control panel functions Button/LED Function Cutting speed control Lit when the main switch is turned on. Minitom Remote... -
Page 22: Starting The Cutting Process
You can stop the cutting process at any time during the cutting process. Note The cut-off wheel may stop rotating if the speed is set to the lowest level. Do not use this function to stop the cutting process. Minitom Remote... -
Page 23: Maintenance And Service - Minitom Remote
Do not operate the machine by hand. Use manipulators. CAUTION Disconnect power cables if you approach the machine physically. Daily To ensure a longer lifetime for your machine, Struers strongly recommends regular cleaning. 7.1.1 Cutting machine Clean all accessible surfaces with a soft, damp cloth. -
Page 24: Cleaning The Cutting Area
7 Maintenance and service - Minitom Remote The micrometer screw is a precision tool. Clean the micrometer screw daily from cutting waste and coat it with a thin layer of acid-free oil. 7.1.2 Cleaning the cutting area Remove cutting debris and swarf from the grid plate. -
Page 25: Cut-Off Wheel
Spare parts Technical questions and spare parts If you have technical questions or when you order spare parts, state serial number and voltage/frequency. The serial number and the voltage are stated on the type plate of the machine. Minitom Remote... -
Page 26: Service And Repair
For further information, or to check the availability of spare parts, contact Struers Service. Contact information is available on Struers.com. Service and repair Struers recommends that a regular service check be carried out yearly or after every 1500 hours of use. 1500 hours correspond to a single work shift during one year. Note Service must only be performed by a Struers engineer or a qualified technician (electromechanical, electronic, mechanical, pneumatic, etc.). -
Page 27: 11 Troubleshooting - Minitom Remote
11 Troubleshooting - Minitom Remote 11 Troubleshooting - Minitom Remote 11.1 Cutting problems Error Cause Action Vibrations The diamond layer is worn Replace the cut-off wheel down to the level of the metal with a new cut-off wheel disc The workpiece moves radically... -
Page 28: 12 Technical Data
12 Technical data 12 Technical data 12.1 Technical data - Minitom Remote Subject Specifications Cutting Motor 46 W (0.06 hp) Cut-off wheels Diameter: 100-127 mm (4"-5") Output axle Rotational speed: 100-420 rpm Diameter: 12.7 mm (½") Balancing specimen holder with specimen: Up to... -
Page 29: Noise And Vibration Levels
Measurements made in accordance with EN ISO 11202 Vibration level 12.3 Diagrams If you wish to view specific information in detail, see the online version of this manual. 12.3.1 Diagrams - Minitom Remote Title Block diagram 16983050 Circuit diagram 16983100 - Page 1 Minitom Remote... - Page 30 12 Technical data 16983050 Minitom Remote...
- Page 31 12 Technical data 16983100 - Page 1 METAL CABINET METAL CANINET Minitom Remote...
- Page 32 12 Technical data 16983100 - Page 2 METAL CABINET Minitom Remote...
- Page 33 12 Technical data 16983100 - Page 3 Minitom Remote...
-
Page 34: Legal And Regulatory Information
External short circuit protection • Residual current circuit breaker Accessories and consumables Required accessories and consumables that have been ordered separately. The use of Struers consumables is recommended. For information about the available range, see: • The Minitom Remote brochure (https://www.struers.com) •... -
Page 35: Packaging Specifications
> 85 % RH non- condensing Table or workbench The machine is designed to be placed on a table or workbench. The Struers table is optional. The table must be able to carry at least: Minitom Remote 8 kg (17.5 lbs) -
Page 36: Dimensions
13 Pre-installation checklist Recommended table dimensions Width: 50 cm (20") Depth: 50 cm (20") Height: 80 cm (31.5") 13.4 Dimensions Minitom Remote A 40.5 cm (15.9") B 29.0 cm (11.4") A 27.0 cm (10.6") Footprint A 20.5 cm (8.0") B 23.0 cm (9.0") -
Page 37: Recommended Space
13 Pre-installation checklist Minitom Remote - Control box A 22.5 cm (8.8") B 19.8 cm (7.8") C 20.5 cm (8.0") A 48.3 cm (19.0") B 46.5 cm (18.3") C 3.2 cm (1.2") D 17.8 cm (7.0") E 22.6 cm (8.9") 13.5 Recommended space Space in front of the machine •... -
Page 38: Lifting
13 Pre-installation checklist Note Struers recommends that all original packaging and fittings are kept for future use. Cut the packing tape on the top of the box. Remove the loose parts. Remove the unit from the box. 13.7 Lifting CRUSHING HAZARD Take care of your fingers when handling the machine. - Page 39 Local standards may override the recommendations for the main electrical power supply cable.If needed, contact a qualified electrician to verify which option is suitable for the local installation setup. Residual Current Circuit Breaker Type A, 30 mA (or better) is recommended (RCCB) Minitom Remote...
-
Page 40: 14 Manufacturer
Responsibility of the manufacturer The following restrictions should be observed, as violation of the restrictions may cause cancellation of Struers legal obligations. The manufacturer assumes no responsibility for errors in the text and/or illustrations in this manual. The information in this manual is subject to change without notice. The manual may mention accessories or parts not included in the supplied version of the equipment. -
Page 41: Declaration Of Conformity
Name / Име / Název / Navn / Name / Όνομα / Nombre / Nimetus / Nimi / Nom / Naziv / Név / Nome / Pavadinimas / Nosaukums / Minitom Remote Naam / Nazwa / Nome / Denumirea / Názov / Ime / Namn / 名 前 / 제품명 / Наименование / Adı / 名称...
Need help?
Do you have a question about the Minitom Remote and is the answer not in the manual?
Questions and answers