Advertisement
Quick Links
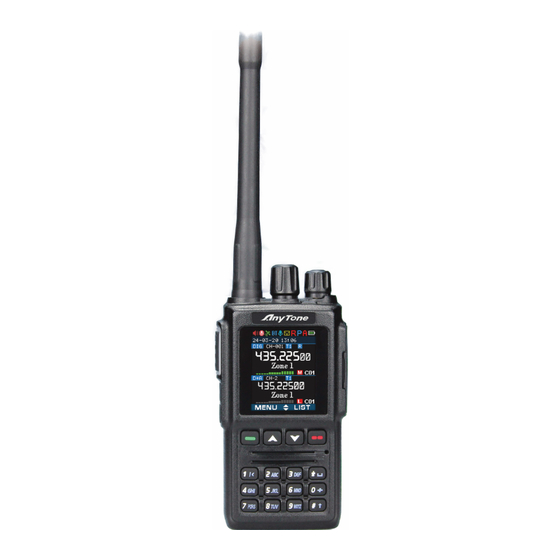
AT-D168UV Programing Guide
AT-D168UV Programming Guide
INTRODUCTION
The AnyTone AT-D168UV radio released late 2024 is similar to the
AT-D868UV and AT-D878UV radios. This is an advanced one chip
digital/analog radio complying with the ETSI Tier I and II
specifications
and
offering
4
inherent
power
levels
of
5W/2.5W/1.0W/0.2W. The frequency bands include both 144—148
MHz and 420—450 MHz. If a channel is programmed for digital and
analog reception type, the radio will auto-sense digital or analog
transmissions and connect accordingly. It offers 4,000 channels as
well as VFO tuning and for DMR operation offers 2 channels per
frequency. The radio has 10,000 Talk Groups and 500,000 Digital
Contacts.
The radio includes a vertical 1.77 inch TFT color LCD display which
allows ease of seeing the many operating modes including icons for
a successful connection to a repeater as well as the caller ID and
name etc. The LCD also shows signal strength of received signal. The
bandwidth is 12.5k/25k for analog, and 12.5k for digital DMR
operation. The radio offers text messaging, voice messaging, roaming
function, 4 hours of analog and digital voice recording, digital
encryption, and ranging between radios are now standard features.
Firmware can as well be user updated. All typical CTCSS/DCS, and
DTMF/2TONE/5TONE encode and decode features are also included
with the radio. The digital part of the radio allows SMS texting
functions via the keyboard and includes a vibrating radio for receipt
of messages. You can even talk/listen to satellites with the radio.
Two batteries are delivered with the radio. One of them will be a
2,600 mAh Li-ion battery: and the other a 1,800 mAh Li-ion battery.
The radio battery charger included has the new USB-C connection
to facilitate standardize use. A 2 Amp phone charger with the USB-C
connector can therefore also be used to charge the battery.
Page 1
From KD0PNQ
Advertisement

Related Manuals for AnyTone AT-D168UV


Summary of Contents for AnyTone AT-D168UV
- Page 1 AT-D168UV Programing Guide AT-D168UV Programming Guide INTRODUCTION The AnyTone AT-D168UV radio released late 2024 is similar to the AT-D868UV and AT-D878UV radios. This is an advanced one chip digital/analog radio complying with the ETSI Tier I and II specifications offering...
-
Page 2: Getting Started
Install the CPS Programming software on your computer, and read software from the radio first so you use the correct set-up. The AT-D168UV radio, used in Europe and the USA, uses different frequency bands. The CPS asks the question if you want to read only the “other data”... - Page 3 1) Use the AT-D168UV CPS to read the radio, and check the Model information to understand which frequency mode the radio is. 2) Use the AT-D168UV CPS to open an existing codeplug .rdt file from a D878UV or D578UV codeplug. Check the Mode information to understand which frequency band the codeplug is generated for.
- Page 4 Option B: create a new codeplug using the correct frequency band. Use the AT-D168UV CPS to open a codeplug, then use “export all” to export the files. In the AT-D168UV CPS, “Set Initialization” (from the top menu), and then in “Model Information”...
- Page 5 The second thing is to fill the Contact Talk Group (TG) list you also find under the expanded DIGITAL area to the left of the CPS Program. The AT-D168UV program looks like an excel spreadsheet once opened, and the left side defines the many aspects of programming.
- Page 6 Once all TG’s are entered in the .csv file, the Contact List should be “imported” back using the Programming Software for the AT-D168UV radio the same way you exported the file. Click on TOOL menu, and then “import” for TG‘s and in the new window click on Digital Contacts and select the .csv file you want imported.
- Page 7 DMR ID’s you want from the DMR database into the radio .csv file. Then back to the TOOL menu on the AT-D168UV, and “import” so you can import the entire .csv DMR ID list into the radio. Note: You have to enter “Private Call” in all the CALL TYPE columns of the radio .csv database before loading it into the radio.
- Page 8 AT-D168UV Programing Guide Channel Name: The name of the channel (typically name of repeater and TG) Receive Freq.: the VHF or UHF frequency Transmit Freq.: the VHF or UHF frequency Channel Type: Select Analog, Digital, Mixed Analog or Mixed Digital Transmit Power: Select one of four levels and to 5W/2.5W/1W/0.2W for VHF,...
- Page 9 AT-D168UV Programing Guide Work Alone: Check if you want the radio to make an emergency call if you do not press any key or PTT within a set time as set under the left “Public” and Alarm Setting. Talk Around:...
- Page 10 AT-D168UV Programing Guide Step 3: Channel->Analog->Squelch mode, set to Optional Signal Step 4: Channel->Analog->5Tone ID, select the 5Tone code Step 5: Optional Setting->Key function, assign a key to Call. Step 6: Press the Call key to send the selected 5Tone.
- Page 11 Once completely filled in, click OK to save this Channel. There is also an option to first “export” the channel data into a .csv file, from the original AT-D168UV CPS, where the radio was read to get all the data in the correct format, and then work the entry of most data in the excel format.
- Page 12 The completed Channel data should look something like below: 6.0 ZONE LIST CREATION NOTE: You have to use the AT-D168UV radio with the up/down key arrow button to go between zones. Create a ‘Zone’ name (that relates to the name of the scan list) and insert it for the time being to create a group of channels for example all tied to one repeater.
- Page 13 AT-D168UV Programing Guide 7.0 SCAN LIST This set-up is very similar to how the CPS works. You double click on the top channel and see a new window. You name it as you find appropriate. You then drop the channels you want in this scan list by using the >>...
-
Page 14: Optional Setting
Priority channel. 8.0 OPTIONAL SETTING The AT-D168UV radio basic configuration set-up is done in the Optional Setting window. This page contains a lot of important information for the radio operation. Once the Optional Setting window is open, there are several sub-sections to program. - Page 15 AT-D168UV Programing Guide Alert Tone Please note that the radio may consume up to 38 mS before it sounds the beginning of a tone. Therefore, make the first choice longer than 38 mS. SMS Alert: Select which notification you want when receiving an SMS...
- Page 16 AT-D168UV Programing Guide Key Sound Adjust: Select Adjustable (volume knob) or a level from 1 – 15 Ana. Ana. Idle Channel Tone: Select Off or On if you want a tone when a channel is idle Call Tone Call Tone: Select frequency and duration of this tone if you want one in front of a transmission.
- Page 17 AT-D168UV Programing Guide Note: The AT-D168UV if programmed for display of 1 channel the switching will the show the second channel. Also note that the channel the transmitter works on if both channels are shown has a larger line under the line so that the word ANA or DIG is bigger than the channel used for listening only.
- Page 18 AT-D168UV Programing Guide Frequencies: Select what frequency is wanted for the repeater under UHF or VHF and repeater 1 or 2. Record Record Function: Select Off or On to record each TX and RX internally from both analog and digital voices sent or received. You should set up...
- Page 19 AT-D168UV Programing Guide VOX Detection: Select built-in mic or external mic or both STE (Squelch Tail Eliminate) for simplex radio to radio in analog mode only STE Type CTCSS: Select Off, Silent or a selected tone phase shift STE When No Signal: Select Off or 55.2 Hz or 259.2 Hz...
- Page 20 AT-D168UV Programing Guide Quality, Last Call Reply, Channel Type Switch, Roaming, Max Volume, Slot Switch, APRS Type Switch, Zone Select, Timed Roaming Set, APRS Set, Mute Timing, CTC/DCS Set, Bluetooth, GPS, Ch. Name, CDT Scan, APRS Send, DIM Shut, GPS Roaming, WX Alarm, Sq.
- Page 21 Once all the parameters have been programmed, click on “OK” to save what you have programmed. This completes the main programing in the CPS of the AT-D168UV radio. 9. RECORD You have the option in the radio to record up to 4 hours and that is every call with the AT- D168UV radio if you have “Record”...
-
Page 22: Satellite Reception
Also make sure the UTC time (-6 hours for Minnesota) is set correct as part of the Optional Settings shown in the CPS. As the AT-D168UV does not have GPS yet please show “Off” for the GPS positioning as shown below. - Page 23 AT-D168UV Programing Guide (the local horizon) where you are located and the satellite. The radio circle and the red dot should tell you where the satellite is located and if the elevation is negative, it is below the horizon and any communication with the satellite is not possible (the picture below on the right shows -14˚...
- Page 24 AT-D168UV Programing Guide Wait for the time displayed to go to 0. It also will show the signal strength with the green bar on the right. Use the PTT to transmit to the satellite when the satellite is in position and you have the indication that you can do so.
- Page 25 “Device Manager” to make sure the cable you have works correctly – take it off and on to see what Port (COM & LPT) it opens. The AT-D168UV radio comes with a special programming cable – USB to USB-C. Select if you want to write just the “Other Data” (all radio parameters) and/or Digital Contact List when loading the CodePlug into the radio.
- Page 26 Please note that the AT-D168UV radio offers many more set-ups but those are best described in the Manual that comes with the radio. The Manual also talks about how to safely use the batteries.
Need help?
Do you have a question about the AT-D168UV and is the answer not in the manual?
Questions and answers
i cannot get the com port to show when cable is plugged in