
Related Manuals for Endress+Hauser CPY7B


Summary of Contents for Endress+Hauser CPY7B
- Page 1 Products Solutions Services BA00128C/07/EN/16.24-00 71665047 2024-06-10 Operating Instructions CPY7B Electrolyte vessel...
-
Page 2: Table Of Contents
Table of contents CPY7B Table of contents About this document ... 3 Warnings ......3 Symbols used . -
Page 3: About This Document
CPY7B About this document About this document Warnings Structure of information Meaning This symbol alerts you to a dangerous situation. DANGER Failure to avoid the dangerous situation will result in a fatal or serious injury. Causes (/consequences) If necessary, Consequences of non- compliance (if applicable) ‣... -
Page 4: Basic Safety Instructions
Basic safety instructions CPY7B Basic safety instructions Requirements of the personnel • Installation, commissioning, operation and maintenance of the measuring system may be carried out only by specially trained technical personnel. • The technical personnel must be authorized by the plant operator to carry out the specified activities. -
Page 5: Product Security
CPY7B Product description Product security The product is designed to meet state-of-the-art safety requirements, has been tested, and left the factory in a condition in which it is safe to operate. The relevant regulations and international standards have been observed. -
Page 6: Incoming Acceptance And Product Identification
Incoming acceptance and product identification CPY7B Incoming acceptance and product identification Incoming acceptance On receipt of the delivery: Check the packaging for damage. Report all damage immediately to the manufacturer. Do not install damaged components. Check the scope of delivery using the delivery note. -
Page 7: Scope Of Delivery
• Fixing bracket (CPY7B-A0, CPY7B-B0, CPY7B-C0) • Coupling Pg 9 (CPY7B-A0, CPY7B-B0, CPY7B-C0) • 2 hose couplings with check valve (CPY7B-B0, CPY7B-C1, CPY7B-C0, CPY7B-C1) • Air pump connection (CPY7B-B0, CPY7B-C1, CPY7B-C0, CPY7B-C1) • 0.5 m (1.6 ft) Spiral pressure hose (PA12W) CPY7B-B1, CPY7B-C1) •... -
Page 8: Mounting
NOTICE Improper installation in pressurized systems will result in medium leakage. ‣ Only the pressure-resistant versions – CPY7B-B or CPY7B-C – should be operated in pressurized systems. ‣ Never exceed the maximum working pressure of 10 bar (145 psi) gauge at an ambient temperature of 30 °C (86 °F) . - Page 9 CPY7B Mounting 5.1.1 Dimensions Ø 99 (3.9) 60 (2.36) 90 (3.54) A0055793 2 Dimensions CPY7B-A. Unit: mm (in) Endress+Hauser...
- Page 10 Mounting CPY7B 201 (7.91) * 167 (6.57) * A0055794 3 Dimensions CPY7B-B and CPY7B-C. Unit: mm (in) Version CPY7B-B Version CPY7B-C Additional 50 mm (1.97 in) bending radius for the hose Endress+Hauser...
-
Page 11: Mounting The Electrolyte Vessel
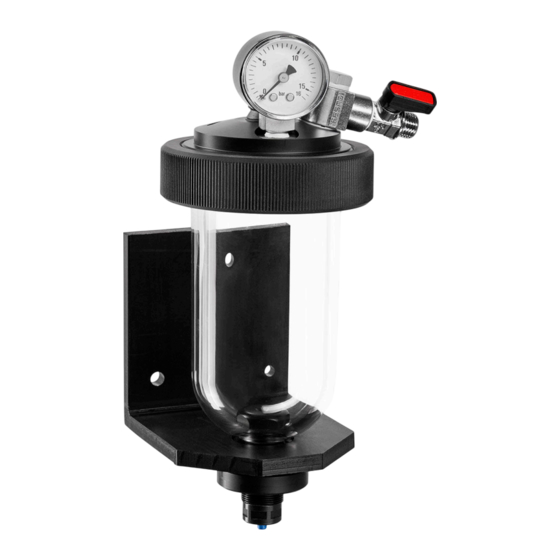
CPY7B Mounting Mounting the electrolyte vessel 5.2.1 Wall mounting A0055604 4 Wall mounting CPY7B-A0 Open-ended wrench Coupling nut Spacer tube Hose union with lock nut Hose union Fixing bracket Endress+Hauser... - Page 12 Mounting CPY7B A0055603 5 Wall mounting CPY7B-B0 Open-ended wrench Pressure gauge Manual valve (acts as a check valve in the "closed" position) Lock nut Spacer tube Hose union with lock nut Hose union Fixing bracket Coupling nut Endress+Hauser...
- Page 13 CPY7B Mounting A0055605 6 Wall mounting CPY7B-C0 Open-ended wrench Pressure gauge Manual valve Hose union Spacer tube Hose union with lock nut Fixing bracket Coupling nut Endress+Hauser...
- Page 14 Installation on an assembly A0055608 A0055609 7 Mounting with the CPA111 and 8 Mounting with the CPA111 and CPY7B-A1 assembly CPY7B-B1 assembly Open-ended wrench Open-ended wrench Coupling nut Manual valve (acts as a check valve Spacer tube in the "closed" position)
-
Page 15: Post-Mounting Check
CPY7B Mounting A0055610 9 Mounting with the CPA111 and CPY7B-C1 assembly Open-ended wrench Manual valve Hose union Spacer tube Hose union Pressure hose Hose connector Spiral hose Hose connection Coupling nut Pressure gauge Post-mounting check After mounting, check all the connections to ensure they are secure and leak-tight. -
Page 16: Commissioning
Only hold the vessel by the open-ended wrench, not by the manual valve. The compressed air connection can be pivoted by approximately 150° for easier installation. Preparation for pressurized versions (CPY7B-B and CPY7B-C): Close the manually operated valve. Compressed air is cut off. - Page 17 CPY7B Commissioning Release the hose coupling. Open the manually operated valve. Vessel is vented. Filling the vessel with electrolyte Release the thread adapter nut. Push down the coupling nut. Endress+Hauser...
- Page 18 Commissioning CPY7B Remove the upper part. Hold the open-ended wrench firmly while doing so. Fill the vessel with the electrolyte. Take care not to overfill the vessel. Place the upper part on the vessel. Tighten the coupling nut. 6.1.2 Venting CAUTION Minor skin or eye injuries are possible as a result of contact with the electrolyte.
-
Page 19: Maintenance
CPY7B Maintenance A0055686 Press in the tappet of the hose union until there is a flow of electrolyte: Reconnect the electrolyte hose to the sensor. 6.1.3 Assembly To reassemble, proceed in the reverse order of filling the electrolyte→ 16: Fit the upper part. -
Page 20: Repair
Cut off the compressed air supply using the manually operated valve (toggle to horizontal position). Observe the pressure gauge on the CPY7B. If the pressure has not dropped after 15 minutes, the couplings are leak-tight. Once the pressure has dropped, re-tighten the couplings. -
Page 21: Spare Parts
The product must be returned if repairs or a factory calibration are required, or if the wrong product was ordered or delivered. As an ISO-certified company and also due to legal regulations, Endress+Hauser is obliged to follow certain procedures when handling any returned products that have been in contact with medium. -
Page 22: Device-Specific Accessories
Technical data CPY7B Device-specific accessories KCl solution CPY4 • Top-up electrolyte solution, concentration 1.5 or 3 mol/l • Volume 250 ml (8.5 fl oz) or 1 000 ml (33.8 fl oz) Junction tube CPY6 • For pH/redox measurement with bridging electrolyte •... -
Page 23: Mechanical Construction
CPY7B Technical data [psi] p [bar] [°C] [°F] A0055687 10.3 Mechanical construction 10.3.1 Dimensions → Section "Installation" 10.3.2 Weight 0.45 kg (1 lb) 10.3.3 Effective capacity 200 ml (6.8 fl oz) 10.3.4 Materials Pressure vessel Polycarbonate O-rings EPDM Unpressurized hose... - Page 24 Technical data CPY7B 10.3.6 Fitted electrodes Reference electrode Coupling Pg 13.5 Maximum reference electrode shaft 120 mm (4.7 in) length Endress+Hauser...
- Page 28 *71665047* 71665047 www.addresses.endress.com...
Need help?
Do you have a question about the CPY7B and is the answer not in the manual?
Questions and answers