
Subscribe to Our Youtube Channel
Related Manuals for XD COLLECTION P322.54 Series


Summary of Contents for XD COLLECTION P322.54 Series
- Page 1 CycleCell 10.000 mAh RCS recycled plastic removable battery powerbank Copyright© XD P322.54X...
-
Page 2: Table Of Contents
CONTENT English ............. . . Nederlands . -
Page 3: English
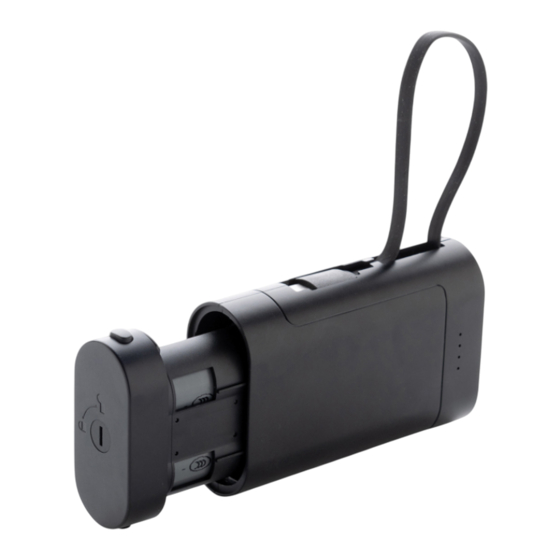
ENGLISH 1. Built-in output cable 2. Indicator lights 3. Power button 4. Lock 5. Battery chamber 6. 7. 6. USB-A Output 7. USB-C Input & Output SPECIFICATIONS Battery type: 2 x Li-ion battery (21700) Battery capacity: 10000mAh/36Wh USB-C Input: 5.0V=2.4A USB-C Output: 5.0V=2.4A USB-A Output: 5.0V=2.4A Built-in USB -C Cable Output=5.0V=2.4A... - Page 4 TO CHARGE THE POWER BANK Connect the built-in cable to a wall adapter, or connect the supplied cable to the power bank and the other end to a wall adapter. The charging will commence, and the indicator light will turn blue. •...
- Page 5 2. Depress the tool and rotate it to the unlock position. 3. Press both buttons simultaneously and then pull the battery chamber. 2. Interchange the battery 1. There is a hole at the back of the battery chamber. Push the battery out through that hole with your finger to remove it.
- Page 6 3. INSTALL THE BATTERY CHAMBER 1. Please insert the battery into the main body’s battery chamber, following the directions shown in the picture. 2. Press both buttons and insert the battery chamber into the main body until it reaches the end. 3.
- Page 7 WARNING! • Do not place or use the product at high temperature or in a humid environment. • Keep the product out of reach of children. • Do not vigorously shake, hit or throw the product. • If the power bank is not used for long time, please charge/discharge it once every three months to ensure the service life of the product.
-
Page 8: Nederlands
NEDERLANDS 1. Ingebouwde uitgangskabel 2. Controlelampjes 3. Aan/uit-knop 4. Slot 5. Batterijvak 6. 7. 6. USB-A-uitgang 7. USB-C-ingang en -uitgang SPECIFICATIES Type batterij: 2 x Li-ion batterij (21700) Batterijcapaciteit: 10000mAh/36Wh USB-C-ingang: 5,0V=2,4A USB-C uitgang: 5,0V=2,4A USB-A-uitgang: 5,0V=2,4A Ingebouwde USB-C-kabel Uitgang: 5,0 V=2,4 A USB-C &... -
Page 9: De Batterij Vervangen
DE POWERBANK OPLADEN Sluit de ingebouwde kabel aan op een wandadapter, of sluit de meegeleverde kabel aan op de powerbank en het andere uiteinde op een wandadapter. Het opladen begint en het indicatielampje wordt blauw. • Het wordt aanbevolen om een adapter te gebruiken die 5,0V=2,4A ondersteunt. •... - Page 10 2. Druk het gereedschap in en draai het naar de ontgrendelingspositie. 3. Druk beide knoppen tegelijkertijd in en trek de batterijlade open. 2. Vervang de batterij 1. Er zit een gat aan de achterkant van de batterijruimte. Duw de batterij met uw vinger door dat gaatje naar buiten om hem te verwijderen.
- Page 11 3. INSTALLEER DE BATTERIJHOUDER 1. Plaats de batterij in de batterijkamer van de behuizing volgens de aanwijzingen op de afbeelding. 2. Druk op beide knoppen en steek de batterijhouder tot het einde in de behuizing. 3. Gebruik een gereedschap om het in het slot te steken, druk vervolgens op het gereedschap en draai het in de vergrendelde positie.
- Page 12 WAARSCHUWING! • Plaats of gebruik het product niet bij hoge temperaturen of in een vochtige omgeving. • Houd het product buiten het bereik van kinderen. • Niet krachtig schudden, slaan of gooien met het product. • Als de powerbank lange tijd niet gebruikt wordt, laad/ontlaad deze dan eens in de drie maanden om de levensduur van het product te garanderen.
-
Page 13: Deutsch
DEUTSCH 1. Eingebautes Ausgangskabel 2. Anzeigelampen 3. Einschalttaste 4. Schloss 5. Batteriekammer 6. 7. 6. USB-A-Ausgang 7. USB-C Eingang & Ausgang SPEZIFIKATIONEN Akku-Typ: 2 x Li-Ionen-Akku (21700) Batteriekapazität: 10000mAh/36Wh USB-C Eingang: 5.0V=2.4A USB-C Ausgang: 5.0V=2.4A USB-A Ausgang: 5.0V=2.4A Integrierter USB-C-Kabelausgang=5,0V=2,4A USB-C &... - Page 14 ZUM AUFLADEN DER POWERBANK Schließen Sie das eingebaute Kabel an einen Wandadapter an, oder schließen Sie das mitgelieferte Kabel an die Powerbank und das andere Ende an einen Wandadapter an. Der Ladevorgang beginnt, und die Anzeigeleuchte leuchtet blau. • Es wird empfohlen, einen Adapter zu verwenden, der 5,0V=2,4A unterstützt. •...
- Page 15 2. Drücken Sie das Werkzeug herunter und drehen Sie es in die Entriegelungsposition. 3. Drücken Sie beide Tasten gleichzeitig und ziehen Sie dann das Batteriefach heraus. 2. Wechseln Sie die Batterie Auf der Rückseite des Batteriefachs befindet sich ein Loch. Drücken Sie die Batterie mit dem Finger durch dieses Loch heraus, um sie zu entfernen.
- Page 16 3. INSTALLIEREN SIE DAS BATTERIEFACH 1. Legen Sie die Batterie in das Batteriefach des Hauptgehäuses ein und folgen Sie dabei den Anweisungen auf dem Bild. 2. Drücken Sie beide Knöpfe und schieben Sie das Batteriefach bis zum Ende in das Hauptgehäuse.
- Page 17 WARNUNG! • Verwenden Sie das Produkt nicht bei hohen Temperaturen oder in einer feuchten Umgebung. • Bewahren Sie das Produkt außerhalb der Reichweite von Kindern auf. • Schütteln, schlagen oder werfen Sie das Produkt nicht heftig. • Wenn die Powerbank längere Zeit nicht benutzt wird, laden/entladen Sie sie bitte alle drei Monate, um die Lebensdauer des Produkts zu gewährleisten.
-
Page 18: Français
FRANÇAIS 1. Câble de sortie intégré 2. Voyants lumineux 3. Bouton d’alimentation 4. Verrouiller 5. Chambre à piles 6. 7. 6. Sortie USB-A 7. Entrée et sortie USB-C CARACTÉRISTIQUES TECHNIQUES Type de batterie : 2 x batterie Li-ion (21700) Capacité de la batterie : 10000mAh/36Wh Entrée USB-C : 5.0V=2.4A Sortie USB-C : 5.0V=2.4A Sortie USB-A : 5.0V=2.4A... - Page 19 POUR CHARGER LE POWER BANK Connectez le câble intégré à un adaptateur mural ou connectez le câble fourni au power bank et l’autre extrémité à un adaptateur mural. Le chargement commence et le témoin lumineux devient bleu. • Il est recommandé d’utiliser un adaptateur prenant en charge 5,0V=2,4A. •...
- Page 20 2. Appuyer sur l’outil et le tourner en position de déverrouillage. 3. Appuyez simultanément sur les deux boutons, puis tirez sur le compartiment à piles. 2. Remplacer la batterie 1. Il y a un trou à l’arrière du compartiment de la batterie. Poussez la pile à travers ce trou avec votre doigt pour la retirer.
- Page 21 3. INSTALLER LE COMPARTIMENT À PILES 1. Insérez la pile dans le compartiment prévu à cet effet, en suivant les instructions indiquées sur l’image. 2. Appuyez sur les deux boutons et insérez le compartiment à piles dans le corps principal jusqu’à...
- Page 22 ATTENTION ! • Ne pas placer ou utiliser le produit à des températures élevées ou dans un environnement humide. • Tenir le produit hors de portée des enfants. • Ne pas secouer vigoureusement, frapper ou jeter le produit. • Si le banc d’alimentation n’est pas utilisé pendant une longue période, veuillez le charger/ décharger une fois tous les trois mois pour garantir la durée de vie du produit.
-
Page 23: Español
ESPAÑOL 1. Cable de salida incorporado 2. Indicadores luminosos 3. Botón de encendido 4. Cerradura 5. Cámara de la batería 6. 7. 6. Salida USB-A 7. Entrada y salida USB-C ESPECIFICACIONES Tipo de batería: 2 x batería de iones de litio (21700) Capacidad de la batería: 10000mAh/36Wh Entrada USB-C: 5,0V=2,4A Salida USB-C: 5,0V=2,4A... - Page 24 PARA CARGAR EL POWER BANK Conecta el cable incorporado a un adaptador de pared, o conecta el cable suministrado al power bank y el otro extremo a un adaptador de pared. Comenzará la carga y la luz indicadora se volverá azul. •...
- Page 25 2. Presione la herramienta y gírela hasta la posición de desbloqueo. 3. Pulse ambos botones simultáneamente y, a continuación, tire del compartimento de la batería. 2. Cambiar la batería 1. En la parte posterior del compartimento de la pila hay un orificio. Empuje la pila hacia fuera a través de ese orificio con el dedo para extraerla.
- Page 26 3. INSTALE LA CÁMARA DE LA BATERÍA 1. Por favor, inserte la batería en la cámara de la batería del cuerpo principal, siguiendo las instrucciones que se muestran en la imagen. 2. Pulse ambos botones e introduzca el compartimento de la pila en el cuerpo principal hasta el final.
- Page 27 ADVERTENCIA • No coloque ni utilice el producto a alta temperatura ni en un entorno húmedo. • Mantener el producto fuera del alcance de los niños. • No agite enérgicamente, golpee ni arroje el producto. • Si el power bank no se utiliza durante mucho tiempo, por favor, cárguelo/descárguelo una vez cada tres meses para asegurar la vida útil del producto.
-
Page 28: Svenska
SVENSKA 1. Inbyggd utgångskabel 2. Indikeringslampor 3. Strömknapp 4. Lås 5. Batterikammare 6. 7. 6. USB-A-utgång 7. USB-C-ingång och -utgång SPECIFIKATIONER Batterityp: 2 x Li-ion-batteri (21700) Batterikapacitet: 10000mAh/36Wh USB-C-ingång: 5,0V=2,4A USB-C-utgång: 5,0V=2,4A USB-A-utgång: 5,0V=2,4A Inbyggd USB -C-kabel Utgång:5,0 V=2,4 A USB-C &... - Page 29 FÖR ATT LADDA POWERBANKEN Anslut den inbyggda kabeln till en väggadapter, eller anslut den medföljande kabeln till powerbanken och den andra änden till en väggadapter. Laddningen påbörjas och indikatorlampan lyser blått. • Vi rekommenderar att du använder en adapter som stöder 5,0 V⎓2,4 A. •...
- Page 30 2. Tryck in verktyget och vrid det till upplåsningsläget. 3. Tryck in båda knapparna samtidigt och dra sedan ut batterikammaren. 2. Byt ut batteriet 1. Det finns ett hål på baksidan av batterikammaren. Tryck ut batteriet genom hålet med fingret för att ta bort det. Observera: Kassera förbrukade batterier på rätt sätt enligt lokala bestämmelser.
- Page 31 3. INSTALLERA BATTERIKAMMAREN 1. Sätt i batteriet i huvuddelens batterikammare enligt anvisningarna på bilden. 2. Tryck på båda knapparna och för in batterikammaren i huvudkroppen tills den når ändan. 3. Använd ett -verktyg för att föra in det i låset, tryck sedan på verktyget och vrid det till LOCK-läget.
- Page 32 VARNING! • Placera eller använd inte produkten vid hög temperatur eller i fuktig miljö. • Förvara produkten oåtkomlig för barn. • Skaka inte produkten kraftigt, slå inte på den och kasta den inte. • Om powerbanken inte används under en längre tid, ladda/urladda den en gång var tredje månad för att säkerställa produktens livslängd.
-
Page 33: Italiano
ITALIANO 1. Cavo di uscita incorporato 2. Spie luminose 3. Pulsante di accensione 4. Blocco 5. Camera della batteria 6. 7. 6. Uscita USB-A 7. Ingresso e uscita USB-C SPECIFICHE Tipo di batteria: 2 batterie agli ioni di litio (21700) Capacità... - Page 34 PER CARICARE IL POWER BANK Collegare il cavo incorporato a un adattatore a muro, oppure collegare il cavo in dotazione al power bank e l’altra estremità a un adattatore a muro. La carica inizierà e l’indicatore luminoso diventerà blu. • Si consiglia di utilizzare un adattatore che supporti 5,0V=2,4A. •...
- Page 35 2. Premere lo strumento e ruotarlo in posizione di sblocco. 3. Premere entrambi i pulsanti contemporaneamente e poi estrarre il vano batteria. 2. Sostituire la batteria 1. Sul retro del vano batteria è presente un foro. Per rimuoverla, spingere la batteria attraverso il foro con il dito.
- Page 36 3. INSTALLARE LA CAMERA DELLA BATTERIA 1. Inserire la batteria nell’apposito alloggiamento del corpo principale, seguendo le indicazioni riportate nell’immagine. 2. Premere entrambi i pulsanti e inserire il vano batteria nel corpo principale fino all’estremità. 3. Utilizzare uno strumento per inserirlo nella serratura, quindi premere lo strumento e ruotarlo in posizione LOCK.
- Page 37 ATTENZIONE! • Non collocare o utilizzare il prodotto a temperature elevate o in un ambiente umido. • Tenere il prodotto fuori dalla portata dei bambini. • Non scuotere, colpire o lanciare vigorosamente il prodotto. • Se il power bank non viene utilizzato per lungo tempo, si prega di caricarlo/scaricarlo una volta ogni tre mesi per garantire la durata del prodotto.
-
Page 38: Polski
POLSKI 1. Wbudowany kabel wyjściowy 2. Lampki kontrolne 3. Przycisk zasilania 4. Blokada 5. Komora akumulatora 6. 7. 6. Wyjście USB-A 7. Wejście i wyjście USB-C SPECYFIKACJA Typ baterii: 2 x bateria litowo-jonowa (21700) Pojemność baterii: 10000mAh/36Wh Wejście USB-C: 5.0V=2.4A Wyjście USB-C: 5.0V=2.4A Wyjście USB-A: 5.0V=2.4A Wbudowany kabel USB-C Wyjście=5.0V=2.4A... -
Page 39: Wymiana Baterii
ABY NAŁADOWAĆ POWER BANK Podłącz wbudowany kabel do zasilacza ściennego lub podłącz dostarczony kabel do power banku, a drugi koniec do zasilacza ściennego. Rozpocznie się ładowanie, a wskaźnik zaświeci się na niebiesko. • Zaleca się korzystanie z zasilacza obsługującego napięcie 5,0 V⎓2,4 A. •... - Page 40 2. Wciśnij narzędzie i obróć je do pozycji odblokowania. 3. Naciśnij oba przyciski jednocześnie, a następnie wyciągnij komorę baterii. 2. Wymiana baterii 1. Z tyłu komory baterii znajduje się otwór. Aby wyjąć baterię, należy wypchnąć ją palcem przez ten otwór. Uwaga: Zużyte baterie należy utylizować zgodnie z lokalnymi przepisami.
- Page 41 3. ZAINSTALOWAĆ KOMORĘ AKUMULATORA 1. Baterię należy włożyć do komory baterii głównego korpusu, postępując zgodnie ze wskazówkami pokazanymi na ilustracji. 2. Naciśnij oba przyciski i włóż komorę baterii do głównego korpusu aż do końca. 3. Użyj narzędzia , aby włożyć go do zamka, a następnie naciśnij narzędzie i obróć je do pozycji LOCK.
- Page 42 OSTRZEŻENIE! • Nie należy umieszczać ani używać produktu w wysokiej temperaturze lub w wilgotnym środowisku. • Produkt należy przechowywać w miejscu niedostępnym dla dzieci. • Nie należy energicznie potrząsać, uderzać ani rzucać produktem. • Jeśli power bank nie jest używany przez dłuższy czas, należy ładować/rozładowywać go raz na trzy miesiące, aby zapewnić...
-
Page 43: Explanation Weee Logo
Explanation WEEE logo: English: The crossed-out wheeled bin symbol indicates that the item should be disposed of separately from household waste. The item should be handed in for recycling in accordance with local environmental regulations for waste disposal. By separating a marked item from household waste, you will help reduce the volume of waste sent to incinerators or land-fill and minimize any potential negative impact on human health and the environment. - Page 44 French: Le symbole de la poubelle barrée indique que l’objet doit être éliminé séparément des déchets ménagers. L’objet doit être remis au recyclage conformément aux réglementations environnementales locales en matière d’élimination des déchets. En séparant un objet marqué des déchets ménagers, vous contribuerez à réduire le volume des déchets envoyés aux incinérateurs ou aux décharges et à...
- Page 45 Polish: Przekreślony symbol kosza na kołach wskazuje, że przedmiot powinien być usuwany oddziel- nie od odpadów domowych. Przedmiot powinien zostać dostarczony do recyklingu zgodnie z lokalnymi przepisami dotyczącymi ochrony środowiska w zakresie utylizacji odpadów. Poprzez oddzielenie oznaczonego przedmiotu od odpadów domowych, pomożesz zmniejszyć ilość odpadów wysyłanych do spalarni lub składowisk i zminimalizować...
- Page 46 EU Declaration of Conformity ENGLISH XD Connects B.V. hereby declares that this product is in compliance with the essential requirements and other relevant provisions of Derective 2014/30/EU. The complete Declaration of Conformity can be found at www.xdconnects.com > search on item number. DEUTSCH XD Connects B.V.
- Page 47 XD Connects B.V. Lange Kleiweg 6-28 2288 GK Rijswijk, The Netherlands 1F, iCentrum, Holt Street, Birmingham, B7 4BP, England Copyright© XD P322.54X...
Need help?
Do you have a question about the P322.54 Series and is the answer not in the manual?
Questions and answers