SAJ C6 Series User Manual
Commercial on-grid solar inverter
Hide thumbs
Also See for C6 Series:
- User manual (27 pages) ,
- User manual (27 pages) ,
- Quick installation manual (8 pages)
Table of Contents
Advertisement
Quick Links
C6 Series Solar Inverter
C6
Series
COMMERCIAL ON-GRID SOLAR INVERTER
USER MANUAL
Tel.: (86)20 66608588
Fax.: (86)20 66608589
Web: www.saj-electric.com
GUANGZHOU SANJING ELECTRIC CO.,LTD
Add: SAJ Innovation Park,No.9, Lizhishan Road,Science City, Guangzhou High-tech Zone , Guangdong, P.R.China
C6-(75K-125K) -(T6, T9, T12)-40
{=2*{page}-1}
V0.0
Advertisement
Table of Contents

Related Manuals for SAJ C6 Series


Summary of Contents for SAJ C6 Series
- Page 1 C6 Series Solar Inverter Series COMMERCIAL ON-GRID SOLAR INVERTER USER MANUAL Tel.: (86)20 66608588 Fax.: (86)20 66608589 Web: www.saj-electric.com GUANGZHOU SANJING ELECTRIC CO.,LTD Add: SAJ Innovation Park,No.9, Lizhishan Road,Science City, Guangzhou High-tech Zone , Guangdong, P.R.China C6-(75K-125K) -(T6, T9, T12)-40 {=2*{page}-1} V0.0...
- Page 2 C6 Series Solar Inverter Preface Thank you for choosing SAJ products. We are pleased to provide you first-class products and exceptional service. This manual provides information about installation, operation, maintenance, troubleshooting and safety. Please follow the instructions of this manual so that we can ensure delivery of our professional guidance and whole-hearted service.
-
Page 3: Table Of Contents
C6 Series Solar Inverter TABLE OF 4.4 Mounting Procedure ............................. 16 5. ELECTRICAL CONNECTION ......................... 21 5.1 Safety Instruction ..............................22 CONTENTS 5.2 Specifications for Electrical Interface ....................... 22 5.3 AC Connection ................................ 23 5.4 DC Side Electrical Connection ..........................26 5.5 Communication Connection .......................... -
Page 4: Scope Of Application
1.1 Scope of Application This User Manual provides instructions and detailed procedures of installing, operating, maintaining, and troubleshooting of the following SAJ on-grid inverters: C6-75K-T6-40; C6-99K-T9-40; C6-100K-T9-40; C6-110K-T12-40; C6-125K-T12-40 Please keep this manual all time available in case of emergency. - Page 5 · Do not stay close to the inverter while there are severe weather conditions including storm, lighting, etc. · Before opening the housing, the SAJ inverter must be disconnected from the grid and PV generator; you must wait for at least five minutes to let the energy storage capacitors completely discharged after disconnecting from power source.
-
Page 6: Explanations Of Symbols
C6 Series Solar Inverter 2.2 Explanations of Symbols Symbol Description Dangerous electrical voltage This device is directly connected to public grid, thus all work to the inverter shall only be carried out by qualified personnel. Danger to life due to high electrical voltage! There might be residual currents in inverter because of large capacitors. -
Page 7: Application Scope Of Products
C6 Series Solar Inverter 3.1 Application Scope of Products C6 series product is grid-tied three phase inverter without transformer. The product converts the DC generated by solar panels into AC that meets the public grid requirements and send the AC into the grid. -
Page 8: Specification For Product Model
C6 Series Solar Inverter 3.3 Specification for Product Model 3.5 Datasheet C6 – K – T - 40 C6-75K/99K/100K/110K/125K-T6/T9/T12-40 ① ② ③ ④ Model C6-75K-T6-40 C6-99K-T9-40 C6-100K-T9-40 C6-110K-T12-40 C6-125K-T12-40 DC Input ① C6 stands for product name. Max. PV Array Power [KWp]@STC ②... - Page 9 C6 Series Solar Inverter Model C6-75K-T6-40 C6-99K-T9-40 C6-100K-T9-40 C6-110K-T12-40 C6-125K-T12-40 Euro Efficiency 98.5% Protection DCI Monitoring Integrated GFCI Monitoring Integrated Grid Monitoring Integrated Internal Overvoltage Protection Integrated DC Insulation Rsistance Detection Integrated AC Short Circuit Current Protection Integrated AC Grounding Detection...
-
Page 10: Pre-Installation Check
4.2 Pre-installation Check 4.2.1 Check the Package Although SAJ’s inverters have thoroughly tested and checked before delivery, it is uncertain that the inverters INSTRUCTIONS FOR may suffer damages during transportation. Please check the package for any obvious signs of damage, and if such evidence is present, do not open the package and contact your dealer as soon as possible. -
Page 11: The Determination Of The Installation Method And Position
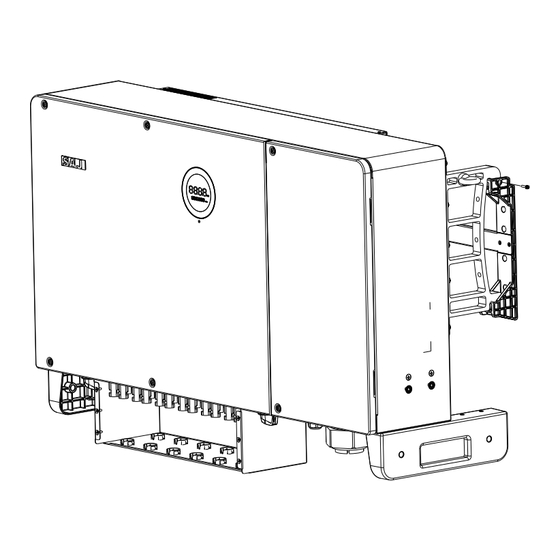
The specific height is determined by the site environment. To make sure the installation spot is suitably ventilated, if multiple SAJ on-grid solar inverters are installed at the same area, the safety clearance should be followed for proper ventilation condition. - Page 12 C6 Series Solar Inverter 4.4.2 Wall Mounting Place the mouting bracket onto the wall and mark the positions of the holes. 1044 Multimeter Measurement Marker Measuring tape Utility knife Wrist strap 1003 range: 1100Vdc Insulated shoes Protective gloves Dust mask...
- Page 13 C6 Series Solar Inverter Drill Holes and Place the Expansion Tubes Follow the given guides, drill 3 holes in the wall (in conformity with position marked in Figure 4.8), and then place expansion tubes in the holes using a rubber mallet.
-
Page 14: Electrical Connection
C6 Series Solar Inverter 5.1 Safety Instruction Electrical connection must only be operated by professional technicians. Please keep in mind that the inverter is a bi-power supply equipment. Before connection, necessary protective equipment must be employed by technicians, including insulating gloves, insulating shoes and safety helmet. -
Page 15: Ac Connection
C6 Series Solar Inverter 5.3.2 Cable Specification Item Name DC Switch Cross-sectional area of cables(mm²) External diameter DC Input (mm) Cable type Scope (S) Recommended grounding cable (Spe) RS232 Communication Three core, four core RS485 Communication 38-66 five core cable 95-240 Spe≥S/2... -
Page 16: Dc Side Electrical Connection
C6 Series Solar Inverter 5.3.6 AC Side Electrical Connection Cable conductor material Recommended OT/OD terminal material Copper Copper 1.Strip off wire insulation skin and AC cable insulation skin to a proper length Copper clad aluminum Copper 2.Crimp the AC cable with OT/DT terminal... - Page 17 C6 Series Solar Inverter 5.4.2 PV Connector Assembly Connecting Procedures 1.Loosen the lock screws on positive and negative connector. 2. Strip the insulation of the positive and negative cables with 8-10mm length. DANGER • Dangerous to life due to electric shock when live components or DC cables are touched.
-
Page 18: Communication Connection
C6 Series Solar Inverter 5. Plug in the pressed positive and negative cables into relevant insulated enclosure, a “click” should be 9. After connecting the PV cables, install the PV upper cover to the PV cover with screws. heard or felt when the contact cable assembly is seated correctly. - Page 19 C6 Series Solar Inverter Position Description DIP Switch Alarm Output Dry Contact Emergency Stop Dry Contact Meter Output RS485 Communication Port Table 5.8 Terminal description 5.5.2 Dry Contact Connection Figure5.17 Relay is in normal close contact 2. When relay is on normal open contact (NO) and no alarm/fault occurs, LED indicator is off; When there is fault occurs, relay is on normal close contact (NC), LED is on.
-
Page 20: Rs485 Communication Connection
C6 Series Solar Inverter Multiple inverter dry contact connection interface for cable connection. Figure5.20 Multiple inverter dry contact 5.6 RS485 Communication Connection The inverter is integrated with RS485 communication terminal and meter communication terminal. RS485 communication terminal is mainly for multiple inverters communication which can be connected in a daisy Figure5.22... -
Page 21: Rs232/Usb Connection
Receive data Ground wire Table 5.11 USB pin port definition This USB port is usd to connect an eSolar Wi-Fi/4G/AIO3 communication module. For details, refer to the Quick Installation Guide of the communication module at https://www.saj-electric.com/. Figure5.25 Multiple inverter terminal block... -
Page 22: Led Indicators
C6 Series Solar Inverter 6.1 LED Indicators Figure 6.1 Human-computer interface Display Status Description Solid Green The inverter is in normal on-grid state Breathing Mode The inverter is in the initialization or standby state COMMISSIONING Solid Red An error occurs... -
Page 23: App Connection
C6 Series Solar Inverter 6.2 App Connection 3. If you do not have an account, register first. a. tap Register. Choose whether you are an owner or an installer or distributor. 6.2.1 Downloading the App b. Follow the instructions on the screen to complete the registration. -
Page 24: Setting Reactive Power Control (For Australia)
C6 Series Solar Inverter 6.2.4 Inverter Setting Review 6.2.5 Remote monitoring Connect the internet by using the eSolar Wi-Fi/4G/AIO3 module and upload the inverter data onto the server. On Device Info, view the setting details, such as Basic Info, Running Info, Power Generation, and Event Info;... - Page 25 Curve for a Volt-Watt response mode (AS4777 Series) Note: With regard to the Power rate limit mode, SAJ sets the product WGra to 16.67%Pn by default in the following cases according to the requirements of 3.3.5.2 as 4777.2: 2020. 1. Soft ramp up after connect, 2.
-
Page 26: Error Code
C6 Series Solar Inverter 7.1 Error Code Code Fault Information Code Fault Information Master Relay Error Master Self-Test Failed Master HW Inv Current High Master EEPROM Error Master Temperature High Error Master AC SPD Error Master Temperature Low Error Master DC SPD Error Lost Communication M<->S... - Page 27 SAJ technical support. Check whether the radiator is blocked, whether the inverter is in too high or too low Check the settings of the solar panel. SAJ designer can help you. If the above mentioned are in Over Bus Voltage...
-
Page 28: Routine Maintenance
C6 Series Solar Inverter Inverter Cleaning Clean the enclosure lid and LED indicator of the inverter with moistened cloth with clear water only. Do not use any cleaning agents as it may damage the components. Heat Sink Cleaning Clean the heat sinks with dry cloth or air blower. Do not clean the heat sink with water or cleaning agents. - Page 29 C6 Series Solar Inverter This device should not be disposed as residential waste. An inverter that has reached the end of its life and is not required to be returned to your dealer it must be disposed carefully by an approved collection and recycling facility in your area.
Need help?
Do you have a question about the C6 Series and is the answer not in the manual?
Questions and answers