
Related Manuals for Seville Classics 20113


Summary of Contents for Seville Classics 20113
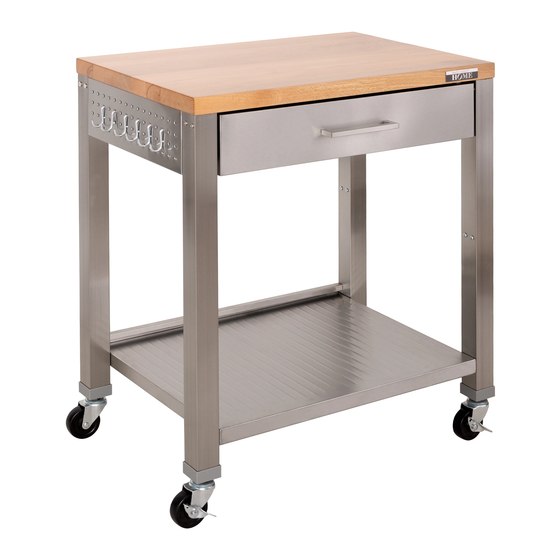
- Page 1 ASSEMBLY INSTRUCTIONS Seville Classics® Stainless-Steel Worktable Cart with Solid Wood Top Model No. 20113 (30" W X 20" D X 36" H / 76.2 cm x 50.8 cm x 91.4 cm) Reference page 11 for special care and maintenance of stainless steel...
- Page 2 #48-2 #48-3 #101...
-
Page 3: Parts List
PARTS LIST Please check the parts carefully according to the parts list. If you are missing any parts, please contact our customer service department (please refer to page 12). (#1 ) SOLID HARDWOOD BOARD TOP X 1 PC (#2) BACK PANEL X 1 PC (#3) BOTTOM SHELF X 1 PC (#4) SIDE PEGBOARD PANEL X 2 PCS (#5) FRONT -BOTTOM CROSSBAR X 1 PC... - Page 4 PARTS LIST Please check the parts carefully according to the parts list. If you are missing any parts, please contact our customer service department (please refer to page 12). (#9) RIGHT-FRONT LEG X 1 PC (#10) RIGHT-BACK LEG X 1 PC (#14) DRAWER HANDLE BRACKET X 1 PC (#20-1) SMALL DRAWER FRONT PANEL X 1 PC (#19-2) DRAWER BASE PANEL X 1 PC...
- Page 5 PARTS LIST Please check the parts carefully according to the parts list. If you are missing any parts, please contact our customer service department (please refer to page 12). (#48-2) SMALL DRAWER LEFT SUPPORT X 1 PC (#48-3) SMALL DRAWER RIGHT SUPPORT X 1 PC (#47) "U"...
- Page 6 PARTS LIST Please check the parts carefully according to the parts list. If you are missing any parts, please contact our customer service department (please refer to page 12). (#15) SCREW B (M4 x 8L) X 20 PCS (#61) SCREW O (M4 x 12L) X 22 PCS (#68) SCREW I (M6 x 15L) X 46 PCS (#25) WRENCH X 1 PC (#21) SCREW DRIVER X 1PC...
- Page 7 Prep Table (Model No. 20113) *NOTE We recommend TWO people to assemble the worktable cart.* BACK Solid Hardwood Board Top (#1) Tip: BACK There are s ckers on each part, please refer to the direc on of the arrow indicated by the part s ckers when assembling.
- Page 8 Prep Table (Model No. 20113) *NOTE We recommend TWO people to assemble the worktable cart.* Install (#48-2) Small Drawer Le Support and (#48-3) Step 3: Small Drawer Right Support As shown in the picture, a ach (#48-2) Small Drawer Le...
- Page 9 Prep Table (Model No. 20113) *NOTE We recommend TWO people to assemble the worktable cart.* Step 6: Install (#5) Front -Bo om Crossbar As shown in the picture, a ach (#5) Front-Bo m Crossbar on the back side of two Front Legs, line up the screw holes, use 2 pcs (#68) Screw I (M6X15L) to ghten.
- Page 10 Prep Table (Model No. 20113) *NOTE We recommend TWO people to assemble the worktable cart.* Step 9: Install (#20) Small Drawer Install (#20-1) Small Drawer Front Panel, (#20-3) Small Drawer Le Panel, (#20-4) Small Drawer Right Panel According to the S cker Instruc ons, line up the...
- Page 11 Prep Table (Model No. 20113) *NOTE We recommend TWO people to assemble the worktable cart.* Step 10: Install (#20) Small Drawers into Workcenter 1) Fully pull out and extend the side rails of the drawer brackets as shown in the image.
- Page 12 Variations of color within these standards and minor scratches in the clear coat finish will not be a reason for replacement. If the wood top is received with excessive damage or splitting, Seville Classics will guarantee replacement of the wood top. Restore Shallow Scratches or Chips If the wood top becomes scratched and chipped over time or during assembly, a Polyurethane finish can be applied to help restore the wood's natural texture, as well as protect the surface from future damage.
-
Page 13: Contact Information
If you are missing any parts, have any ques ons, or need add onal assistance in assembly, please contact our bilingual (English and Spanish) customer service department at: Seville Classics, Inc. 19401 Harborgate Way Torrance, CA 90501 USA Telephone: (800) 323-5565 within USA... - Page 14 UltraHD® Line UltraHD® 2-Door Rolling Cabinet UltraHD® 6-Foot Height Adjustable Workbench Model No. 20227 (Granite) Model No. 20292 (Granite) Model No. 20145 (Graphite) Model No. 20293 (Graphite) UltraHD® Wall Cabinet with Open Shelf UltraHD® 2-Door Rolling Workbench Model No. 20230 (Granite) Model No.
Need help?
Do you have a question about the 20113 and is the answer not in the manual?
Questions and answers