
Related Manuals for Seville Classics UltraHD 20276


Summary of Contents for Seville Classics UltraHD 20276
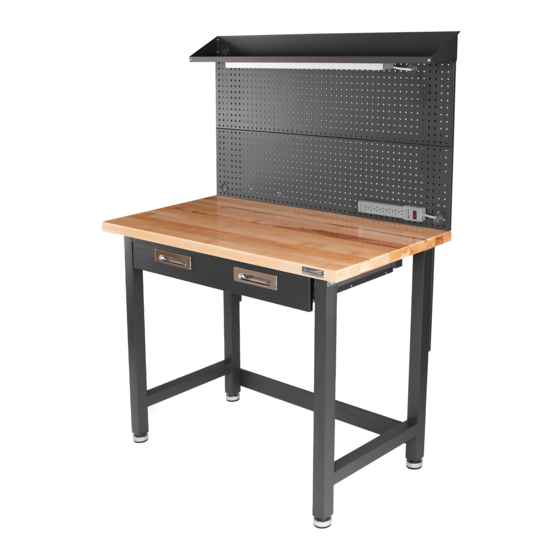
- Page 1 ASSEMBLY INSTRUCTIONS UltraHD® Workcenter LED work light included (Model No. 20276) 48 in W X 24 in D X 65.5 in H (1.21 m x 60.9 cm x 1.66 m) Reference page 7 for special care and maintenance of stainless steel TR161028...
-
Page 2: Parts List
PARTS LIST (pg 1 of 8) Please check the parts carefully according to the parts list. If you are missing any parts, please contact our customer service department (please refer to page 8 of 8). Small Drawer Top Cantilever Shelf Parts Parts Qty. - Page 3 PARTS LIST (pg 2 of 8) Please check the parts carefully according to the parts list. If you are missing any parts, please contact our customer service department (please refer to page 8 of 8). #104 #102 #101 #103 #100 #107 #106 #105...
- Page 4 ASSEMBLY INSTRUCTIONS (pg 3 of 8) *NOTE: We recommend TWO people to assemble the workbench. TIP: A magnetic screwdriver is included for your convenience. If a power screwdriver is used, keep on a low torque setting. Install (#5-B) Leg Piece. Step 1.
- Page 5 ASSEMBLY INSTRUCTIONS (pg 4 of 8) *NOTE: We recommend TWO people to assemble the workbench. Step 4. Install (#49) Pegboard Long Support Bar. Attach (#49) Pegboard Long Support Bar to the back of the workbench, line up the screw holes, use (#40) Screw E with (#27- B) Washer to tighten.
- Page 6 ASSEMBLY INSTRUCTIONS (pg 5 of 8) *NOTE: We recommend TWO people to assemble the workbench. Step 8. Install (#20-3 & #20-4) Left & Right Small Drawer Side Panels. Fit and attach the (#20-3 & #20-4) Left & Right Small Drawer Side Panels to the (#20-1) Small Drawer Front Panel. Make sure the (#20-3 &...
- Page 7 ASSEMBLY INSTRUCTIONS (pg 6 of 8) *NOTE: We recommend TWO people to assemble the workbench. Step 11. Insert Drawers. Pull out the drawer sliders and inner ball bearing track completely. Then attach and fit the Drawer to the inner track of the sliders and slide drawers WARNING: Pull out the Ball Bearing track towards you.
- Page 8 ASSEMBLY INSTRUCTIONS (pg 7 of 8) *NOTE: We recommend TWO people to assemble the workbench. Step 14. Place (#45) Power Strip. Insert and screw (#51) Stud Screw J to (#3-C) Bottom Pegboard Panel, then, hook (#45) Power Strip on and make sure the power cord goes through Rubber Grommet of (#3-C) Bottom Pegboard Panel.
-
Page 9: Contact Information
(pg 8 of 8) *If you are missing any parts, have any questions, or need additional assistance in assembly, please contact our bilingual (English/Spanish) customer service department at: Seville Classics, Inc. 19401 South Harborgate Way Torrance, CA 90501 Telephone: (800) 323-5565 within USA... - Page 10 UltraHD Line Model No. 20206 Model No. 16221 UltraHD Locker Gear Cabinet UltraHD Workbench Model No. 20262 Model No. 20230 UltraHD Wall Cabinet UltraHD Rolling Workbench Model No. 20217 Model No. 20255 UltraHD Trash Bin UltraHD Tool Box...
Need help?
Do you have a question about the UltraHD 20276 and is the answer not in the manual?
Questions and answers