
Related Manuals for Kurt TriLock TL6CS


Summary of Contents for Kurt TriLock TL6CS
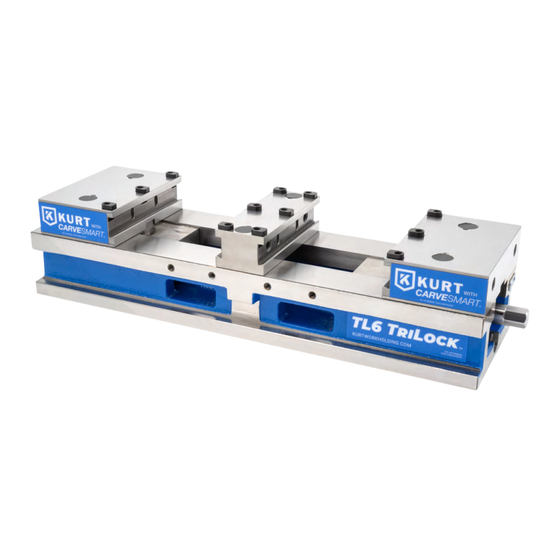
- Page 1 TL6CS TriLock 3-in-1 Vise WITH CARVESMART JAWS Operating Instruction Manual - TL6CS / TL6CSP WATCH PRODUCT SETUP VIDEO Scan Code with ENGLISH Phone Camera...
-
Page 2: Table Of Contents
TABLE OF CONTENTS Introduction ...................... 3 Set-Up Instructions ..................4 Installation Instructions ................. 5 Operating Instructions ................6-19 TL6CS Parts List ....................20 TL6CS Mechanical Drawing ................21 Maintenance Schedule .................22 Troubleshooting Tips ..................23 Maintenance Log/Notes ................ 24-26 Warranty ......................27 VISE DATA Use this to fill out information about your vise for quick reference. -
Page 3: Introduction
INTRODUCTION Thank you for purchasing a Kurt TL6CS TriLock 3-in-1 vise. You have just purchased one of the best machine vises in the industry. The outstanding accuracy of this product is second to none. Backed by a lifetime warranty against workmanship and material defects, this product is built to last when used and maintained properly. -
Page 4: Set-Up Instructions
SET-UP INSTRUCTIONS Now that you have your new Kurt Vise, it’s time to set-up and begin using it. You will see that your new vise comes with a Kurt swivel handle. The handle is specifically designed to provide maximum torque to your vise (clamping force provided below). -
Page 5: Installation Instructions
VISE INSTALLATION INSTRUCTIONS Do not attempt to lift the vise by attaching to any of the jaws or injury may result. Always attach lifting CAUTION devise to the vise base frame. 1. Position vise on your machine table, pallet or tombstone using the 0.625″... -
Page 6: Operating Instructions
Rotate clockwise to clamp and counterclockwise to unclamp your vise. This handle, combined with the correct amount of torque, will provide you with all the clamping force you will need to machine your parts. Kurt suggests using a torque wrench set to any of the torque specifications listed on page 4 to ensure repeatable clamp force. - Page 7 Fig.2 Sketch #2A Incorrect part clamping. Vise width centerline Sketch #2B Correct part clamping Sketch #2C Correct part clamping Sketch #2D Correct part clamping Dummy spacer OPERATING INSTRUCTIONS...
- Page 8 TRILOCK 3-IN-1 DESIGN The TriLock 3-in-1 vise adjusts quickly between a double station vise, a large single station vise for large parts, and a small single station vise for small parts. Standard Double Station 4.0″ 4.0″ (shown with stock 0.5″ hard jaws) Small Single Station 4.0″...
- Page 9 THIRD HAND FRICTION BLOCK 3-in-1 size adjustments are facilitated with a friction block designed to allow the screw assembly to move freely within the body. Using the ″Third Hand″ Friction Block: The friction block (also known as the Third Hand) has three tension settings: 1.
- Page 10 OPERATING INSTRUCTIONS Standard Double Station Use: Loosen the friction block screw (third hand) to Place parts in the two stations of the vise. the fully disengaged position so that the screw assembly can move freely. Close vise by rotating the handle clockwise Open vise by rotating the handle counter- until both jaws come in contact with the parts.
- Page 11 OPERATING INSTRUCTIONS Push the screw assembly toward the back of Next, tighten the third hand holding nut all the the vise until the 1/8″ gap is in the rear station. way to the fully engaged position. This locks This positions the friction block (third hand). the rear nut and allows the vise to open and close on one part at a time.
- Page 12 OPERATING INSTRUCTIONS Small Single Station Use: To use this vise as a small single station vise, follow the steps below: Loosen the friction block screw (third hand) to Close the rear jaw by turning the screw handle the fully disengaged position so that the screw clockwise until rear jaw makes contact with assembly can move freely.
- Page 13 OPERATING INSTRUCTIONS Large Single Station Use: To use this vise as a large single station vise, follow the steps below: Loosen the friction block screw (third hand) to Loosen and remove the locating socket head the fully disengaged position so that the screw cap screws from the center stationary jaw.
- Page 14 CARVESMART JAW OPTIONS 6061 Extruded Aluminum Jaws: Aluminum jaws are available in five profiles and several pre-cut lengths with SmartStops including: 4″, 6″, and 8″ sizes. Also available in 31″ and 94″ lengths that can be cut to any size. 2"...
- Page 15 CHANGING CARVESMART JAWS Loosen 3 screws on top of each jaw for each Remove existing plate (if present). individual jaw plate. Be sure to align the location pin and that the Then firmly tighten all screws. Do the same new jaw plate is flat against vise top. with each individual jaw plate and you’re ready to go.
- Page 16 JAW POSITIONING Fig.3 Note: Dimensions below are in inches unless specified. BB MAX CC MIN 5.07 BB MAX 12.37 CC MIN 7.16 OPERATING INSTRUCTIONS...
- Page 17 SIDE & END VIEW Fig.4 Note: Dimensions below are in inches unless specified. FF MAX FF MAX P [TYP] 3.125 6.000 21.00 2.250 10.813 1.08 1.6875 4.00 3.875 1/2 -13 1.305 3.305 FF Max 5.07 OPERATING INSTRUCTIONS...
-
Page 18: Mounting Locations
MOUNTING LOCATIONS Fig.5 Note: Dimensions below are in inches unless specified. 1.08 3.813 5.000 2.000 0.625 (5/8) 3.297 0.46 OPERATING INSTRUCTIONS... - Page 19 SURFACE MOUNT USING SINE KEYS Locating the TL6 with keys requires the use of sine keys. Sine Keys are available in several different sizes that are listed on our website at www.kurtworkholding.com. The keys are sold in sets of 2 per package. You can also utilize dowel or step dowels in special cases where sine keys do not work.
-
Page 20: Tl6Cs Parts List
TL6CS PARTS LIST ITEM# PART# DESCRIPTION QTY. TL6-1 Body, Machined TL6CS-2 Movable Jaw TL6-3F Front Nut TL6-3R Rear Nut TL6-5 Screw TL6CS-6 CarveSmart Style Stationary Jaw TL6-14 Protecting Plug TL6-18 Shcs, 1/2-20unf X 1.5 Lg Modified TL6-19 Shcs, Shoulder TL6-20 Shcs, Precision Shoulder 1/2-13 TL6-21 Shcs, Shoulder... -
Page 21: Tl6Cs Mechanical Drawing
TL6CS MECHANICAL DRAWING Fig.6 NOT SHOWN: TL6CS MECHANICAL DRAWING... -
Page 22: Maintenance Schedule
MAINTENANCE SCHEDULE Perform regular maintenance to ensure proper operation. Improper maintenance results in poor performance and may void your warranty. Daily/ Weekly 1. Remove chips from surface of vise. 2. Visually inspect seals for damage and cleanliness. 3. Visually inspect for chip entrapments and remove when necessary. 4. -
Page 23: Troubleshooting Tips
TROUBLESHOOTING TIPS If properly maintained, the Kurt TL6 TriLock Vise will operate trouble free for many years. In some cases it will be necessary to troubleshoot. Use the information below to help in the process. Problem: My vise turns hard. -
Page 24: Maintenance Log/Notes
MAINTENANCE LOG/NOTES: MAINTENANCE LOG/NOTES... - Page 25 MAINTENANCE LOG/NOTES: MAINTENANCE LOG/NOTES...
- Page 26 MAINTENANCE LOG/NOTES: MAINTENANCE LOG/NOTES...
-
Page 27: Warranty
The sole obligation of Kurt Manufacturing Company, Inc. (Kurt) and the purchaser’s SOLE AND EXCLUSIVE REMEDY hereunder, shall be limited to the replacement or repair of any Kurt product or part (by an authorized Kurt technician) which are returned to Kurt Manufacturing Company’s... - Page 28 If you have any feedback or questions please contact us: Kurt Industrial Products // A Division Of Kurt Manufacturing 9445 East River Road NW | Mpls, MN 55433 Phone 763-574-8309 | Toll Free 877-226-7823 Fax 763-574-8318 | Toll Free Fax 877-226-7823 Manual Revision: kurtworkholding.com | workholding@kurt.com...
Need help?
Do you have a question about the TriLock TL6CS and is the answer not in the manual?
Questions and answers